
1/32 Hasegawa N1K2-J Shiden Kai
-
jeaton01

- Elite Member
- Posts: 2062
- Joined: Thu Apr 23, 2020 9:20 am
- Location: Northern California
- Contact:
Re: 1/32 Hasegawa N1K2-J Shiden Kai
Looks great! Not happening on my workbench! As my grandson says, "It's too hard, Grandpa", when he can't handle a modeling task.

Re: 1/32 Hasegawa N1K2-J Shiden Kai
Thanks for checking in!
I've decided to glue the tail to the fuselage first to get a good join. It's much easier to take of this joint as well as possible now and deal with any top and bottom seam issues after the fuselage halves go together.
I'm trying to ensure a level joint all around and avoid any steps if possible.
Just a dry fit to make sure all four pieces go together nicely. After this dries, I'll fill in the joint like I did the wing inserts.
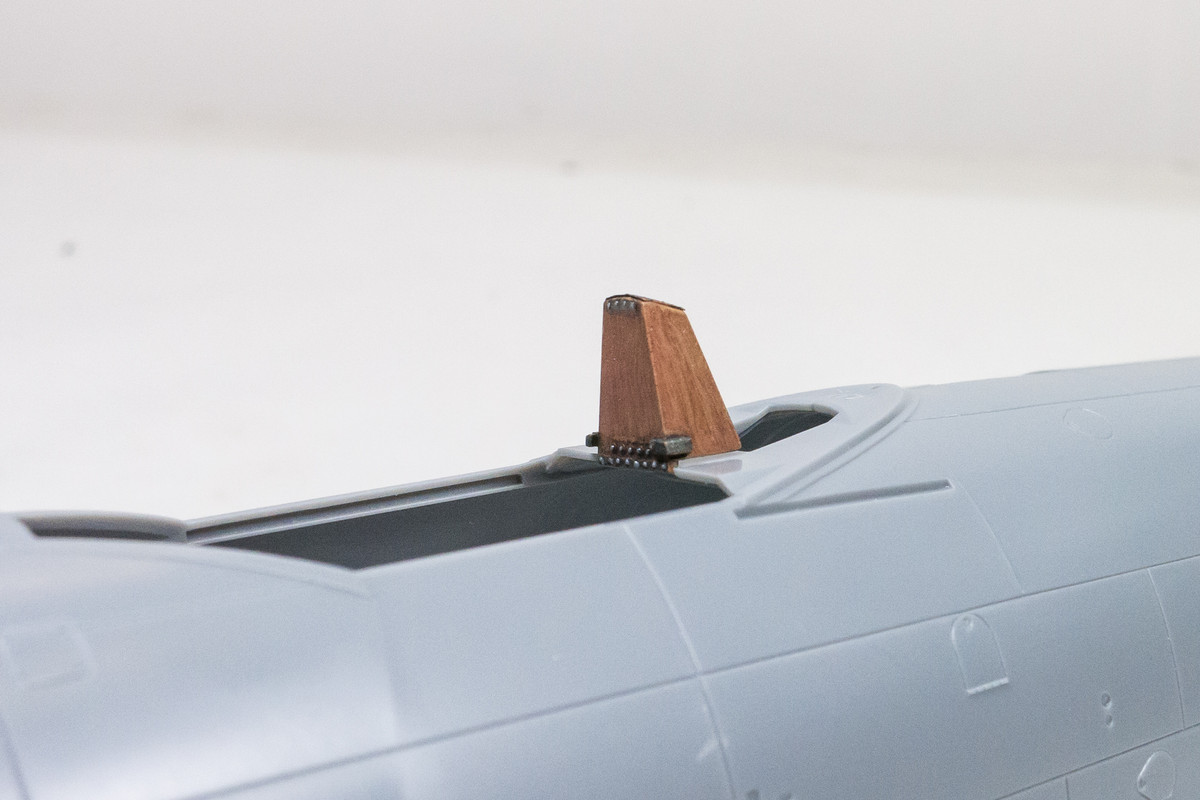
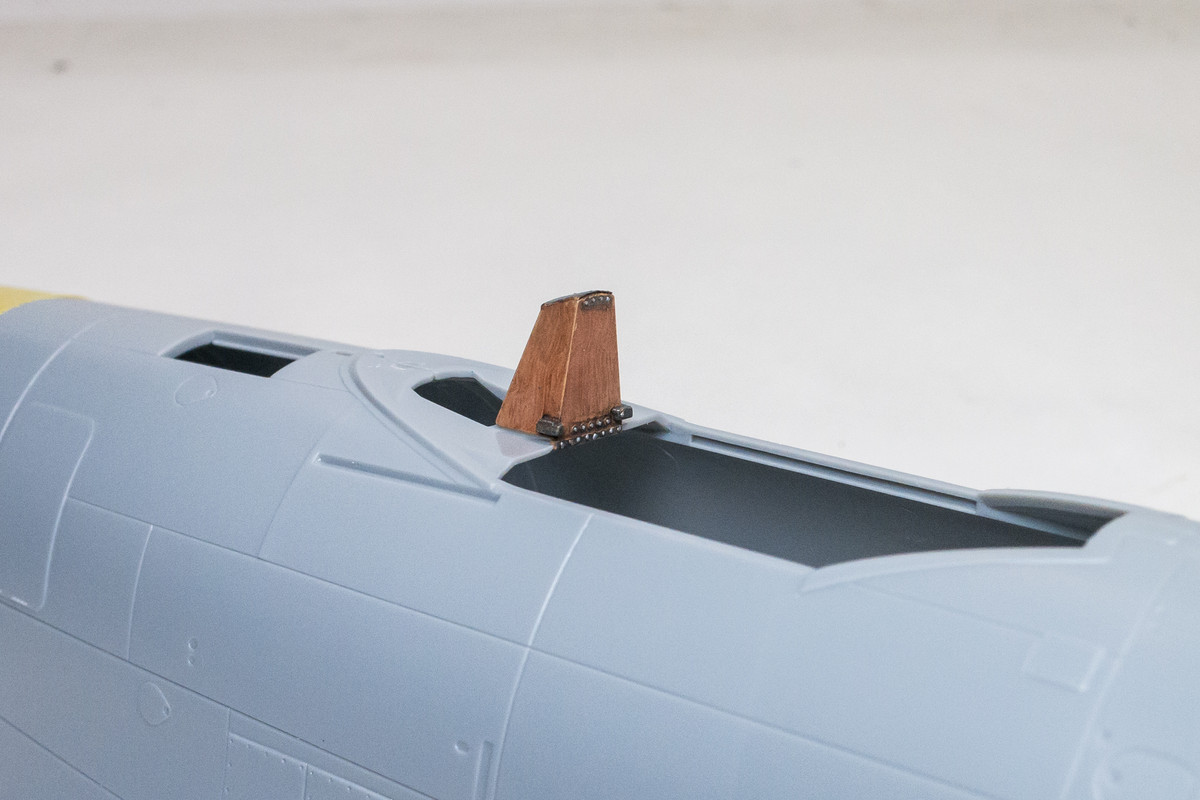
Back to some detail work... picking things that don't require to be painted in cockpit green since I don't have that color yet. The headrest is made of wood so I made a rough stab at simulating wood using oil paints.
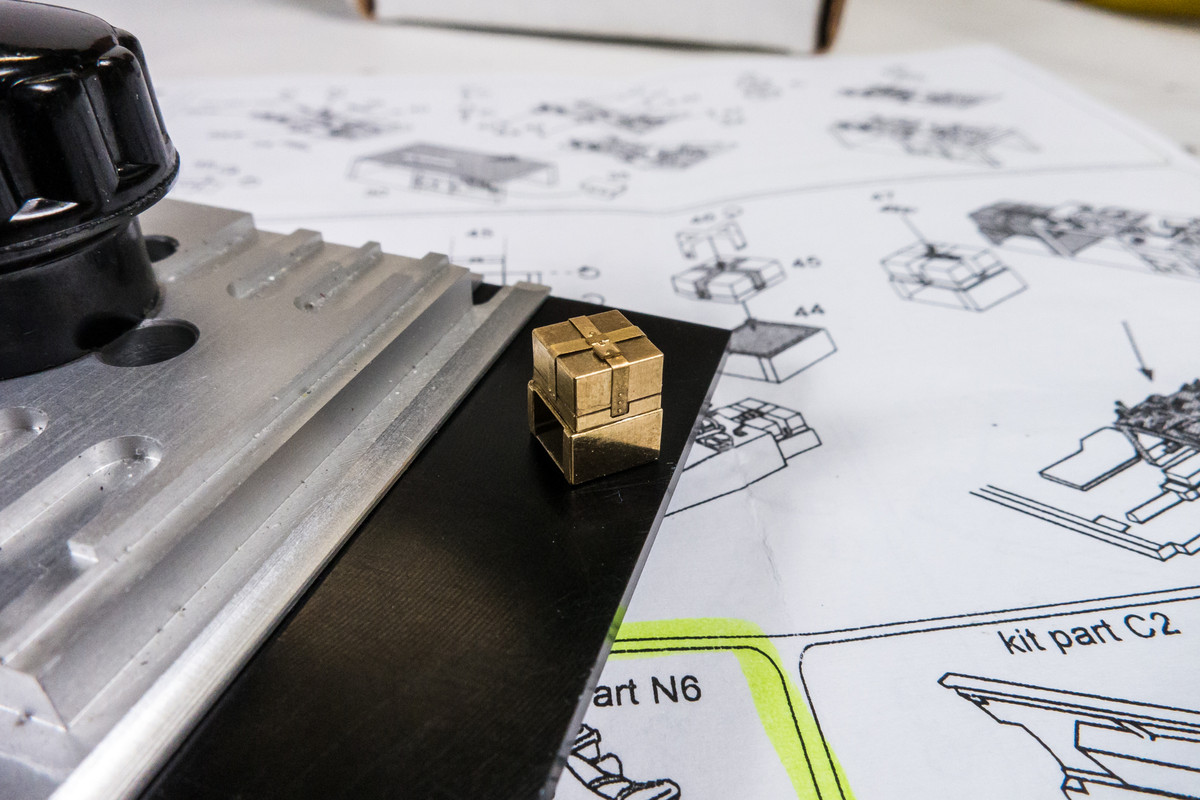
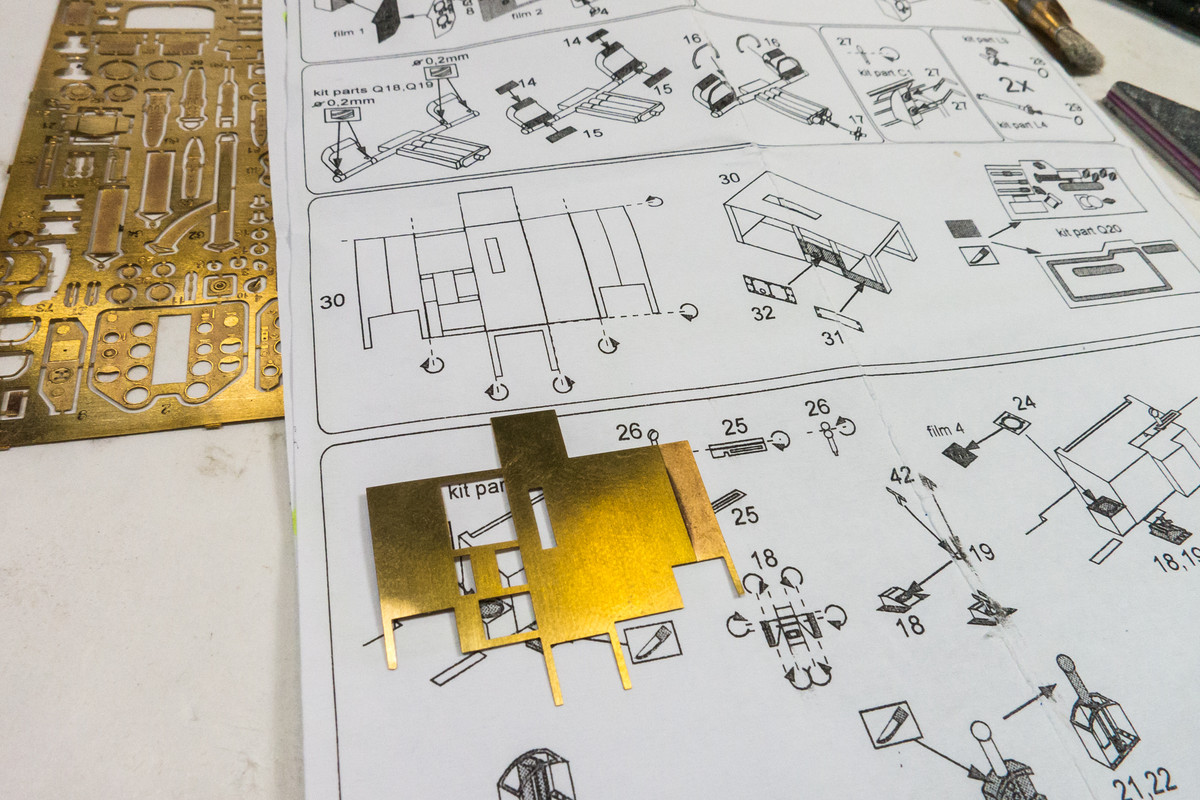
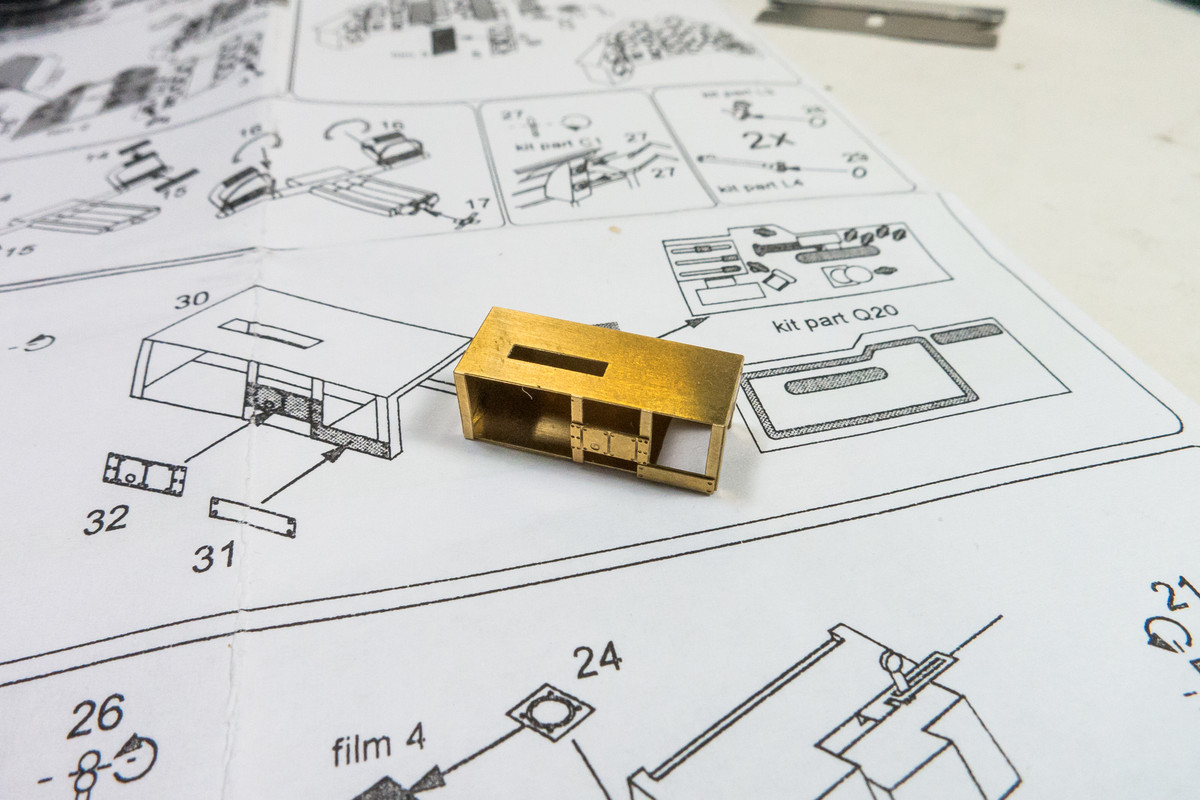
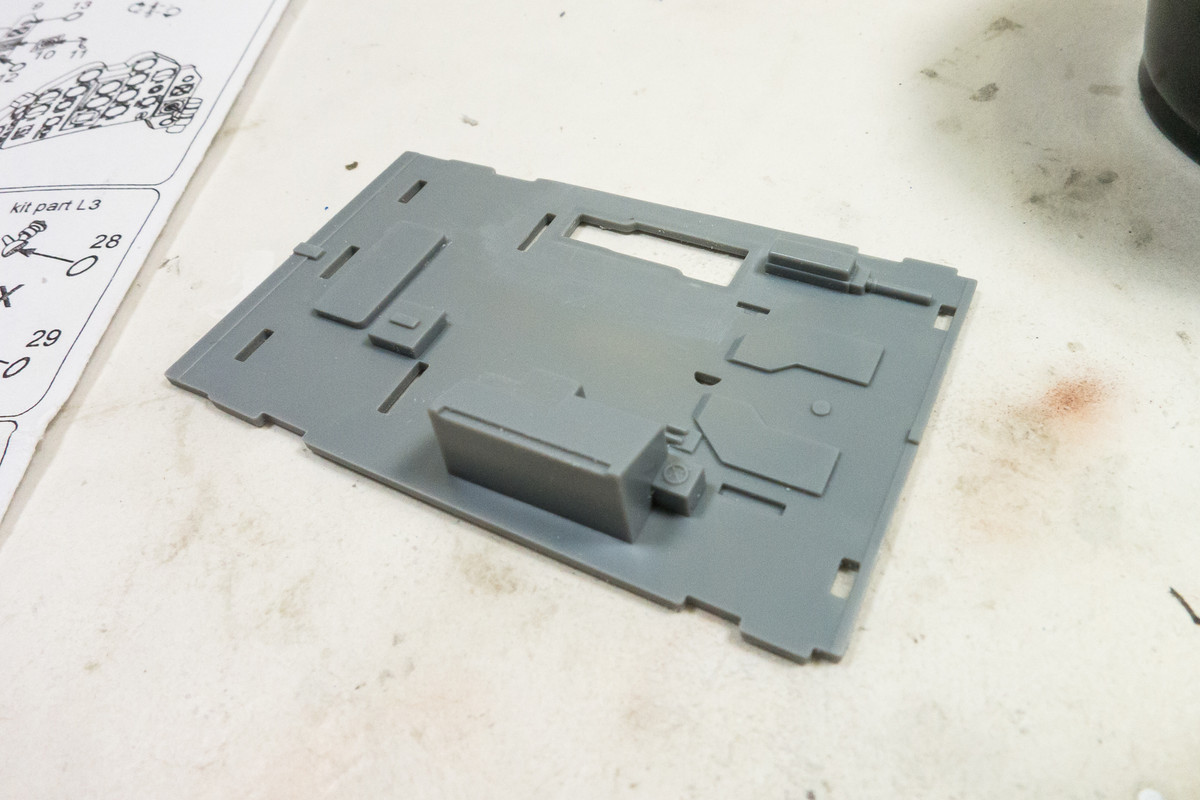
My first attempt at one of the box shapes for the cockpit. This one is made up of four parts but the folds are pretty simple.
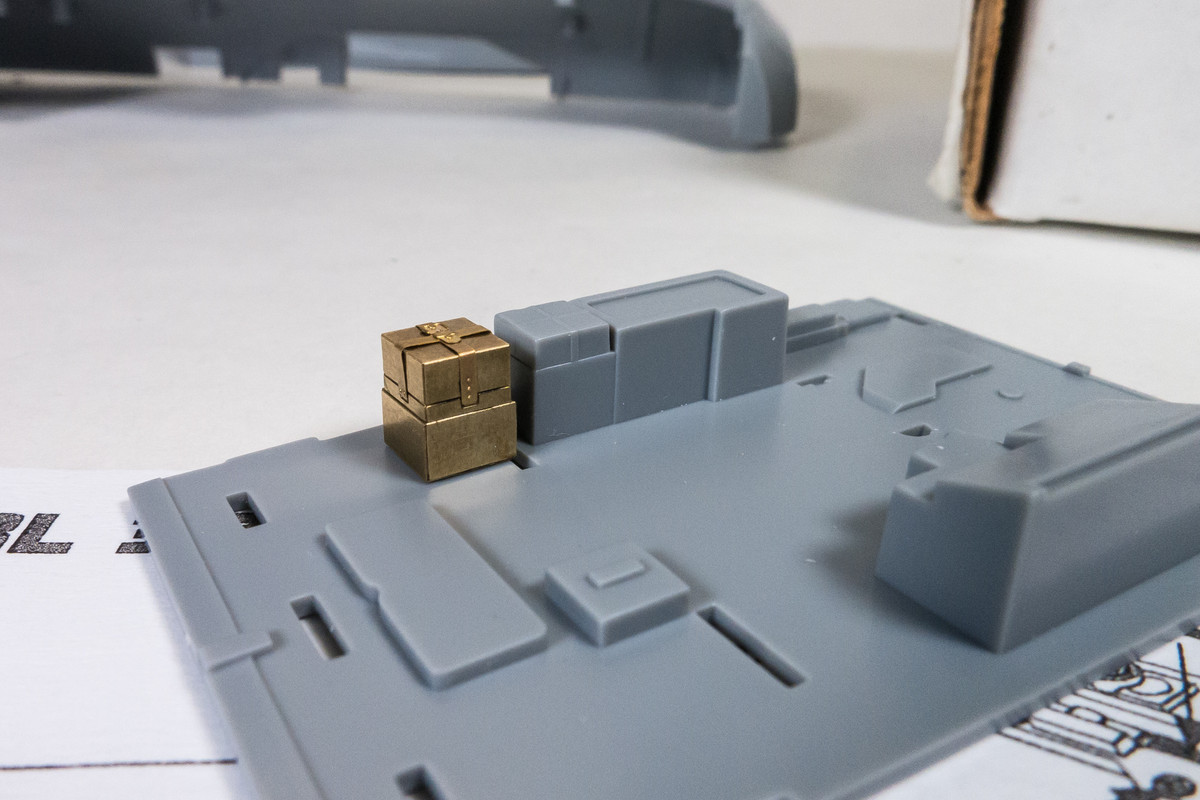
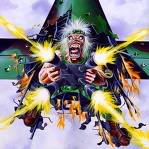
Here's the box next to the molded box it is supposed to replace. The bigger structure next to it forms the biggest and most complicated of the PE parts and I'm saving that for later.
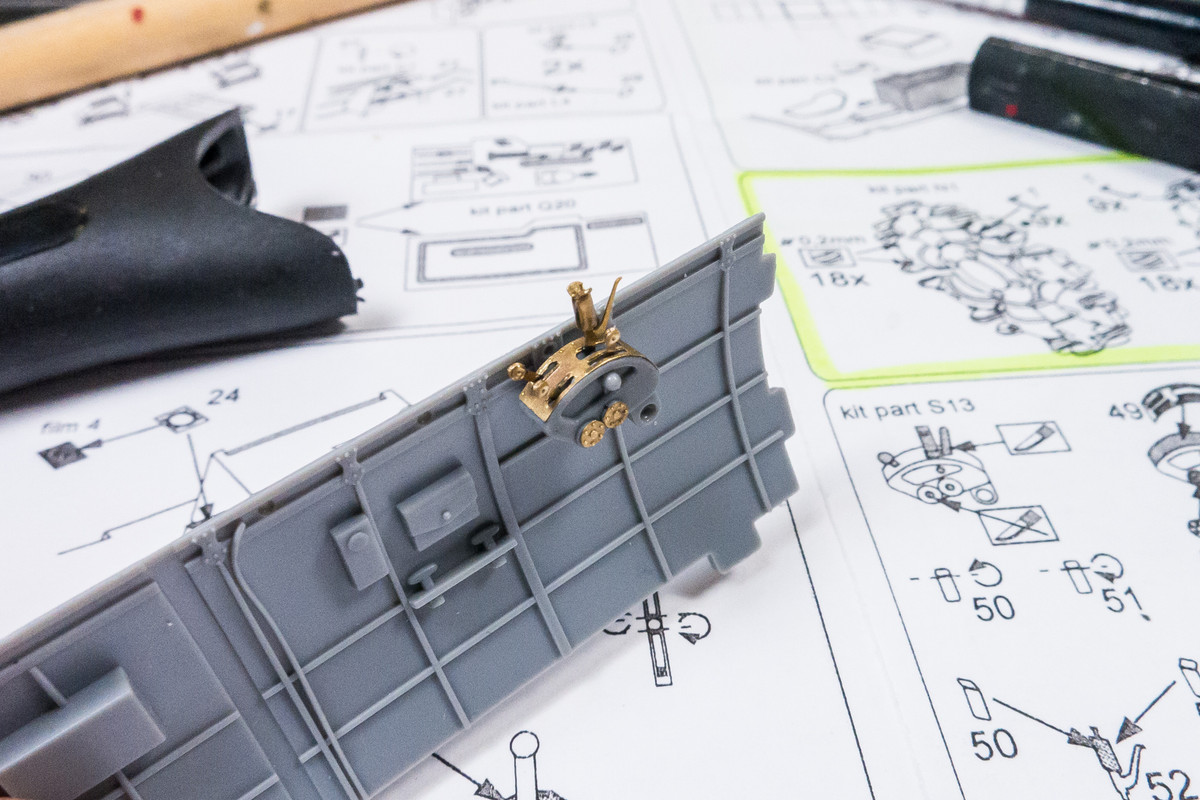
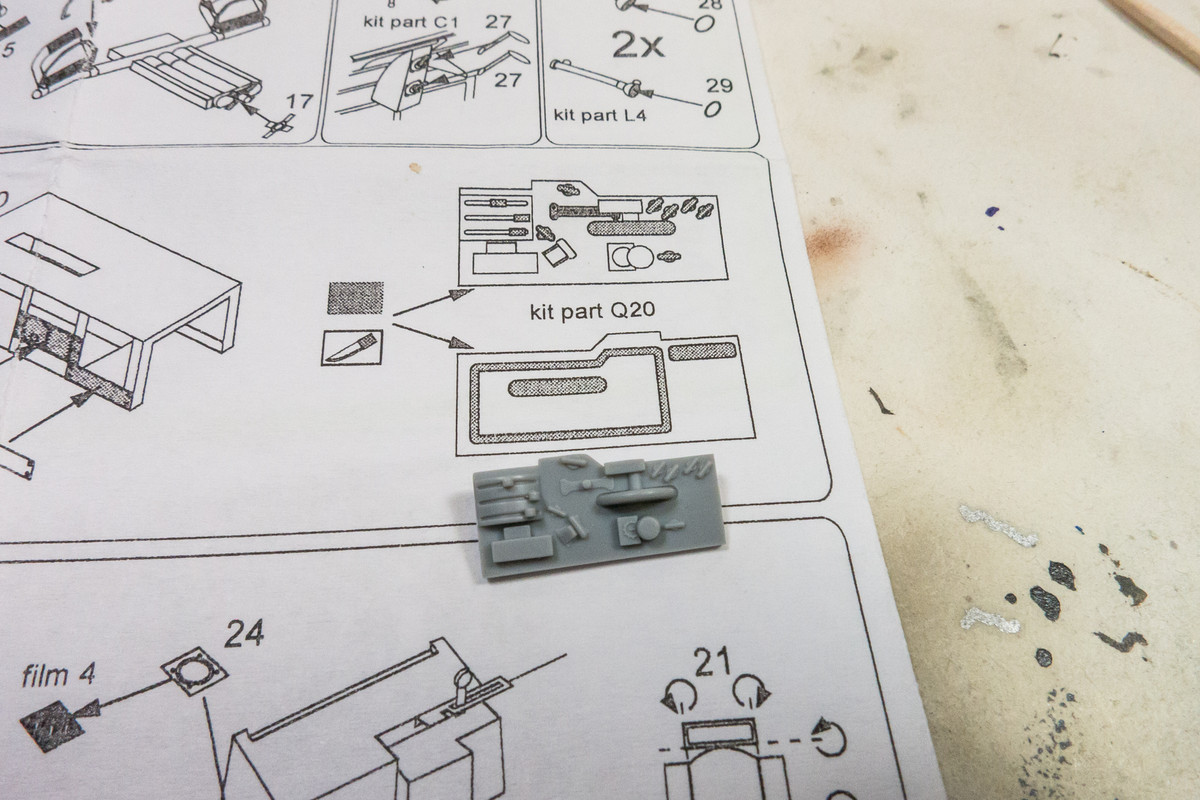
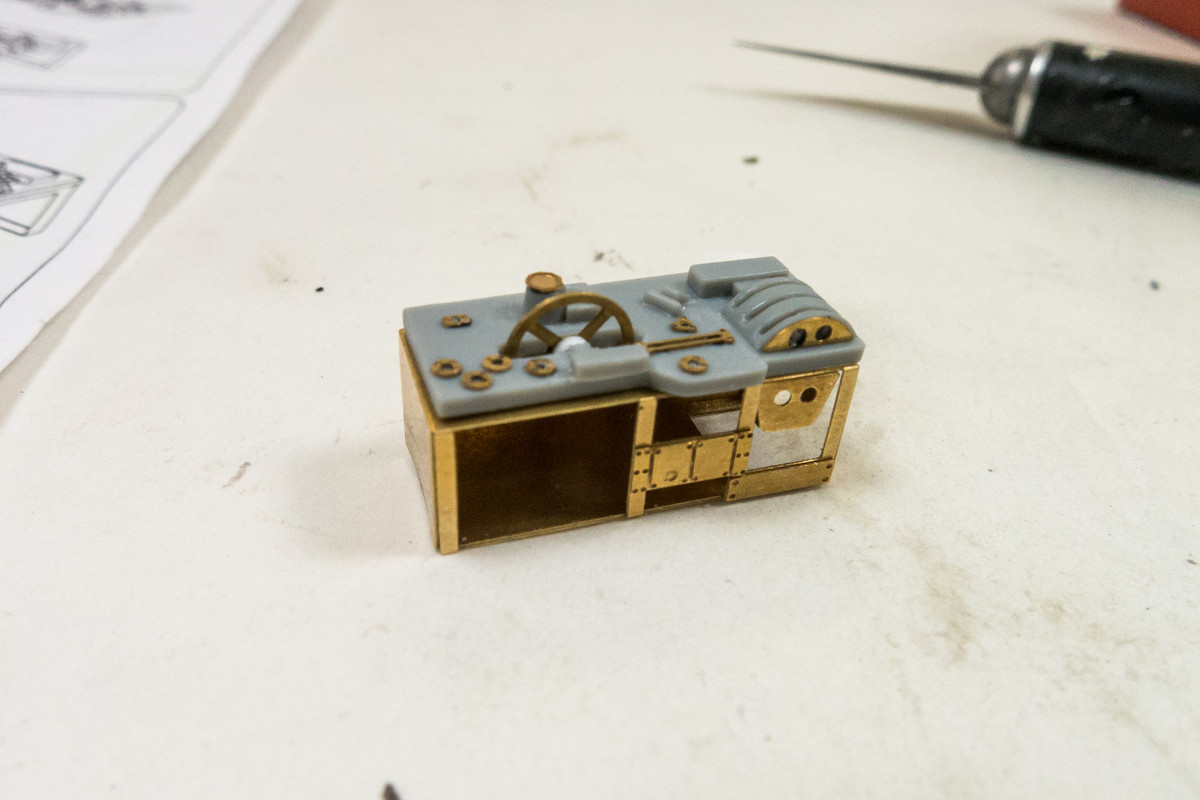
Next I tackle the throttle quadrant. First the molded levers are removed.
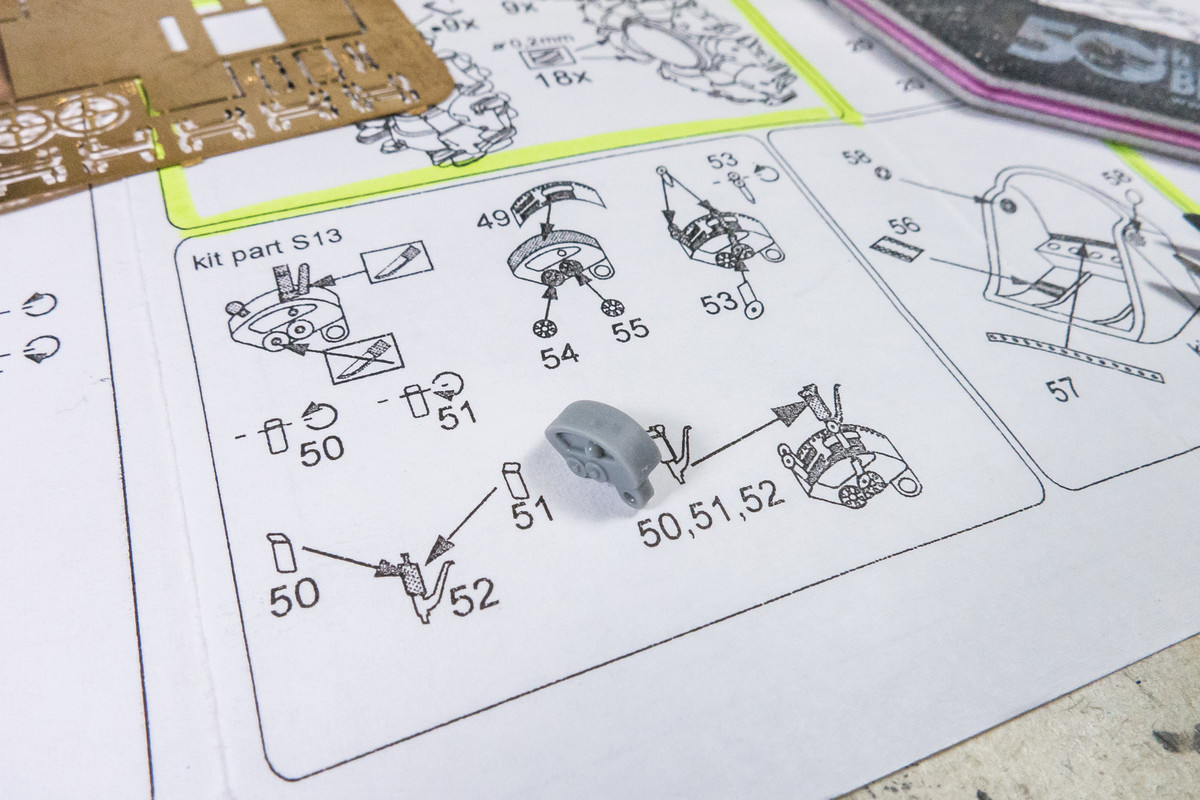
There is a PE piece with slots cut into it that covers the curved face of the throttle quadrant. Holding that PE part in place with my fingers, I shoot the face with black paint.

This creates a guide that I use to cut grooves into the throttle face that will correspond to the slots on the PE part.
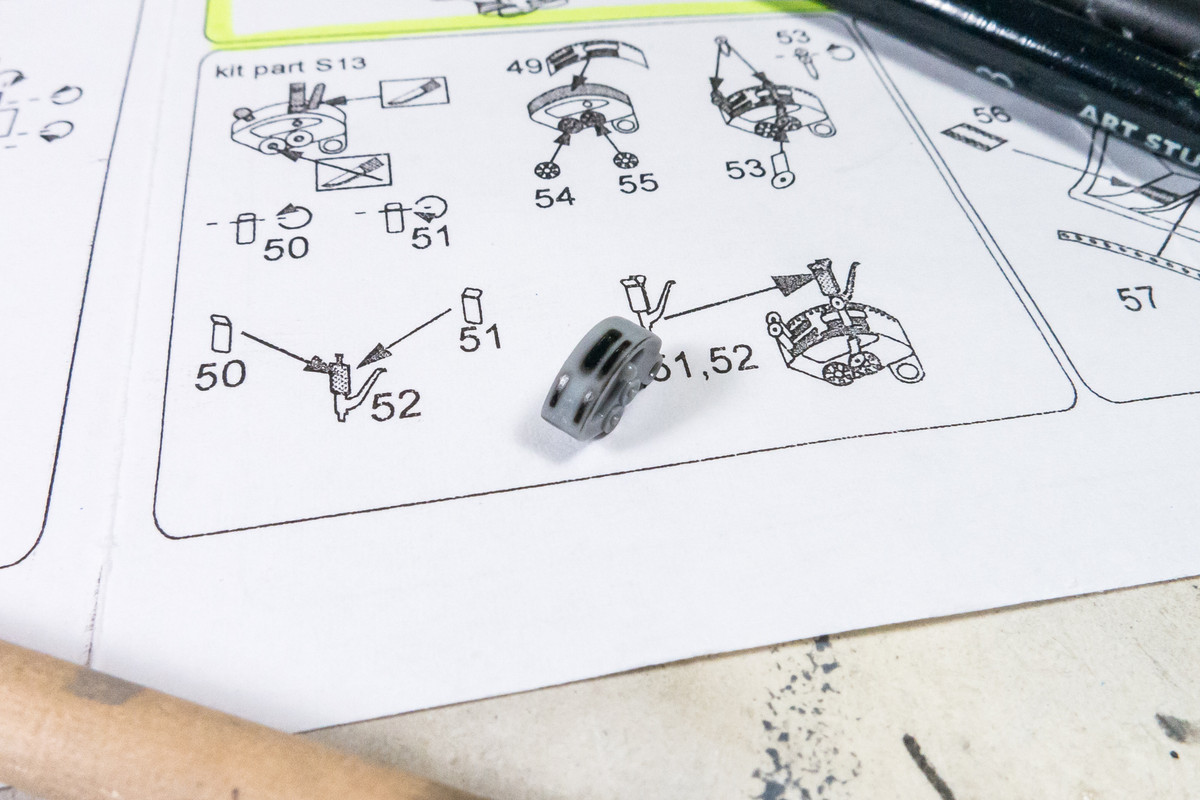
So now the throttle body has some appropriately deep slots for the levers and throttle.
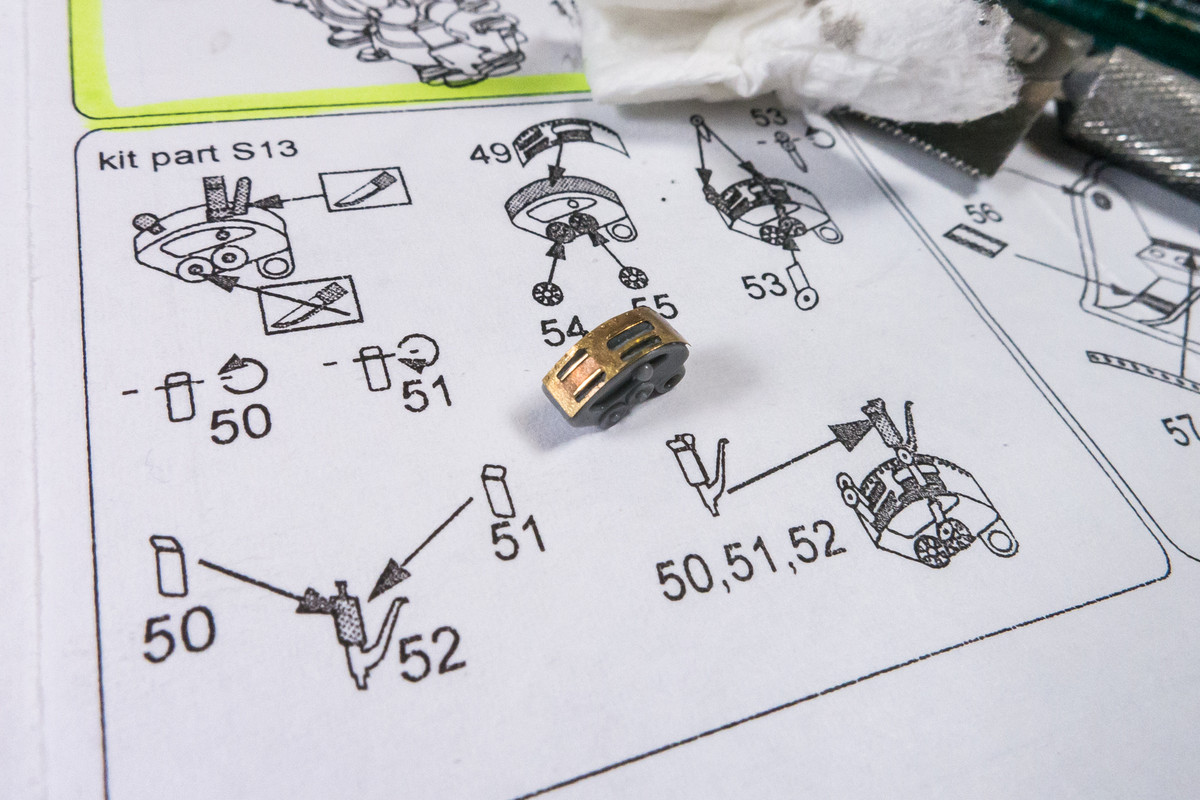
The various PE levers are glued into place. The throttle lever is an interesting pistol-grip shape. You can't see it but I've built up the handles of the levers and throttle with UV epoxy to give them a more rounded cross-section.
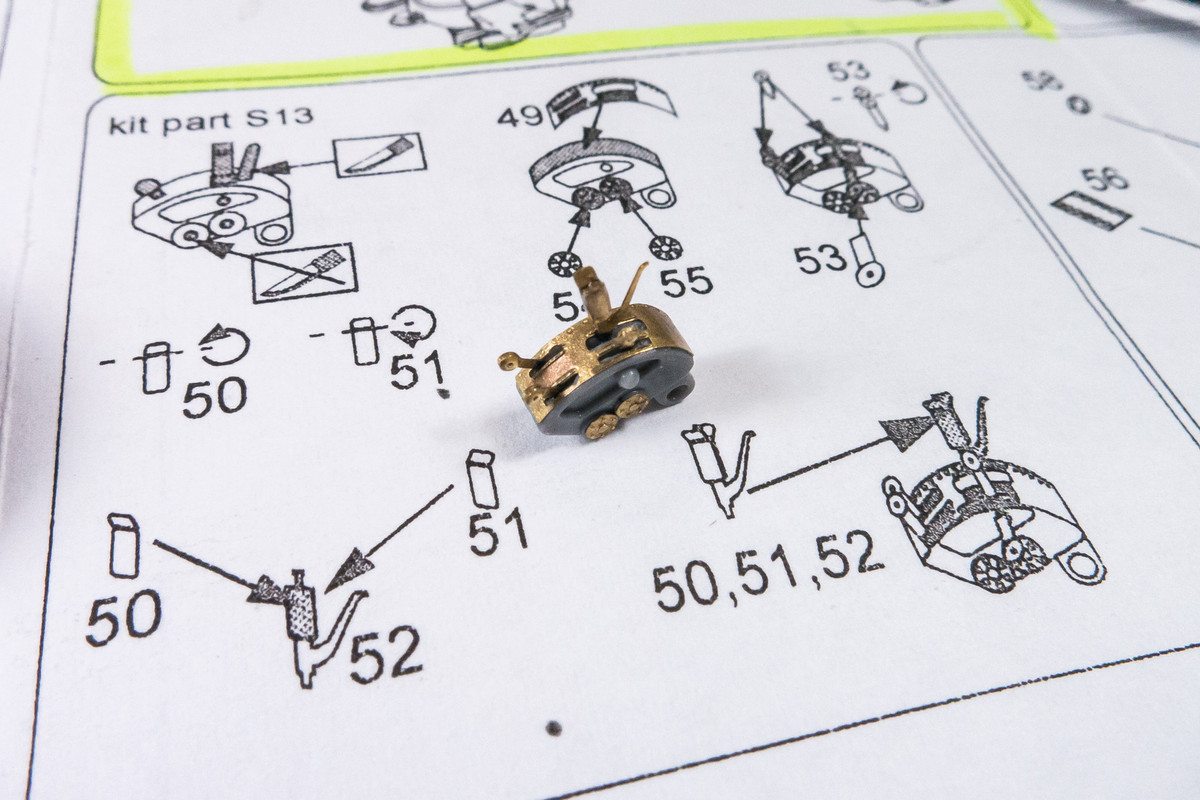
The throttle quadrant is placed high on the port sidewall and will be fairly visible. So these enhancement are well worthwhile.
It's just a progression. I used to hate fiddling with PE but some experience (good and bad) and collecting the right tools and glue over time has helped make using PE more manageable. I can't remember who recommended it here but I've using VMS Flexy 5K CA glue and it has made things easier for me. It's not as thin (watery) as some CA glues and doesn't set up as fast but it has very good capillary action when you need it. A good debonder like Great Planes Pro CA Debonder takes care of any excess CA mess that gets created. And a simple folding tool to help make some exact bends when you need to.jeaton01 wrote:Looks great! Not happening on my workbench! As my grandson says, "It's too hard, Grandpa", when he can't handle a modeling task.
I've decided to glue the tail to the fuselage first to get a good join. It's much easier to take of this joint as well as possible now and deal with any top and bottom seam issues after the fuselage halves go together.
I'm trying to ensure a level joint all around and avoid any steps if possible.
Just a dry fit to make sure all four pieces go together nicely. After this dries, I'll fill in the joint like I did the wing inserts.
Back to some detail work... picking things that don't require to be painted in cockpit green since I don't have that color yet. The headrest is made of wood so I made a rough stab at simulating wood using oil paints.
My first attempt at one of the box shapes for the cockpit. This one is made up of four parts but the folds are pretty simple.
Here's the box next to the molded box it is supposed to replace. The bigger structure next to it forms the biggest and most complicated of the PE parts and I'm saving that for later.
Next I tackle the throttle quadrant. First the molded levers are removed.
There is a PE piece with slots cut into it that covers the curved face of the throttle quadrant. Holding that PE part in place with my fingers, I shoot the face with black paint.
This creates a guide that I use to cut grooves into the throttle face that will correspond to the slots on the PE part.
So now the throttle body has some appropriately deep slots for the levers and throttle.
The various PE levers are glued into place. The throttle lever is an interesting pistol-grip shape. You can't see it but I've built up the handles of the levers and throttle with UV epoxy to give them a more rounded cross-section.
The throttle quadrant is placed high on the port sidewall and will be fairly visible. So these enhancement are well worthwhile.
John aka JKim
-----------<><

-----------<><
-
tempestjohnny
- Elite Member
- Posts: 3331
- Joined: Sat Oct 15, 2016 4:51 am
- Location: Naples. FL
Re: 1/32 Hasegawa N1K2-J Shiden Kai
John I've said it before....Your attention to detail is amazing.
-
BlackSheep214

- Elite Member
- Posts: 10362
- Joined: Sun Apr 06, 2014 8:47 pm
Re: 1/32 Hasegawa N1K2-J Shiden Kai
Amazing PE attention and detail work. I made the recommendation of the VMS Flexy 5k CA PE glue. That reminds me, I need to get more for mine went dry from not sealing the cap on tight - a fault of my own. 
“Who controls the skies, controls the fate of this Earth”
Author unknown- 352nd Fighter Group, Blue-Nosed Bastards of Bodney
“Send one plane it’s a sortie; send two planes it’s a flight; send four planes it’s a test of airpower. - Richard Kohn
Author unknown- 352nd Fighter Group, Blue-Nosed Bastards of Bodney
“Send one plane it’s a sortie; send two planes it’s a flight; send four planes it’s a test of airpower. - Richard Kohn

Re: 1/32 Hasegawa N1K2-J Shiden Kai
Brengun has made a really nice PE set.
March as one, Don't look back
Odin's sons... Attack!
Unleash hell! Do not repent! Warfare grants us no lament
Let your weapons slash and tear This is no place for fear
Hold the lines! Move as one! In unity our victory's won
Our shields will form a mighty wall
United we shall never fall
Odin's sons... Attack!
Unleash hell! Do not repent! Warfare grants us no lament
Let your weapons slash and tear This is no place for fear
Hold the lines! Move as one! In unity our victory's won
Our shields will form a mighty wall
United we shall never fall
Re: 1/32 Hasegawa N1K2-J Shiden Kai
Thanks guys! I've been "forced" to slow down and work on details since I am in wait mode on some critical items to be delivered. I really can't jump forward on this build without my cockpit paint, right?
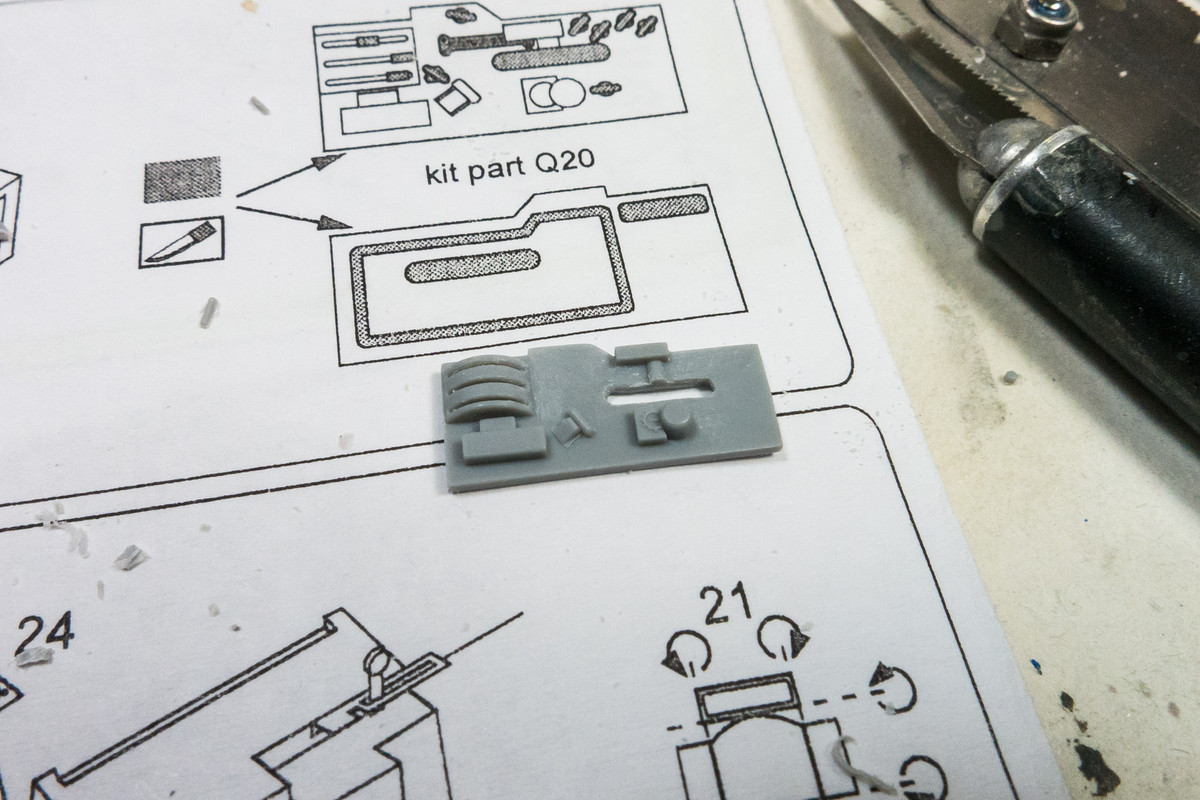
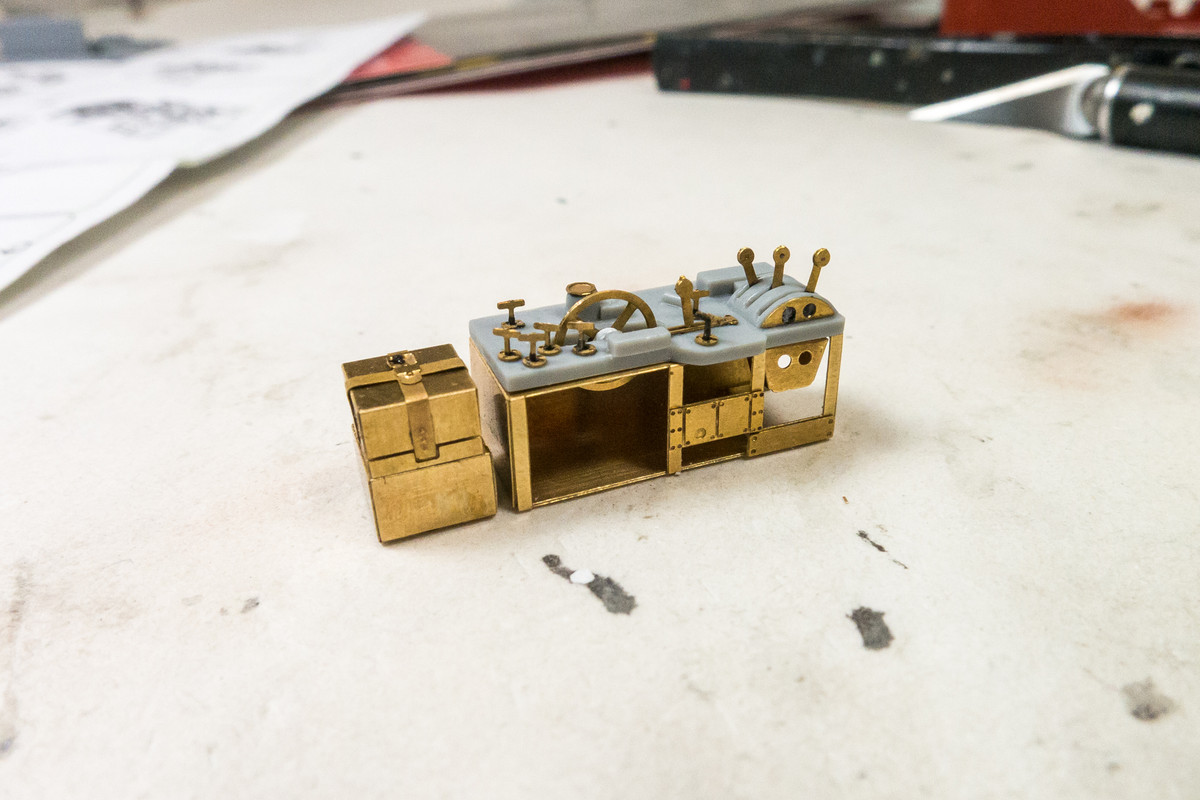
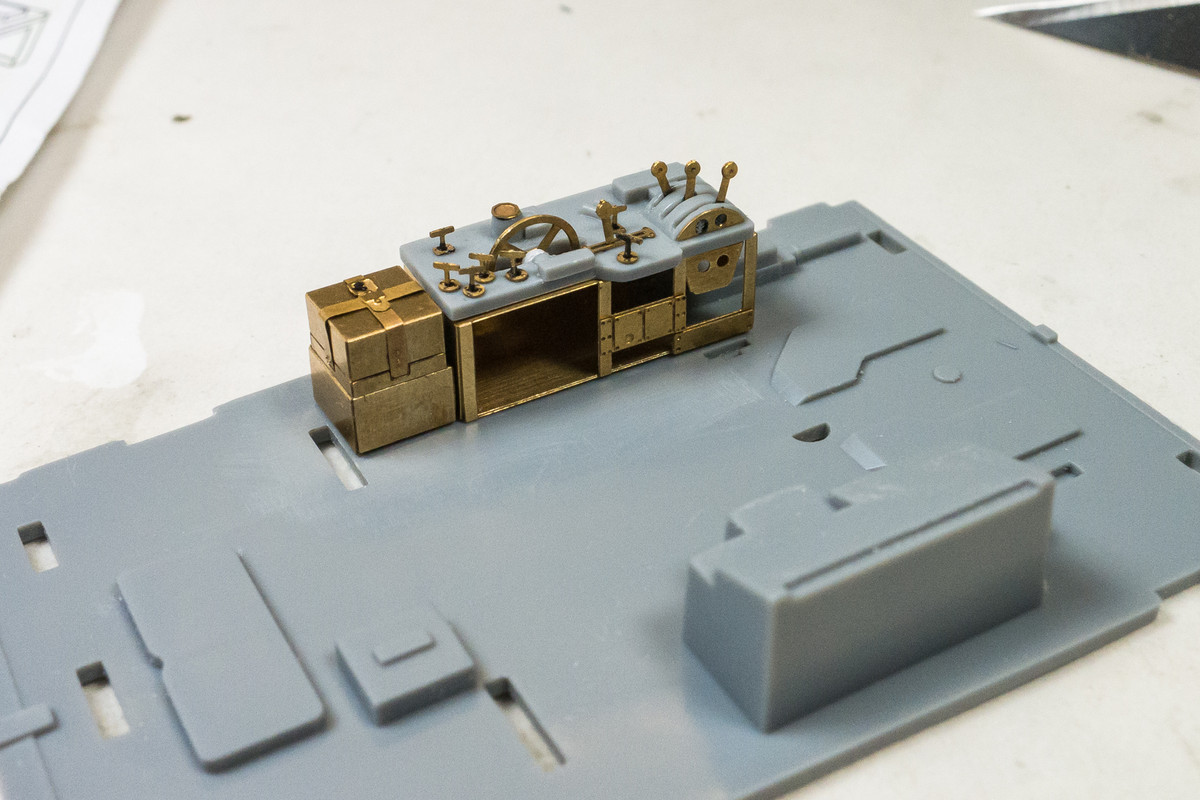
I decided to take a stab at folding the bigger box. It's not very complicated but the windows and narrow bits gave me pause.
The PE tool was used to initiate the folds but I would have to guide the final closure with my fingers.
Whew! That wasn't too bad.
The kit part goes on top of this structure but some removals, top and bottom, are necessary to accommodate the PE enhancements.

Ahhh... yes, it was you! Great recommendation, which I am totally digging.BlackSheep214 wrote:Amazing PE attention and detail work. I made the recommendation of the VMS Flexy 5k CA PE glue. That reminds me, I need to get more for mine went dry from not sealing the cap on tight - a fault of my own.
I decided to take a stab at folding the bigger box. It's not very complicated but the windows and narrow bits gave me pause.
The PE tool was used to initiate the folds but I would have to guide the final closure with my fingers.
Whew! That wasn't too bad.
The kit part goes on top of this structure but some removals, top and bottom, are necessary to accommodate the PE enhancements.
John aka JKim
-----------<><
-----------<><
Re: 1/32 Hasegawa N1K2-J Shiden Kai
Since the two PE boxes came out ok, I sawed off the molded counterparts from the cockpit floor.

This is where a sanding tool like the David Union D400 comes in very handy.
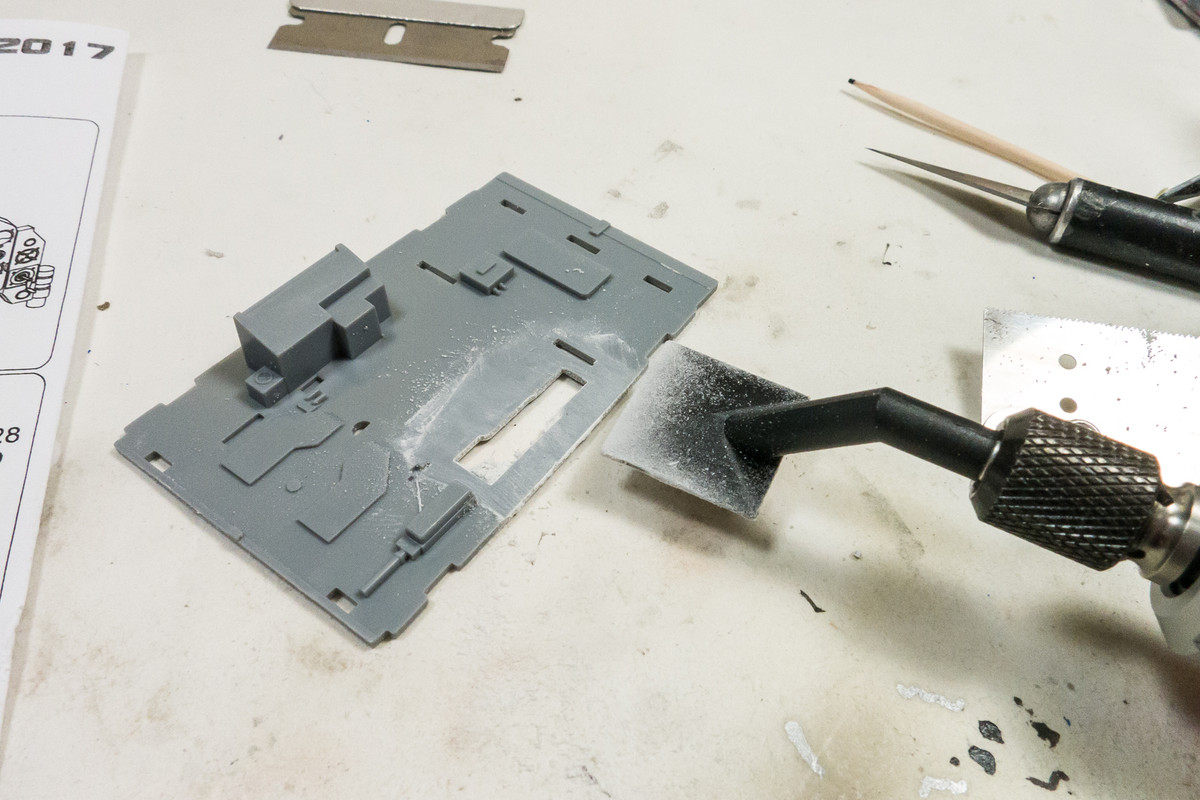
With those structures out of the way, we can see how the replacement parts fit.
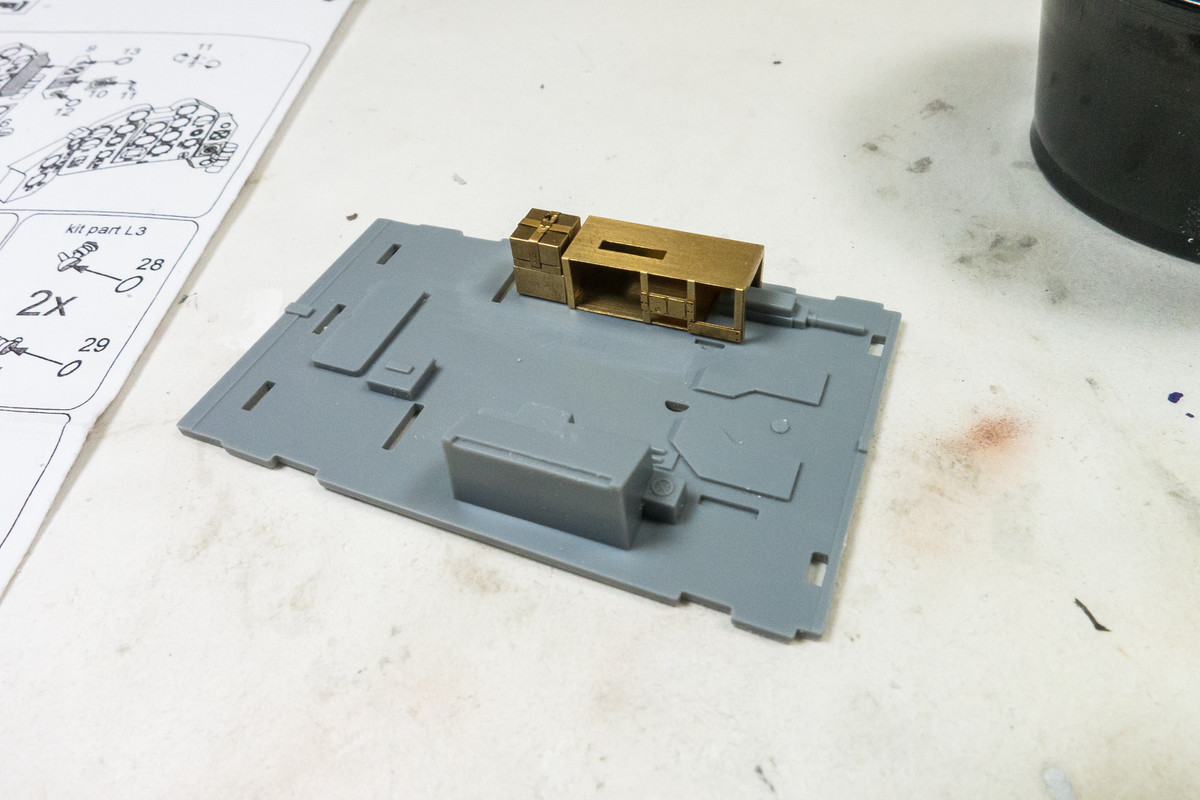
Brengun not only provides lots of small levers but the mounts, complete with a hole in the middle, to accommodate the new levers.
Lots of nice detail being added to the cockpit using the Brengun set!
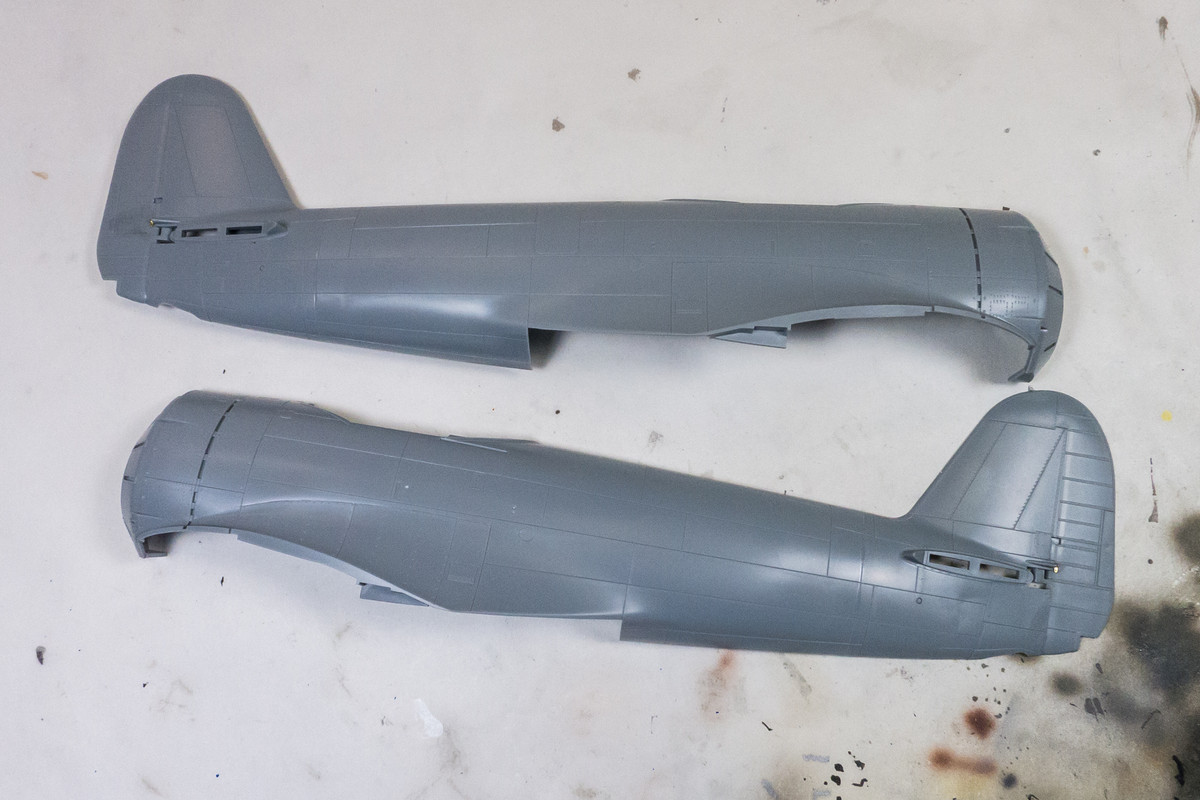
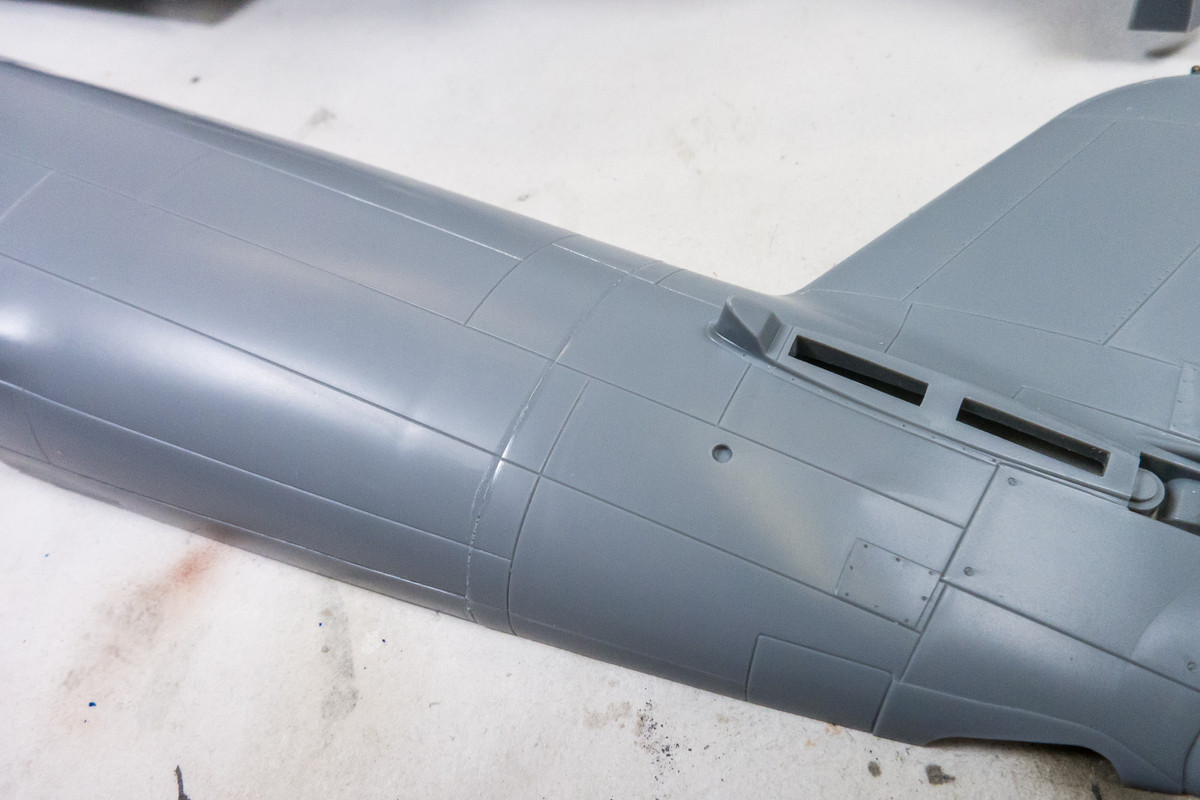
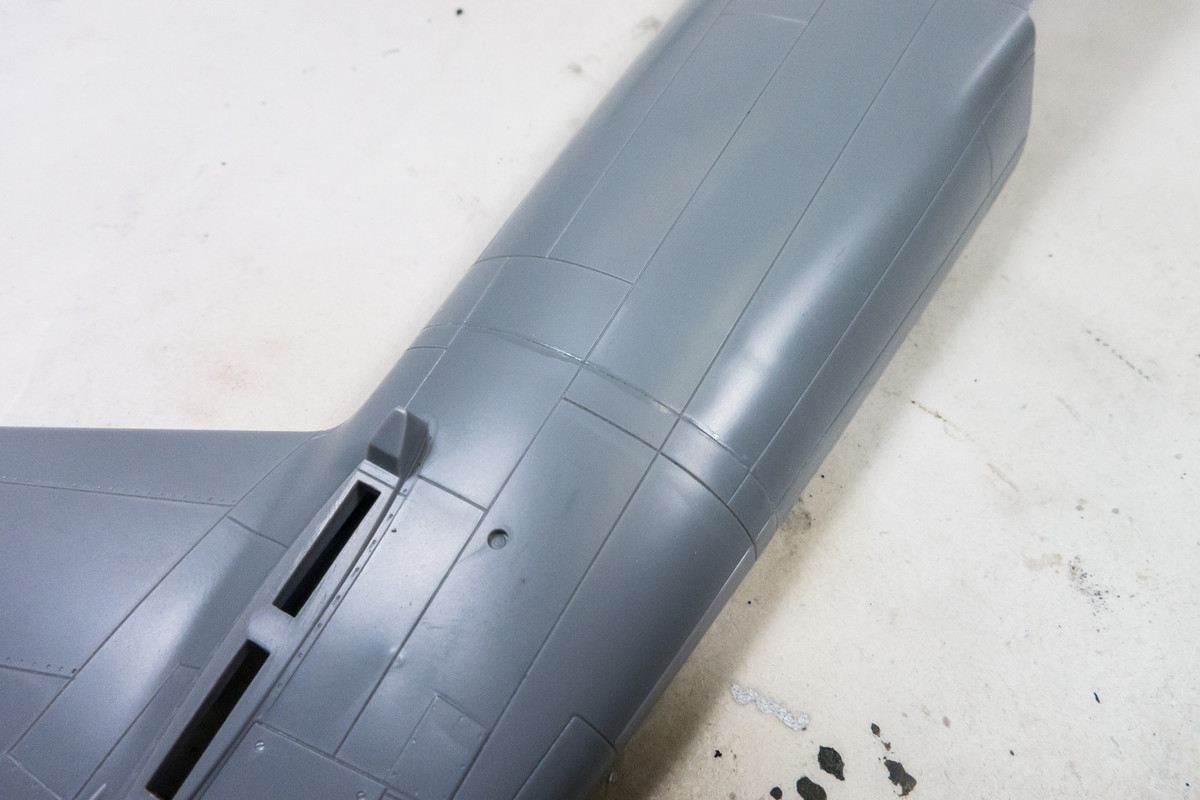
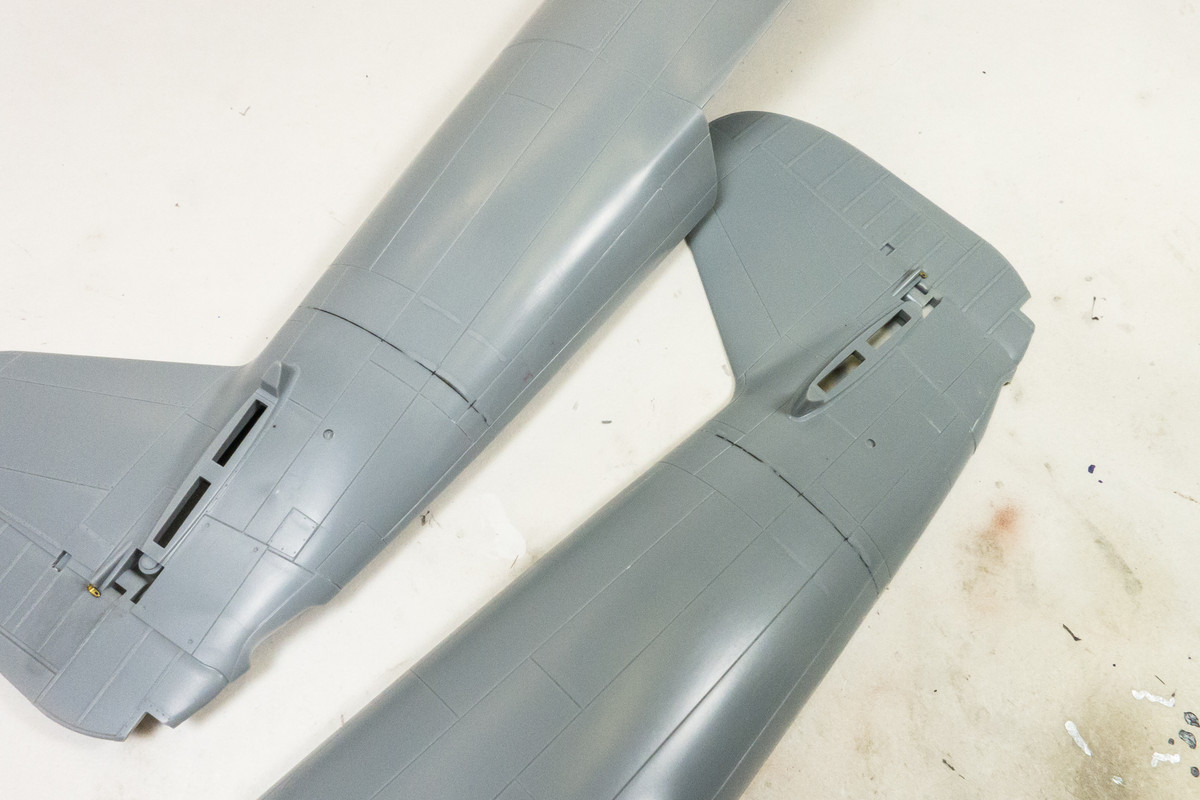
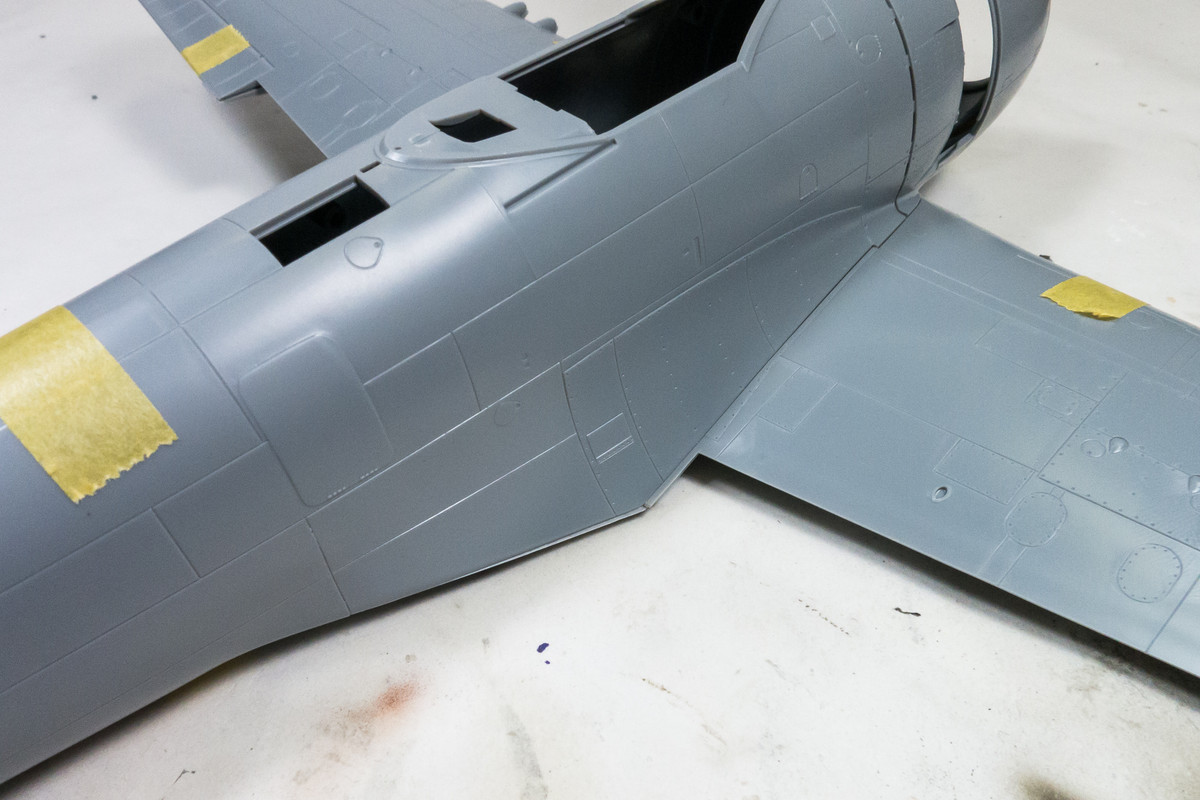
I've cleaned up the tail/fuselage joints and re-established the panel lines. Still waiting on the new riveter.
This is where a sanding tool like the David Union D400 comes in very handy.
With those structures out of the way, we can see how the replacement parts fit.
Brengun not only provides lots of small levers but the mounts, complete with a hole in the middle, to accommodate the new levers.
Lots of nice detail being added to the cockpit using the Brengun set!
I've cleaned up the tail/fuselage joints and re-established the panel lines. Still waiting on the new riveter.
John aka JKim
-----------<><
-----------<><
-
Medicman71

- Elite Member
- Posts: 9684
- Joined: Mon Apr 07, 2014 9:32 am
- Location: Houston, Tx
Re: 1/32 Hasegawa N1K2-J Shiden Kai
Nice work with the PE!
Mike
Sponsored by Boeing, Lockheed Martin, Northrop Grumman, Saab, BAE, and Dassault
Sponsored by Boeing, Lockheed Martin, Northrop Grumman, Saab, BAE, and Dassault
-
BlackSheep214
- Elite Member
- Posts: 10362
- Joined: Sun Apr 06, 2014 8:47 pm
Re: 1/32 Hasegawa N1K2-J Shiden Kai
Incredible..... 
“Who controls the skies, controls the fate of this Earth”
Author unknown- 352nd Fighter Group, Blue-Nosed Bastards of Bodney
“Send one plane it’s a sortie; send two planes it’s a flight; send four planes it’s a test of airpower. - Richard Kohn
Author unknown- 352nd Fighter Group, Blue-Nosed Bastards of Bodney
“Send one plane it’s a sortie; send two planes it’s a flight; send four planes it’s a test of airpower. - Richard Kohn
Re: 1/32 Hasegawa N1K2-J Shiden Kai
Appreciate the comments. Am I the only one working on a model this holiday weekend?
With the majority of the PE pieces assembled, if not permanently glued in or painted yet, I thought it would be a good time to dry fit the cockpit assembly. Many pieces are just sitting there so there is probably alot of misaligned and skewed parts. But it gives a sense of the scope of enhancements that the Brengun PE set brings to the table.
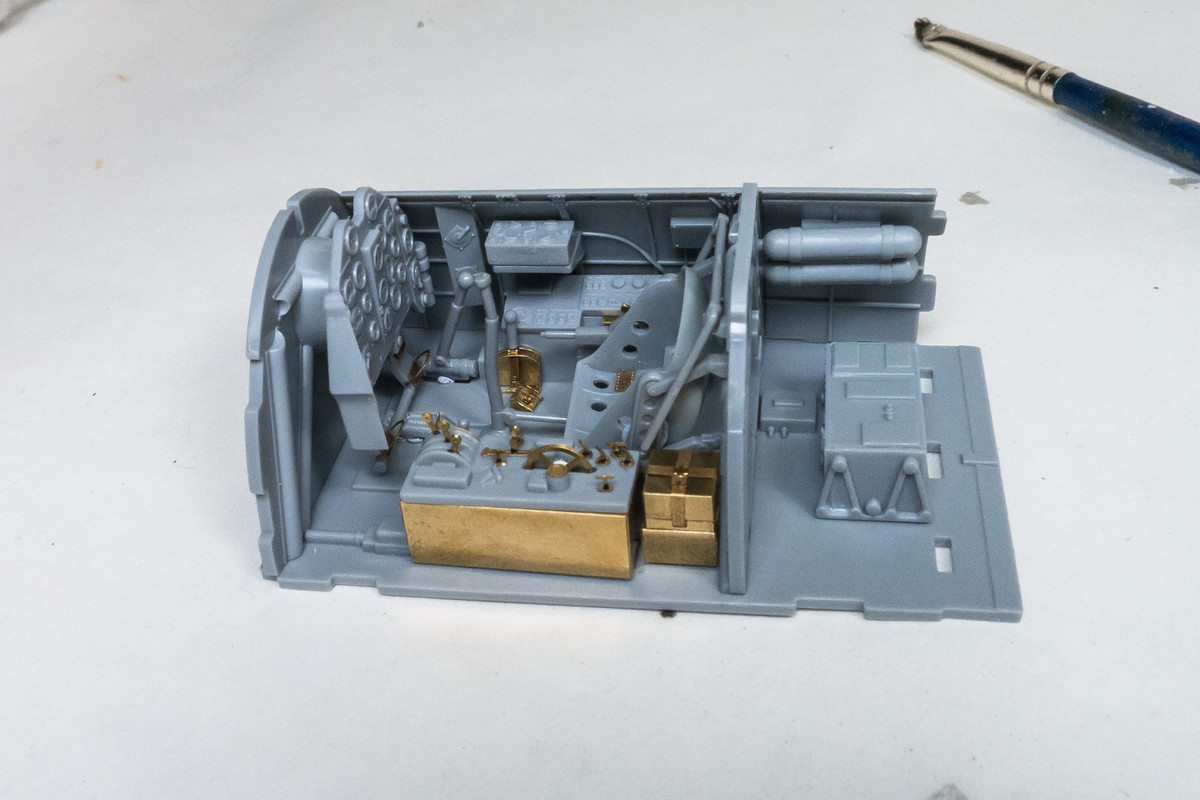
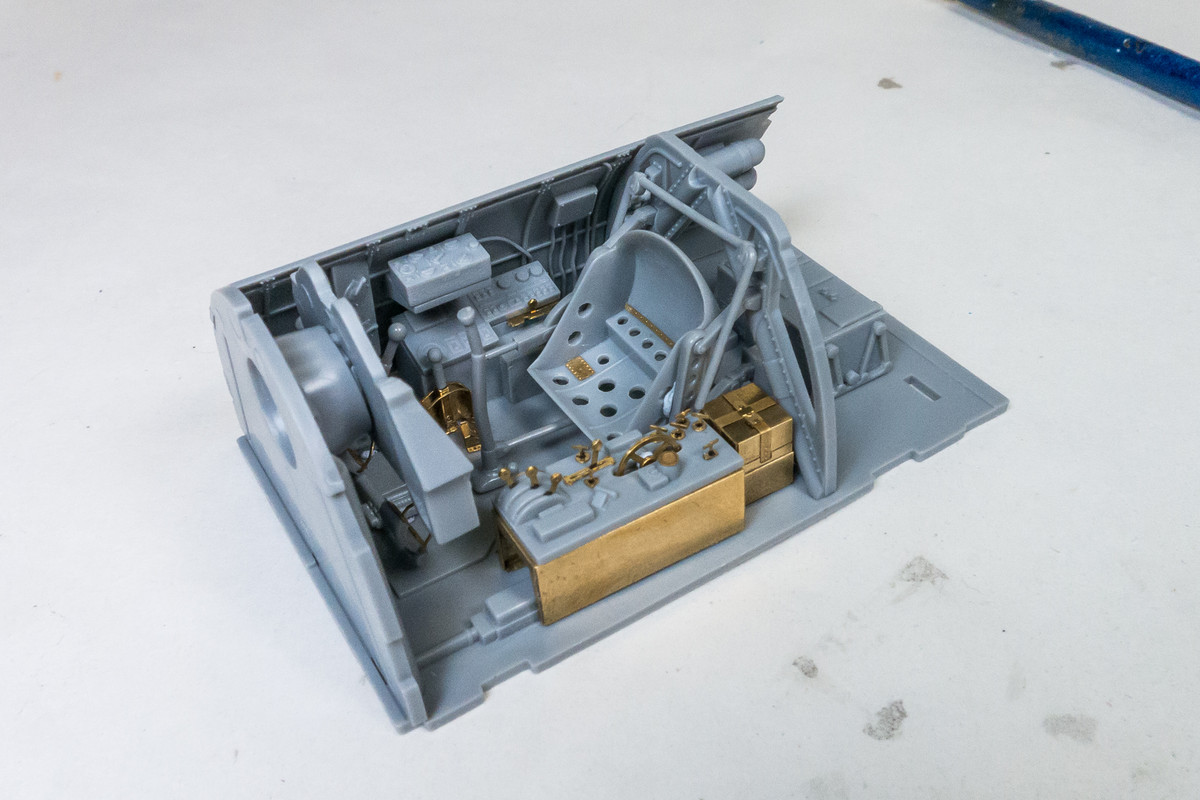
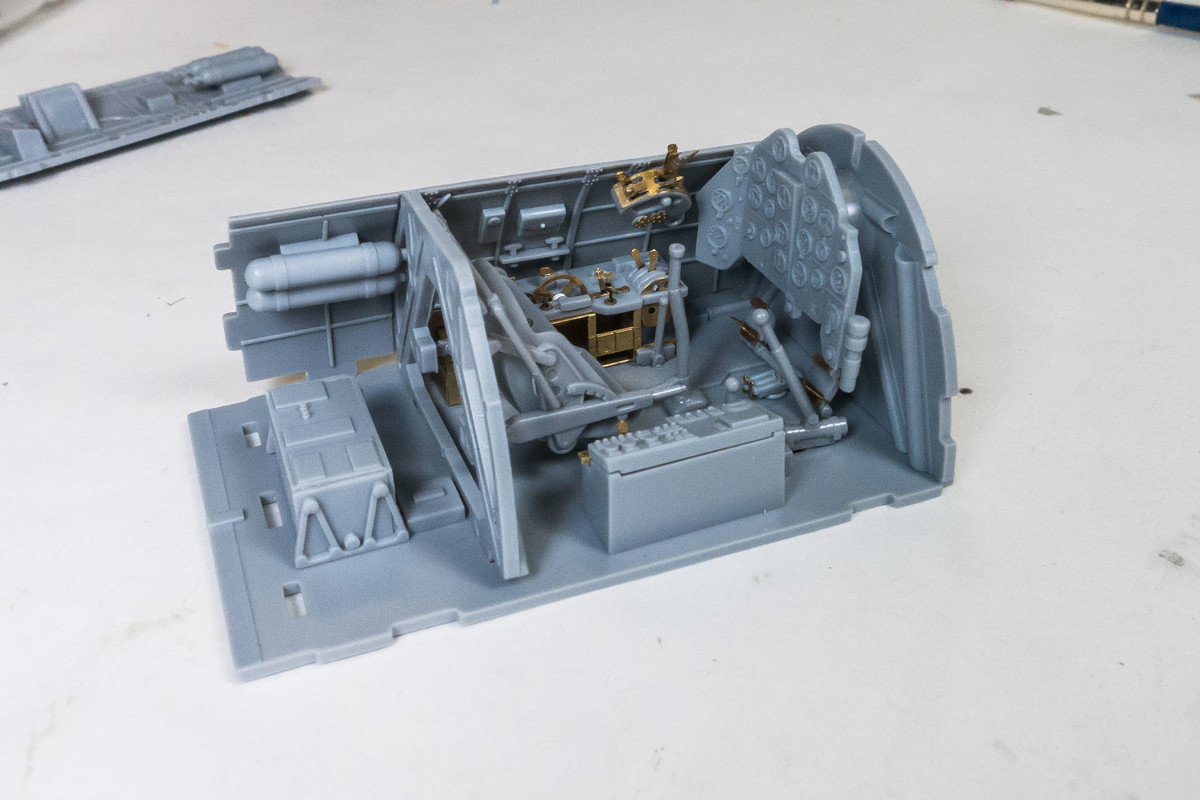
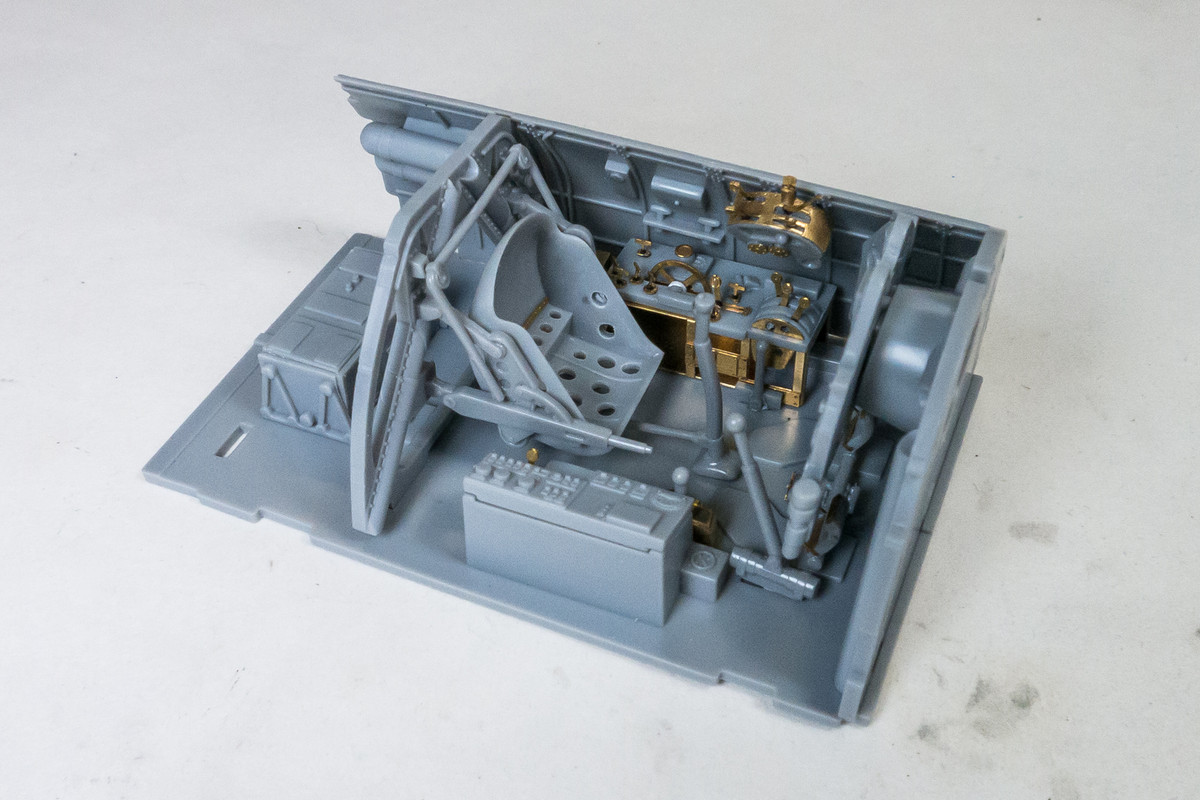
There is still lots to do in the cockpit including the photoetch and acetate instrument panel, seat harnesses, maybe some wiring and painting, of course.
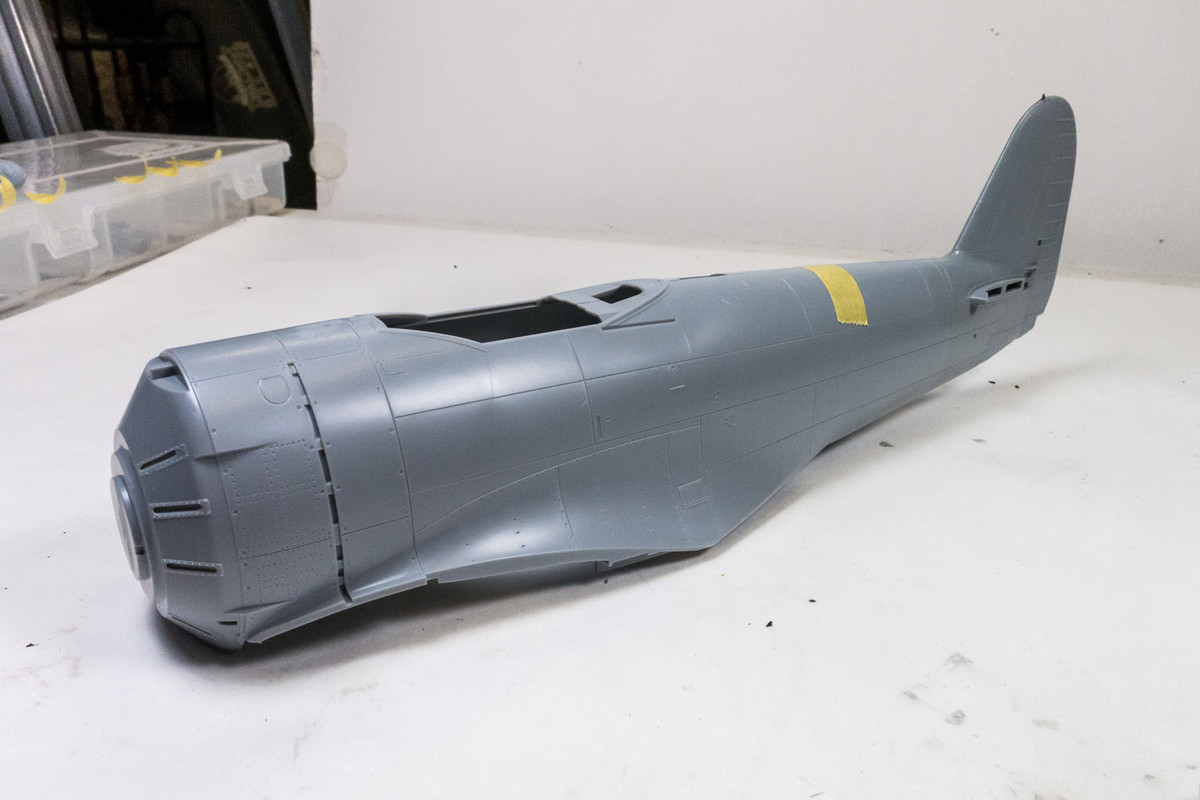
I cut the upper wings off their sprue. I was keeping them attached to protect that thin trailing edge extension that will probably get broken at some point in the build.
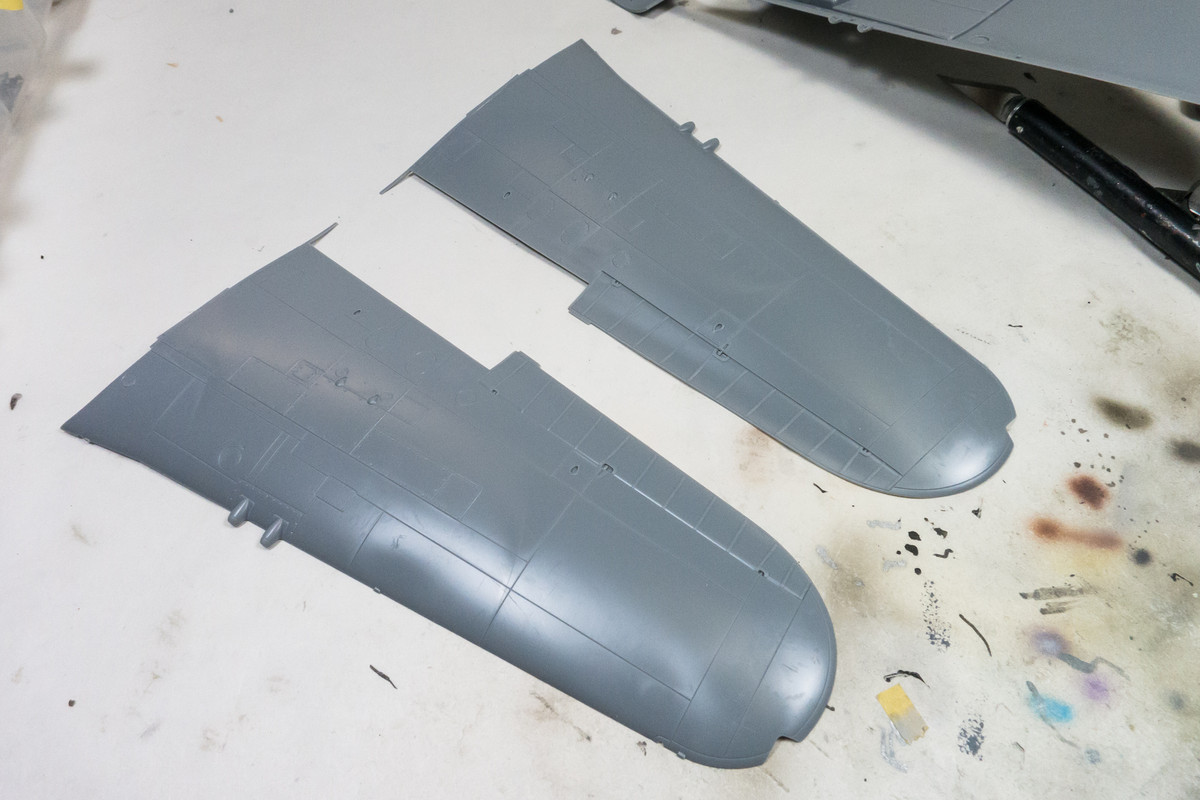
Rough fit with a few pieces of tape show a very good fit at the wing root. I do see a bit of that "underbite" along the trailing edge of the wing fillet that I've seen on other builds but that should be a very easy fix.
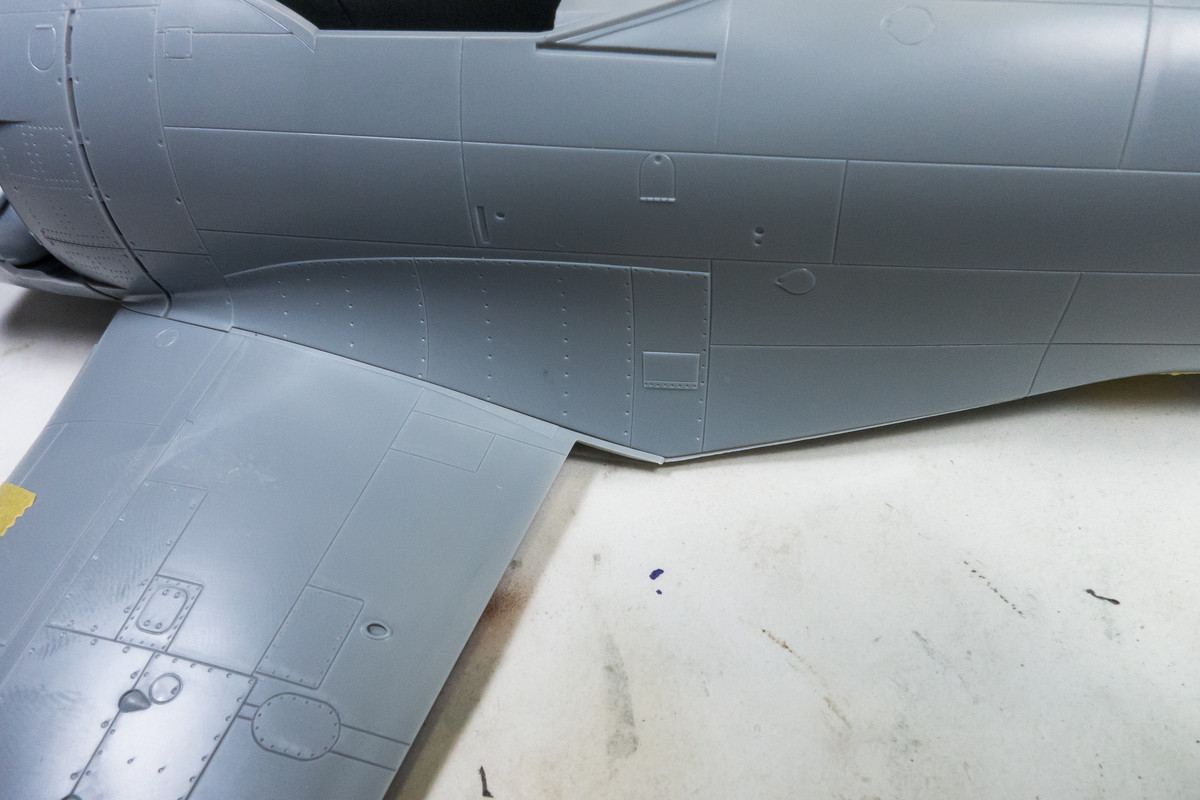
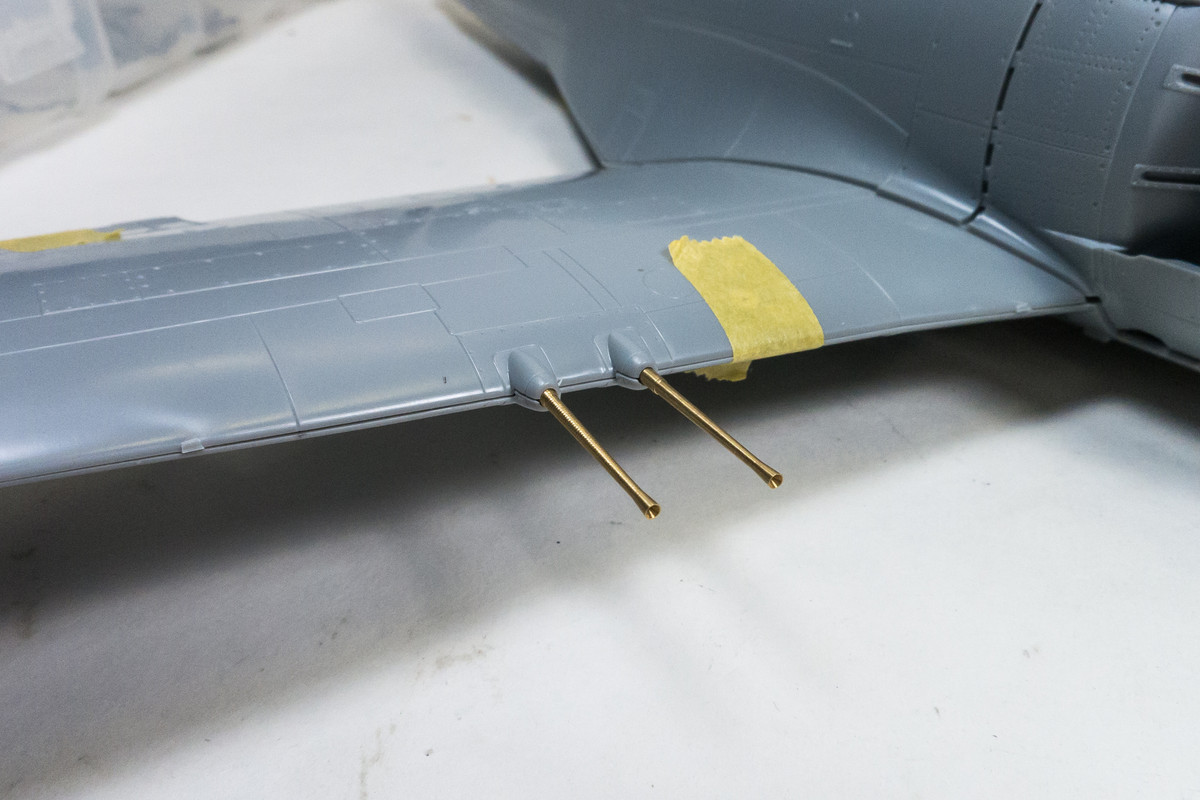
Checking to see if the RB Models brass gun barrels need any special attention for attachment but they seem to be a plug-in fit.
With the majority of the PE pieces assembled, if not permanently glued in or painted yet, I thought it would be a good time to dry fit the cockpit assembly. Many pieces are just sitting there so there is probably alot of misaligned and skewed parts. But it gives a sense of the scope of enhancements that the Brengun PE set brings to the table.
There is still lots to do in the cockpit including the photoetch and acetate instrument panel, seat harnesses, maybe some wiring and painting, of course.
I cut the upper wings off their sprue. I was keeping them attached to protect that thin trailing edge extension that will probably get broken at some point in the build.
Rough fit with a few pieces of tape show a very good fit at the wing root. I do see a bit of that "underbite" along the trailing edge of the wing fillet that I've seen on other builds but that should be a very easy fix.
Checking to see if the RB Models brass gun barrels need any special attention for attachment but they seem to be a plug-in fit.
John aka JKim
-----------<><
-----------<><