Maddog Manufacturing 2018 Production
-
Duke Maddog

- Elite Member
- Posts: 7075
- Joined: Tue Jun 03, 2014 11:22 am
- Location: Rowland Heights, CA
Re: Maddog Manufacturing 2018 Production
Thanks Stuart! Yes, the 737 is in 1/72 scale. This is the old Airfix kit. The new decals went on okay, but they are slightly smaller in places than the original so some extra work had to be done to make them look okay. Then of course, parts of them curled, and when I added decal solvent, it wrinkled them up. Now this whole side is wrinkled in parts and I'm just gonna have to finish it that way. This is why I ordered two sets of these decals but only got the one set. Next I want to clear coat this and then try the other side. If I can just get all the decals on and sealed, then I can finish this stinkin' model! 
The Duke
Virtuoso of Miniatures
"Do you know what the chain of command is? It's the chain I get and beat you with 'till you understand who's in ruttin' command!"
-Jayne Cobb, Firefly Episode 2 "The Train Job"
We are modelers - the same in spirit, in hunger to insanely buy newly released kits, hustlers in hiding our stash from our better halves and experts in using garbage as replacements for after-market parts.
-
Duke Maddog
- Elite Member
- Posts: 7075
- Joined: Tue Jun 03, 2014 11:22 am
- Location: Rowland Heights, CA
Re: Maddog Manufacturing 2018 Production
Well, it's been over a month and I finally have some time to post what I've gotten done in all that time.
Let's start again with my aircraft.
Some time ago I got some extra decals for my Boeing 737. I then added some decal film to them to help insure they don't break up too much. Finally, I managed to get one side on to repair the damaged ones that were already there:

That has also been clearcoated for protection, and later I'll try the other side. I was surprised at how long that decal took to loosen up!
Moving along, I did the radar dome on the night fighting Hellcat I'm building for Bruce here:

I need to clearcoat those parts and get the decals on this model.
Moving on, I worked on my two helicopters. The Nigerian Hind was first. I assembled the main rotors first:

Then I added the landing gear and gear doors:

This is a test fit to see how it all sits. All I need is a bit of paint touch up; the ordinance and eventually, a canopy:

I also worked on my Australian HAP Tigre; getting the main rotors done and the whole thing clearcoated for decals:

Here it is with the decals on, and the canopy masking off:

Later I noticed that the little beastie wasn't sitting right; she was leaning to one side. So, I turned it over, cut one of the landing gear and added a shim to the strut. That is the white thing you see here:

Finally, this one was almost done. I added the ordinance, the main and tail rotors, and a tail wheel from another kit since this one had gotten lost; and then touched up some of the paint. All that is needed on this is the "eyeball" on top of the cockpit and the gun beneath the nose:

That completes the aircraft, now to bring it down to the ground....
To start with, I base coated the M-992:

I was going to fix the tracks some, but I'm tired of this thing sitting on the bench. I'll be hand painting the camo pattern on this later.
Next I decided to get the tracks on the Russian BREM. I started by adding some links to the drive sprocket and then cementing that on the hull, as indicated by the instructions:

After some more work, I got one run of tracks done:

One more run to do and I'll be ready to close this up and paint it.
Next I primed the Italian Lince:

After that dried, I shot it with a coat of pale OD as a base:

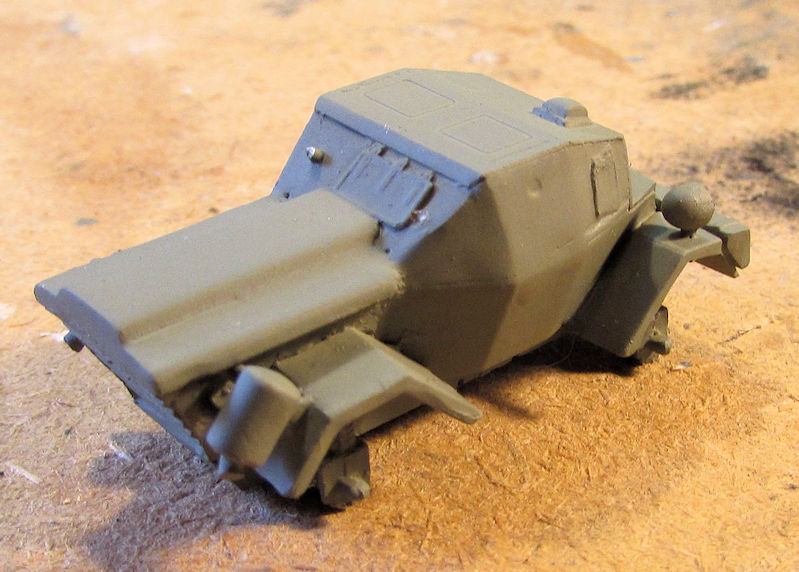
The back roof brace broke off, as I was sure it would, so later on when I'm almost done, I'll make a new one from styrene rod.
Next I went to work on my WWI MACK truck. First I shot the green back on the roof of the cab where I'd filled and sanded the seams:

Next, I was not happy with the looks of the tilt. I started by doing some sanding to remove some seams and then brought out my putty and filled all the seams, sink marks and gouges I'd made before:

Some time later, I got everything as smooth as I wanted:

I then gloss coated the chassis and cab for decals and shot a new Field Drab color on the tilt. It all looks much better now:


Now I just need to decal this, dullcoat it, then assemble the last detail parts and weather it and I'll have another MACK truck.
Since I was dabbling in WWI subjects, I finished painting the pattern on my WWI 8-inch artillery gun:


This just needs some weathering and it'll be done. Finally!
Since I was hand painting camouflage patterns, I decided it was time to finish the armored train engine too. I had started with the green before and now I finally got it all done:


After that, I added the brown:


This one just needs a bit of weathering also and I'll have it finished. Hopefully soon.
Moving on out to my shipyards, we find the Izumo getting some attention. I had masked off the flight deck so it was time to shoot the lighter grey:

It's almost impossible to see in those pics so you'll have to take my word for it. Here's the island after I finished painting it too:

Later the masking came off. I was extremely pleased at how well this looked:

I dry-fit the island to see how it looks:


I was most impressed with how seamless the join was on this. Excellent molding!
After that, I decided to build the lower hull. I added the sonar dome, rudders, strakes and screws to the underside. I'm still not sure I'll add this to the model, but at least it will be completed if I do:


Later on, I painted the funnels and then cemented the island down on the deck. I then added most of the detail parts to the deck and island. I left off all the tall, thin antennas and masts that would end up breaking off as I worked on this further. Now this is ready for touch up paint and clearcoat for decals:


That completes the run of progress I've gotten done so far. I hope to finish up at least four of these in the next week, and possibly another few by the end of the year. Here's hoping!
Thanks all for looking in, comments are welcome.
Let's start again with my aircraft.
Some time ago I got some extra decals for my Boeing 737. I then added some decal film to them to help insure they don't break up too much. Finally, I managed to get one side on to repair the damaged ones that were already there:
That has also been clearcoated for protection, and later I'll try the other side. I was surprised at how long that decal took to loosen up!
Moving along, I did the radar dome on the night fighting Hellcat I'm building for Bruce here:
I need to clearcoat those parts and get the decals on this model.
Moving on, I worked on my two helicopters. The Nigerian Hind was first. I assembled the main rotors first:
Then I added the landing gear and gear doors:
This is a test fit to see how it all sits. All I need is a bit of paint touch up; the ordinance and eventually, a canopy:
I also worked on my Australian HAP Tigre; getting the main rotors done and the whole thing clearcoated for decals:
Here it is with the decals on, and the canopy masking off:
Later I noticed that the little beastie wasn't sitting right; she was leaning to one side. So, I turned it over, cut one of the landing gear and added a shim to the strut. That is the white thing you see here:
Finally, this one was almost done. I added the ordinance, the main and tail rotors, and a tail wheel from another kit since this one had gotten lost; and then touched up some of the paint. All that is needed on this is the "eyeball" on top of the cockpit and the gun beneath the nose:
That completes the aircraft, now to bring it down to the ground....
To start with, I base coated the M-992:
I was going to fix the tracks some, but I'm tired of this thing sitting on the bench. I'll be hand painting the camo pattern on this later.
Next I decided to get the tracks on the Russian BREM. I started by adding some links to the drive sprocket and then cementing that on the hull, as indicated by the instructions:
After some more work, I got one run of tracks done:
One more run to do and I'll be ready to close this up and paint it.
Next I primed the Italian Lince:
After that dried, I shot it with a coat of pale OD as a base:
The back roof brace broke off, as I was sure it would, so later on when I'm almost done, I'll make a new one from styrene rod.
Next I went to work on my WWI MACK truck. First I shot the green back on the roof of the cab where I'd filled and sanded the seams:
Next, I was not happy with the looks of the tilt. I started by doing some sanding to remove some seams and then brought out my putty and filled all the seams, sink marks and gouges I'd made before:
Some time later, I got everything as smooth as I wanted:
I then gloss coated the chassis and cab for decals and shot a new Field Drab color on the tilt. It all looks much better now:
Now I just need to decal this, dullcoat it, then assemble the last detail parts and weather it and I'll have another MACK truck.
Since I was dabbling in WWI subjects, I finished painting the pattern on my WWI 8-inch artillery gun:
This just needs some weathering and it'll be done. Finally!
Since I was hand painting camouflage patterns, I decided it was time to finish the armored train engine too. I had started with the green before and now I finally got it all done:
After that, I added the brown:
This one just needs a bit of weathering also and I'll have it finished. Hopefully soon.
Moving on out to my shipyards, we find the Izumo getting some attention. I had masked off the flight deck so it was time to shoot the lighter grey:
It's almost impossible to see in those pics so you'll have to take my word for it. Here's the island after I finished painting it too:
Later the masking came off. I was extremely pleased at how well this looked:
I dry-fit the island to see how it looks:
I was most impressed with how seamless the join was on this. Excellent molding!
After that, I decided to build the lower hull. I added the sonar dome, rudders, strakes and screws to the underside. I'm still not sure I'll add this to the model, but at least it will be completed if I do:
Later on, I painted the funnels and then cemented the island down on the deck. I then added most of the detail parts to the deck and island. I left off all the tall, thin antennas and masts that would end up breaking off as I worked on this further. Now this is ready for touch up paint and clearcoat for decals:
That completes the run of progress I've gotten done so far. I hope to finish up at least four of these in the next week, and possibly another few by the end of the year. Here's hoping!
Thanks all for looking in, comments are welcome.
The Duke
Virtuoso of Miniatures
"Do you know what the chain of command is? It's the chain I get and beat you with 'till you understand who's in ruttin' command!"
-Jayne Cobb, Firefly Episode 2 "The Train Job"
We are modelers - the same in spirit, in hunger to insanely buy newly released kits, hustlers in hiding our stash from our better halves and experts in using garbage as replacements for after-market parts.
Virtuoso of Miniatures
"Do you know what the chain of command is? It's the chain I get and beat you with 'till you understand who's in ruttin' command!"
-Jayne Cobb, Firefly Episode 2 "The Train Job"
We are modelers - the same in spirit, in hunger to insanely buy newly released kits, hustlers in hiding our stash from our better halves and experts in using garbage as replacements for after-market parts.
-
speedgraflex

- Moderator
- Posts: 9748
- Joined: Fri Feb 10, 2017 11:08 pm
- Location: Santa Monica, California
Re: Maddog Manufacturing 2018 Production
Duke! What a journey! I hope you are enjoying the lil’ Hellcat build. Nice work mating the decals on the Boeing. I was really impressed with the train camo. Beautiful work, Duke! I know there was a helo in the mix as well. You added shim! Nice! Happy holidays, Mark!
Bruce / SPEEDGRAFLEX
-
Duke Maddog
- Elite Member
- Posts: 7075
- Joined: Tue Jun 03, 2014 11:22 am
- Location: Rowland Heights, CA
Re: Maddog Manufacturing 2018 Production
Thanks Bruce! I do appreciate you looking in and commenting. Your replies are always a joy to read. Hopefully I'll be able to post some finished models soon.
Thanks again and Merry Christmas Bruce!
Thanks again and Merry Christmas Bruce!
The Duke
Virtuoso of Miniatures
"Do you know what the chain of command is? It's the chain I get and beat you with 'till you understand who's in ruttin' command!"
-Jayne Cobb, Firefly Episode 2 "The Train Job"
We are modelers - the same in spirit, in hunger to insanely buy newly released kits, hustlers in hiding our stash from our better halves and experts in using garbage as replacements for after-market parts.
Virtuoso of Miniatures
"Do you know what the chain of command is? It's the chain I get and beat you with 'till you understand who's in ruttin' command!"
-Jayne Cobb, Firefly Episode 2 "The Train Job"
We are modelers - the same in spirit, in hunger to insanely buy newly released kits, hustlers in hiding our stash from our better halves and experts in using garbage as replacements for after-market parts.

Re: Maddog Manufacturing 2018 Production
I'm just getting caught up - Great work all around Mark. I'm loving that 737 and Hind 
Stuart Templeton 'I may not be good but I'm slow...'
My blog: https://stuartsscalemodels.blogspot.com/
My blog: https://stuartsscalemodels.blogspot.com/
-
Duke Maddog
- Elite Member
- Posts: 7075
- Joined: Tue Jun 03, 2014 11:22 am
- Location: Rowland Heights, CA
Re: Maddog Manufacturing 2018 Production
Thanks Stuart! Those are my two toughest models so far too. LOL!
The Duke
Virtuoso of Miniatures
"Do you know what the chain of command is? It's the chain I get and beat you with 'till you understand who's in ruttin' command!"
-Jayne Cobb, Firefly Episode 2 "The Train Job"
We are modelers - the same in spirit, in hunger to insanely buy newly released kits, hustlers in hiding our stash from our better halves and experts in using garbage as replacements for after-market parts.
Virtuoso of Miniatures
"Do you know what the chain of command is? It's the chain I get and beat you with 'till you understand who's in ruttin' command!"
-Jayne Cobb, Firefly Episode 2 "The Train Job"
We are modelers - the same in spirit, in hunger to insanely buy newly released kits, hustlers in hiding our stash from our better halves and experts in using garbage as replacements for after-market parts.
-
Duke Maddog
- Elite Member
- Posts: 7075
- Joined: Tue Jun 03, 2014 11:22 am
- Location: Rowland Heights, CA
Re: Maddog Manufacturing 2018 Production
Small update for now, just showing the last work I got done in my attempt to finish a few more models for 2018.
First of all, I had gotten the decals on both sides of the 737, and when I tried to fix something, I gripped the fuselage in the wrong place and too hard:

Fortunately, I was able to fix it. The wrinkling however, is permanent; I had no way to avoid that or fix it so, I just have to live with it:

I had so many issues with these decals curling, all attempts to get them to lay flat failed. One side of the fuselage looks like someone's burnt face it is so wrinkled. So, since I couldn't get them to lay perfectly, I just continued on with this, clearcoating it with several more gloss coats, then installing the wings and landing gear and gear doors. "Old Burnt Face" is now completed and can be seen in the Aircraft Forums.
Moving on, I was so close to finishing the Lince armored car that I went ahead and added the wheels and re-built the roof brace:


Despite my best efforts this turned out to be quite a wonky little beast where nothing is aligned. I did manage through some finagling to get all four wheels to touch down. This one can be seen in the finished armor Forums now.
This third one is the M-992. I started the camouflage pattern on it; painting the flat black first as well as painting the tracks:


You can see I hand painted it; I was too fed up with this thing sitting on my bench to deal with Silly Putty. Maybe in the next one.
Later I painted the brown color on this to complete the camouflage pattern:


I then detail painted this and then glosscoated it; added the decals and dullcoated it. This one is now on the completed armor Forums as well.
That closes out my 2018 production line. I may get some work done on other models before the year's end but it would be so minor that I will save it all for my next year's Thread.
Thanks all for looking in, comments are welcome.
First of all, I had gotten the decals on both sides of the 737, and when I tried to fix something, I gripped the fuselage in the wrong place and too hard:
Fortunately, I was able to fix it. The wrinkling however, is permanent; I had no way to avoid that or fix it so, I just have to live with it:
I had so many issues with these decals curling, all attempts to get them to lay flat failed. One side of the fuselage looks like someone's burnt face it is so wrinkled. So, since I couldn't get them to lay perfectly, I just continued on with this, clearcoating it with several more gloss coats, then installing the wings and landing gear and gear doors. "Old Burnt Face" is now completed and can be seen in the Aircraft Forums.
Moving on, I was so close to finishing the Lince armored car that I went ahead and added the wheels and re-built the roof brace:
Despite my best efforts this turned out to be quite a wonky little beast where nothing is aligned. I did manage through some finagling to get all four wheels to touch down. This one can be seen in the finished armor Forums now.
This third one is the M-992. I started the camouflage pattern on it; painting the flat black first as well as painting the tracks:
You can see I hand painted it; I was too fed up with this thing sitting on my bench to deal with Silly Putty. Maybe in the next one.
Later I painted the brown color on this to complete the camouflage pattern:
I then detail painted this and then glosscoated it; added the decals and dullcoated it. This one is now on the completed armor Forums as well.
That closes out my 2018 production line. I may get some work done on other models before the year's end but it would be so minor that I will save it all for my next year's Thread.
Thanks all for looking in, comments are welcome.
The Duke
Virtuoso of Miniatures
"Do you know what the chain of command is? It's the chain I get and beat you with 'till you understand who's in ruttin' command!"
-Jayne Cobb, Firefly Episode 2 "The Train Job"
We are modelers - the same in spirit, in hunger to insanely buy newly released kits, hustlers in hiding our stash from our better halves and experts in using garbage as replacements for after-market parts.
Virtuoso of Miniatures
"Do you know what the chain of command is? It's the chain I get and beat you with 'till you understand who's in ruttin' command!"
-Jayne Cobb, Firefly Episode 2 "The Train Job"
We are modelers - the same in spirit, in hunger to insanely buy newly released kits, hustlers in hiding our stash from our better halves and experts in using garbage as replacements for after-market parts.
-
Medicman71

- Elite Member
- Posts: 9684
- Joined: Mon Apr 07, 2014 9:32 am
- Location: Houston, Tx
Re: Maddog Manufacturing 2018 Production
Nice work Duke! Sucks that those decals wouldn't play nice. I feel your pain. I've had few that went that bad.
Mike
Sponsored by Boeing, Lockheed Martin, Northrop Grumman, Saab, BAE, and Dassault
Sponsored by Boeing, Lockheed Martin, Northrop Grumman, Saab, BAE, and Dassault
-
Duke Maddog
- Elite Member
- Posts: 7075
- Joined: Tue Jun 03, 2014 11:22 am
- Location: Rowland Heights, CA
Re: Maddog Manufacturing 2018 Production
Thanks Medic! Yeah, I've had a lot that have gone bad. It's starting to make me gun shy about decals lately! I refuse to let that happen though. I hope to get a lot more done in the coming year.
I'll be starting another Maddog Manufacturing Thread for 2019 in a few days. Stay tuned.....
I'll be starting another Maddog Manufacturing Thread for 2019 in a few days. Stay tuned.....
The Duke
Virtuoso of Miniatures
"Do you know what the chain of command is? It's the chain I get and beat you with 'till you understand who's in ruttin' command!"
-Jayne Cobb, Firefly Episode 2 "The Train Job"
We are modelers - the same in spirit, in hunger to insanely buy newly released kits, hustlers in hiding our stash from our better halves and experts in using garbage as replacements for after-market parts.
Virtuoso of Miniatures
"Do you know what the chain of command is? It's the chain I get and beat you with 'till you understand who's in ruttin' command!"
-Jayne Cobb, Firefly Episode 2 "The Train Job"
We are modelers - the same in spirit, in hunger to insanely buy newly released kits, hustlers in hiding our stash from our better halves and experts in using garbage as replacements for after-market parts.