
Very nice build so far!
- Kari
Here Kitty Kitty - Meng Panther A
Re: Here Kitty Kitty - Meng Panther A
---
On the bench:
Tamiya F-4B Phantom II 1/48
Kinetic F-16A (new tool) 1/48
https://www.facebook.com/GrundAsk-Scale ... 721218708/
On the bench:
Tamiya F-4B Phantom II 1/48
Kinetic F-16A (new tool) 1/48
https://www.facebook.com/GrundAsk-Scale ... 721218708/
-
Thomas_M

- Admin
- Posts: 4411
- Joined: Fri Dec 13, 2013 9:43 am
- Location: Bad Wurzach - Germany
- Contact:
Re: Here Kitty Kitty - Meng Panther A
Torben, so great job on the Zimmerit! But, a shame that those decals won´t hold! Now I am curious how they will look under a coat of primer!

Re: Here Kitty Kitty - Meng Panther A
Thank you very much, Kari and Thomas!
After I've found and studied the pictures of the real thing there were some discrepancies that bothered me.
Meng told me to use the wrong exhaust system (three outlets on the left side), so this has to be changed. Then there is that jerrycan rack, a field modification that I had to make from scratch. And finally, the position of the jack had to be changed from vertical to horizontal. Consequently the support on the upper exhaust fastener had to be removed and the resulting gap in the Zim was closed.

Okay, but now we're ready for primer stage.

After I've found and studied the pictures of the real thing there were some discrepancies that bothered me.
Meng told me to use the wrong exhaust system (three outlets on the left side), so this has to be changed. Then there is that jerrycan rack, a field modification that I had to make from scratch. And finally, the position of the jack had to be changed from vertical to horizontal. Consequently the support on the upper exhaust fastener had to be removed and the resulting gap in the Zim was closed.
Okay, but now we're ready for primer stage.
-
Stikpusher

- Moderator
- Posts: 19020
- Joined: Sat Apr 05, 2014 8:37 pm
- Location: Ceti Alpha 5
Re: Here Kitty Kitty - Meng Panther A
The left side exhaust with two auxiliary pipes was more common on the ausf.A. Meng is just following the law of probabilities.
"Surely I have made my meaning plain? I intend to avenge myself upon you, Admiral. I have deprived your ship of power, and when I swing 'round, I intend to deprive you of your life."
FLSM
FLSM
Re: Here Kitty Kitty - Meng Panther A
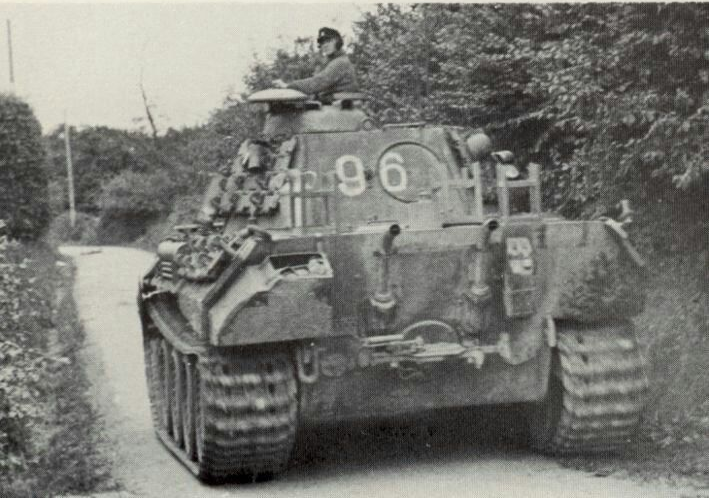
You're absolutely right, Stik. But it cost me just a minute for typin' in "Panther 96" and to get a couple of pictures of this particular vehicle where the exhausts are shown in all their glory. Sometimes I wonder how much time those guys spent in research... 
For further knowledge I ordered Osprey's well written and reasonably priced "Panther Medium Tank 1942-45" and found out some more interesting facts about my kitty cat. Due to the fact that it still sports the old fashioned exhausts pipes but at the same time's fittet with the Kugelblende 50 ball-mounted front MG and the monocular TFZ 12a sight in the turret mantlet means, that it was built either in December 43 or January 44. The 3rd Regiment of 2nd Panzerdivision received 32 Panther A on January 27-28, 1944.
Primer stage is done. Though the layer of Tamiya's grey primer is quite thin, the structure of Meng's Zim lacks a bit of depth. I think the approach of HobbyBoss/Trumpeter with their die-cut styrene sheets looks more promising for a sharper result. Anyway, I can live with how it came out. Two B/W-shots just for the looks and the better contrast:
-
Stikpusher
- Moderator
- Posts: 19020
- Joined: Sat Apr 05, 2014 8:37 pm
- Location: Ceti Alpha 5
Re: Here Kitty Kitty - Meng Panther A
Your Panther is looking great! This kit looks awesome, no matter what shortcomings or slack research on markings vs production batch it has.
"Surely I have made my meaning plain? I intend to avenge myself upon you, Admiral. I have deprived your ship of power, and when I swing 'round, I intend to deprive you of your life."
FLSM
FLSM

Re: Here Kitty Kitty - Meng Panther A
Your Panther is looking great - the level of detail is !ovely. The decals are an interesting way of doing the zimmerit.
Having just got my first 1/35 Armour kit I've been looking at people's differing methods of building them. Was there a reason for leaving the road wheels off - was it this particular kit or just the way you work?
Having just got my first 1/35 Armour kit I've been looking at people's differing methods of building them. Was there a reason for leaving the road wheels off - was it this particular kit or just the way you work?
Stuart Templeton 'I may not be good but I'm slow...'
My blog: https://stuartsscalemodels.blogspot.com/
My blog: https://stuartsscalemodels.blogspot.com/
Re: Here Kitty Kitty - Meng Panther A
Thank you two, glad you like it!
Stuart,
when a kit provides you with movable tracks you have the option to leave the wheels off until the final weathering stage.
Then you glue all the wheels with the exception of the sprocket-wheel. With its help you can easily pull the track over all wheels and close it. You now only have to apply a bit further bit of weathering to blend it all together.
Re: Here Kitty Kitty - Meng Panther A
Thanks - that does indeed make sense. 
Stuart Templeton 'I may not be good but I'm slow...'
My blog: https://stuartsscalemodels.blogspot.com/
My blog: https://stuartsscalemodels.blogspot.com/
-
Duke Maddog

- Elite Member
- Posts: 7115
- Joined: Tue Jun 03, 2014 11:22 am
- Location: Rowland Heights, CA
Re: Here Kitty Kitty - Meng Panther A
Brilliant work Mostrich! That primer does look good.
The Duke
Virtuoso of Miniatures
"Do you know what the chain of command is? It's the chain I get and beat you with 'till you understand who's in ruttin' command!"
-Jayne Cobb, Firefly Episode 2 "The Train Job"
We are modelers - the same in spirit, in hunger to insanely buy newly released kits, hustlers in hiding our stash from our better halves and experts in using garbage as replacements for after-market parts.