Maddog Manufacturing 2018 Production
-
BlackSheep214

- Elite Member
- Posts: 10442
- Joined: Sun Apr 06, 2014 8:47 pm
Re: Maddog Manufacturing 2018 Production
Heh... you've been a little busy beaver there Duke!! 
“Who controls the skies, controls the fate of this Earth”
Author unknown- 352nd Fighter Group, Blue-Nosed Bastards of Bodney
“Send one plane it’s a sortie; send two planes it’s a flight; send four planes it’s a test of airpower. - Richard Kohn
Author unknown- 352nd Fighter Group, Blue-Nosed Bastards of Bodney
“Send one plane it’s a sortie; send two planes it’s a flight; send four planes it’s a test of airpower. - Richard Kohn

Re: Maddog Manufacturing 2018 Production
Looks of good progress and some great finishes Duke - I love that MAN truck. I see them all the time over here.
Stuart Templeton 'I may not be good but I'm slow...'
My blog: https://stuartsscalemodels.blogspot.com/
My blog: https://stuartsscalemodels.blogspot.com/
-
Duke Maddog

- Elite Member
- Posts: 7099
- Joined: Tue Jun 03, 2014 11:22 am
- Location: Rowland Heights, CA
Re: Maddog Manufacturing 2018 Production
BlackSheep214 wrote:Heh... you've been a little busy beaver there Duke!!
Just a little my friend!
Thanks Stuart! I'm glad you like them. It must be fun watching a convoy of those MANs drive by.
The Duke
Virtuoso of Miniatures
"Do you know what the chain of command is? It's the chain I get and beat you with 'till you understand who's in ruttin' command!"
-Jayne Cobb, Firefly Episode 2 "The Train Job"
We are modelers - the same in spirit, in hunger to insanely buy newly released kits, hustlers in hiding our stash from our better halves and experts in using garbage as replacements for after-market parts.
Re: Maddog Manufacturing 2018 Production
Yeah they're pretty cool. i live near a main supply depot so I see them quite often. when I worked for Lockheed we had a project on for a battlefield control centre - we had loads of these things on site. Great Trucks.
Stuart Templeton 'I may not be good but I'm slow...'
My blog: https://stuartsscalemodels.blogspot.com/
My blog: https://stuartsscalemodels.blogspot.com/
-
Duke Maddog
- Elite Member
- Posts: 7099
- Joined: Tue Jun 03, 2014 11:22 am
- Location: Rowland Heights, CA
Re: Maddog Manufacturing 2018 Production
Okay, all this past week and a half, I've been dealing with the extreme pain of a pinched nerve in my back between my shoulder blades. It has all but incapacitated me; making my left arm numb and making it uncomfortable for me to sit; lying down is painful, and driving extremely dangerous due to not being able to turn my head to the left. Not to mention the heavy doses of pain meds I'm taking just to get through a day. I have been seeing a Dr. and chiropractor to get this fixed and it's helping a little, but I really messed myself up! That being said, amazingly enough I am able to work on models without too much discomfort; in fact the combination of meds and modeling almost lets me forget I have this pain... till I try to turn my head again. So I've been spending a lot of time on the bench when I'm not sleeping or watching movies. Here is the result of this past week's work. Let's go to my Hobby Room.
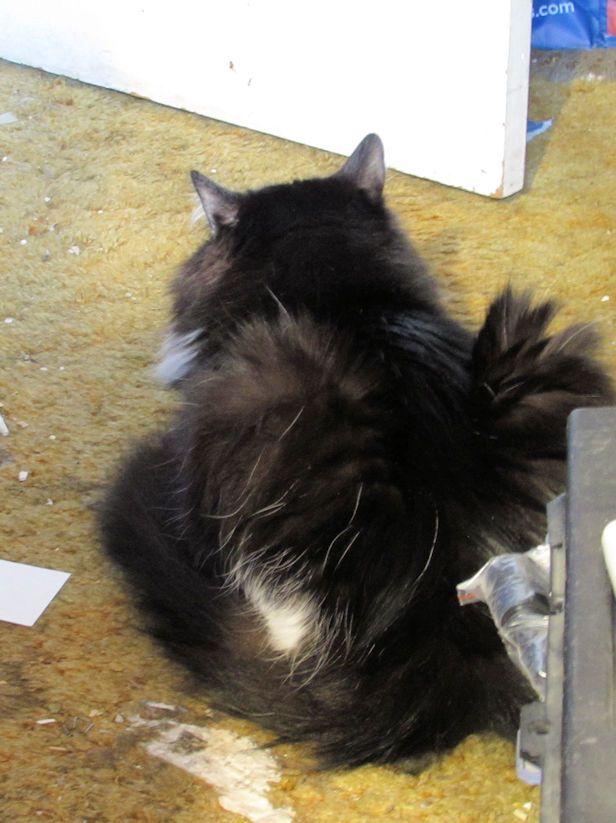
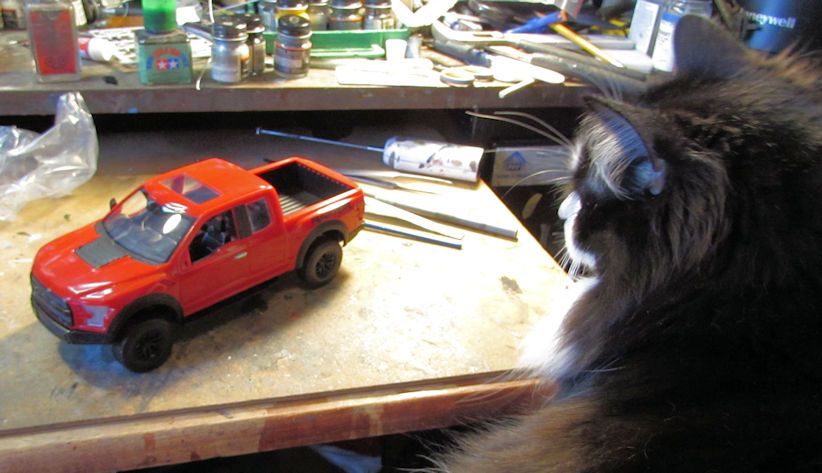
Sylvester was standing guard as I worked all this week:
To start with, I wanted something fast, easy and uncomplicated to get myself back into this since this pain started. That's when I noticed this truck from my Mystery Box haul:
It is the Revell snap together truck we used to get for the Make-n-Takes at the Fullerton Airport. The first thing I did when I pulled everything out of the bag was to paint the console LED screen and then dry-brush the rest of the console to bring out the detail:
Five minutes of blissful building later, I had this:
You can see I even did a black wash in certain areas where the detail was recessed enough, and I lightly dry-brushed the front of the grill in chrome to bring out the grid pattern. Sylvester took a break from guarding the door to check out my work. He also approves:
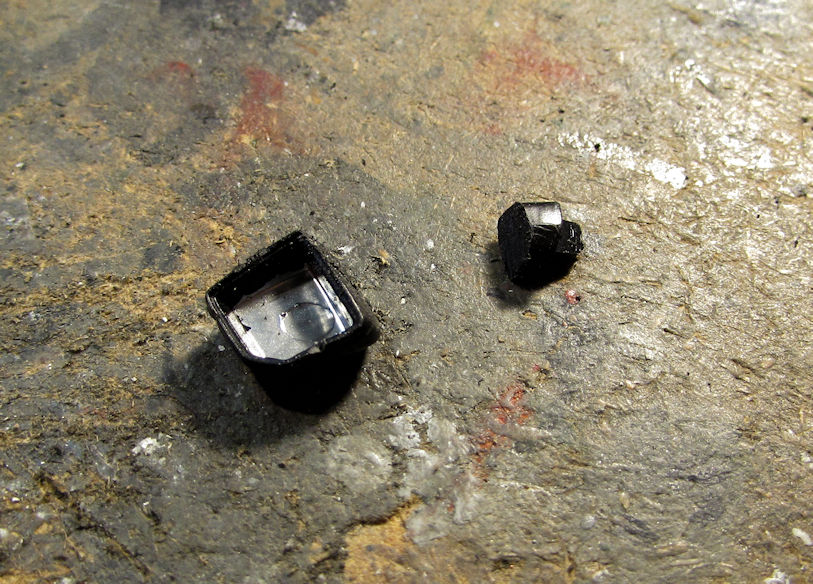
No I didn't paint the body first. I did polish it afterward though. You'll notice that there is no left hand rear view mirror. That's because this kit only came with two right side mirrors. What do do....
I took and cut off the post on one of the right side mirrors and re-shaped it slightly to fit on the left side:
After gluing it back together, put it on. It isn't an exact match to the right side, but it does pass muster for me:
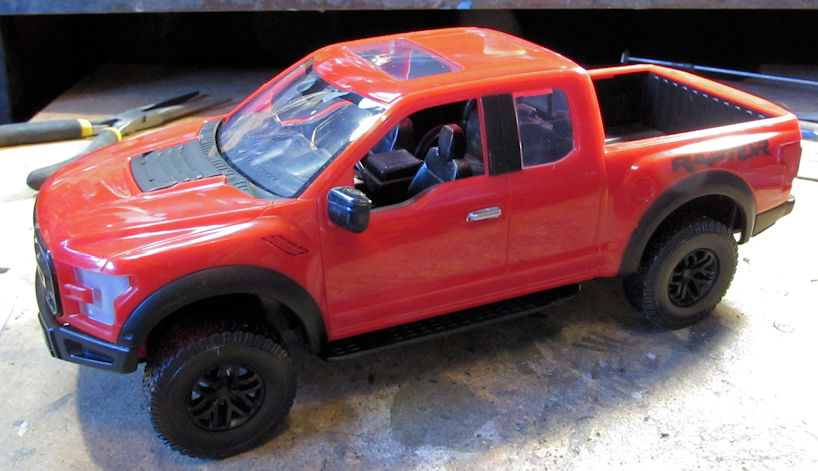
I debated chroming the "Ford" logo on the front grill and back tailgate. I might still do that.
Now that I got all warmed up, it was time for some serious modeling....
Even though I was starting to get more serious, I still wanted something simple and easy. So, I pulled out this Italeri Train station I'd gotten some time back and got it all basically assembled:
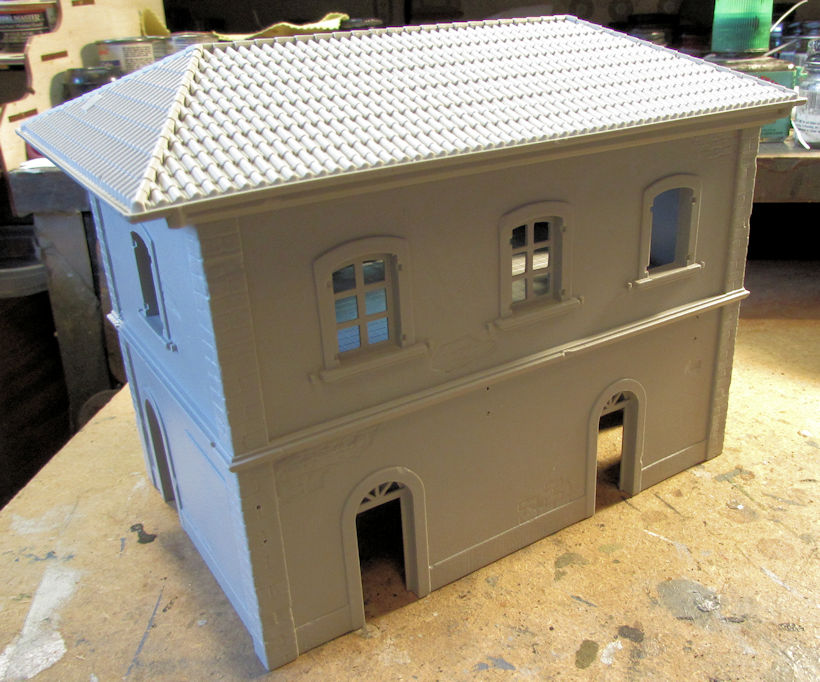
There's still a lot of detail parts to add to this but the basic structure is done. This kit even comes with clear plastic for the windows.
Now it was time to move forward on some models that had been sitting for awhile. As I was re-arranging things from my marathon finishing session, I found this ancient MPC Mi-24 Hind I started some years back. I was going to make it Nigerian. So, I pulled it out and added all the extra detail parts to this that I could so it would be ready for paint:
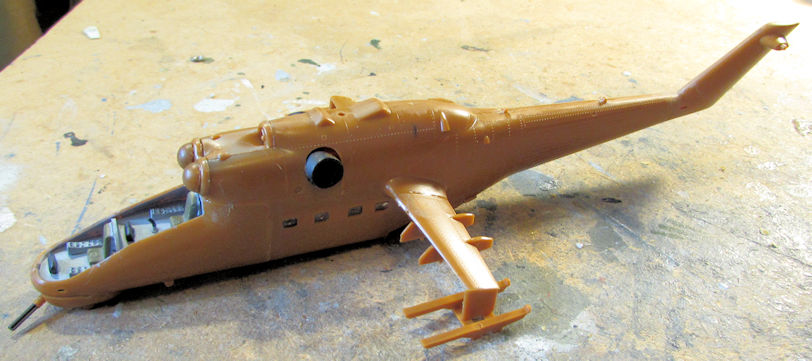
The canopy got messed up from some paint and other substance spilling on it so I need to find another Hind model to nick a canopy from. Until then, I might just mask the open cockpit and still paint his anyway.
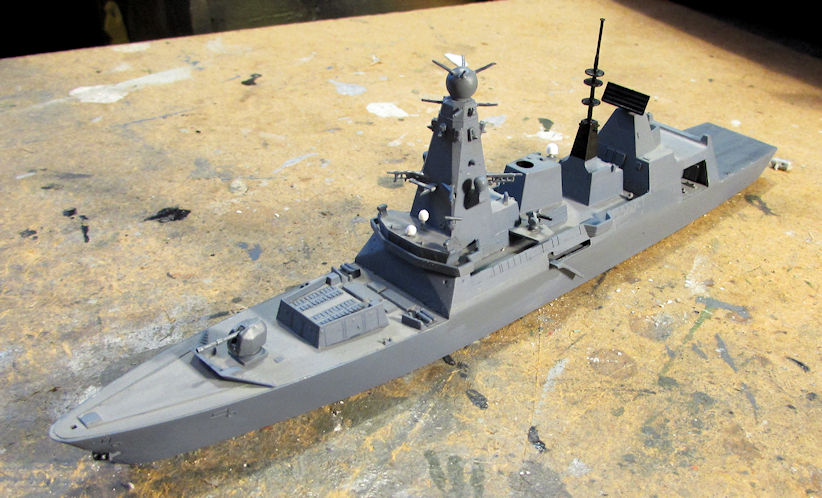
Moving along, I also worked on a British Type 42 destroyer that had been sitting for far too long. I finally added all the extra bits and bobs that I could:
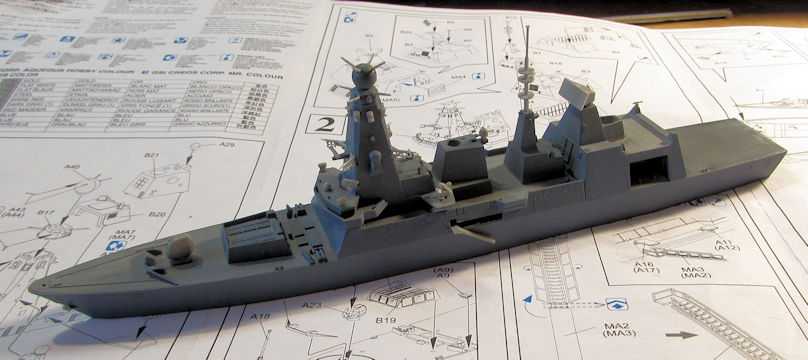
After all that, I noticed that the main superstructure; when glued on, had a noticeable overhang on one side, and a slight one on the other side. I very carefully sanded this down smooth and added some acrylic putty to the seam:

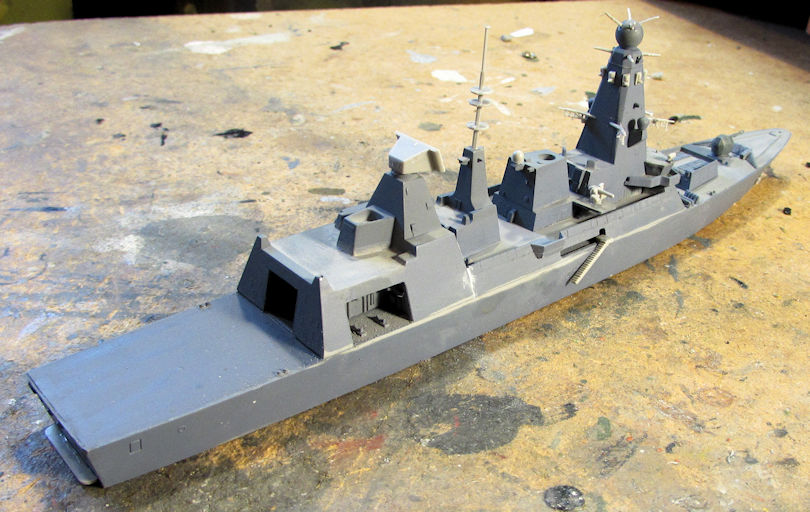
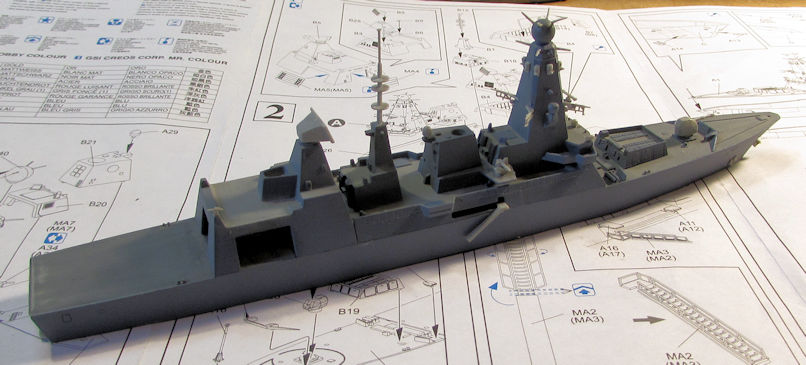
Some time later after I got all the detail painting and touch ups done, this is ready for clearcoat and decals:
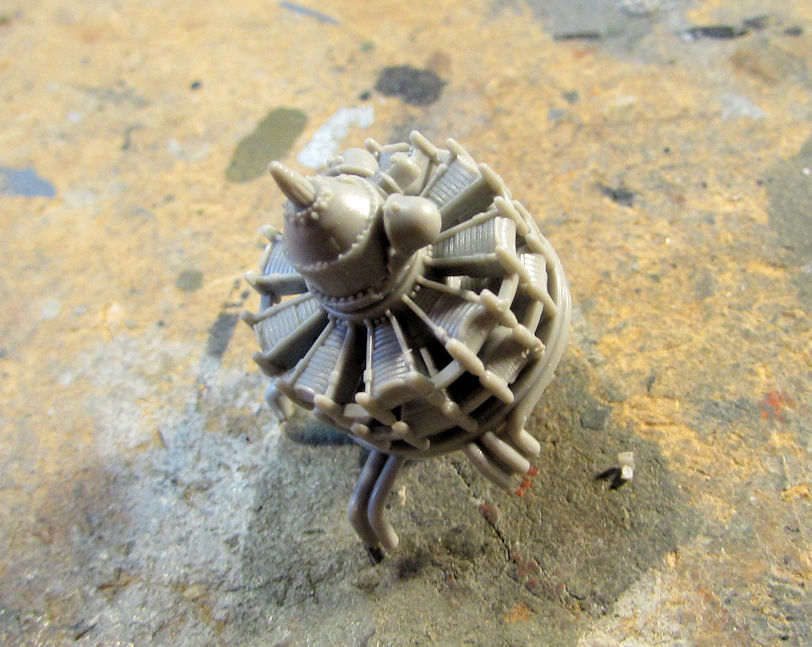
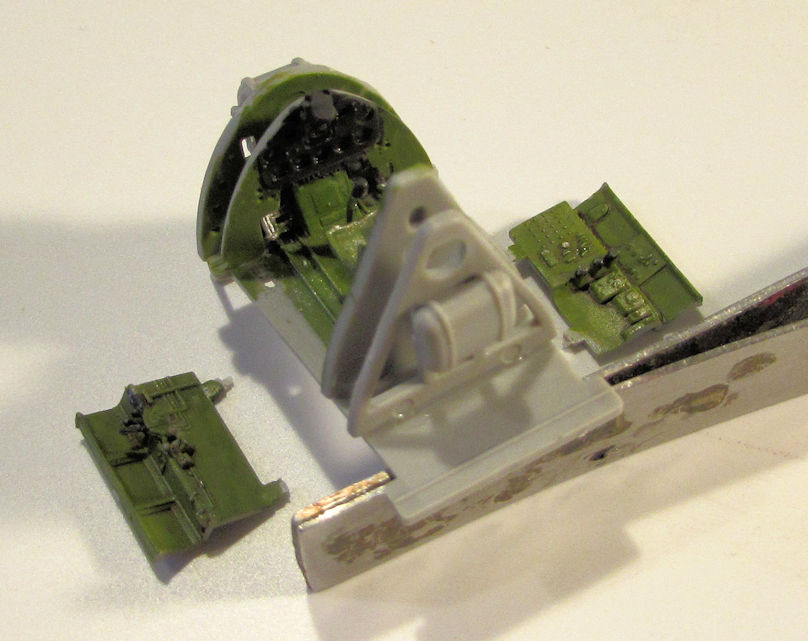
This next model is a commission build for Bruce here on these Forums. As you recall, he sent me a Cyber Hobby 1/72 scale F-6 Hellcat and wants me to build this with the wings folded. I started with the cockpit first, naturally:
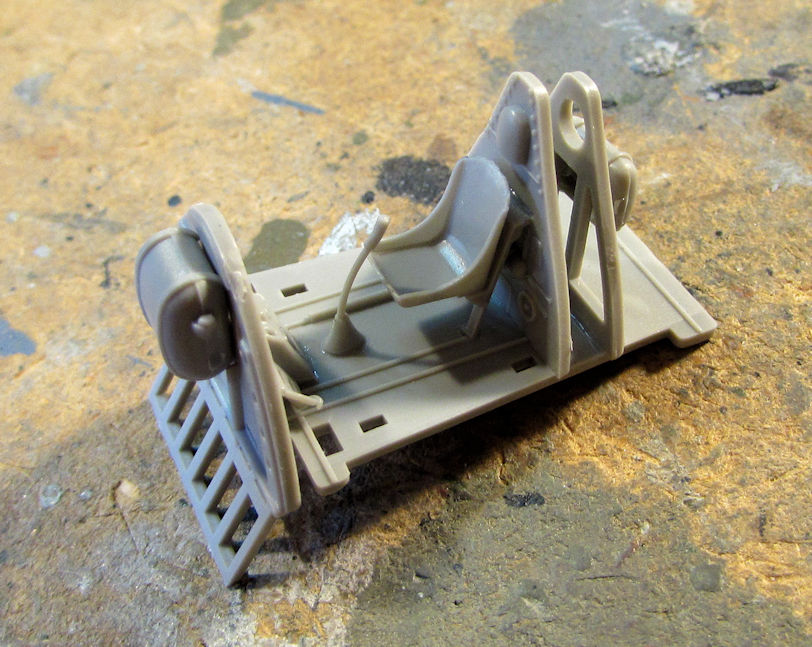
There are still some side walls to add to this but only after painting. Next I assembled the engine and mount. There is quiet a bit of detail in here:
Finally, since he wants this to be the night fighter version; I assembled the three parts for the radar dome:
Bruce, I also set up a dedicated Thread just for your Hellcat build. That way you can see it happening without all this extraneous activity. You can find it here:
http://www.spamodeler.com/forum/viewtop ... =20&t=3575
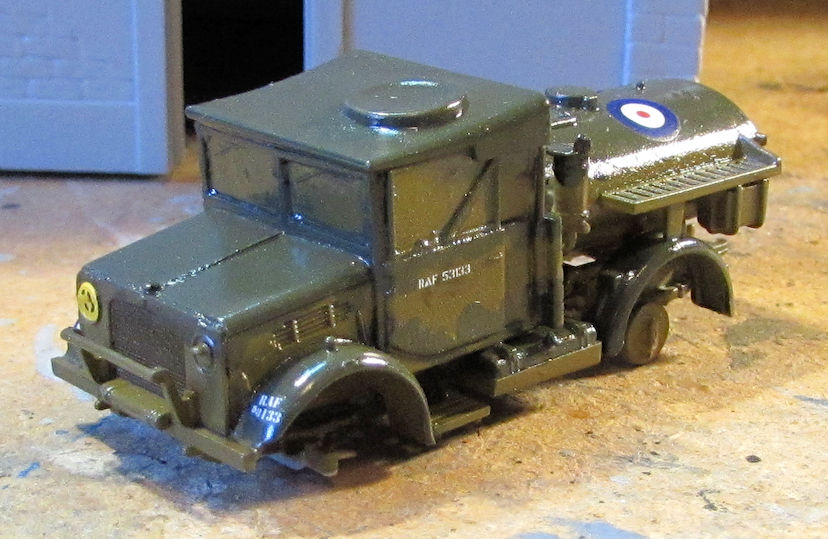
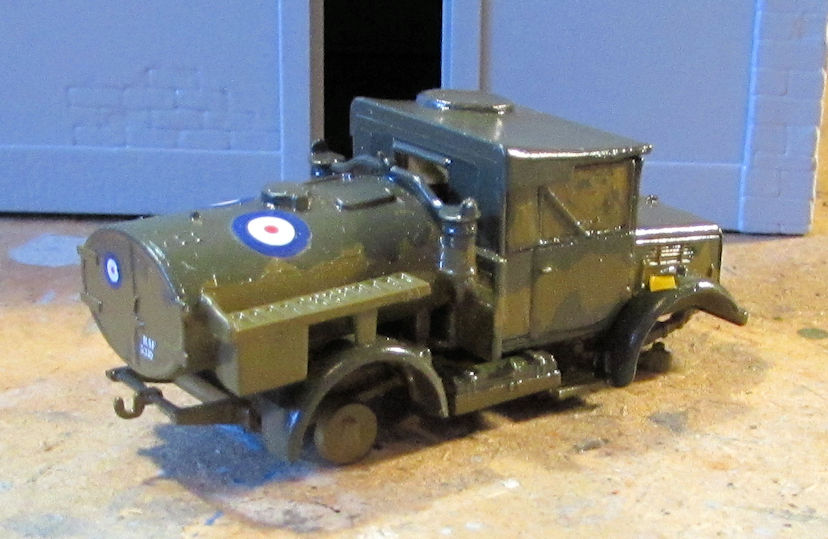
Moving along from here to my armor, I got a considerable amount of progress done. In the vein of trying to move existing projects along, I added the decals to the RAF Vehicle set. First the Tilly:


Then the Bedford Tanker:
Next I added the decals to the Churchill bridgelayer:
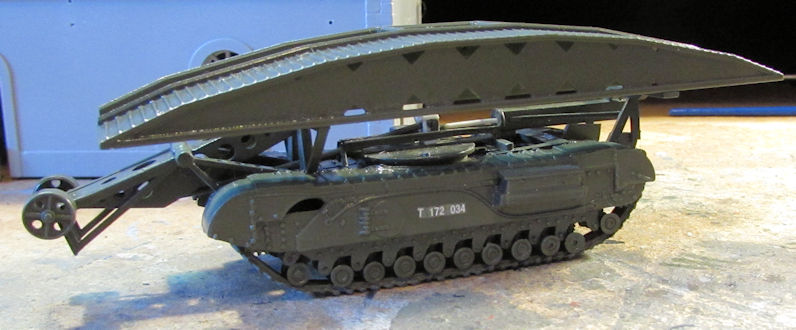
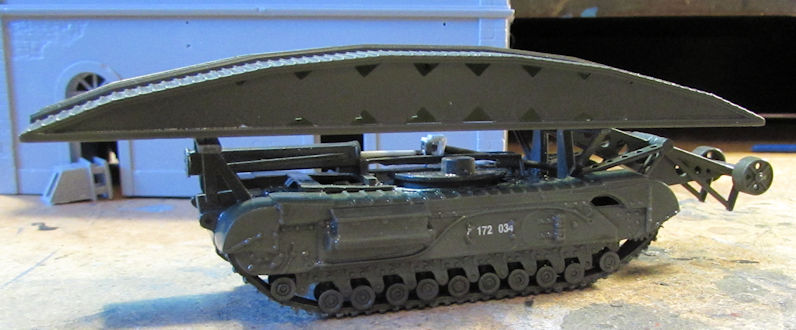
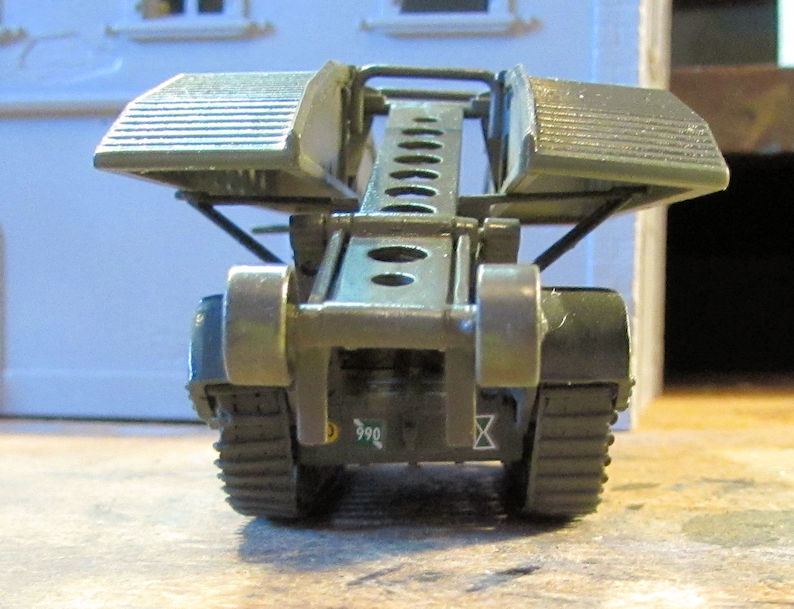
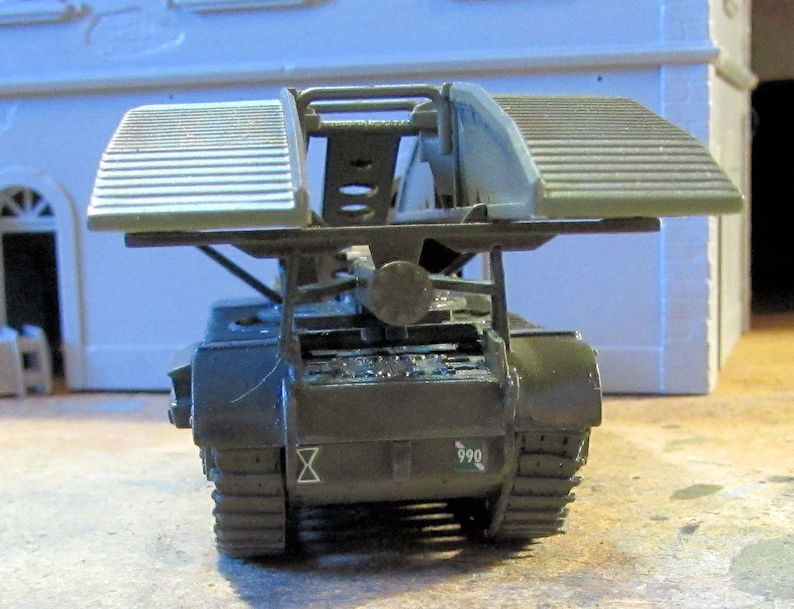
Later, after I dullcoated this, I pulled the bride portion off and started to weather it. I used Tamiya weathering powders of mud, sand and light sand to spread across the top of the bridge with a wet brush. I got this result:
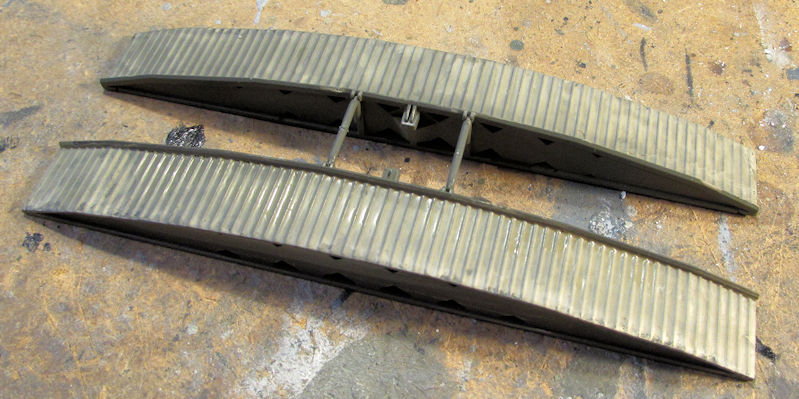
It's still a bit wet. Once it dries, I'll be wiping off a lot of that to represent dirt removed from vehicles passing over it. Then I'll dry brush this with steel afterward.
Now for the armor models I started.
This is the Soviet SG-122 I got in Phoenix. I figured it was a simple enough kit to build. I forgot it was Military Wheels! It was a bit of a challenge to say the least. I started with the assembly of the lower hull. Good start:
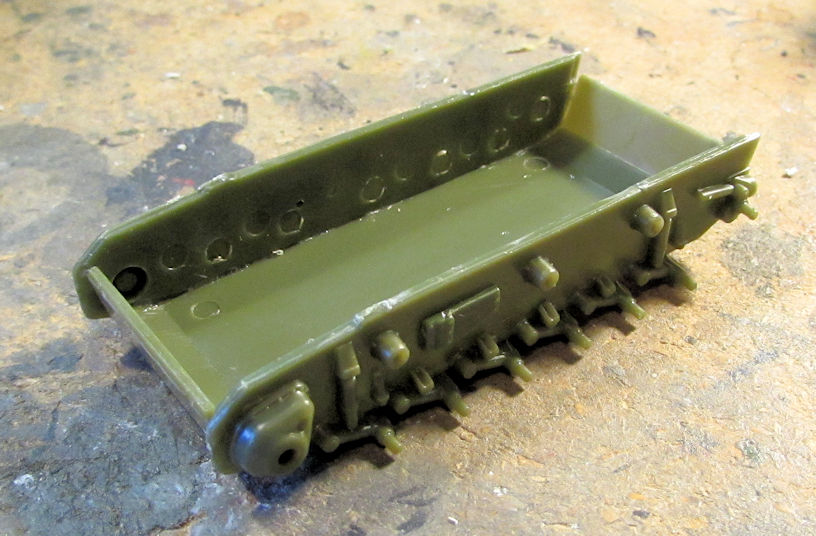
Then I added the upper hull and rear engine grills to this:

Still not too bad, despite poor instructions and very vague attachment indicators.
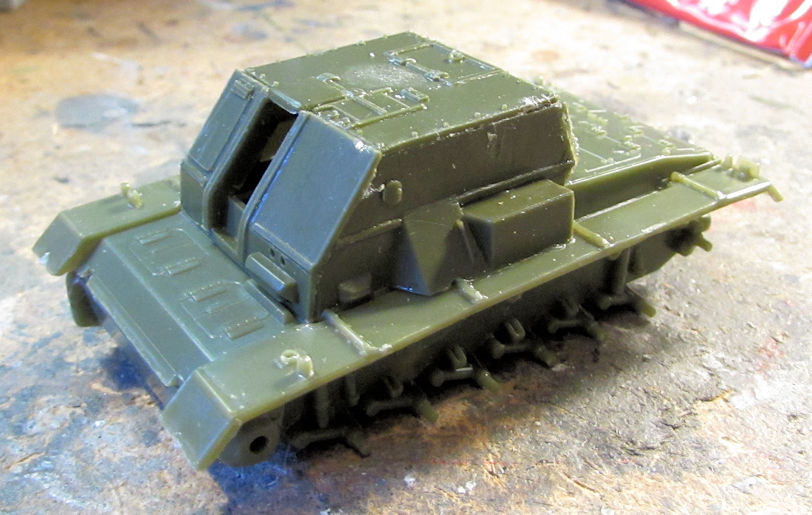
then I tried the upper casemate. That's when it got rough with me. After awhile, I beat this into submission:
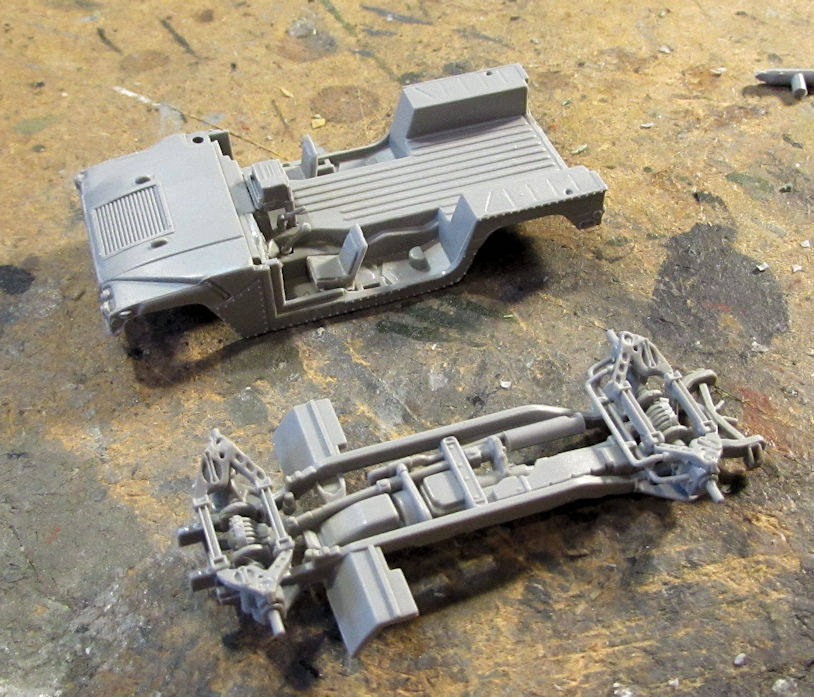
Moving along, I decided I needed another easy model to work on. So why not two? I pulled out the Dragon Humvee twin set with the cargo truck and the steel-plated gun truck. I started on the upper interior first, then moved on to the chassis:
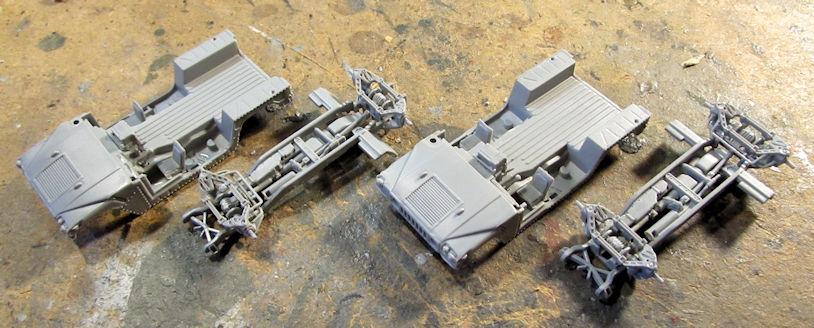
Once they were done, I assembled the second one. Here they are together:
The next assemblies is where the similarities on these diverge and so require different assembly steps.
Finally, I decided to build my Roden WWI gun, thinking it would be fairly simple. After all, it is only a gun right? But it's a Roden gun so it gave me a fight.
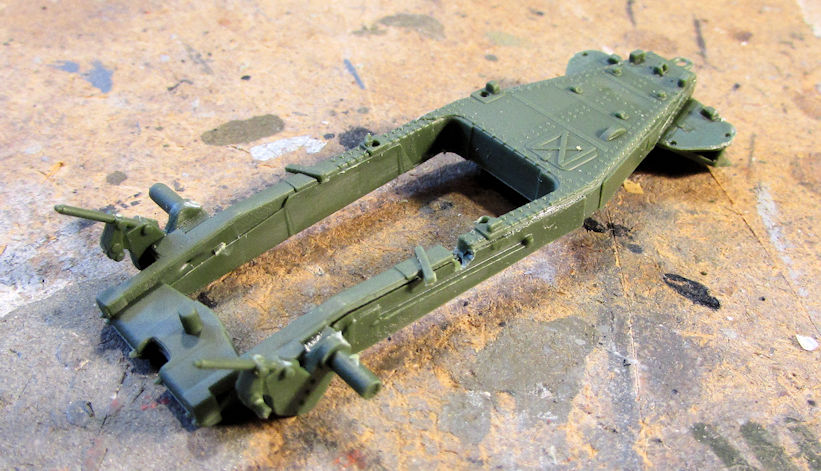
I started with the main carriage, getting most of the basic pieces on:
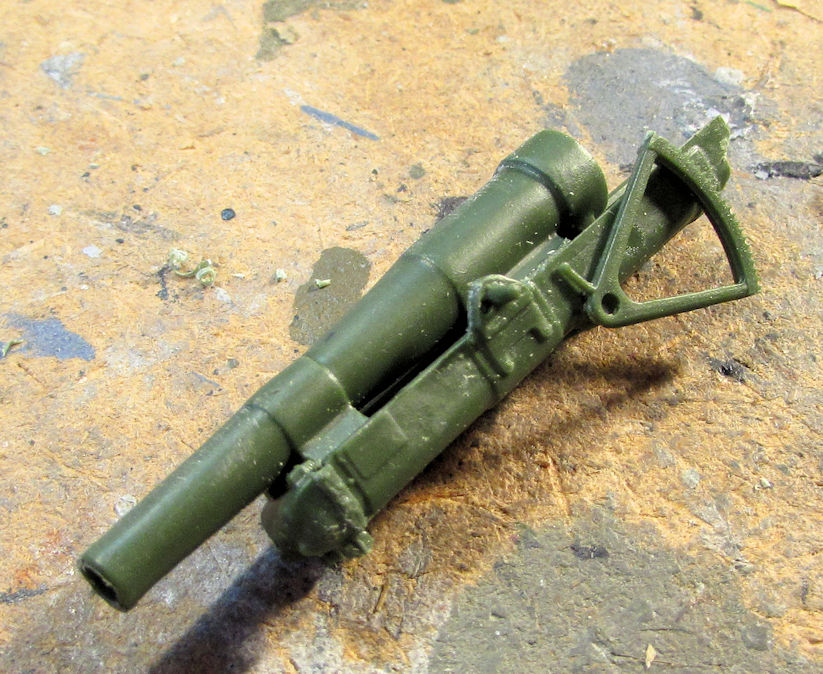
I then moved on and built the barrel:
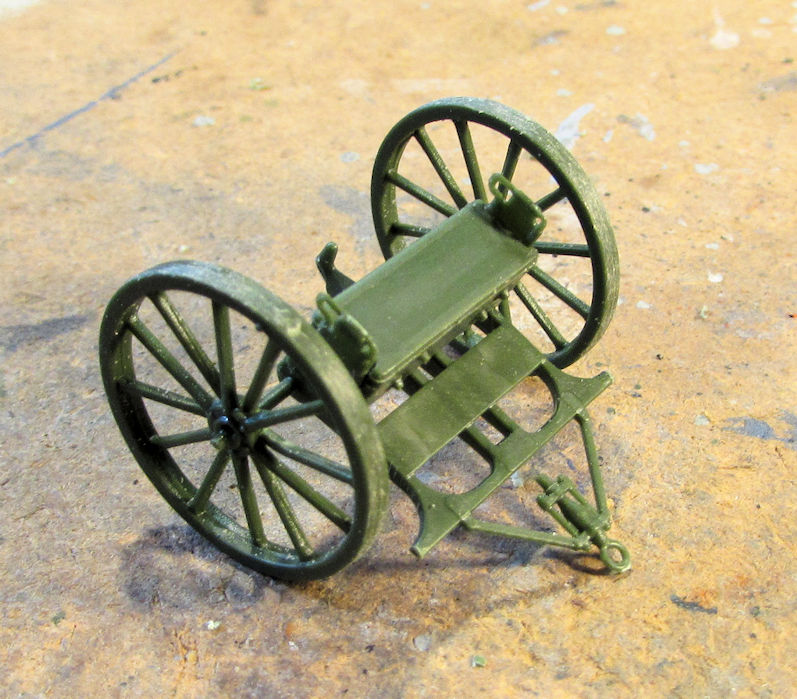
While that was drying, I assembled the gun trailer. I forget what it's called... it'll come to me:
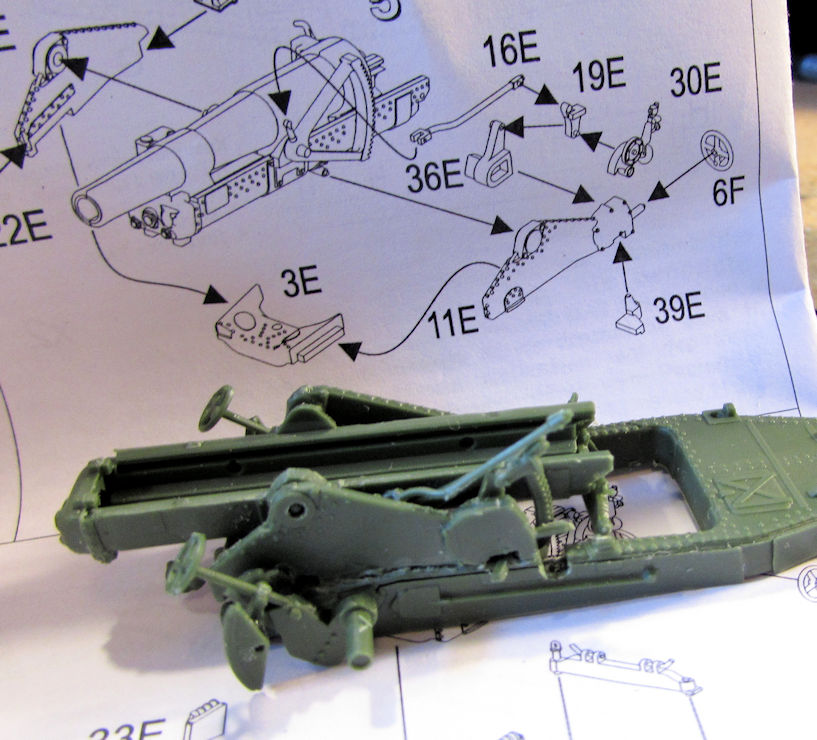
I then went back and added the gun trunnions and recoil track to the main carriage:
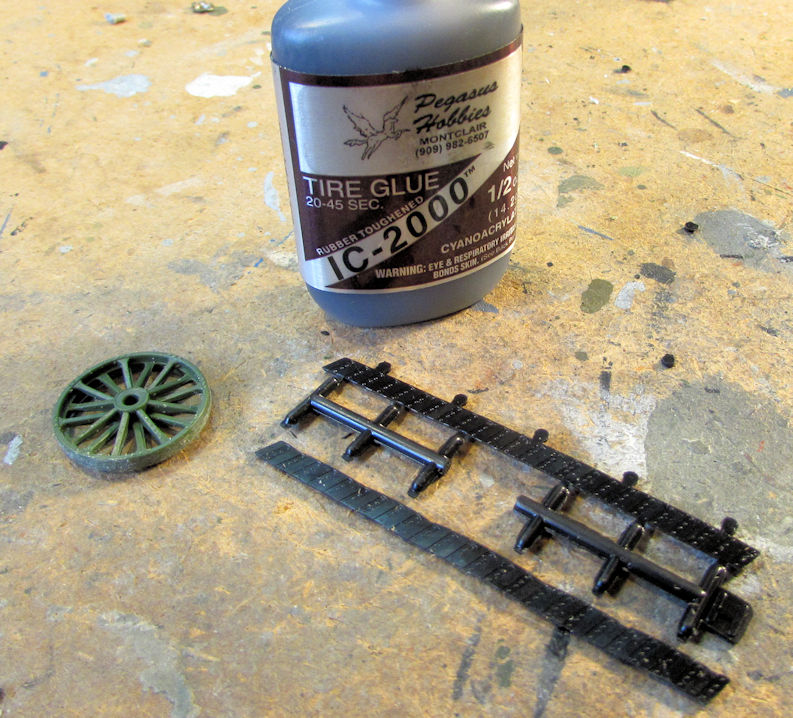
After that, I went to go look at the wheels. Oh joy! This kit gives one some vinyl tread plate for the main gun wheels! It's a Roden kit:

So, I pulled out my trusty Tire Glue to add this track to the wheels:
The best way to do this was to glue half of it to the wheels, then wrap it around the rest of the way when the first half was dry:
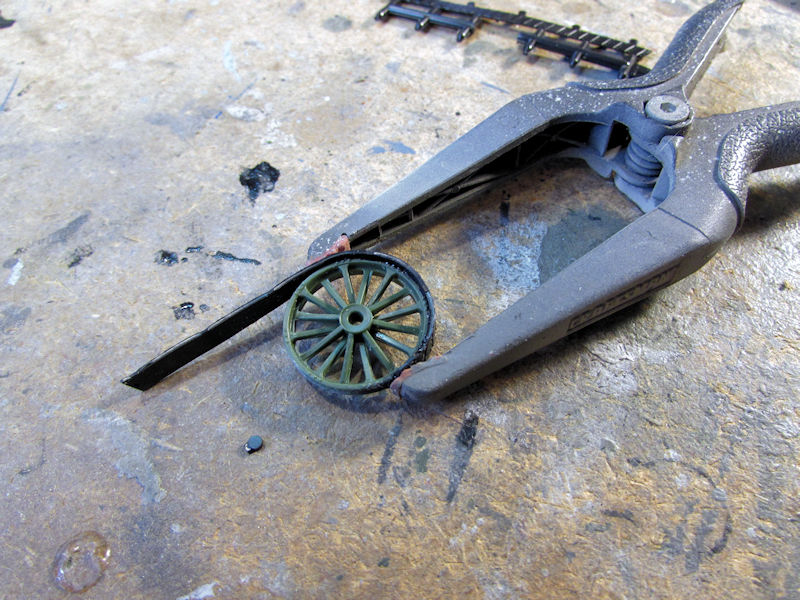
Man, what a pain! While they were drying, I tried to add more detail parts to the main gun carriage and trunnions. Notice the ling thin piece number 16E and where it is supposed to go. Now notice the piece 16E I added to the gun. Notice how it is far to long:
It's a Roden kit.
Piece 16E did not make it onto this model.
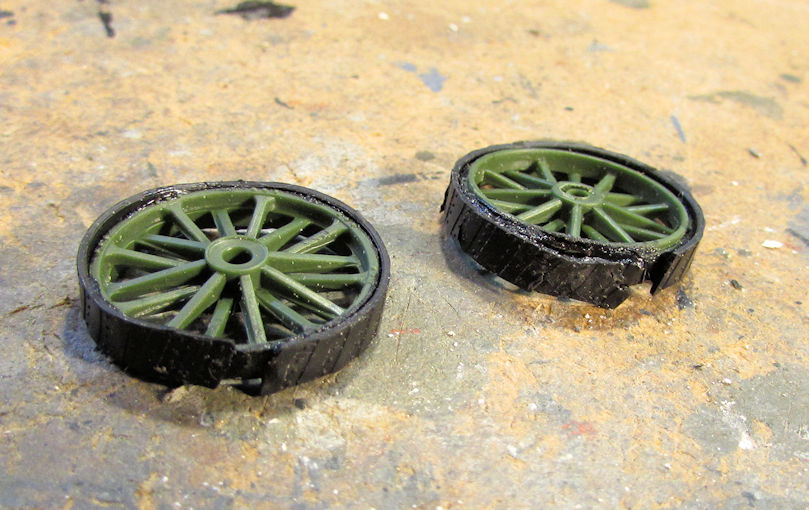
Getting back to the wheels, you'll notice that the vinyl parts do not stretch all the way around. They stop just short:
It's a Roden kit.
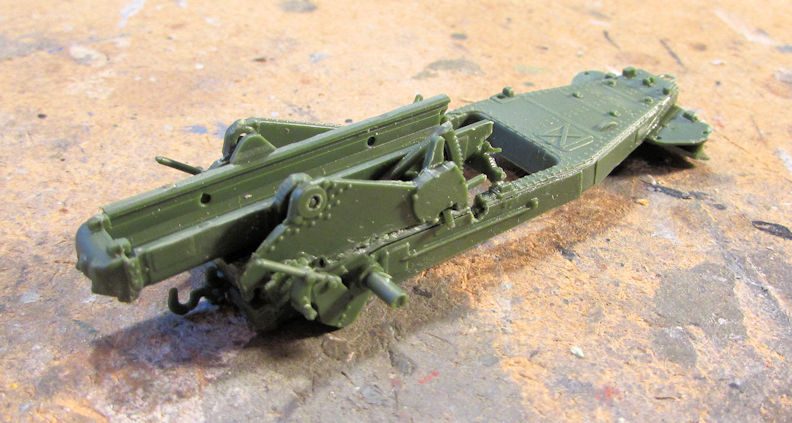
I'll figure something out later about what to do with that. Meanwhile, I added the wheels to this to see how it looks so far:

Not bad, despite the ill-fitting parts and the crappy vinyl parts. Here it is with it hooked up to the trailer:
This beastie will be hand painted... too many easily broken details all over this to mask and spray.
And for fun, I hooked that up to the FWD 3-ton ammunition carrier that would normally have pulled this in the war:

Well that completes my update for this week. Thanks all for looking in. Comments are welcome.
Sylvester was standing guard as I worked all this week:
To start with, I wanted something fast, easy and uncomplicated to get myself back into this since this pain started. That's when I noticed this truck from my Mystery Box haul:
It is the Revell snap together truck we used to get for the Make-n-Takes at the Fullerton Airport. The first thing I did when I pulled everything out of the bag was to paint the console LED screen and then dry-brush the rest of the console to bring out the detail:
Five minutes of blissful building later, I had this:
You can see I even did a black wash in certain areas where the detail was recessed enough, and I lightly dry-brushed the front of the grill in chrome to bring out the grid pattern. Sylvester took a break from guarding the door to check out my work. He also approves:
No I didn't paint the body first. I did polish it afterward though. You'll notice that there is no left hand rear view mirror. That's because this kit only came with two right side mirrors. What do do....
I took and cut off the post on one of the right side mirrors and re-shaped it slightly to fit on the left side:
After gluing it back together, put it on. It isn't an exact match to the right side, but it does pass muster for me:
I debated chroming the "Ford" logo on the front grill and back tailgate. I might still do that.
Now that I got all warmed up, it was time for some serious modeling....
Even though I was starting to get more serious, I still wanted something simple and easy. So, I pulled out this Italeri Train station I'd gotten some time back and got it all basically assembled:
There's still a lot of detail parts to add to this but the basic structure is done. This kit even comes with clear plastic for the windows.
Now it was time to move forward on some models that had been sitting for awhile. As I was re-arranging things from my marathon finishing session, I found this ancient MPC Mi-24 Hind I started some years back. I was going to make it Nigerian. So, I pulled it out and added all the extra detail parts to this that I could so it would be ready for paint:
The canopy got messed up from some paint and other substance spilling on it so I need to find another Hind model to nick a canopy from. Until then, I might just mask the open cockpit and still paint his anyway.
Moving along, I also worked on a British Type 42 destroyer that had been sitting for far too long. I finally added all the extra bits and bobs that I could:
After all that, I noticed that the main superstructure; when glued on, had a noticeable overhang on one side, and a slight one on the other side. I very carefully sanded this down smooth and added some acrylic putty to the seam:
Some time later after I got all the detail painting and touch ups done, this is ready for clearcoat and decals:
This next model is a commission build for Bruce here on these Forums. As you recall, he sent me a Cyber Hobby 1/72 scale F-6 Hellcat and wants me to build this with the wings folded. I started with the cockpit first, naturally:
There are still some side walls to add to this but only after painting. Next I assembled the engine and mount. There is quiet a bit of detail in here:
Finally, since he wants this to be the night fighter version; I assembled the three parts for the radar dome:
Bruce, I also set up a dedicated Thread just for your Hellcat build. That way you can see it happening without all this extraneous activity. You can find it here:
http://www.spamodeler.com/forum/viewtop ... =20&t=3575
Moving along from here to my armor, I got a considerable amount of progress done. In the vein of trying to move existing projects along, I added the decals to the RAF Vehicle set. First the Tilly:
Then the Bedford Tanker:
Next I added the decals to the Churchill bridgelayer:
Later, after I dullcoated this, I pulled the bride portion off and started to weather it. I used Tamiya weathering powders of mud, sand and light sand to spread across the top of the bridge with a wet brush. I got this result:
It's still a bit wet. Once it dries, I'll be wiping off a lot of that to represent dirt removed from vehicles passing over it. Then I'll dry brush this with steel afterward.
Now for the armor models I started.
This is the Soviet SG-122 I got in Phoenix. I figured it was a simple enough kit to build. I forgot it was Military Wheels! It was a bit of a challenge to say the least. I started with the assembly of the lower hull. Good start:
Then I added the upper hull and rear engine grills to this:
Still not too bad, despite poor instructions and very vague attachment indicators.
then I tried the upper casemate. That's when it got rough with me. After awhile, I beat this into submission:
Moving along, I decided I needed another easy model to work on. So why not two? I pulled out the Dragon Humvee twin set with the cargo truck and the steel-plated gun truck. I started on the upper interior first, then moved on to the chassis:
Once they were done, I assembled the second one. Here they are together:
The next assemblies is where the similarities on these diverge and so require different assembly steps.
Finally, I decided to build my Roden WWI gun, thinking it would be fairly simple. After all, it is only a gun right? But it's a Roden gun so it gave me a fight.
I started with the main carriage, getting most of the basic pieces on:
I then moved on and built the barrel:
While that was drying, I assembled the gun trailer. I forget what it's called... it'll come to me:
I then went back and added the gun trunnions and recoil track to the main carriage:
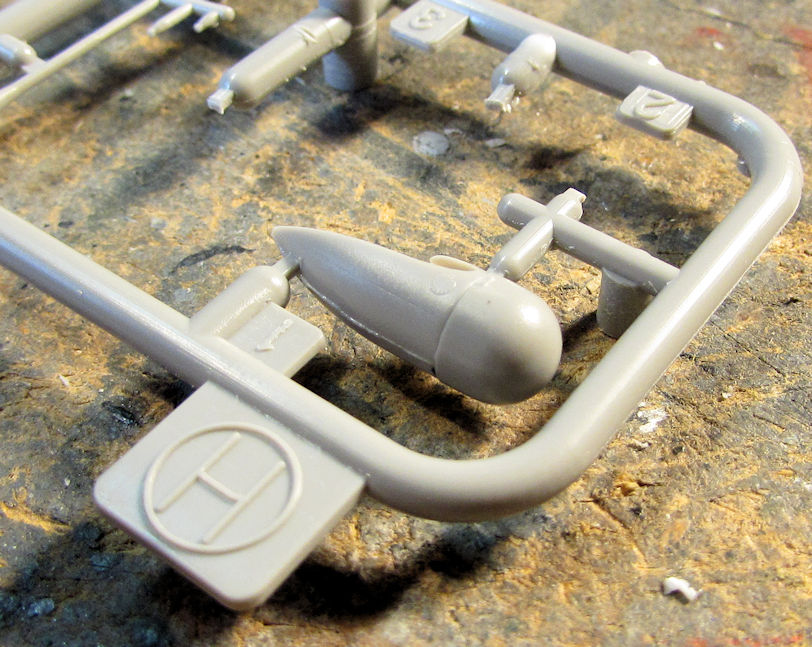
After that, I went to go look at the wheels. Oh joy! This kit gives one some vinyl tread plate for the main gun wheels! It's a Roden kit:
So, I pulled out my trusty Tire Glue to add this track to the wheels:
The best way to do this was to glue half of it to the wheels, then wrap it around the rest of the way when the first half was dry:
Man, what a pain! While they were drying, I tried to add more detail parts to the main gun carriage and trunnions. Notice the ling thin piece number 16E and where it is supposed to go. Now notice the piece 16E I added to the gun. Notice how it is far to long:
It's a Roden kit.
Piece 16E did not make it onto this model.
Getting back to the wheels, you'll notice that the vinyl parts do not stretch all the way around. They stop just short:
It's a Roden kit.
I'll figure something out later about what to do with that. Meanwhile, I added the wheels to this to see how it looks so far:
Not bad, despite the ill-fitting parts and the crappy vinyl parts. Here it is with it hooked up to the trailer:
This beastie will be hand painted... too many easily broken details all over this to mask and spray.
And for fun, I hooked that up to the FWD 3-ton ammunition carrier that would normally have pulled this in the war:
Well that completes my update for this week. Thanks all for looking in. Comments are welcome.
The Duke
Virtuoso of Miniatures
"Do you know what the chain of command is? It's the chain I get and beat you with 'till you understand who's in ruttin' command!"
-Jayne Cobb, Firefly Episode 2 "The Train Job"
We are modelers - the same in spirit, in hunger to insanely buy newly released kits, hustlers in hiding our stash from our better halves and experts in using garbage as replacements for after-market parts.
Virtuoso of Miniatures
"Do you know what the chain of command is? It's the chain I get and beat you with 'till you understand who's in ruttin' command!"
-Jayne Cobb, Firefly Episode 2 "The Train Job"
We are modelers - the same in spirit, in hunger to insanely buy newly released kits, hustlers in hiding our stash from our better halves and experts in using garbage as replacements for after-market parts.
-
speedgraflex

- Moderator
- Posts: 9759
- Joined: Fri Feb 10, 2017 11:08 pm
- Location: Santa Monica, California
Re: Maddog Manufacturing 2018 Production
Wow! Incredible progress, Duke!! You are a master! I am grateful you separated the Hellcat, to make following progress easier. Thanks ever so much. You are the best!
Re “It’s a Roden kit,” I looked at a review on a Polish IPMS site, looks to me as there is a locating pin on the metal part of the wheel and the tread is s t r e t c h e d around it. I have no idea if you tried this first but from the instructions the vinyl treads are under pressure to conform to the wheels. Whether this will cause an exploding tread effect or not is anyone’s guess!
Re “It’s a Roden kit,” I looked at a review on a Polish IPMS site, looks to me as there is a locating pin on the metal part of the wheel and the tread is s t r e t c h e d around it. I have no idea if you tried this first but from the instructions the vinyl treads are under pressure to conform to the wheels. Whether this will cause an exploding tread effect or not is anyone’s guess!
Bruce / SPEEDGRAFLEX
-
Duke Maddog
- Elite Member
- Posts: 7099
- Joined: Tue Jun 03, 2014 11:22 am
- Location: Rowland Heights, CA
Re: Maddog Manufacturing 2018 Production
Thanks Bruce! I don't know about "Master"; I can't seem to place higher than Third in most contests! LOL!
You are welcome for splitting off the Hellcat to another Thread. I figured you would like a dedicated thread to follow along more easily.
I did see that on the instruction sheet. However, the nubs I was supposed to glue this to were lost in all the flash on the surface of the wheel. I ended up sanding it all away since there was so many irregularities. I probably could have stretched it a little more, but they don't use words in their instruction sheets to tell me I needed to. I was concerned about having a split tread piece and so I just glued it as is.
Thanks again for the help and the motivating compliments. Stay tuned, more to come.
The Duke
Virtuoso of Miniatures
"Do you know what the chain of command is? It's the chain I get and beat you with 'till you understand who's in ruttin' command!"
-Jayne Cobb, Firefly Episode 2 "The Train Job"
We are modelers - the same in spirit, in hunger to insanely buy newly released kits, hustlers in hiding our stash from our better halves and experts in using garbage as replacements for after-market parts.
Virtuoso of Miniatures
"Do you know what the chain of command is? It's the chain I get and beat you with 'till you understand who's in ruttin' command!"
-Jayne Cobb, Firefly Episode 2 "The Train Job"
We are modelers - the same in spirit, in hunger to insanely buy newly released kits, hustlers in hiding our stash from our better halves and experts in using garbage as replacements for after-market parts.
-
Duke Maddog
- Elite Member
- Posts: 7099
- Joined: Tue Jun 03, 2014 11:22 am
- Location: Rowland Heights, CA
Re: Maddog Manufacturing 2018 Production
Here's another small update showing my latest work from the past three or four days now. Thank God for this great Hobby keeping me distracted through my ordeal!
I'll start with the Churchill bridgelayer tank. I finished the weathering on the bridging section now. It's kind of hard to see well here but I'm happy with the result:
That tank is now finished, so I moved on.
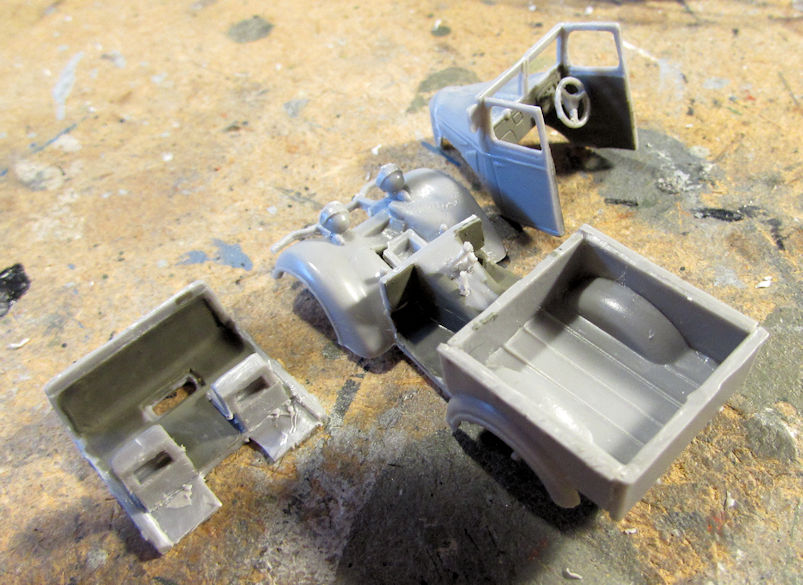
I found another Shelf Queen when rummaging around the Hobby Room. This is a little ACE kit of a Japanese Kurogane pickup truck that I'd started a couple years ago and then stopped because I thought a vital piece was missing. Another Shelf Queen that was shelved due to missing parts....
Turns out, I was mis-reading the instruction sheet and the 'missing' part had been there the whole time. So, I went back to work on it. I started out by finishing the chassis and suspension:
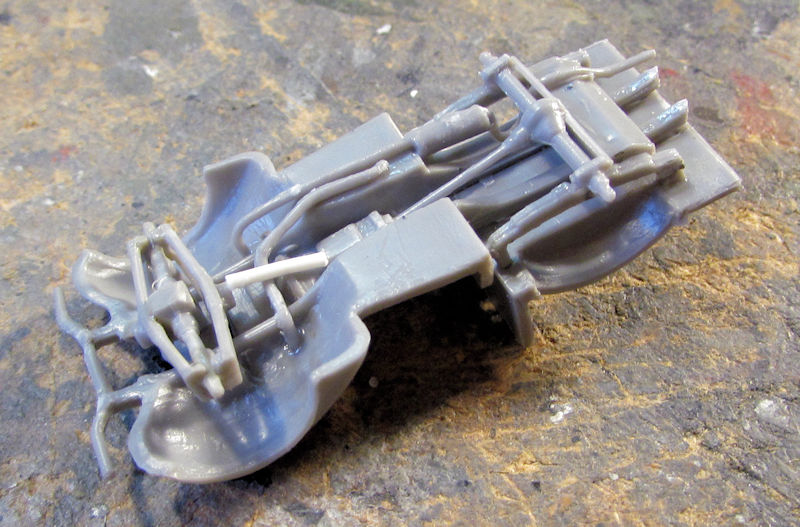
That was fairly easy, although getting the axles to line up was a bit tough.
Next I moved on to the cab. Not too bad:
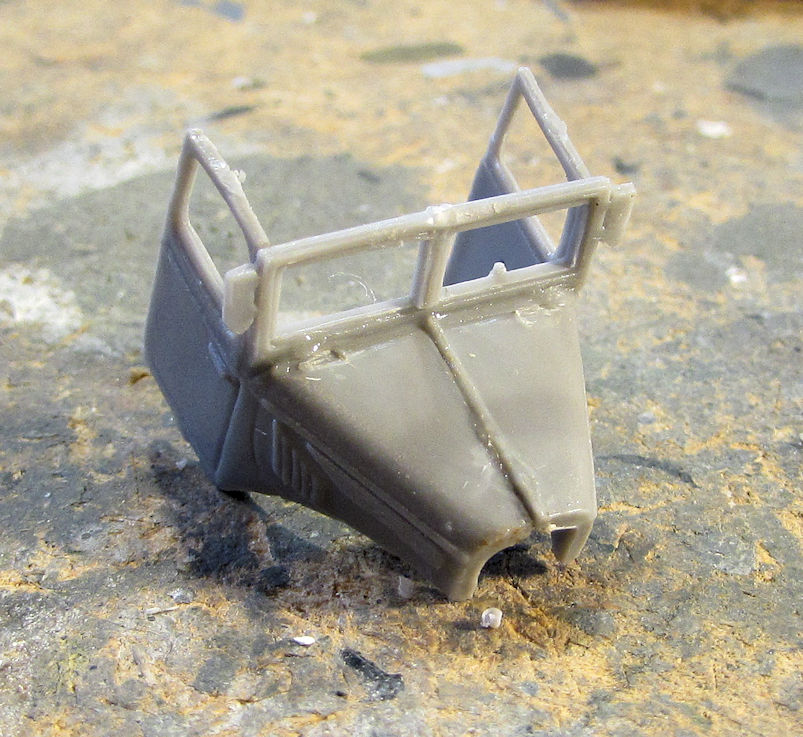
I then built the bed and then test fit the parts of the cab to see how it would fit since early ACE kits are notorious for poor fit. This one is no exception. In fact, it is even worse than many ACE kits I've done before:
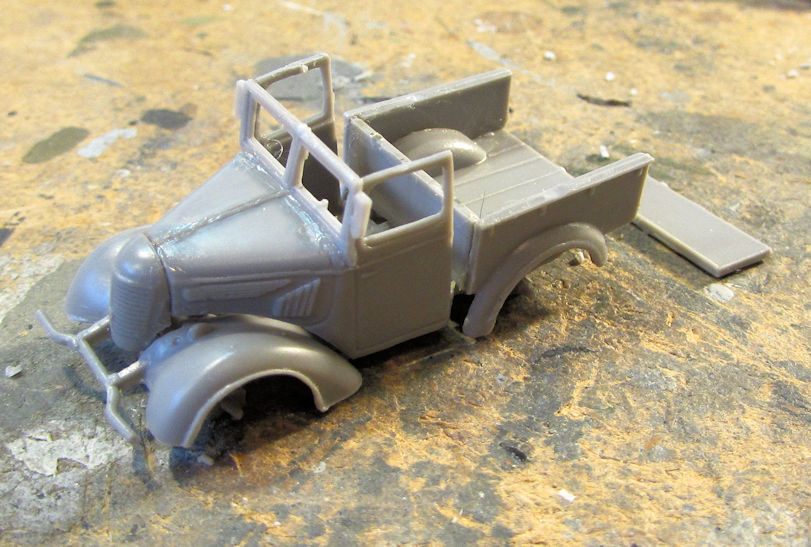
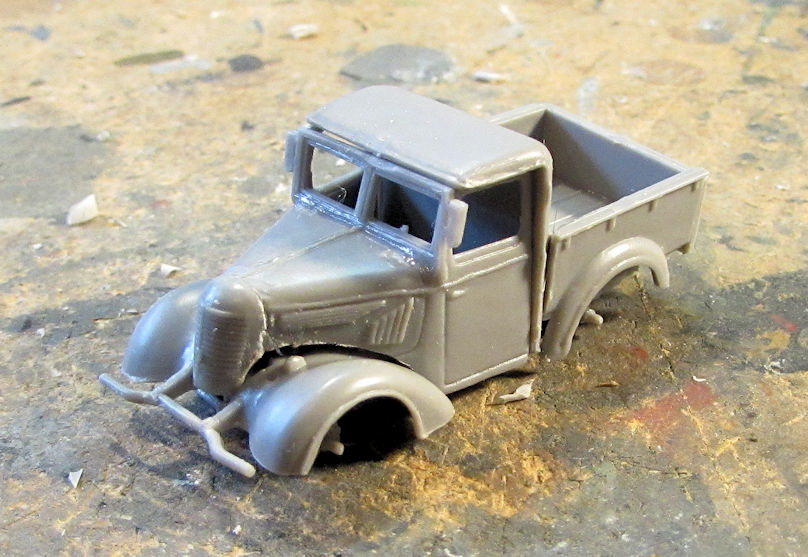

Yeah, that's gonna take a lot of work. But I want this Shelf Queen finished so I painted the interior to prepare for the eventual fight to close this up:
I still need to touch up a few things inside and then add the windows and then I'll be able to move on.
Since I had already completed the other two vehicles in my RAF Support Vehicles set, I completed the last one here. This is the little motorcycle that came in the set. Yes, I did have to build it; there were three pieces to assemble after all:
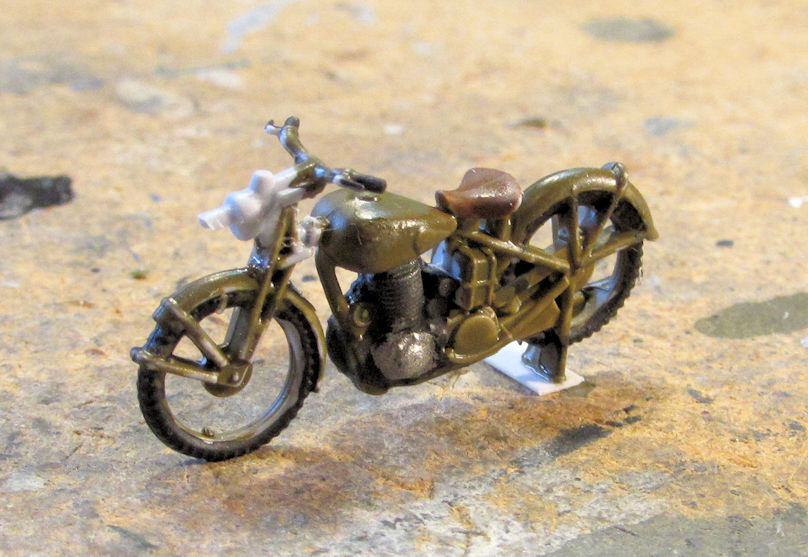
After some touch up painting here, I was able to call that one done.
Next, I worked on the F-6 Hellcat commission build. I got the instrument panel painted up using a lightened flat black for the panel itself, then I painted the dials with a Metallic black to simulate glass covered dials:
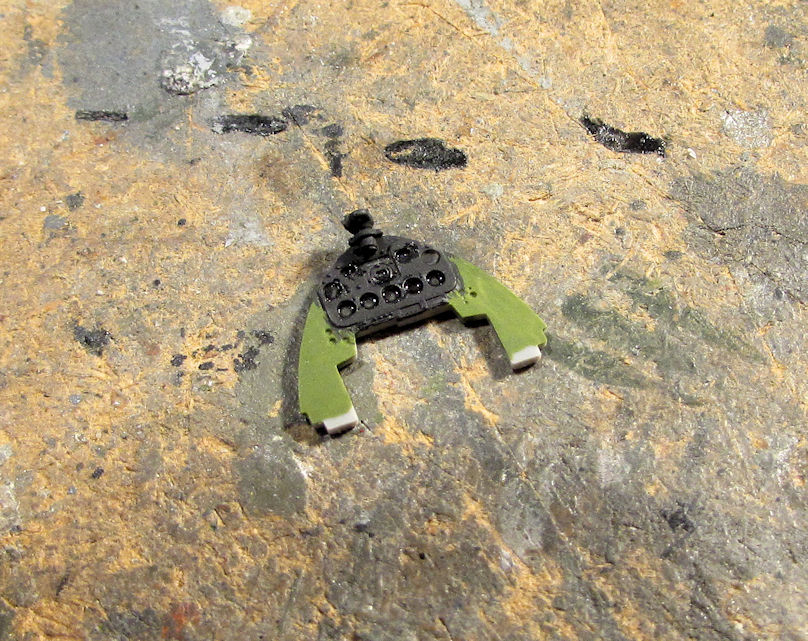
I then painted up the entire cockpit and installed the instrument panel:
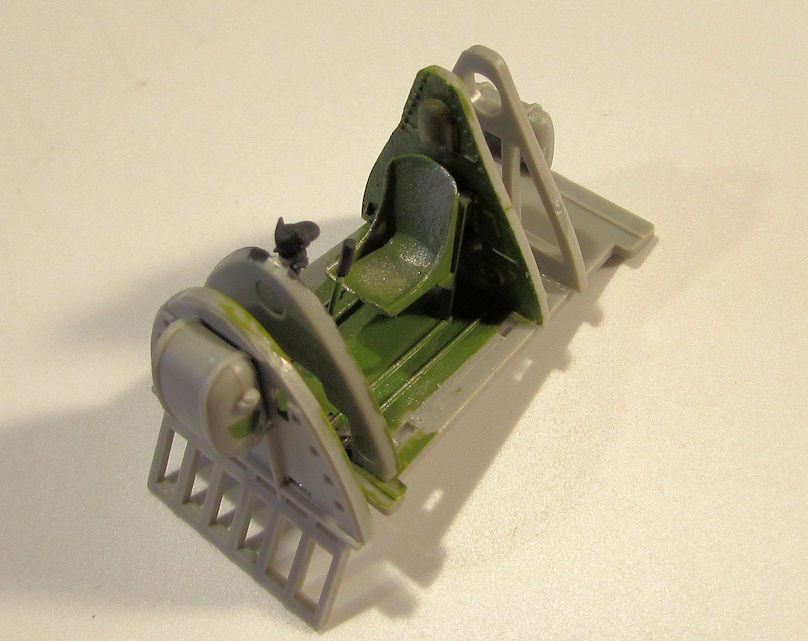
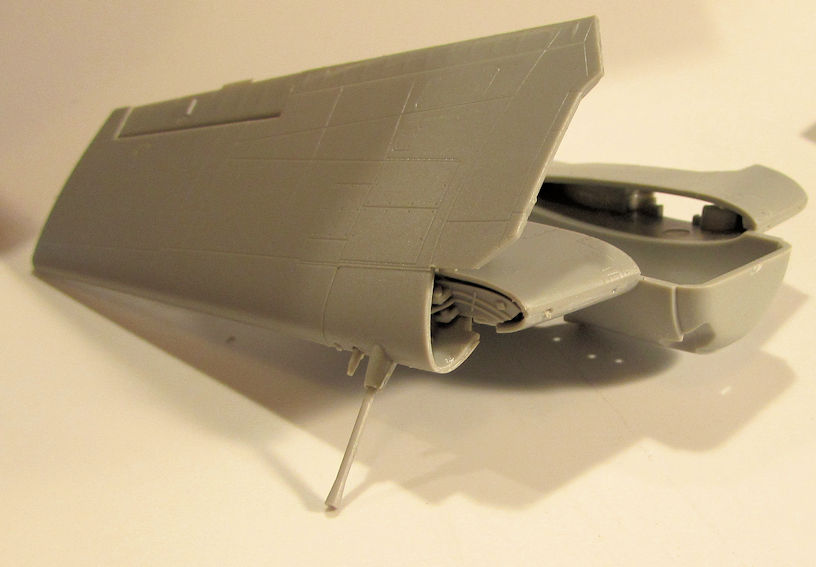
This kit came with photo-etch seatbelts that I'll need to paint and install next. I then assembled the wings; using the linkages for folded ones:
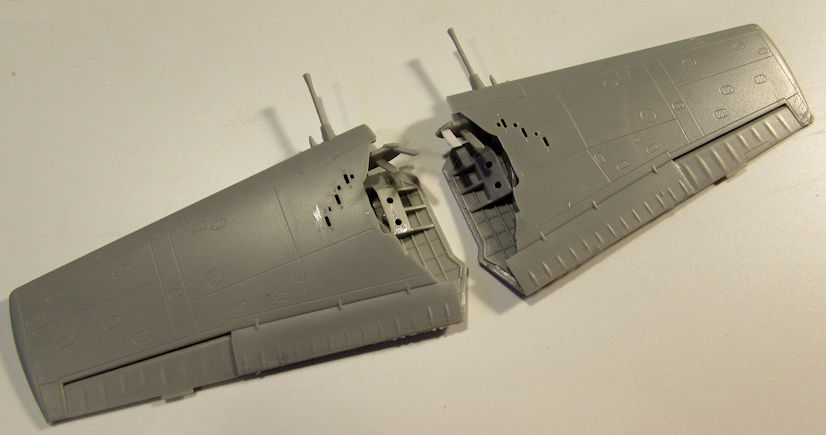
Afterward I assembled the center section that attaches to the fuselage. Here it is with the assembled wings:
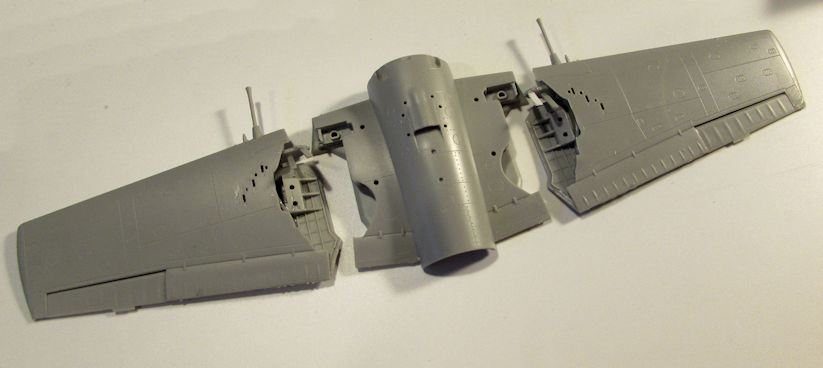
You'll note that one linkage is white; while test fitting the wings to the center section I broke one off which then disappeared. Strip styrene to the rescue!
Here is one of the wings test fit in place. It does look good:
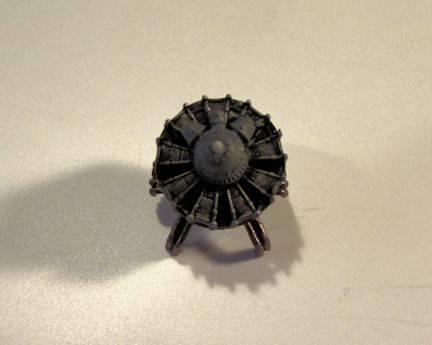
Finally, I can't post an update without showing the engine. I got it all painted up and ready to install. I also ran it for a bit to test it and it purrs like a kitten. LOL! The pics don't do it justice here:
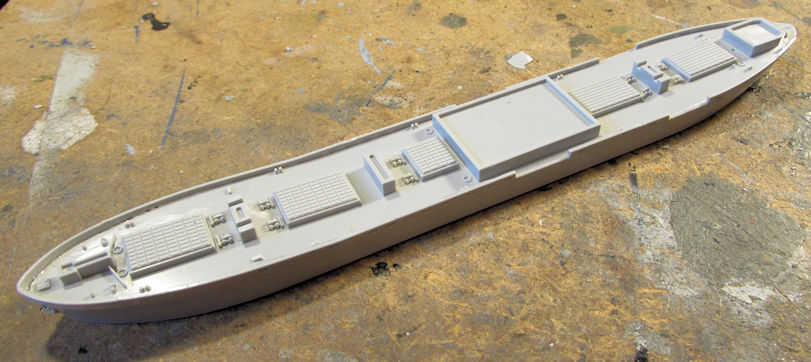
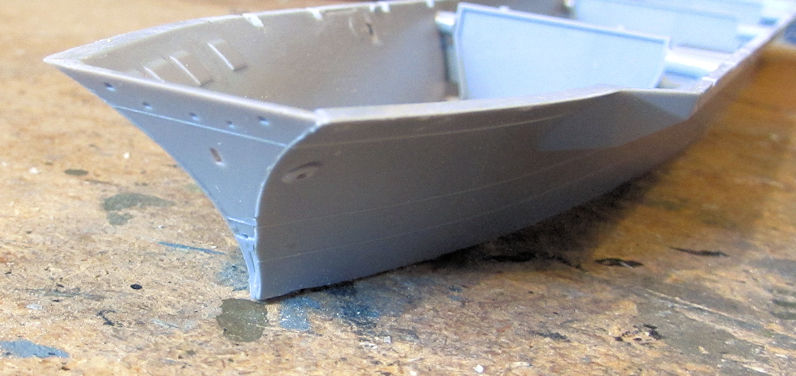
Finally, the Maddog Manufacturing Shipyards laid down three more ships since I needed a break from aircraft and armor. This first one is the hull for a 1/700 scale Liberty ship, the USS Bootes:
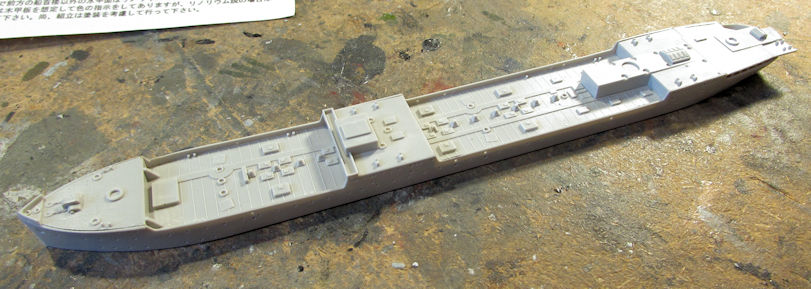
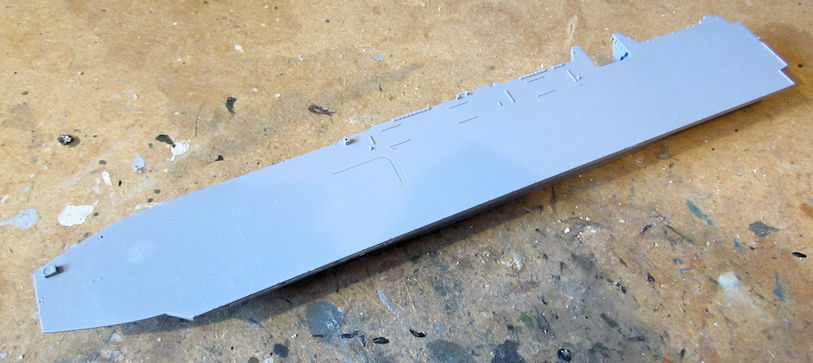
In the next slipway over, we laid down the hull for a 1/700 scale WWII Japanese fleet oiler:
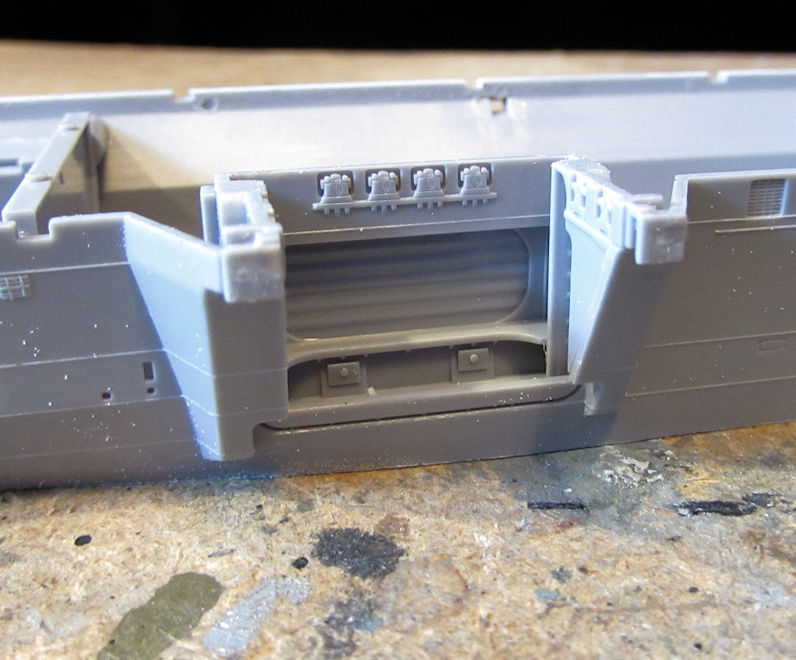
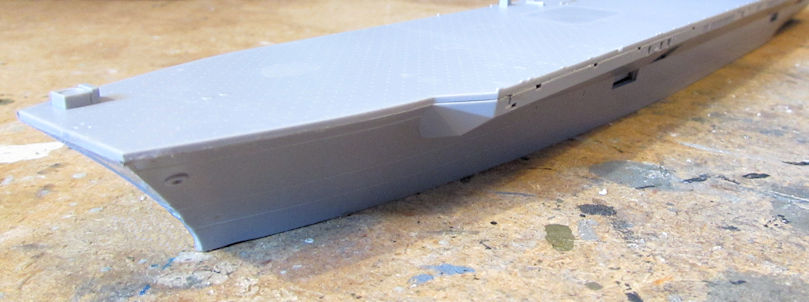
Finally, in my larger slipway used for carriers and battleships, we laid down a new Japanese Maritime Self Defense Force aircraft carrier; or as they call it, an aircraft carrying through-deck escort cruiser. This is a review kit of the 1/700 scale DDH Izumo being reviewed on another Forums. The first part of the assembly involved assembling the hull. This kit gives you some strong bulkhead pieces to keep the hull in the proper shape. I also added the bow plate, the stern, and the side hanger deck elevator and door to make this hull complete:
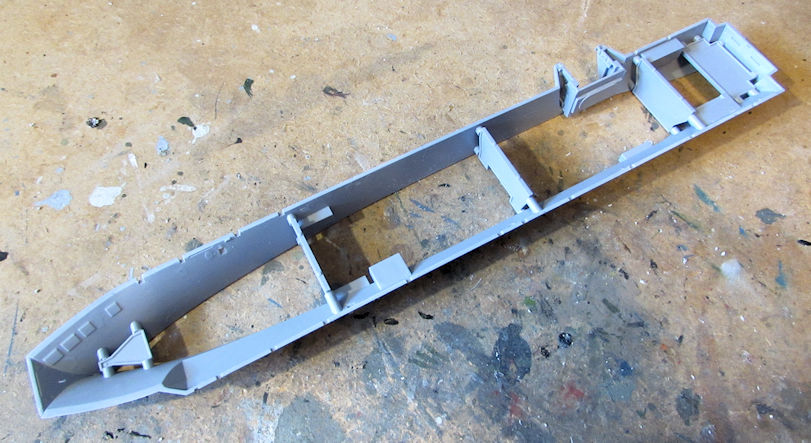
The fit of this kit is exquisite! No seams at all; everything seemed to just 'snap' into place. A few extremely minor ridges occurred but that is easily fixed with a few swipes of the sanding stick:
This is one exceptionally well engineered kit with incredible detail.
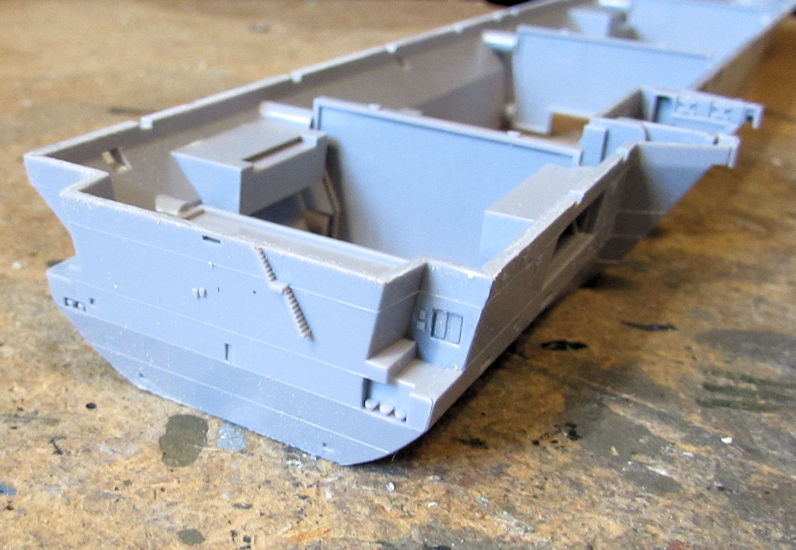
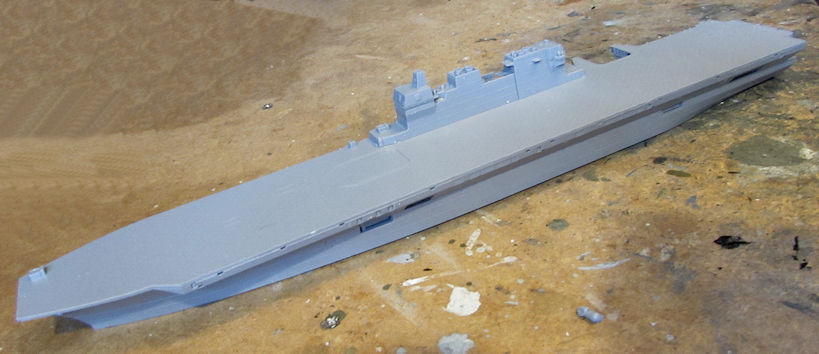
Following this, I added the flight deck to the hull. On the tops of the support bulkheads, there are nubs that need to remain; do not sand them off. They correspond with holes on the underside of the flight deck which keeps this piece perfectly lined up with the hull. I glued this in place and it had no seams or fit issues whatsoever:
You can see here the excellent fit; I left a small bead of glue there to sand down later to eliminate any seam this might have. I didn't even need to clamp this:
Next up, I started the island superstructure. It has two sections that need to be assembled. Here are the two of them assembled and lined up. Again, exquisite fit with no issues to speak of:
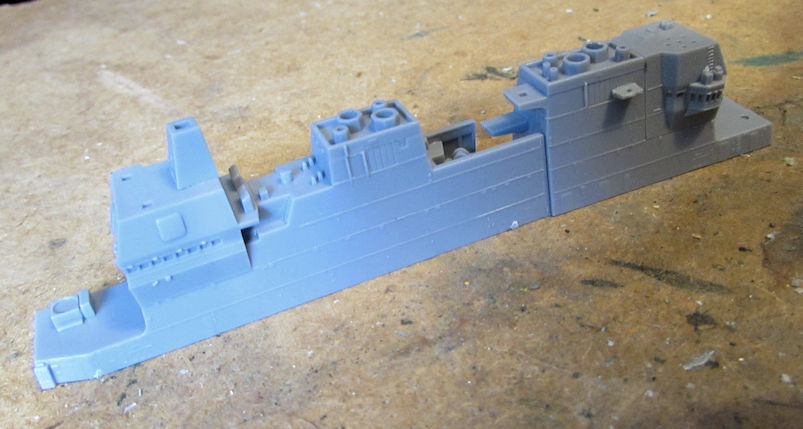
Here she is with the island dry-fit to the deck. This was after about a half hours' work assembling this:
This is a much bigger ship than I imagined, considerably larger than their Osumi class of LST/through-deck destroyers. Just to show you, I shot a pic of the Izumo next to the hull of the Japanese fleet oiler to show you the massive size of this ship:

And that completes this week's update so far. Today is Hobby Day so I'll be getting more done later on. Until then, thanks for looking in, comments are welcome.
I'll start with the Churchill bridgelayer tank. I finished the weathering on the bridging section now. It's kind of hard to see well here but I'm happy with the result:
That tank is now finished, so I moved on.
I found another Shelf Queen when rummaging around the Hobby Room. This is a little ACE kit of a Japanese Kurogane pickup truck that I'd started a couple years ago and then stopped because I thought a vital piece was missing. Another Shelf Queen that was shelved due to missing parts....
Turns out, I was mis-reading the instruction sheet and the 'missing' part had been there the whole time. So, I went back to work on it. I started out by finishing the chassis and suspension:
That was fairly easy, although getting the axles to line up was a bit tough.
Next I moved on to the cab. Not too bad:
I then built the bed and then test fit the parts of the cab to see how it would fit since early ACE kits are notorious for poor fit. This one is no exception. In fact, it is even worse than many ACE kits I've done before:
Yeah, that's gonna take a lot of work. But I want this Shelf Queen finished so I painted the interior to prepare for the eventual fight to close this up:
I still need to touch up a few things inside and then add the windows and then I'll be able to move on.
Since I had already completed the other two vehicles in my RAF Support Vehicles set, I completed the last one here. This is the little motorcycle that came in the set. Yes, I did have to build it; there were three pieces to assemble after all:
After some touch up painting here, I was able to call that one done.
Next, I worked on the F-6 Hellcat commission build. I got the instrument panel painted up using a lightened flat black for the panel itself, then I painted the dials with a Metallic black to simulate glass covered dials:
I then painted up the entire cockpit and installed the instrument panel:
This kit came with photo-etch seatbelts that I'll need to paint and install next. I then assembled the wings; using the linkages for folded ones:
Afterward I assembled the center section that attaches to the fuselage. Here it is with the assembled wings:
You'll note that one linkage is white; while test fitting the wings to the center section I broke one off which then disappeared. Strip styrene to the rescue!
Here is one of the wings test fit in place. It does look good:
Finally, I can't post an update without showing the engine. I got it all painted up and ready to install. I also ran it for a bit to test it and it purrs like a kitten. LOL! The pics don't do it justice here:
Finally, the Maddog Manufacturing Shipyards laid down three more ships since I needed a break from aircraft and armor. This first one is the hull for a 1/700 scale Liberty ship, the USS Bootes:
In the next slipway over, we laid down the hull for a 1/700 scale WWII Japanese fleet oiler:
Finally, in my larger slipway used for carriers and battleships, we laid down a new Japanese Maritime Self Defense Force aircraft carrier; or as they call it, an aircraft carrying through-deck escort cruiser. This is a review kit of the 1/700 scale DDH Izumo being reviewed on another Forums. The first part of the assembly involved assembling the hull. This kit gives you some strong bulkhead pieces to keep the hull in the proper shape. I also added the bow plate, the stern, and the side hanger deck elevator and door to make this hull complete:
The fit of this kit is exquisite! No seams at all; everything seemed to just 'snap' into place. A few extremely minor ridges occurred but that is easily fixed with a few swipes of the sanding stick:
This is one exceptionally well engineered kit with incredible detail.
Following this, I added the flight deck to the hull. On the tops of the support bulkheads, there are nubs that need to remain; do not sand them off. They correspond with holes on the underside of the flight deck which keeps this piece perfectly lined up with the hull. I glued this in place and it had no seams or fit issues whatsoever:
You can see here the excellent fit; I left a small bead of glue there to sand down later to eliminate any seam this might have. I didn't even need to clamp this:
Next up, I started the island superstructure. It has two sections that need to be assembled. Here are the two of them assembled and lined up. Again, exquisite fit with no issues to speak of:
Here she is with the island dry-fit to the deck. This was after about a half hours' work assembling this:
This is a much bigger ship than I imagined, considerably larger than their Osumi class of LST/through-deck destroyers. Just to show you, I shot a pic of the Izumo next to the hull of the Japanese fleet oiler to show you the massive size of this ship:
And that completes this week's update so far. Today is Hobby Day so I'll be getting more done later on. Until then, thanks for looking in, comments are welcome.
The Duke
Virtuoso of Miniatures
"Do you know what the chain of command is? It's the chain I get and beat you with 'till you understand who's in ruttin' command!"
-Jayne Cobb, Firefly Episode 2 "The Train Job"
We are modelers - the same in spirit, in hunger to insanely buy newly released kits, hustlers in hiding our stash from our better halves and experts in using garbage as replacements for after-market parts.
Virtuoso of Miniatures
"Do you know what the chain of command is? It's the chain I get and beat you with 'till you understand who's in ruttin' command!"
-Jayne Cobb, Firefly Episode 2 "The Train Job"
We are modelers - the same in spirit, in hunger to insanely buy newly released kits, hustlers in hiding our stash from our better halves and experts in using garbage as replacements for after-market parts.
Re: Maddog Manufacturing 2018 Production
Awesome work as usual Duke - what a great selection of projects. I'm really glad this hobby of ours is proving a good escape.
That carrier does indeed look a superb kit, quite the polar opposite in fact of the ACE kit... ouch!!!
That carrier does indeed look a superb kit, quite the polar opposite in fact of the ACE kit... ouch!!!
Stuart Templeton 'I may not be good but I'm slow...'
My blog: https://stuartsscalemodels.blogspot.com/
My blog: https://stuartsscalemodels.blogspot.com/
-
Duke Maddog
- Elite Member
- Posts: 7099
- Joined: Tue Jun 03, 2014 11:22 am
- Location: Rowland Heights, CA
Re: Maddog Manufacturing 2018 Production
Thanks Stuart! I'm glad it is too; I just have to maintain productivity in between sleep inducing meds. I agree about the carrier's great fit as opposed to the ACE kit. Still, I love building ACE kits; they are fun in a way and ACE certainly does give some unique and different models that most companies won't touch; especially in my chosen scale.
The Duke
Virtuoso of Miniatures
"Do you know what the chain of command is? It's the chain I get and beat you with 'till you understand who's in ruttin' command!"
-Jayne Cobb, Firefly Episode 2 "The Train Job"
We are modelers - the same in spirit, in hunger to insanely buy newly released kits, hustlers in hiding our stash from our better halves and experts in using garbage as replacements for after-market parts.
Virtuoso of Miniatures
"Do you know what the chain of command is? It's the chain I get and beat you with 'till you understand who's in ruttin' command!"
-Jayne Cobb, Firefly Episode 2 "The Train Job"
We are modelers - the same in spirit, in hunger to insanely buy newly released kits, hustlers in hiding our stash from our better halves and experts in using garbage as replacements for after-market parts.