Maddog Manufacturing 2023 Grand Reopening!
-
Brandons_Iron
- Advanced Member
- Posts: 270
- Joined: Tue Jan 21, 2020 11:18 am
- Location: Eastern Idaho
Re: Maddog Manufacturing 2023 Grand Reopening!
Definitely some cool subjects you got rolling there. 
BrandonK
If you can't fix it with duct tape, you're not using enough duct tape.
If you can't fix it with duct tape, you're not using enough duct tape.
-
Duke Maddog

- Elite Member
- Posts: 7103
- Joined: Tue Jun 03, 2014 11:22 am
- Location: Rowland Heights, CA
Re: Maddog Manufacturing 2023 Grand Reopening!
Thank you Brandon! Hopefully I can get a few of these rolling over the finish line soon.
The Duke
Virtuoso of Miniatures
"Do you know what the chain of command is? It's the chain I get and beat you with 'till you understand who's in ruttin' command!"
-Jayne Cobb, Firefly Episode 2 "The Train Job"
We are modelers - the same in spirit, in hunger to insanely buy newly released kits, hustlers in hiding our stash from our better halves and experts in using garbage as replacements for after-market parts.
-
Duke Maddog
- Elite Member
- Posts: 7103
- Joined: Tue Jun 03, 2014 11:22 am
- Location: Rowland Heights, CA
Re: Maddog Manufacturing 2023 Grand Reopening!
I have a lot to be thankful for this past Thanksgiving Day week, some of which is the progress we made on some of these models that have been fighting me. So much has been done that it's time for another tour.
We have kept the Shipyards idle again, so this tour will start in the Hangar to show the progress made on a couple projects.
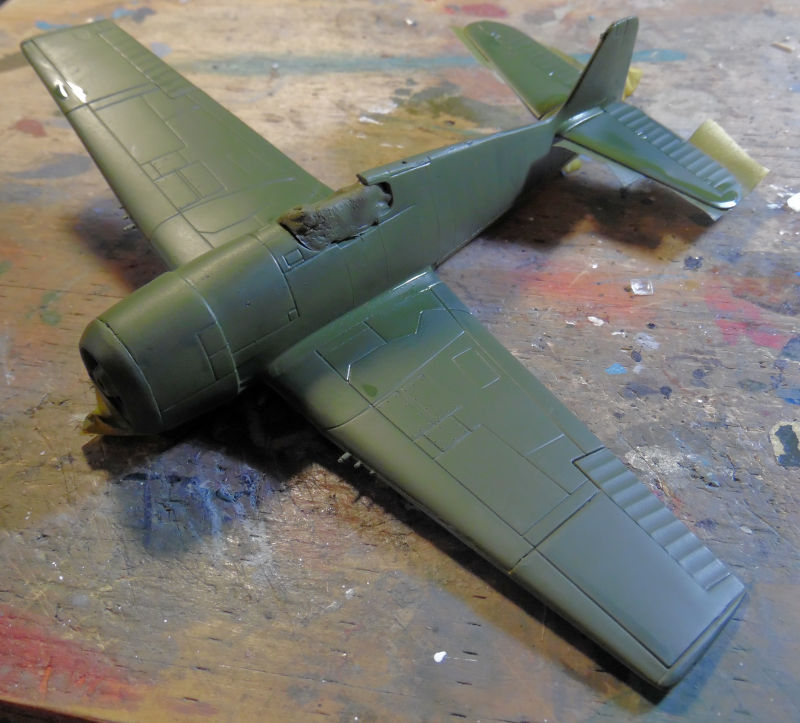
First, we got the decals on the Russian Shtormovik:
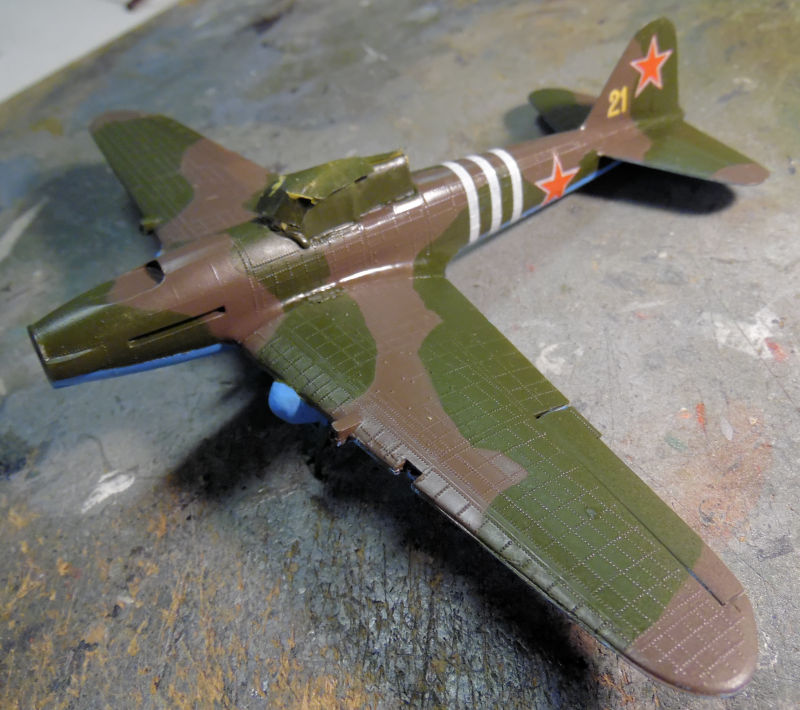
They went on surprisingly well considering the extensive age of the decals. Now all that is left is the final details before this can be called done.
Next, we discovered that the support struts for the wing on the Russian Be-4 were far too short due to the fact that we had to raise the center pylon to keep the propeller from chopping off the nose. So we cut some new ones from strip styrene:
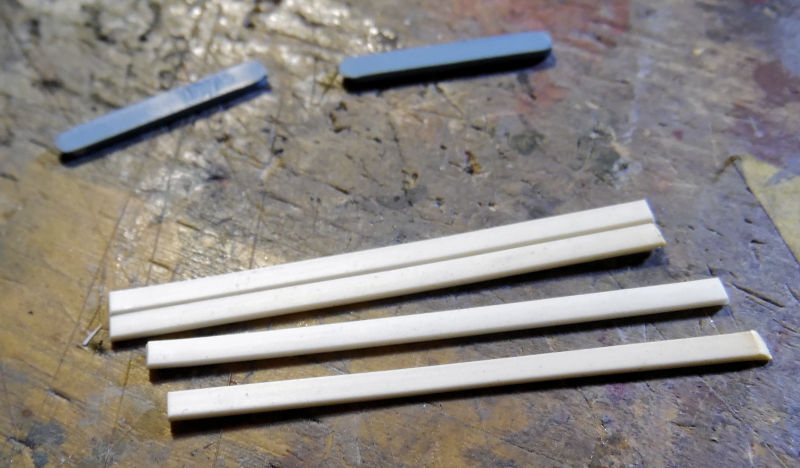
The originals are in blue above the four strips. Then; using Silly Putty to hold the fuselage in place upside down, we glued the wing to the fuselage and added the struts:

In retrospect, we should have done the same with the outrigger pontoons. I may still do that later....
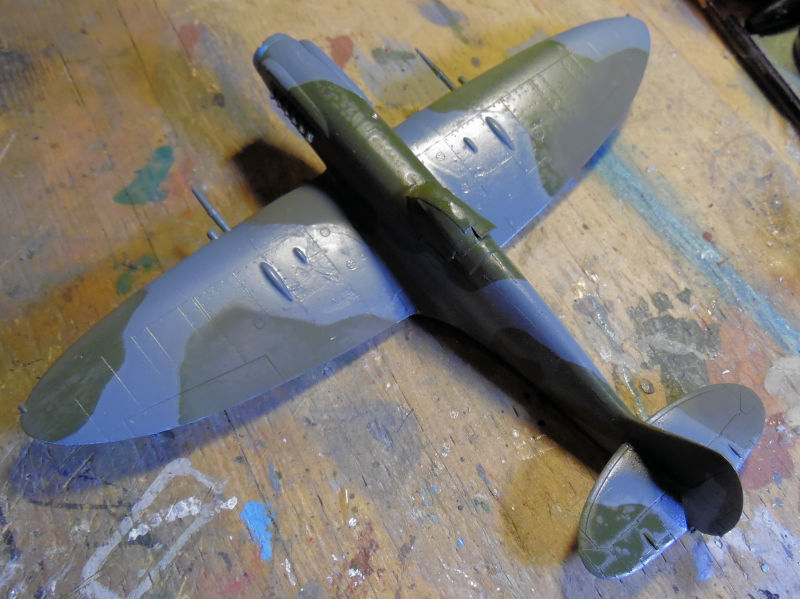
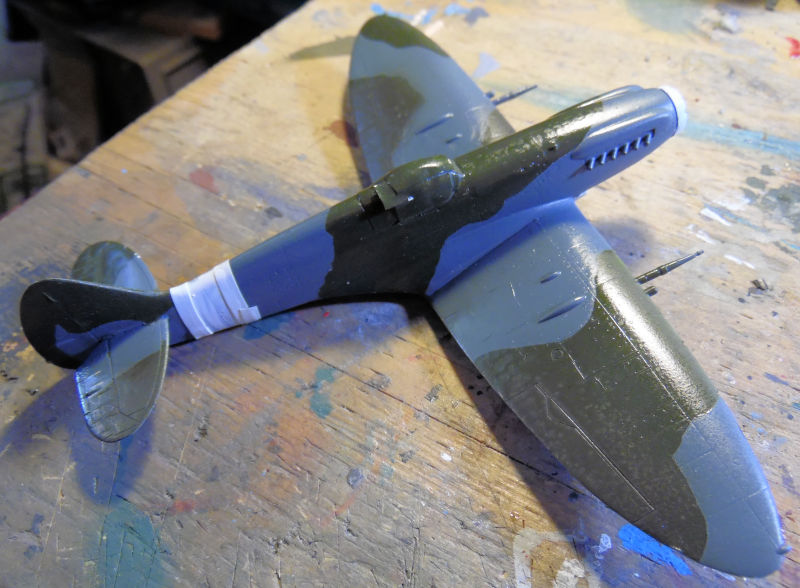
Moving on, the Spitfire VIII got the decals applied as well:
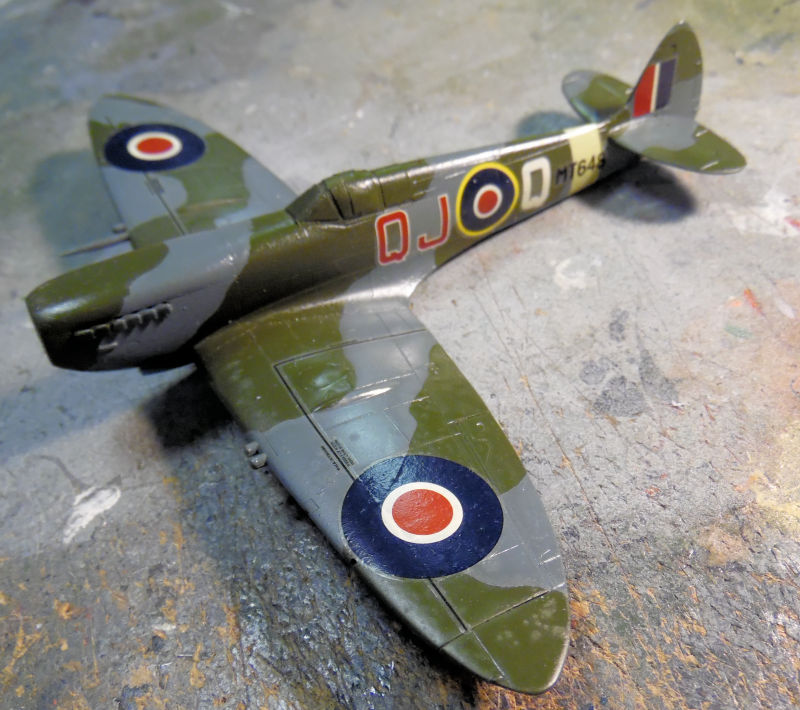
Yes, they silvered quite badly, so that was addressed and the main landing gear and the tail wheel were installed:
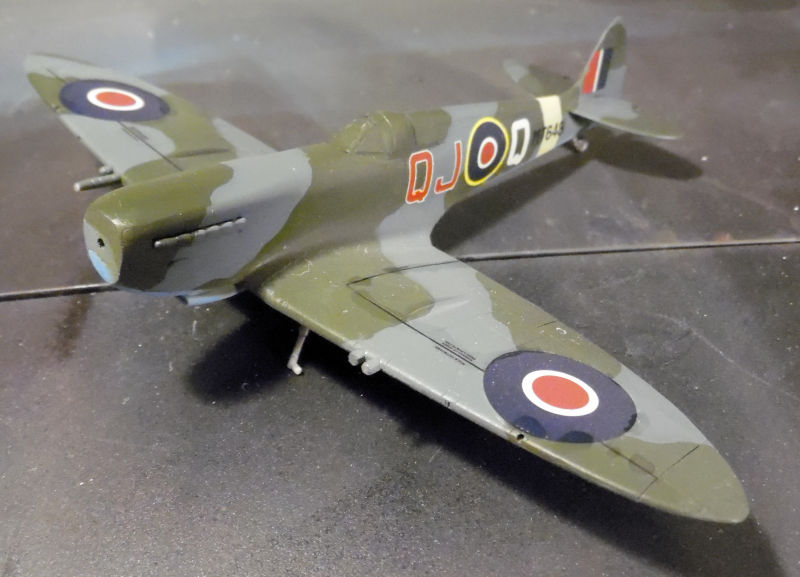
Getting close on that one.
That closes out the tour of the Hangar; as mentioned it was a short one. Now on to the Motor Pool where a lot has been happening.
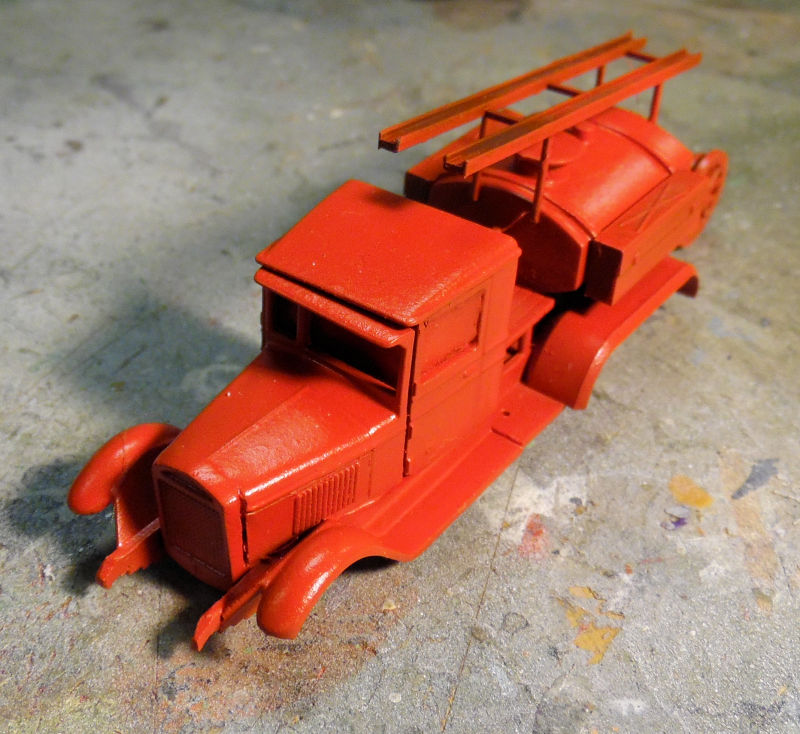
Here in the Motor Pool, we were rocking out getting things done. First, I decided we needed to get a couple of the Shelf Queens out if the Motor Pool and delivered to their respective forces. We started with the Russian fire truck that had been sitting for a couple years. It's an old PST kit which says a lot. It started out getting a new coat of red paint:
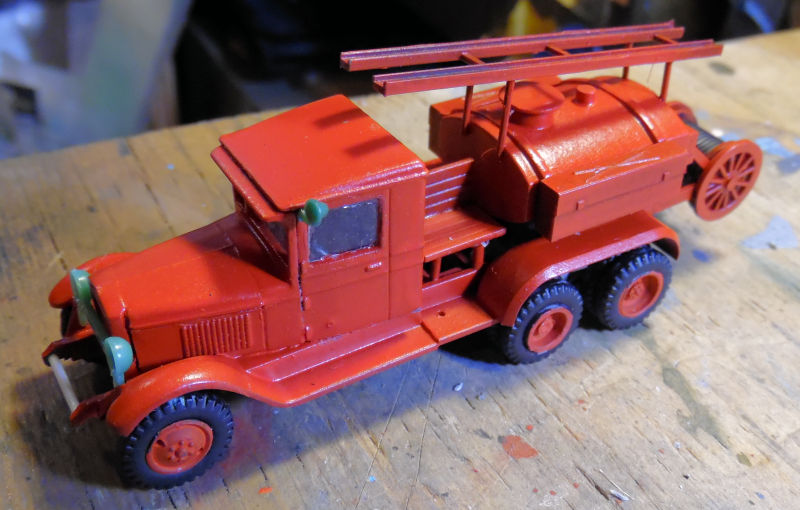
Next the wheels and some additional parts were added after which some more paint was done on some of the larger new additions:
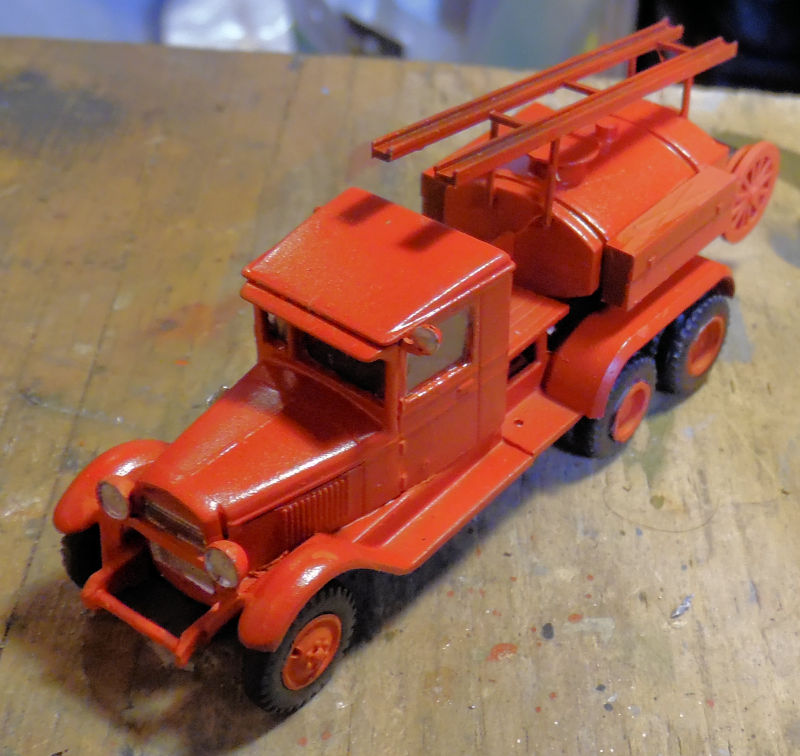
The new parts were painted and other details were painted up as well:
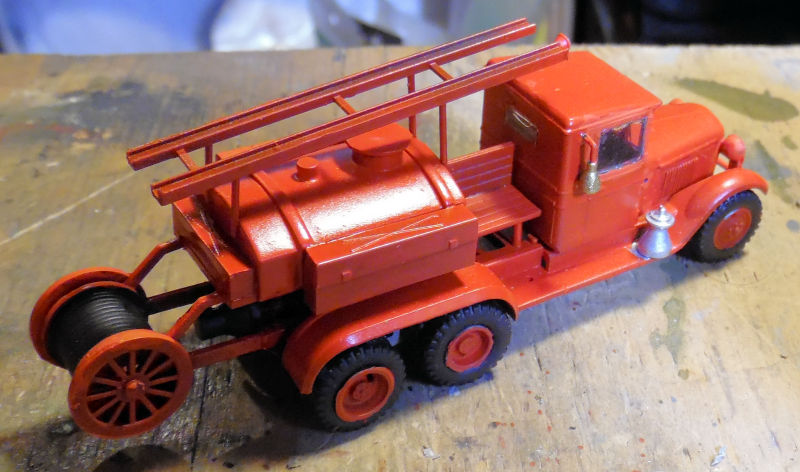
That one quickly arrived at the dispersal depot after that.
Another Shelf Queen that had sat for three or more years was my Russian SCUD D. I had wanted to finish it alongside the SCUD C I was building in conjunction with it, but the serious lack of the proper parts for the C means it will take too long and there was no reason the-D should sit in limbo with it. First, a couple additional colors were added for a three-tone camouflage pattern; it was hand brushed as I wanted this done quickly and there were too many delicate parts on the launcher arms for Silly Putty:
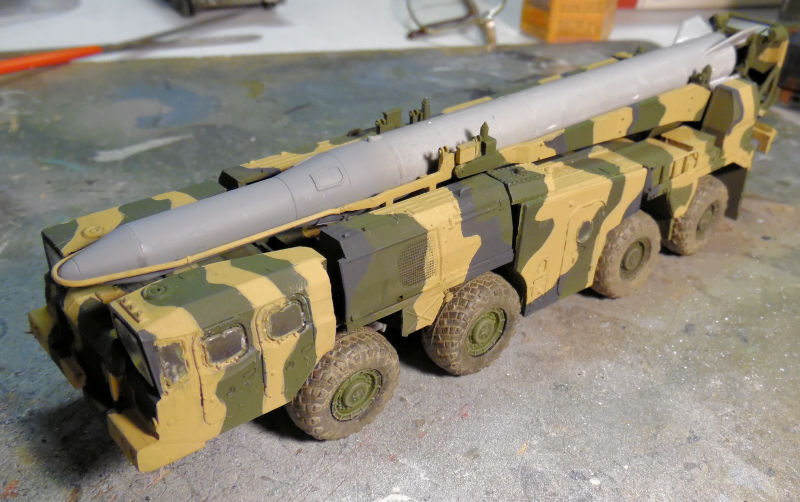
You can see wheels were added as well. The missile was just dry fit for looks.
Later the missile was painted, the vehicle was weathered and later some small decals were added after this next pic was taken:
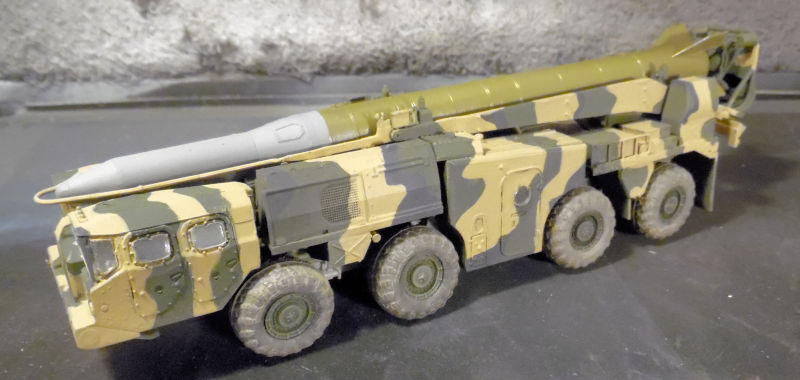
This one was sent to the dispersal depot after the last detail parts were added.
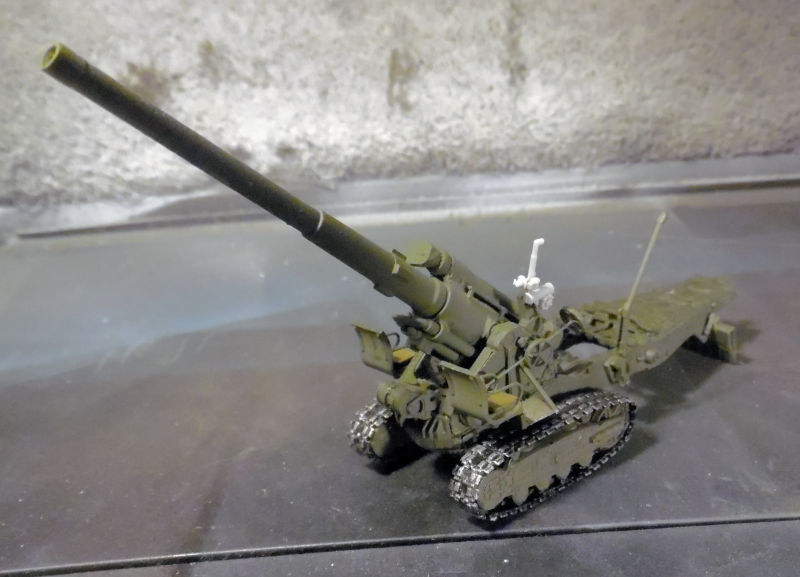
Concerning the two Russian tracked heavy guns; one was sent to the dispersal depot despite missing a few parts. They are not immediately noticeable, so until the missing parts turn up, it is being delivered. The second one, the 152mm gun was going to be delivered too, but the aiming scope was crooked. When we went to straighten it out, it broke off and disappeared. Since I was already so tired of these two guns taking up space, I scratched a new scope which is highly inaccurate, but screw it! It stays unless and until the right part reappears:
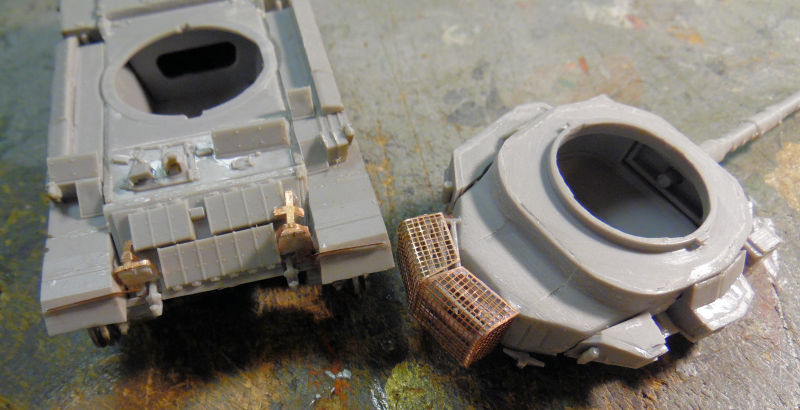
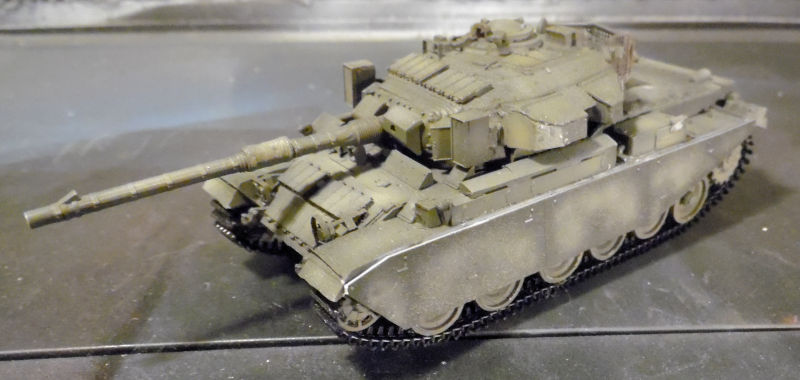
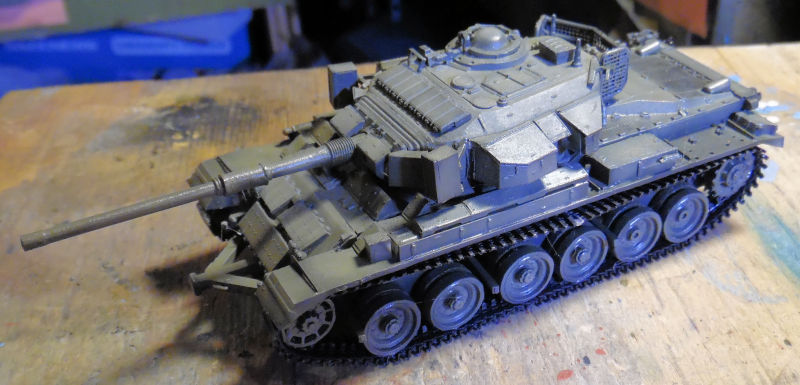
Moving on to the next bay, we found the photo etch for the Israeli Sho't Kal Gimel, so it was added to the turret and hull. Here you can see the basket part is partially glued and was glued the rest of the way after the glue dried:
The Gimel then got her side skirts on and a coat of paint:
The Dalet, meanwhile, had her tracks installed. Yes, I used the Pactra cement on the black vinyl tracks and it held them together perfectly, as if they were made of styrene:
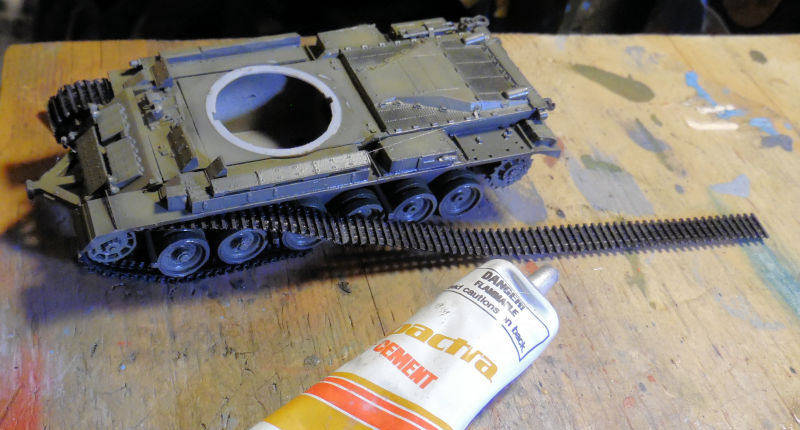
With that, it didn't take long to get both tracks on:
Later the Dalet got some additional photo etch added that had not been installed before:
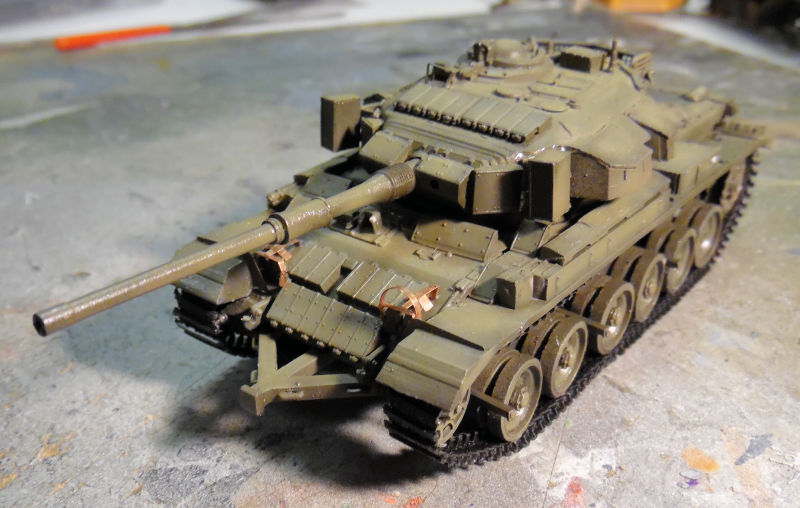
Back to the Gimel, we installed the crew machine guns and added the barrel decals:
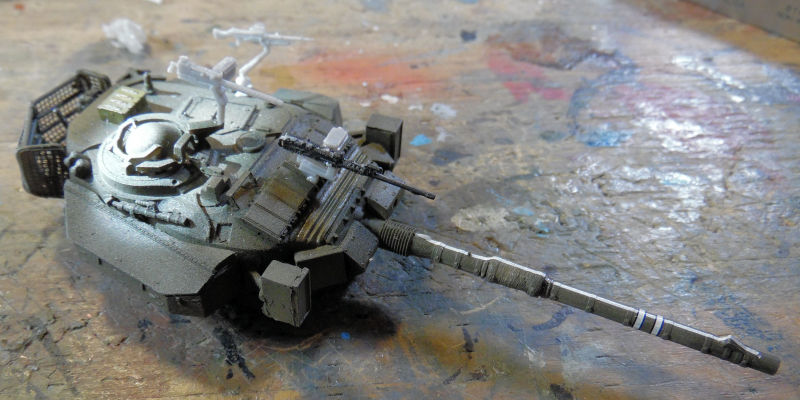
The decals were also applied to the rest of the tank and the detail parts painted. This allowed us to send the Gimel to the Dispersal Depot.
Finally, in this last bay, we assembled all the major components to the chassis and then painted the camouflage pattern on this cab. It was freehanded with an airbrush because I was just getting lazy at this point and wanted this truck finished:
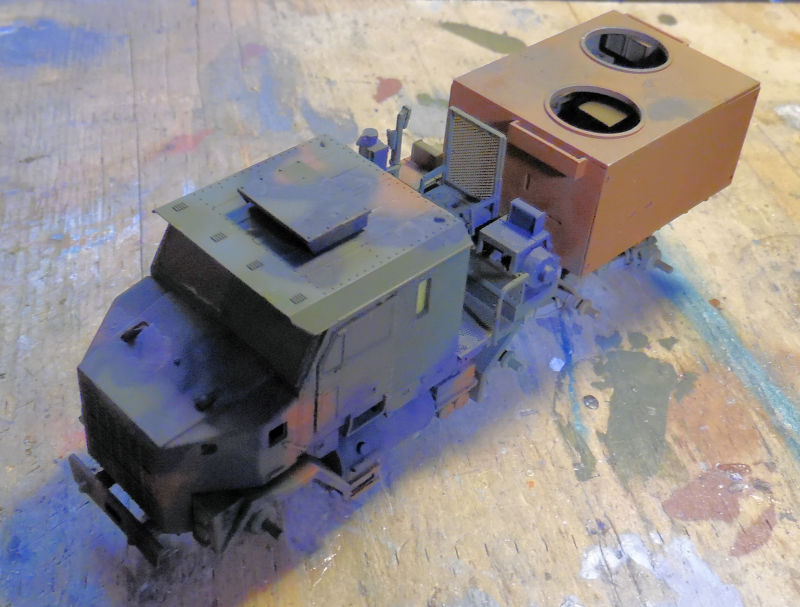
After a clearcoat, the decals were applied:

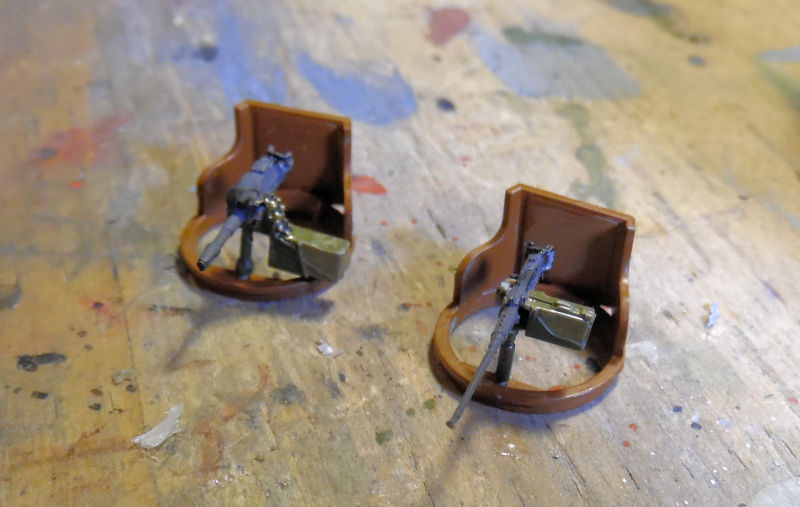
While they were drying, we went to work on the gun stations. They were fairly quick and easy to do, despite having a lot of parts:
Some of the last final details were added, including the anti-RPG sheets, the wheels and several additional detail parts:

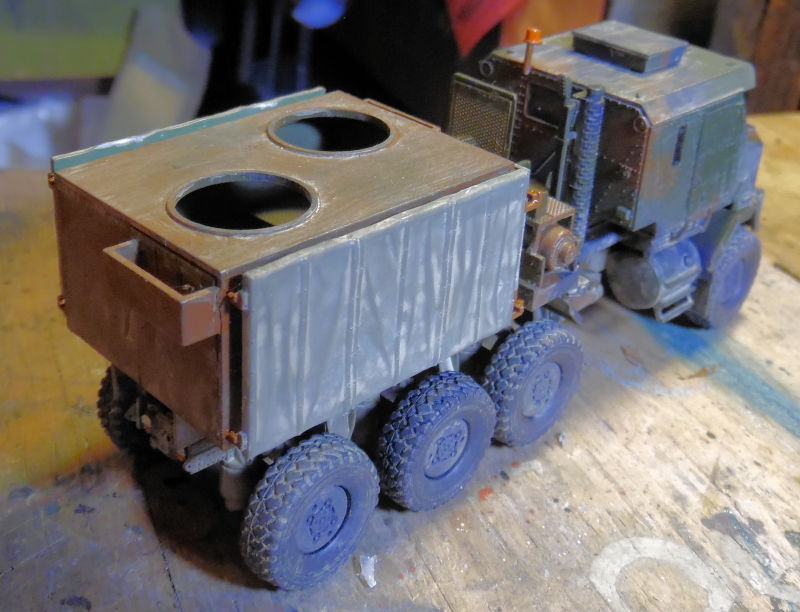
After completing the rear view mirrors, this truck was also sent to the Dispersal Depot.
Thank you all for coming in and seeing the latest progress. Pics will be forthcoming of all the completed models, stay tuned for them later. Meanwhile, comments are welcome, thank you for joining this latest tour.
We have kept the Shipyards idle again, so this tour will start in the Hangar to show the progress made on a couple projects.
First, we got the decals on the Russian Shtormovik:
They went on surprisingly well considering the extensive age of the decals. Now all that is left is the final details before this can be called done.
Next, we discovered that the support struts for the wing on the Russian Be-4 were far too short due to the fact that we had to raise the center pylon to keep the propeller from chopping off the nose. So we cut some new ones from strip styrene:
The originals are in blue above the four strips. Then; using Silly Putty to hold the fuselage in place upside down, we glued the wing to the fuselage and added the struts:
In retrospect, we should have done the same with the outrigger pontoons. I may still do that later....
Moving on, the Spitfire VIII got the decals applied as well:
Yes, they silvered quite badly, so that was addressed and the main landing gear and the tail wheel were installed:
Getting close on that one.
That closes out the tour of the Hangar; as mentioned it was a short one. Now on to the Motor Pool where a lot has been happening.
Here in the Motor Pool, we were rocking out getting things done. First, I decided we needed to get a couple of the Shelf Queens out if the Motor Pool and delivered to their respective forces. We started with the Russian fire truck that had been sitting for a couple years. It's an old PST kit which says a lot. It started out getting a new coat of red paint:
Next the wheels and some additional parts were added after which some more paint was done on some of the larger new additions:
The new parts were painted and other details were painted up as well:
That one quickly arrived at the dispersal depot after that.
Another Shelf Queen that had sat for three or more years was my Russian SCUD D. I had wanted to finish it alongside the SCUD C I was building in conjunction with it, but the serious lack of the proper parts for the C means it will take too long and there was no reason the-D should sit in limbo with it. First, a couple additional colors were added for a three-tone camouflage pattern; it was hand brushed as I wanted this done quickly and there were too many delicate parts on the launcher arms for Silly Putty:
You can see wheels were added as well. The missile was just dry fit for looks.
Later the missile was painted, the vehicle was weathered and later some small decals were added after this next pic was taken:
This one was sent to the dispersal depot after the last detail parts were added.
Concerning the two Russian tracked heavy guns; one was sent to the dispersal depot despite missing a few parts. They are not immediately noticeable, so until the missing parts turn up, it is being delivered. The second one, the 152mm gun was going to be delivered too, but the aiming scope was crooked. When we went to straighten it out, it broke off and disappeared. Since I was already so tired of these two guns taking up space, I scratched a new scope which is highly inaccurate, but screw it! It stays unless and until the right part reappears:
Moving on to the next bay, we found the photo etch for the Israeli Sho't Kal Gimel, so it was added to the turret and hull. Here you can see the basket part is partially glued and was glued the rest of the way after the glue dried:
The Gimel then got her side skirts on and a coat of paint:
The Dalet, meanwhile, had her tracks installed. Yes, I used the Pactra cement on the black vinyl tracks and it held them together perfectly, as if they were made of styrene:
With that, it didn't take long to get both tracks on:
Later the Dalet got some additional photo etch added that had not been installed before:
Back to the Gimel, we installed the crew machine guns and added the barrel decals:
The decals were also applied to the rest of the tank and the detail parts painted. This allowed us to send the Gimel to the Dispersal Depot.
Finally, in this last bay, we assembled all the major components to the chassis and then painted the camouflage pattern on this cab. It was freehanded with an airbrush because I was just getting lazy at this point and wanted this truck finished:
After a clearcoat, the decals were applied:
While they were drying, we went to work on the gun stations. They were fairly quick and easy to do, despite having a lot of parts:
Some of the last final details were added, including the anti-RPG sheets, the wheels and several additional detail parts:
After completing the rear view mirrors, this truck was also sent to the Dispersal Depot.
Thank you all for coming in and seeing the latest progress. Pics will be forthcoming of all the completed models, stay tuned for them later. Meanwhile, comments are welcome, thank you for joining this latest tour.
The Duke
Virtuoso of Miniatures
"Do you know what the chain of command is? It's the chain I get and beat you with 'till you understand who's in ruttin' command!"
-Jayne Cobb, Firefly Episode 2 "The Train Job"
We are modelers - the same in spirit, in hunger to insanely buy newly released kits, hustlers in hiding our stash from our better halves and experts in using garbage as replacements for after-market parts.
Virtuoso of Miniatures
"Do you know what the chain of command is? It's the chain I get and beat you with 'till you understand who's in ruttin' command!"
-Jayne Cobb, Firefly Episode 2 "The Train Job"
We are modelers - the same in spirit, in hunger to insanely buy newly released kits, hustlers in hiding our stash from our better halves and experts in using garbage as replacements for after-market parts.
-
Gary Brantley

- Addicted Member
- Posts: 1757
- Joined: Tue Apr 08, 2014 9:40 pm
- Location: Cameron, Texas
Re: Maddog Manufacturing 2023 Grand Reopening!
Man, you've been a busy man! Well done all around, Mark!
-
Duke Maddog
- Elite Member
- Posts: 7103
- Joined: Tue Jun 03, 2014 11:22 am
- Location: Rowland Heights, CA
Re: Maddog Manufacturing 2023 Grand Reopening!
Thank you Gary! Yeah, been snatching every moment I can to slip in and get as many models done as I can before year end. I appreciate you stopping in!
The Duke
Virtuoso of Miniatures
"Do you know what the chain of command is? It's the chain I get and beat you with 'till you understand who's in ruttin' command!"
-Jayne Cobb, Firefly Episode 2 "The Train Job"
We are modelers - the same in spirit, in hunger to insanely buy newly released kits, hustlers in hiding our stash from our better halves and experts in using garbage as replacements for after-market parts.
Virtuoso of Miniatures
"Do you know what the chain of command is? It's the chain I get and beat you with 'till you understand who's in ruttin' command!"
-Jayne Cobb, Firefly Episode 2 "The Train Job"
We are modelers - the same in spirit, in hunger to insanely buy newly released kits, hustlers in hiding our stash from our better halves and experts in using garbage as replacements for after-market parts.
-
Medicman71

- Elite Member
- Posts: 9791
- Joined: Mon Apr 07, 2014 9:32 am
- Location: Houston, Tx
Re: Maddog Manufacturing 2023 Grand Reopening!
Wow! I had a lot to get caught up on. Great work on all the builds Mark!
Mike
Sponsored by Boeing, Lockheed Martin, Northrop Grumman, Saab, BAE, and Dassault
Sponsored by Boeing, Lockheed Martin, Northrop Grumman, Saab, BAE, and Dassault
-
Duke Maddog
- Elite Member
- Posts: 7103
- Joined: Tue Jun 03, 2014 11:22 am
- Location: Rowland Heights, CA
Re: Maddog Manufacturing 2023 Grand Reopening!
Thank you Mike! I still have more coming so stay tuned!
The Duke
Virtuoso of Miniatures
"Do you know what the chain of command is? It's the chain I get and beat you with 'till you understand who's in ruttin' command!"
-Jayne Cobb, Firefly Episode 2 "The Train Job"
We are modelers - the same in spirit, in hunger to insanely buy newly released kits, hustlers in hiding our stash from our better halves and experts in using garbage as replacements for after-market parts.
Virtuoso of Miniatures
"Do you know what the chain of command is? It's the chain I get and beat you with 'till you understand who's in ruttin' command!"
-Jayne Cobb, Firefly Episode 2 "The Train Job"
We are modelers - the same in spirit, in hunger to insanely buy newly released kits, hustlers in hiding our stash from our better halves and experts in using garbage as replacements for after-market parts.
-
Duke Maddog
- Elite Member
- Posts: 7103
- Joined: Tue Jun 03, 2014 11:22 am
- Location: Rowland Heights, CA
Re: Maddog Manufacturing 2023 Grand Reopening!
We've had three weeks of awesome productivity here, so it's time for another tour of Maddog Manufacturing. Once again this will be a bit of a long tour, so please remember all safety requirements and enjoy the tour!
Our first stop as always is the Hangar. We have a couple of started models, and a few Shelf Queens that are receiving attention too.
In the first bay here is the British Spitfire Mk. XIV. We got all the paint damage repaired from when the paint cracked under the gloss coat:
Later the white stripe had to be painted on, so that was done. Yes, I decided to do it by hand:
After that dried, we shot the whole thing with a gloss and added the decals:
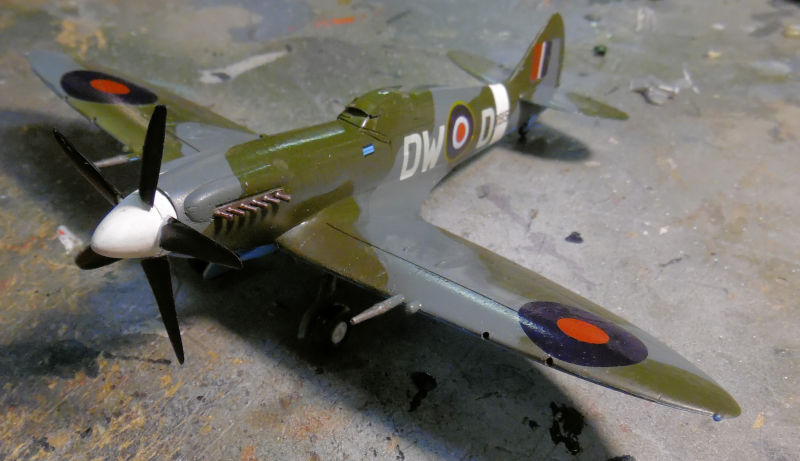
Other details were painted and most final parts were added. Later the rockets were added and this was declared done and sent to the Dispersal Field.
In this next bay we returned to the Fleet Air Arm F-6F Hellcat. This one got a shot of light RAF grey on the bottom:
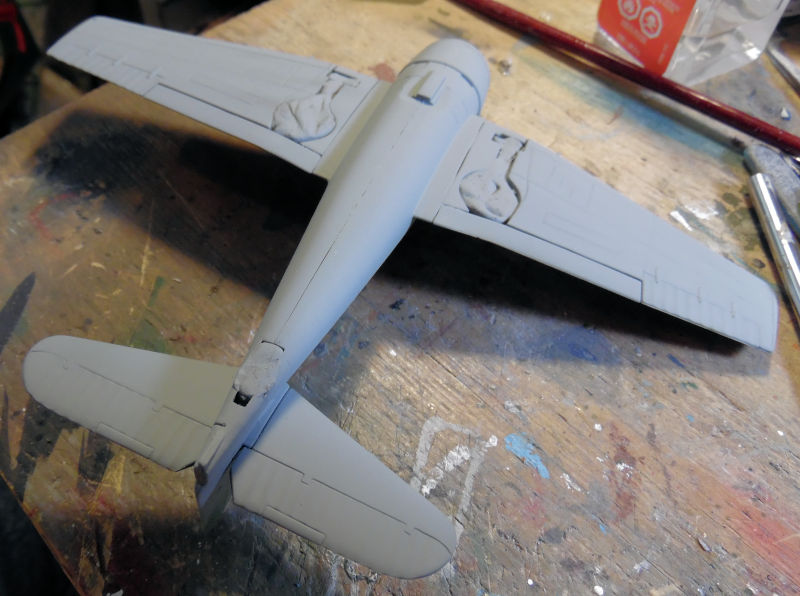
Later, it was masked off and the upper green color was shot:
After some Silly Putty application we'll be able to shoot the second color. Looking forward to that!
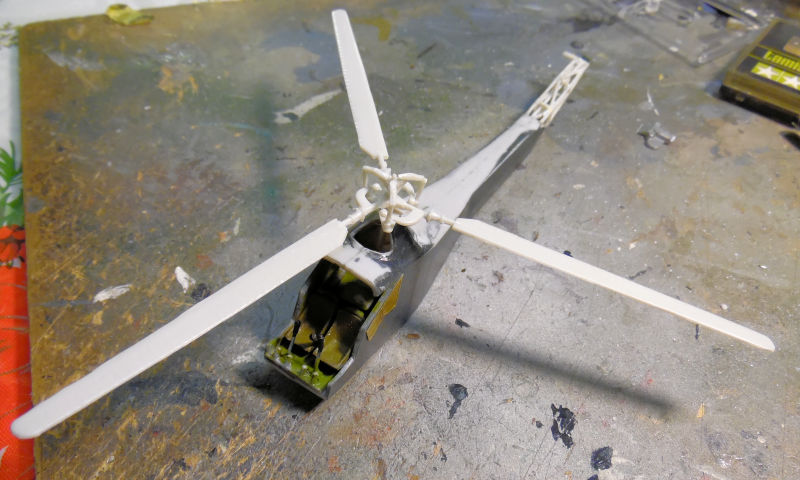
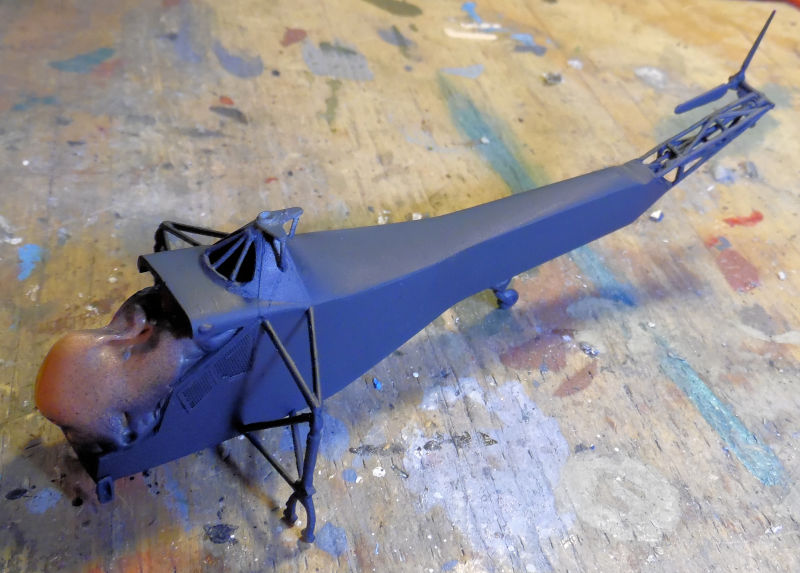
In this next bay we have a shelf queen that was started some five or six years ago, packed up in the box again and promptly lost. While organizing and going through boxes, it was found again and so work commenced in this to get it done. This is an R-4D helicopter used in the Korean War and we had it built up to the basic fuselage stage. When we brought it out to work on it, the first thing we did was use this model to teach a couple kids how to airbrush. Later, we went back and painted the interior and then sanded smooth the seams that showed up in the paint:
Next was the addition of photo-etch parts and the assembly of the tail rotor:
Following that, we got the main rotor assembled, which was quite the ordeal given the weak attachment points on the blades. We got it done though:
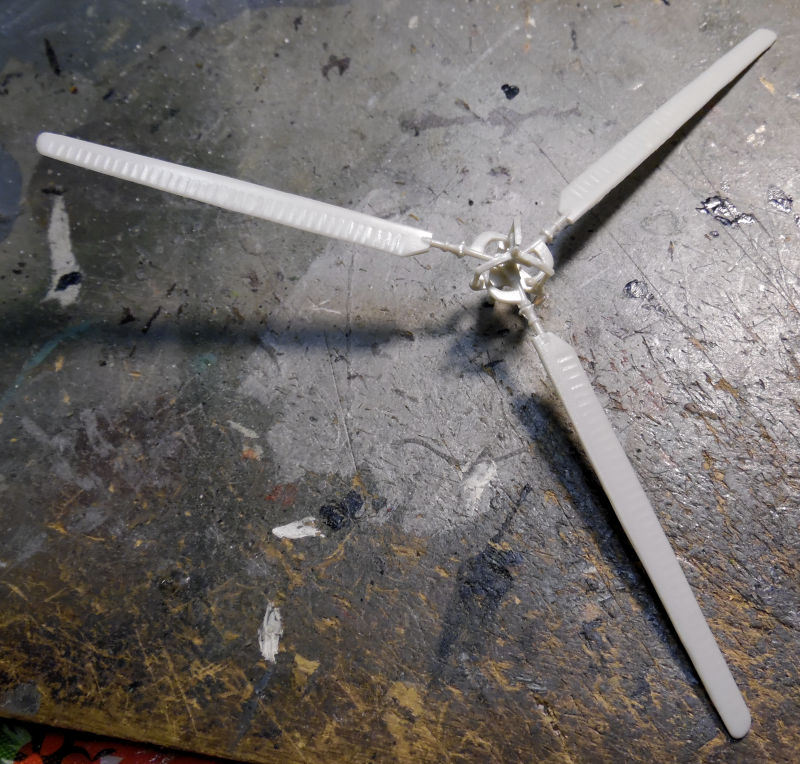
A little dry fit showed us what we were dealing with:
Later we started on the main landing gear. We got the main support struts installed, but had lost the main gear legs so this is where we left off at the time:
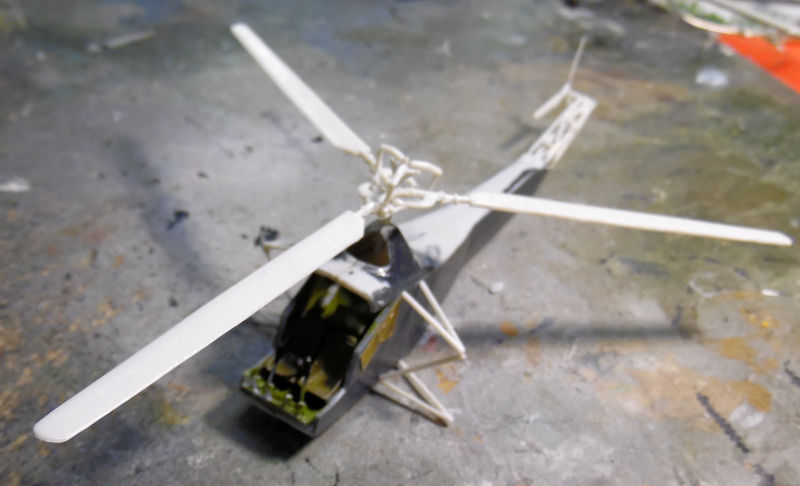
You can see the main rotor is still dry fit. Now a day later, we found the main gear legs and added them, then added the tail wheel and strut along with a couple more detail parts:
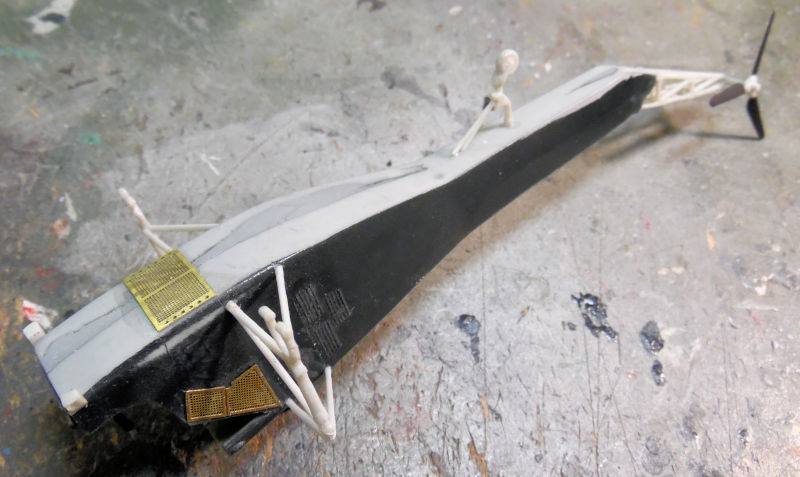
Here you can see why this was packed away in the first place: Vac-Formed canopy. Well, in for a penny, in for a pound, we got the frames painted first:
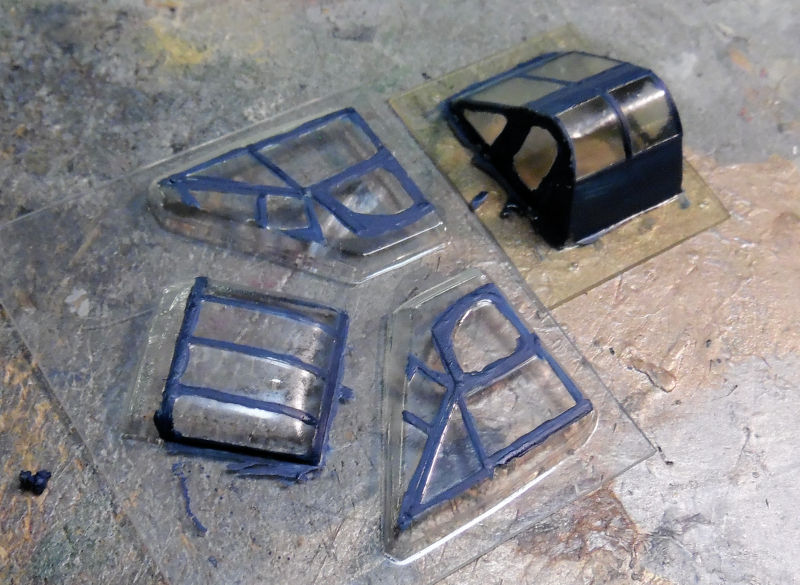
Any suggestions for installing those would be awesome. Meanwhile, we masked off the cockpit with more Silly Putty and got it ready for paint:

Which went on a short time later:
That was later shot with a gloss coat for decals which will go on later. This is where we stopped on that.
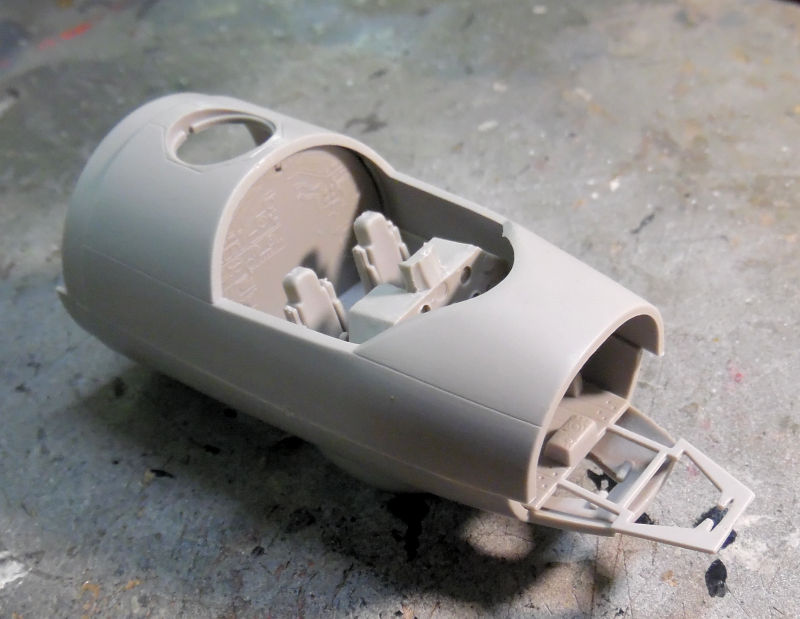
Moving on to the next bay, we have the start of an Egyptian Tu-16 Badger. I have a second one that will be done up in Iraqi Air Force markings too. For now, we got the cockpit assembled and dry-fit inside the cockpit module:
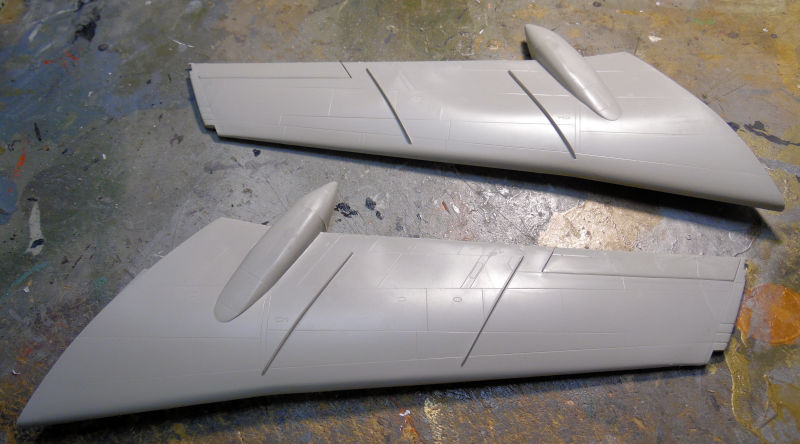
We then assembled the wings since they were so easy to do:
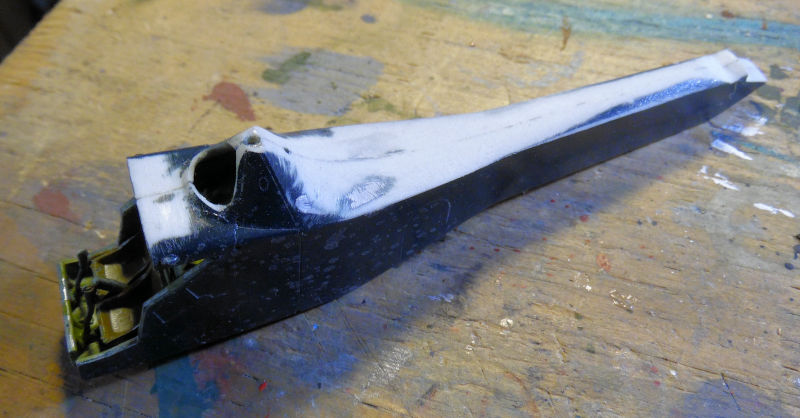
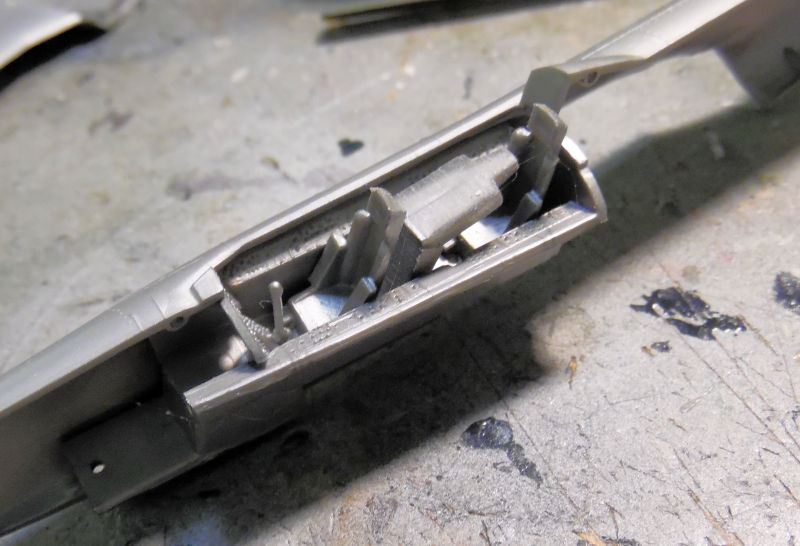
Further progress required paint that we did not have so we put this aside to start another fast and relatively easy kit; one I had never previously built before. This is the Heller F-94D in 1/72 scale and we started with the cockpit which was then cemented inside one half of the fuselage:
Later that cockpit was painted but before that, we built the main wings:
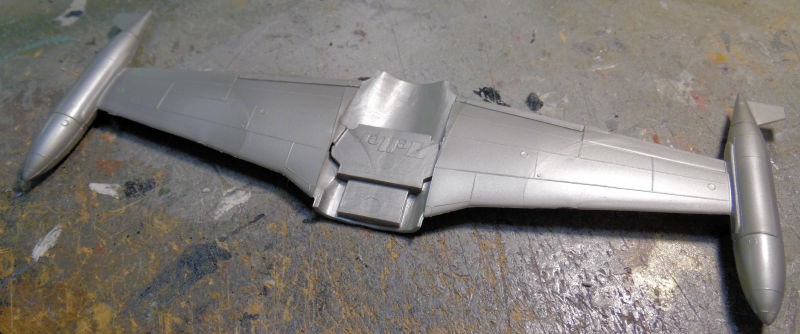
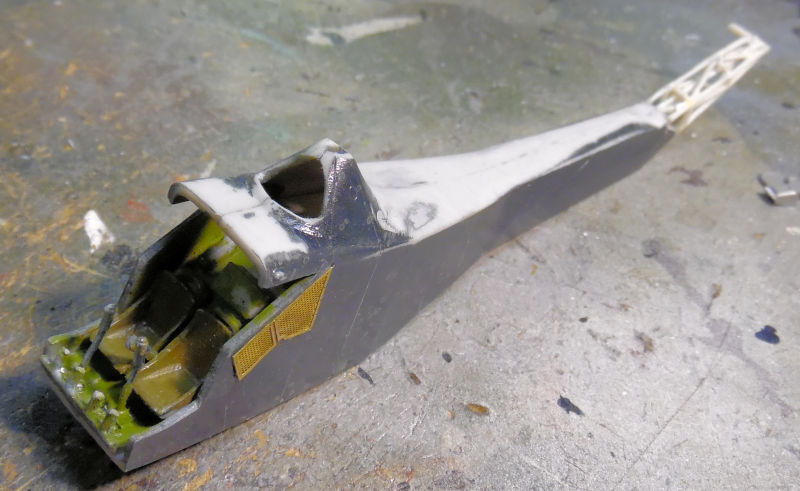
Later on, after adding the right amount of nose weight, this was all assembled together; puttied and sanded and readied for paint:
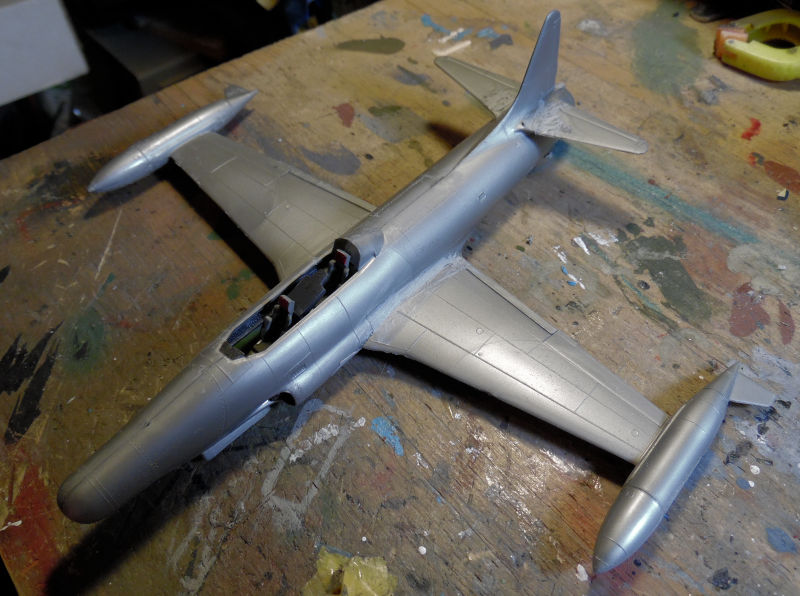
Later the cockpit canopy was masked and installed and this got a coat of flat black paint as a primer so we could see what issues this was going to have:
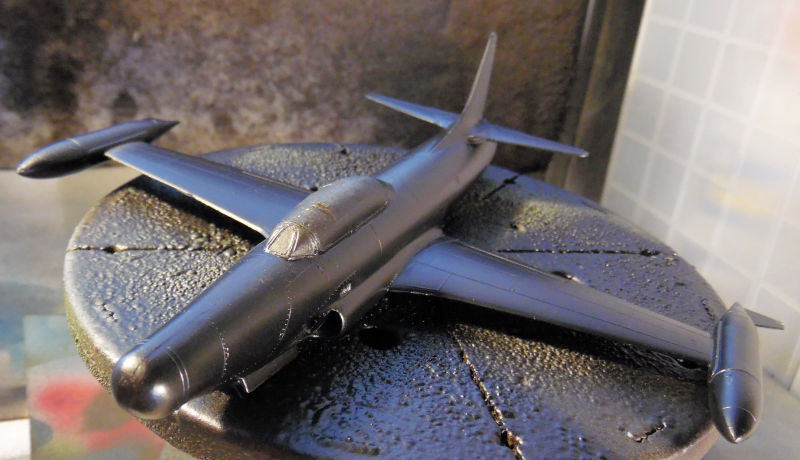
That's where we stand now with that. This completes the tour of the Hangar,now on to the Motor Pool.
Here in the Motor Pool, we have a number of things happening, some of which are new, and some are borderline shelf queens.
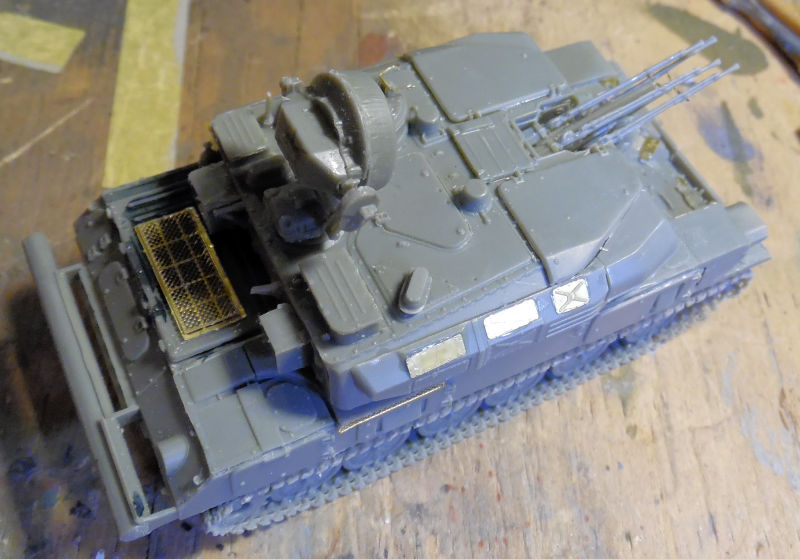
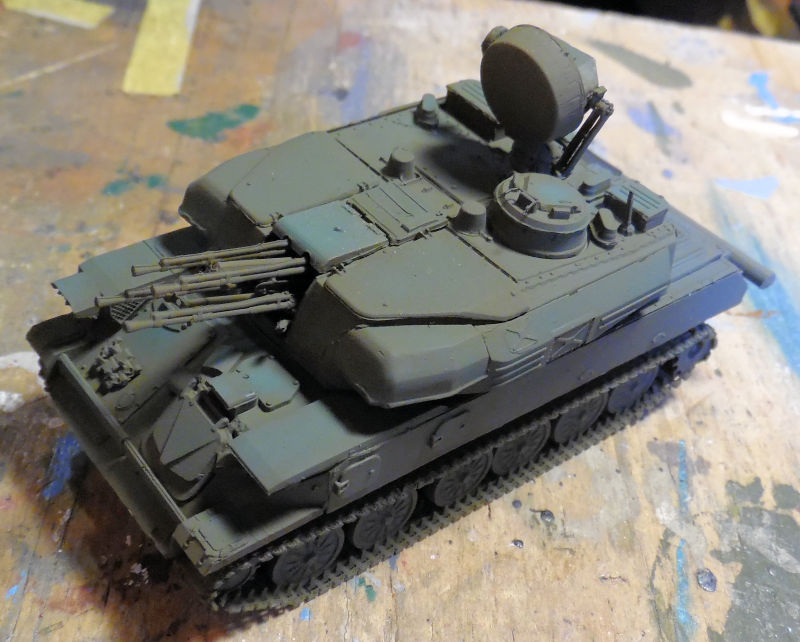
First up is this frustrating Armory ZSU-23-4 Shilka. Amazingly enough, we managed to get the torsion bars and wheels installed, followed by the individual link and length tracks. In fact one of the road wheels does not have a torsion bar because when I was trying to position it; the torsion bar sprang from the tweezers never to be seen again. So, I realized that the tracks touch this wheel top and bottom so it was cemented into place with the tracks themselves holding it into place.
Later photo etch parts were added to this:
Once they were all dry, we sent this to the spray booth where the base coat was shot. Honestly, I never thought I'd ever get this model to this stage, but here it is, shot with a darker green than it's supposed to have due to me being out of the proper green:

In order to try and lighten it up, we took some Euro Dark Green and modulated the color over it. This is the first pass, later we did more and it improved a bit:
Once that was dry, we shot a gloss coat on this, gave it a wash, decals and other attention:
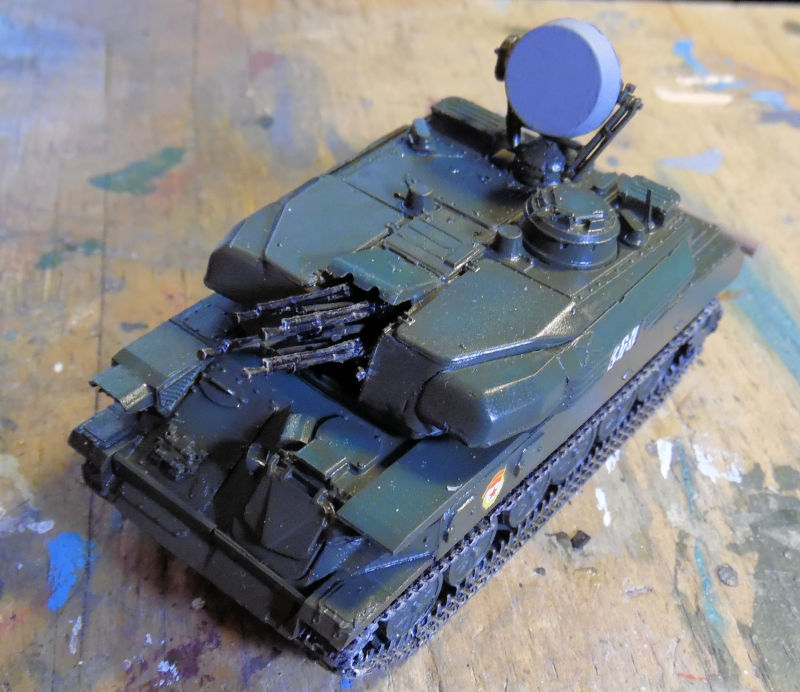
After this a dullcoat was applied and weathering done during it's shakedown run. Then it was sent to the Dispersal Yard.
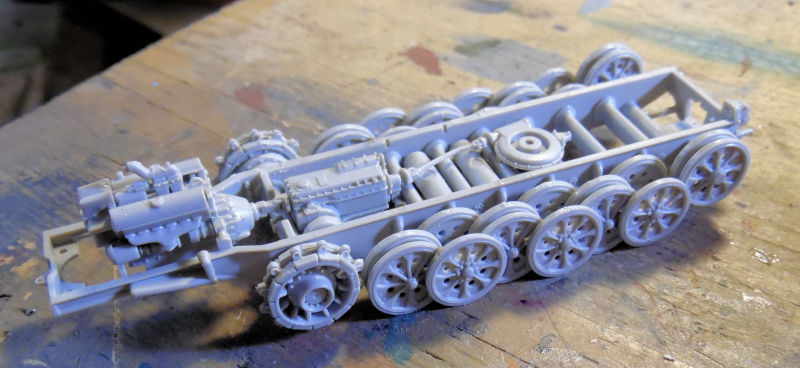
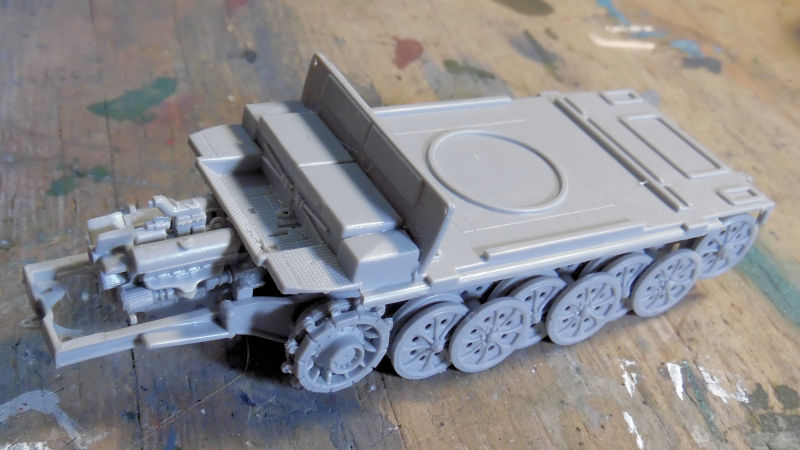
In the next bay is another shelf queen, started some six years ago, packed up again in it's box and promptly lost. It was found in the same box as the helicopter so I figued it was time to move on this one. This is the Trumpeter SdKfz-9 with a crane. The basic chassis had been already done, so we continued to finish up that part, mostly adding the roadwheels, drive sprockets and idlers:
The main floor was then worked on, mostly assembling all the parts for the driver's and passenger's compartment. It's just dry fit on that chassis:
The base of the crane was then built as seen here:

That's as far as we got on that one. In the next bay we started another German truck, the Steyr 1500. The box was so messed up we just had to build it. Basic assembly was pretty good for a short run kit:
The remaining parts and some photo etch was then added:
Later this was shot with paint in the spray booth, but no pics of that.
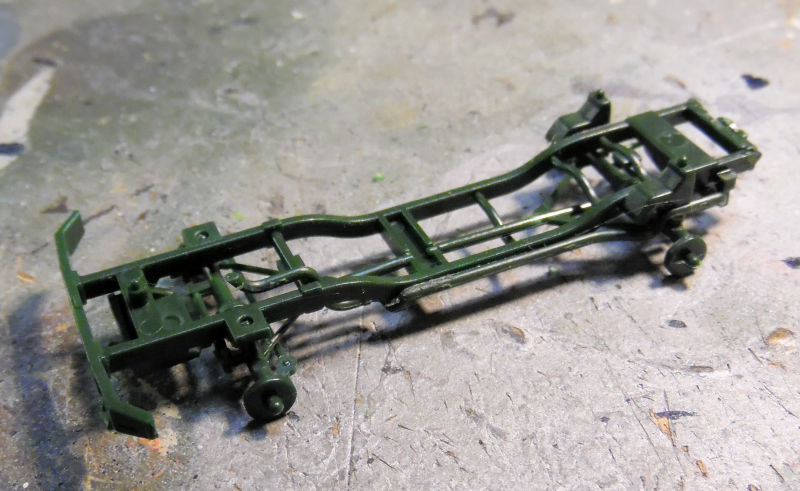
Moving to the next bay we have the start of another easy model; this time another german armored car (more modern this time) made by Revell of Germany. It was left behind at the hobby day hall, so I decided to build it. First was the chassis:
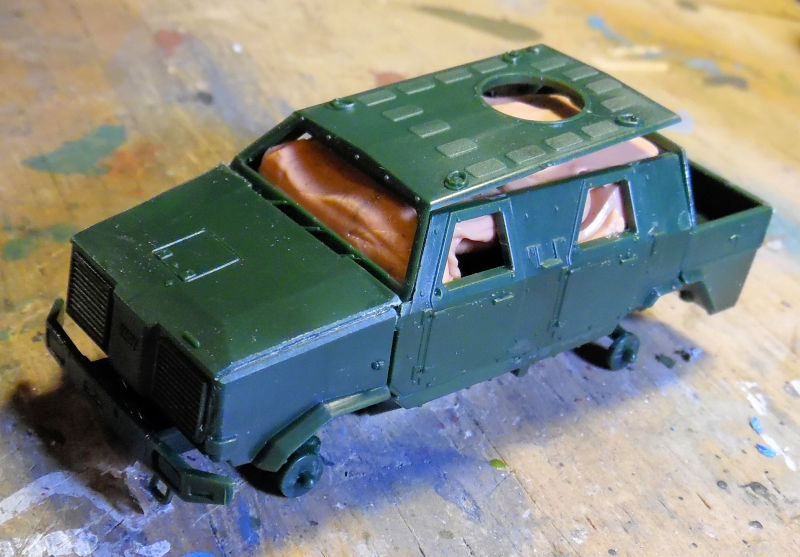
Next the whole body and interior was assembled. Then we added Silly Putty to the interior and added the roof so we can shoot the base paint on it:
That came later.
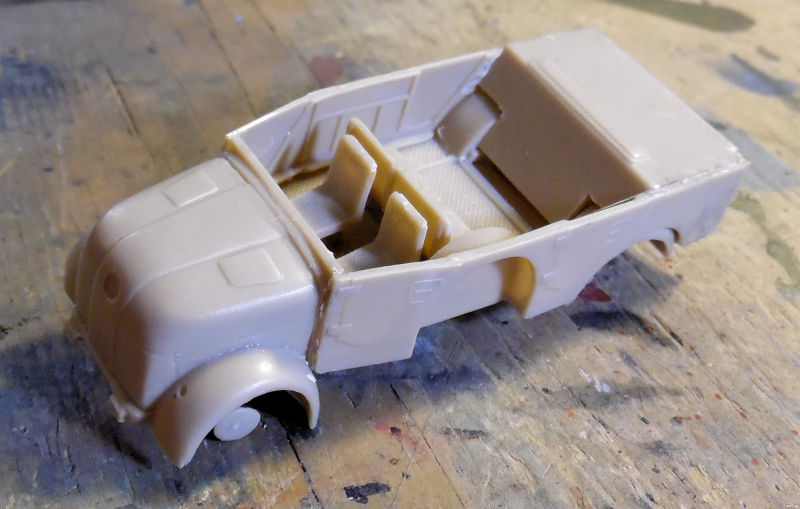
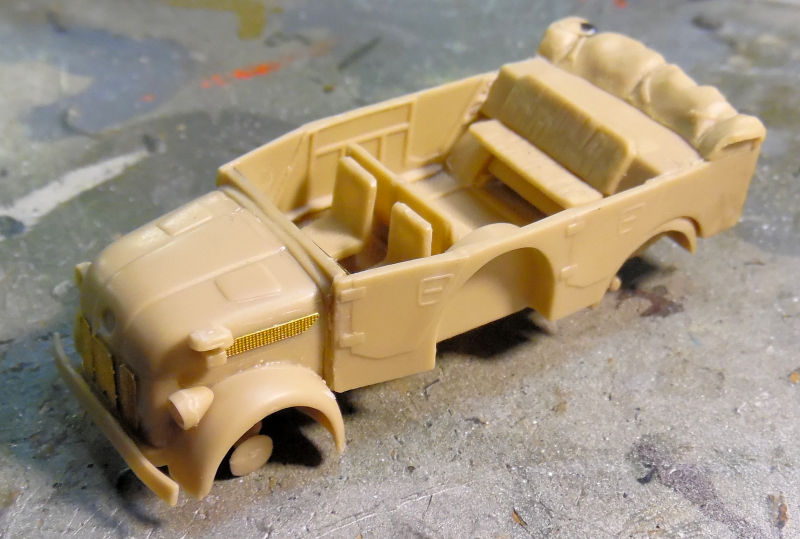
Finally in this last bay we went back to work on the little ACE Ford Stakebed truck. Some dry fitting was done to the chassis after we had painted the stakebed slats and the leather seats in the cab:
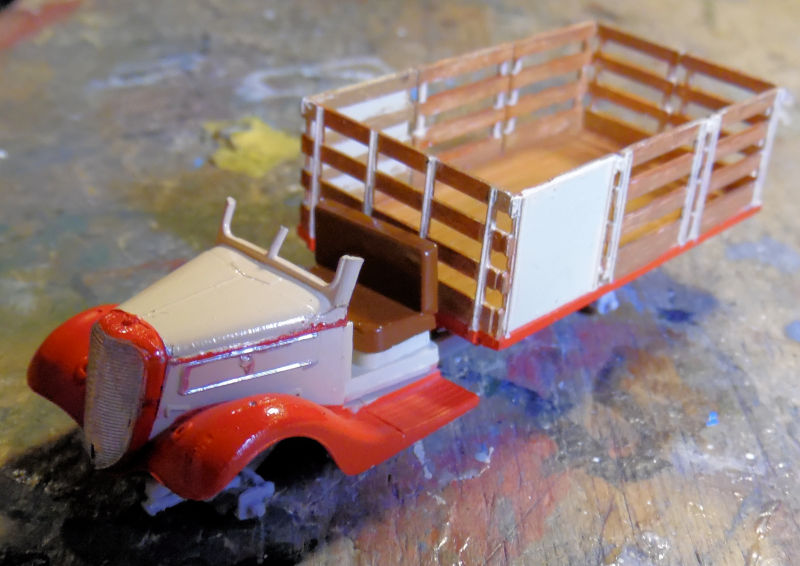
Later we finished the cab, except for the roof so we could get the windows in there later. The cab and stakebed were then glued to the chassis:
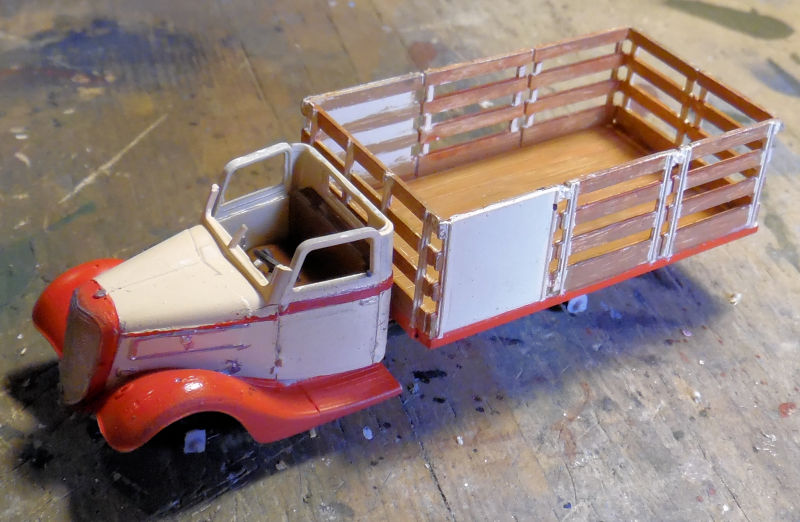
That's as far as we got with that, along with some touch up to the paint here and there. Hopefully thi swill be done soon!
That completes the tour of the Motor Pool, but the tour isn't over. We're going to detour into the Shipyards briefly so you can see the start of a new project that I'd been wanting to do fora very long awhile. This is the ancient Pyro kit of the Robert E. Lee Paddle wheeled Riverboat. We started with painting the waterliine on the hull and then adding the main deck to it. While that was drying, we started the paddle wheels. These required us to cement every paddle to each if the wheel sides as such:
You can see where we started by adding a few paddles to certain quarters of the wheel to hold it together first. Then all the rest were cemented into place. That was the first one. The second one is here:
Both wheels eventually got done:

This final shot shows the paddle wheels and the boilers dry fit in place on the main hull:

By the way, that model is a little over two feet long. It has been and interesting and fun build so far.
And that completes this tour of Maddog Manufacturing for this second week of December. I hope you enjoyed it and remember comments are always welcome.
Our first stop as always is the Hangar. We have a couple of started models, and a few Shelf Queens that are receiving attention too.
In the first bay here is the British Spitfire Mk. XIV. We got all the paint damage repaired from when the paint cracked under the gloss coat:
Later the white stripe had to be painted on, so that was done. Yes, I decided to do it by hand:
After that dried, we shot the whole thing with a gloss and added the decals:
Other details were painted and most final parts were added. Later the rockets were added and this was declared done and sent to the Dispersal Field.
In this next bay we returned to the Fleet Air Arm F-6F Hellcat. This one got a shot of light RAF grey on the bottom:
Later, it was masked off and the upper green color was shot:
After some Silly Putty application we'll be able to shoot the second color. Looking forward to that!
In this next bay we have a shelf queen that was started some five or six years ago, packed up in the box again and promptly lost. While organizing and going through boxes, it was found again and so work commenced in this to get it done. This is an R-4D helicopter used in the Korean War and we had it built up to the basic fuselage stage. When we brought it out to work on it, the first thing we did was use this model to teach a couple kids how to airbrush. Later, we went back and painted the interior and then sanded smooth the seams that showed up in the paint:
Next was the addition of photo-etch parts and the assembly of the tail rotor:
Following that, we got the main rotor assembled, which was quite the ordeal given the weak attachment points on the blades. We got it done though:
A little dry fit showed us what we were dealing with:
Later we started on the main landing gear. We got the main support struts installed, but had lost the main gear legs so this is where we left off at the time:
You can see the main rotor is still dry fit. Now a day later, we found the main gear legs and added them, then added the tail wheel and strut along with a couple more detail parts:
Here you can see why this was packed away in the first place: Vac-Formed canopy. Well, in for a penny, in for a pound, we got the frames painted first:
Any suggestions for installing those would be awesome. Meanwhile, we masked off the cockpit with more Silly Putty and got it ready for paint:
Which went on a short time later:
That was later shot with a gloss coat for decals which will go on later. This is where we stopped on that.
Moving on to the next bay, we have the start of an Egyptian Tu-16 Badger. I have a second one that will be done up in Iraqi Air Force markings too. For now, we got the cockpit assembled and dry-fit inside the cockpit module:
We then assembled the wings since they were so easy to do:
Further progress required paint that we did not have so we put this aside to start another fast and relatively easy kit; one I had never previously built before. This is the Heller F-94D in 1/72 scale and we started with the cockpit which was then cemented inside one half of the fuselage:
Later that cockpit was painted but before that, we built the main wings:
Later on, after adding the right amount of nose weight, this was all assembled together; puttied and sanded and readied for paint:
Later the cockpit canopy was masked and installed and this got a coat of flat black paint as a primer so we could see what issues this was going to have:
That's where we stand now with that. This completes the tour of the Hangar,now on to the Motor Pool.
Here in the Motor Pool, we have a number of things happening, some of which are new, and some are borderline shelf queens.
First up is this frustrating Armory ZSU-23-4 Shilka. Amazingly enough, we managed to get the torsion bars and wheels installed, followed by the individual link and length tracks. In fact one of the road wheels does not have a torsion bar because when I was trying to position it; the torsion bar sprang from the tweezers never to be seen again. So, I realized that the tracks touch this wheel top and bottom so it was cemented into place with the tracks themselves holding it into place.
Later photo etch parts were added to this:
Once they were all dry, we sent this to the spray booth where the base coat was shot. Honestly, I never thought I'd ever get this model to this stage, but here it is, shot with a darker green than it's supposed to have due to me being out of the proper green:
In order to try and lighten it up, we took some Euro Dark Green and modulated the color over it. This is the first pass, later we did more and it improved a bit:
Once that was dry, we shot a gloss coat on this, gave it a wash, decals and other attention:
After this a dullcoat was applied and weathering done during it's shakedown run. Then it was sent to the Dispersal Yard.
In the next bay is another shelf queen, started some six years ago, packed up again in it's box and promptly lost. It was found in the same box as the helicopter so I figued it was time to move on this one. This is the Trumpeter SdKfz-9 with a crane. The basic chassis had been already done, so we continued to finish up that part, mostly adding the roadwheels, drive sprockets and idlers:
The main floor was then worked on, mostly assembling all the parts for the driver's and passenger's compartment. It's just dry fit on that chassis:
The base of the crane was then built as seen here:
That's as far as we got on that one. In the next bay we started another German truck, the Steyr 1500. The box was so messed up we just had to build it. Basic assembly was pretty good for a short run kit:
The remaining parts and some photo etch was then added:
Later this was shot with paint in the spray booth, but no pics of that.
Moving to the next bay we have the start of another easy model; this time another german armored car (more modern this time) made by Revell of Germany. It was left behind at the hobby day hall, so I decided to build it. First was the chassis:
Next the whole body and interior was assembled. Then we added Silly Putty to the interior and added the roof so we can shoot the base paint on it:
That came later.
Finally in this last bay we went back to work on the little ACE Ford Stakebed truck. Some dry fitting was done to the chassis after we had painted the stakebed slats and the leather seats in the cab:
Later we finished the cab, except for the roof so we could get the windows in there later. The cab and stakebed were then glued to the chassis:
That's as far as we got with that, along with some touch up to the paint here and there. Hopefully thi swill be done soon!
That completes the tour of the Motor Pool, but the tour isn't over. We're going to detour into the Shipyards briefly so you can see the start of a new project that I'd been wanting to do fora very long awhile. This is the ancient Pyro kit of the Robert E. Lee Paddle wheeled Riverboat. We started with painting the waterliine on the hull and then adding the main deck to it. While that was drying, we started the paddle wheels. These required us to cement every paddle to each if the wheel sides as such:
You can see where we started by adding a few paddles to certain quarters of the wheel to hold it together first. Then all the rest were cemented into place. That was the first one. The second one is here:
Both wheels eventually got done:
This final shot shows the paddle wheels and the boilers dry fit in place on the main hull:
By the way, that model is a little over two feet long. It has been and interesting and fun build so far.
And that completes this tour of Maddog Manufacturing for this second week of December. I hope you enjoyed it and remember comments are always welcome.
The Duke
Virtuoso of Miniatures
"Do you know what the chain of command is? It's the chain I get and beat you with 'till you understand who's in ruttin' command!"
-Jayne Cobb, Firefly Episode 2 "The Train Job"
We are modelers - the same in spirit, in hunger to insanely buy newly released kits, hustlers in hiding our stash from our better halves and experts in using garbage as replacements for after-market parts.
Virtuoso of Miniatures
"Do you know what the chain of command is? It's the chain I get and beat you with 'till you understand who's in ruttin' command!"
-Jayne Cobb, Firefly Episode 2 "The Train Job"
We are modelers - the same in spirit, in hunger to insanely buy newly released kits, hustlers in hiding our stash from our better halves and experts in using garbage as replacements for after-market parts.
-
Stikpusher

- Moderator
- Posts: 18968
- Joined: Sat Apr 05, 2014 8:37 pm
- Location: Ceti Alpha 5
Re: Maddog Manufacturing 2023 Grand Reopening!
Nice tour Mark! The Shilka is always a favorite subject of mine, just for that era... but the Robert E Lee paddle wheeler, thats a whole class by itself! Nice!
"Surely I have made my meaning plain? I intend to avenge myself upon you, Admiral. I have deprived your ship of power, and when I swing 'round, I intend to deprive you of your life."
FLSM
FLSM

Re: Maddog Manufacturing 2023 Grand Reopening!
Wouh wouh wouh!
What a massive amount of projects ongoing there Mark!
That R-4D helicopter is really tiny! Great work with the PE parts and especially the canopy! Cannot even imagine how to install the vacuum canopy
Cool subject the Tu-16 !
And then , the Robert E Lee riverboat, I think I have never seen this kit, anywhere. Will be really interesting to follow this massive sized build! Curious also how you will paint it, needs almost an own paint-room instead of a paint-booth!
- Kari
---
On the bench:
Tamiya F-4B Phantom II 1/48
Kinetic F-16A (new tool) 1/48
https://www.facebook.com/GrundAsk-Scale ... 721218708/
On the bench:
Tamiya F-4B Phantom II 1/48
Kinetic F-16A (new tool) 1/48
https://www.facebook.com/GrundAsk-Scale ... 721218708/