JKim's Completed Builds (Restored..Again!)

Show off your completed work! One or two pictures and a brief explanation. Let others have a quick look at your finished masterpieces!
User avatar
jkim
Elite Member
Posts: 4073
Joined: Mon Apr 10, 2017 4:03 pm

Re: JKim's Completed Builds

Post by jkim »

Thanks guys! Thomas... I primarily use Tamiya paints for my builds. But I also have some older Gunze Sangyo acrylics in Luftwaffe shades that I use. For Blue 16, the undersides are RLM76, which is a mix of XF2 White and XF23 Light Blue. The primary upper colors are RLM83 (Tamiya XF61) and RLM74 (Gunze Sangyo RLM 74). The light grey on the upper portion of the nose is a mixture of Tamiya XF84 Medium Sea Grey and XF2 White, I believe. The tail is RLM81 (XF64 Red Brown and XF51 Khaki Drab). My mixtures are very imprecise and vary from build to build, even on the same kit.

Here are some in-progress shots of the build. The cockpit was pretty standard and I didn't do anything fancy there since the canopy was going to be shut anyway. The big thing on this kit was that I decided to apply rivets to the exterior. I use a rotary ponce wheel-type tool from RB Productions called the Rivet-R Mini.
Image

Using a set of detailed plan and profile drawings, the rivet lines are sketch onto the surface using a soft leaded pencil.
Image

Once the lines are drawn on the plastic, I simply run the Rivet-R along the lines. No straight edge is used since it is fairly easy to keep the Rivet-R running straight. Oh yeah... see that panel line with the obvious sanding marks along it? That's a newly scribed panel line that was missing from the Hasegawa wing. Hasegawa's modular approach allows for the same molds to be used for different versions but some modeler modifications may be required. Along with this panel line, the circular wheel well needed to be cut out to make it square. Both of these modifications are described in the instructions.
Image

After the rivets are applied, I wipe off the lead markings using a cloth dipped in iso alcohol and then sand the entire surface with very fine sandpaper to remove the raised plastic around the rivet holes.
Image

Underneath, I made some additions to the fuselage bottom according to an online source.
Image
Image

After a failed attempt at using brass sheet, I made some wheel well inserts using plastic sheet.
Image

I chose to close the wheel well doors by chopping off the open doors on the kit fuselage and placing a piece of sprue into the opening.
Image
Image
Image

Some of the sloppy access hatches were filled and re-scribed.
Image
Image
Image

The exhaust pipes were hollowed out and the deflector plates were replaced with brass sheet.
Image
Image
Last edited by jkim on Tue Jun 04, 2019 1:57 pm, edited 3 times in total.
John aka JKim
-----------<><
Image
User avatar
Stikpusher
Moderator
Posts: 21188
Joined: Sat Apr 05, 2014 8:37 pm
Location: Ceti Alpha 5

Re: JKim's Completed Builds

Post by Stikpusher »

:hmm: Every one of your WIPs is a great class in dressing up a kit using fairly simple tools and/or techniques... great stuff! :writing:
"Surely I have made my meaning plain? I intend to avenge myself upon you, Admiral. I have deprived your ship of power, and when I swing 'round, I intend to deprive you of your life."

FLSM
User avatar
BlackSheep214
Elite Member
Posts: 13418
Joined: Sun Apr 06, 2014 8:47 pm

Re: JKim's Completed Builds

Post by BlackSheep214 »

I am at a loss for words. Amazing work!
“Who controls the skies, controls the fate of this Earth”

Author unknown- 352nd Fighter Group, Blue-Nosed Bastards of Bodney

“Send one plane it’s a sortie; send two planes it’s a flight; send four planes it’s a test of airpower. - Richard Kohn
User avatar
jkim
Elite Member
Posts: 4073
Joined: Mon Apr 10, 2017 4:03 pm

Re: JKim's Completed Builds

Post by jkim »

Thanks gentlemen! The focus on this K-4 was not on the details but the paint job so I think it is appropriate to talk a little about how the camo was applied.

I used my usual preshading routine as a foundation for the camo finish.
Image

The RLM76 was applied to the bottom and the sides. I use a very diluted mix when spraying over my marbled base which helps to control the effect but it does take some time to build up the paint in layers.
Image
Image

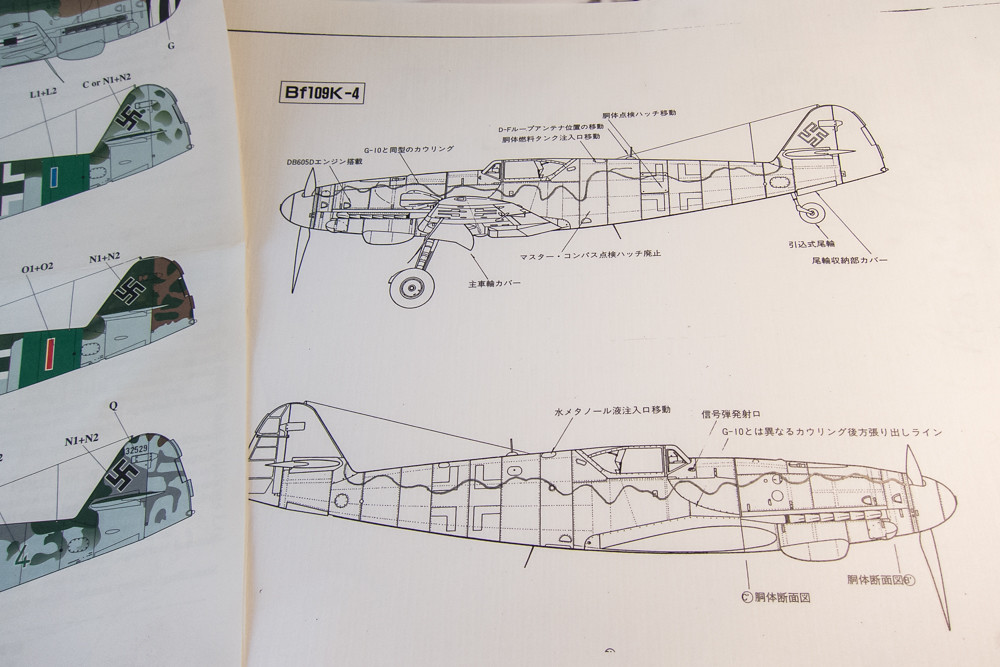
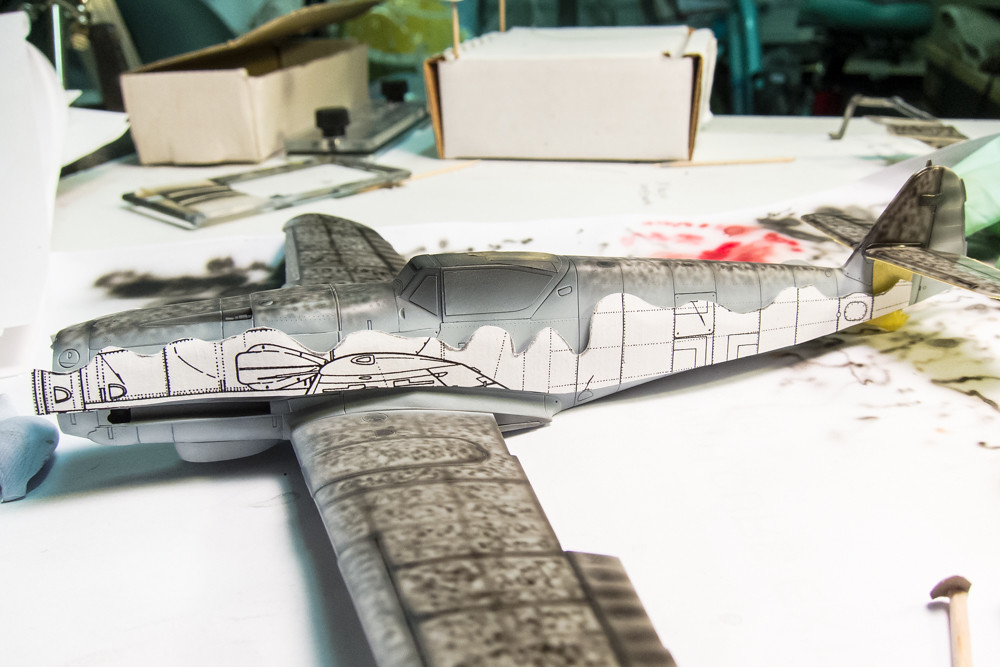
I wanted to get a very tight but still sprayed demarcation between the upper and lower camo colors that were characteristic of W.Nr.331xxx K-4's. I chose to use paper masks attached using blobs of Blu Tack.
Image
Image
Image
Image

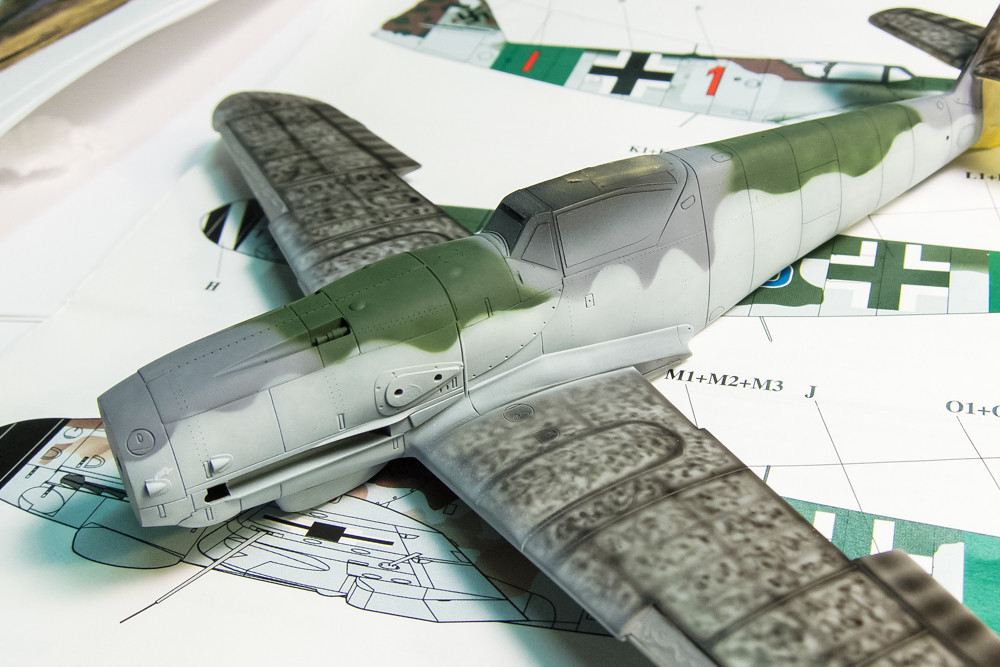
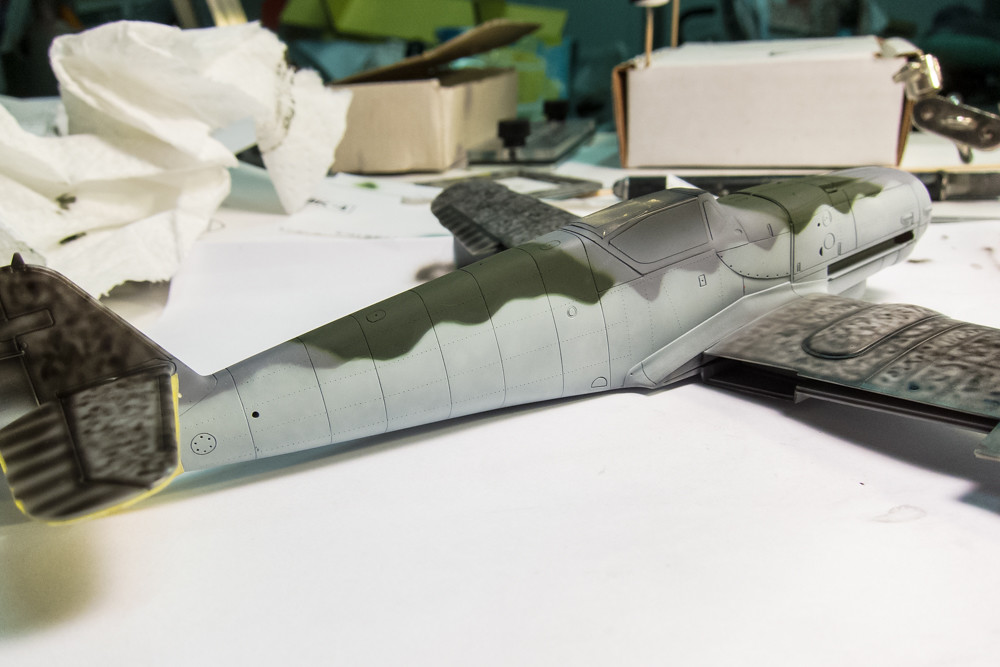
Once the masks were attached, I sprayed the upper colors, RLM75 and RLM83.
Image

I didn't like how the green came out so I resprayed it with a darker mix. I found out that re-attaching the masks and re-spraying will cause a halo effect around slightly misaligned areas so I had to spend some time repairing those areas.
Image
Image

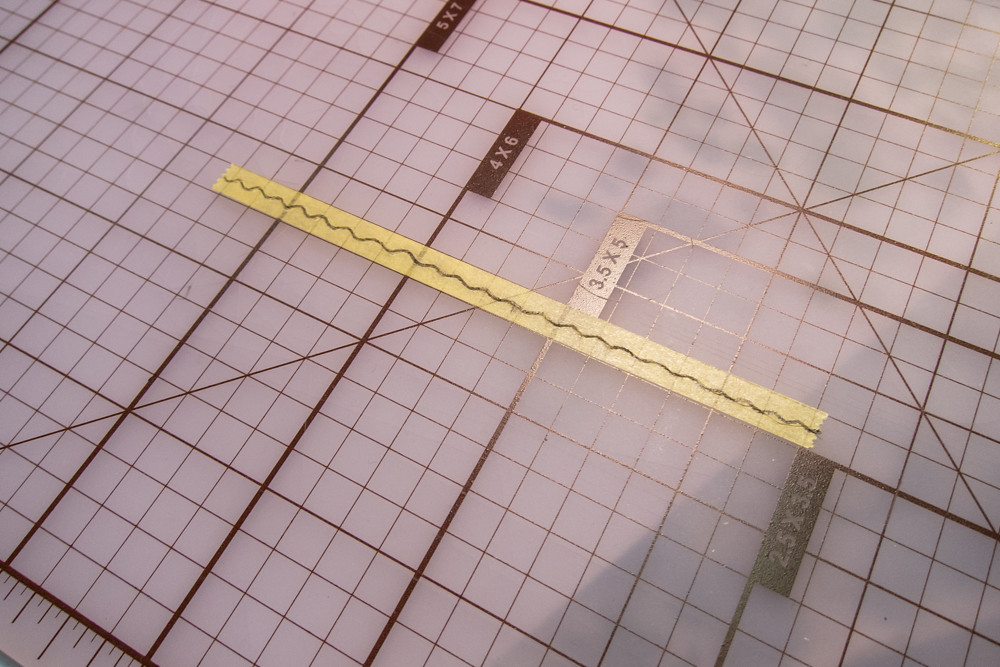
The upper wings were painted next. I used a tight squiggle cut into a strip of Tamiya tape for the wavy demarcation at the leading edge of the wings.
Image

No masks were used for the transition between the grey and green.
Image

Although Blue 16 was photographed minus the tail assembly, the camo pattern strongly suggested it as a W.Nr331xxx aircraft. Many of these aircraft had very hard edged spots on the vertical tail surfaces and a hard edge on the lower edge of the tail that I wanted to capture.
Image

The tail was masked off and painted RLM83. Blu Tack was used to recreate the spot pattern.
Image

I chose to use RLM81 as the tail color, which is speculative given the missing tail of the real aircraft.
Image

The model at this point is probably representative of the factory paint job of a W.Nr331xxx K-4 but it doesn't look much like Blue 16 in the photo. It's obvious that field applications to paint were common on Luftwaffe aircraft, especially toward the end of the war. With this in mind, added the green ID band around the rear fueslage, some mottling in RLM83 and a darker green along the rear bottom edge of the fuselage. I also used this color to represent what appears to be an old tactical number that was sprayed over.
Image

The fuselage crosses were painted white using an old set of Montex G-10 masks that I had in the spares box.
Image
Image

The wing crosses were painted using the same set of masks. The Montex masks can be used multiple times so I make sure I carefully put the mask back onto the backing sheet after use.
Image
Image

At this point, I decided to do some initial weathering but I'll continue a little bit later.
Last edited by jkim on Tue Jun 04, 2019 1:58 pm, edited 2 times in total.
John aka JKim
-----------<><
Image
User avatar
Thomas_M
Admin
Posts: 4244
Joined: Fri Dec 13, 2013 9:43 am
Location: Bad Wurzach - Germany
Contact:

Re: JKim's Completed Builds

Post by Thomas_M »

John, really, I could watch you doing your magic for hours! Thank you so much for this mighty fine tutorial!! :shoutout:
User avatar
BlackSheep214
Elite Member
Posts: 13418
Joined: Sun Apr 06, 2014 8:47 pm

Re: JKim's Completed Builds

Post by BlackSheep214 »

Wow.... just wow... Interesting and great ideas on your camouflage methods.
“Who controls the skies, controls the fate of this Earth”

Author unknown- 352nd Fighter Group, Blue-Nosed Bastards of Bodney

“Send one plane it’s a sortie; send two planes it’s a flight; send four planes it’s a test of airpower. - Richard Kohn
User avatar
Stikpusher
Moderator
Posts: 21188
Joined: Sat Apr 05, 2014 8:37 pm
Location: Ceti Alpha 5

Re: JKim's Completed Builds

Post by Stikpusher »

Thomas_M wrote:John, really, I could watch you doing your magic for hours! Thank you so much for this mighty fine tutorial!! :shoutout:
:that:

Agreed. I have only tried pre shading on a couple occasions and used a different method. I like the way you explained your technique... :writing: more stuff to try... :hmm:
"Surely I have made my meaning plain? I intend to avenge myself upon you, Admiral. I have deprived your ship of power, and when I swing 'round, I intend to deprive you of your life."

FLSM
User avatar
jkim
Elite Member
Posts: 4073
Joined: Mon Apr 10, 2017 4:03 pm

Re: JKim's Completed Builds

Post by jkim »

Thanks guys! K-4 Painting Part Deux....

After the masked markings were applied, I decided to do some preliminary weathering. This consisted of spraying very dilute mixes of dark brown/black around certain panel lines and control surface junctions. I also did the exhaust stains and put some dirty streaking on the bottom.
Image
Image

This step was sealed with a coat of Alclad Aqua Gloss. Decals and then a dark wash is supposed to come next but something kept nagging at me.
Image
Image

Something that I noticed on the photo of Blue 16 was the light coloring of the cowl immediately behind the prop spinner. It looks much lighter than the RLM75 Grey. With the majority of the engine cowling missing, it's hard to say what this area looked like for sure but keeping with the patchwork look of late war Luftwaffe warbirds, I decided to paint the engine cowling a little bit differently.
Image

Another resource that pushed me in this direction is this page from Krzysztof Wolowski's "BF 109 Late Versions" book. Although the example given is not a W.Nr331xxx batch aircraft, I couldn't ignore this seemingly plausible explanation for what my eyes were seeing in the Blue 16 photo.
Image

The cowling was masked off with Tamiya tape.
Image

A base coat of Neutral Grey was sprayed on.
Image

Preshading.
Image

The lower half of the cowling was sprayed RLM76. The upper camo colors were light and dark grey. I can't remember which paints I used.
Image

A little weathering was applied to match the rest of the fuselage and then the whole thing was sealed with another coat of Alclad Aqua Gloss.
Image
Image
Last edited by jkim on Tue Jun 04, 2019 1:59 pm, edited 3 times in total.
John aka JKim
-----------<><
Image
User avatar
speedgraflex
Moderator
Posts: 11358
Joined: Fri Feb 10, 2017 11:08 pm
Contact:

Re: JKim's Completed Builds

Post by speedgraflex »

jkim wrote:Thanks gentlemen! The focus on this K-4 was not on the details but the paint job so I think it is appropriate to talk a little about how the camo was applied.
I wanted to get a very tight but still sprayed demarcation between the upper and lower camo colors that were characteristic of W.Nr.331xxx K-4's. I chose to use paper masks attached using blobs of Blu Tack.
Image
Image
Every time I visit here, I think I'm going to see the original posts, but you keep adding amazing new posts!!!!! And, I am going to use this technique ASAP.
Make more models!
User avatar
jkim
Elite Member
Posts: 4073
Joined: Mon Apr 10, 2017 4:03 pm

Re: JKim's Completed Builds

Post by jkim »

I like to use this method when I want a tightly sprayed demarcation that I can't get with an airbrush alone. The N1K1 Shiden build is another example where this method worked well.
Image
Image
Last edited by jkim on Tue Jun 04, 2019 1:59 pm, edited 2 times in total.
John aka JKim
-----------<><
Image
Post Reply

Return to “Member's Gallery”