

Fujimi 1/72 Nakajima Ki-43 Hayabusa / Oscar

Re: Fujimi 1/72 Nakajima Ki-43 Hayabusa / Oscar
Grrr, all the paint of the anti glare panel came off,

I will just have to brush paint it.
I will just have to brush paint it.





Re: Fujimi 1/72 Nakajima Ki-43 Hayabusa / Oscar
Man I know that feeling. I remasked and sealed and sprayed the areas around the exhaust and anti glare panel on that P-51 I just did about 6 times I think. I just went back and forth between the metal lifting and the OD lifting. It got SUPER frustrating. Nice metal paint job though!BorgR3mc0 wrote:Grrr, all the paint of the anti glare panel came off,
It's up to you how much money you want to spend and how many new words you want to create "correcting" something.

Re: Fujimi 1/72 Nakajima Ki-43 Hayabusa / Oscar
I feel your pain! Maybe not over as large an area, but......Patience, barhopper.
To make each build less crappy than the last one. Or, put another way, "Better than the last one, not as good as the next one!"..
-
Medicman71

- Elite Member
- Posts: 11396
- Joined: Mon Apr 07, 2014 9:32 am
- Location: Houston, Tx
Re: Fujimi 1/72 Nakajima Ki-43 Hayabusa / Oscar
Wow! The NMF looks great despite the setback.
Mike
Sponsored by Boeing, Lockheed Martin, Northrop Grumman, Saab, BAE, and Dassault
Sponsored by Boeing, Lockheed Martin, Northrop Grumman, Saab, BAE, and Dassault
Re: Fujimi 1/72 Nakajima Ki-43 Hayabusa / Oscar
Thanks for the compliments on the nmf. I am going to use some tricks to get it look even beter. This just a shiney base coat from a duplicolor spraycan. I am going to put a wash over it and then seal it with a flat coat. To add variation some panels wil be polished with graphite powder.
Current state of affairs: painted the fabric parts with Tamiya Japanese army grey. And reprinted the anti glare panel with Revell aqueous paint.

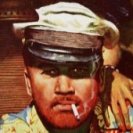
I am also painting a pilot. Maybe I am going to make a little diorama, I also got a Japanese starter truck by Hasegawa.... The base coat is GW scorched brown, flesh is GW Dwarven flesh and the uniform is Japanese kakhi by Anderea miniatures. Still a lot to do but the first coats are going fine.

Current state of affairs: painted the fabric parts with Tamiya Japanese army grey. And reprinted the anti glare panel with Revell aqueous paint.
I am also painting a pilot. Maybe I am going to make a little diorama, I also got a Japanese starter truck by Hasegawa.... The base coat is GW scorched brown, flesh is GW Dwarven flesh and the uniform is Japanese kakhi by Anderea miniatures. Still a lot to do but the first coats are going fine.
Re: Fujimi 1/72 Nakajima Ki-43 Hayabusa / Oscar
Nice resolution of the problem. The finish seems really great.
I'm building too the starter truck.. But a Chinese copy of the hasegawa :(
I'm building too the starter truck.. But a Chinese copy of the hasegawa :(
-
steve scan
- Newbie
- Posts: 22
- Joined: Sun Jul 13, 2014 6:09 pm
Re: Fujimi 1/72 Nakajima Ki-43 Hayabusa / Oscar
Looking great, paint has come out well.
Getting an education was a bit like getting a communicable sexual disease. It made you unsuitable for a lot of jobs, then you had the urge to pass it on
Re: Fujimi 1/72 Nakajima Ki-43 Hayabusa / Oscar
I finished the pilot:

And put the decals on. Although they are almost 20 years old (I have a "50 years after WWII "commemorative boxing) they work fine. And with some Microset they settled into the panel lines. They are sealed with some brushed on Future.


And put the decals on. Although they are almost 20 years old (I have a "50 years after WWII "commemorative boxing) they work fine. And with some Microset they settled into the panel lines. They are sealed with some brushed on Future.
Re: Fujimi 1/72 Nakajima Ki-43 Hayabusa / Oscar
I have put a wash on the whole plane.


Then gently removed the exces with some tissue and q-tip in the direction of the airflow.

It is still a bit to glossy so I will put on a flat coat. Then it is time for detail painting and putting on the final pieces. It could be finished this weekend.....
Then gently removed the exces with some tissue and q-tip in the direction of the airflow.
It is still a bit to glossy so I will put on a flat coat. Then it is time for detail painting and putting on the final pieces. It could be finished this weekend.....