1:48 P-51B “Spare Parts” (Tamiya Kit)

Re: 1:48 P-51B “Spare Parts” (Tamiya Kit)
She's looking really good Kenny! Don't sell yourself short, your method of building and painting is excellent. The attention to detail you put into your paint jobs is something I want to do.
March as one, Don't look back
Odin's sons... Attack!
Unleash hell! Do not repent! Warfare grants us no lament
Let your weapons slash and tear This is no place for fear
Hold the lines! Move as one! In unity our victory's won
Our shields will form a mighty wall
United we shall never fall
Odin's sons... Attack!
Unleash hell! Do not repent! Warfare grants us no lament
Let your weapons slash and tear This is no place for fear
Hold the lines! Move as one! In unity our victory's won
Our shields will form a mighty wall
United we shall never fall
-
Stikpusher

- Moderator
- Posts: 21383
- Joined: Sat Apr 05, 2014 8:37 pm
- Location: Ceti Alpha 5
Re: 1:48 P-51B “Spare Parts” (Tamiya Kit)
I like your new approach guidelines Kenny, and you're off to a great start on this one. But like the others have said, don’t sell your old work short. I’d have been very happy to to turn out such build myself. You do some mighty fine work.
"Surely I have made my meaning plain? I intend to avenge myself upon you, Admiral. I have deprived your ship of power, and when I swing 'round, I intend to deprive you of your life."
FLSM
FLSM
-
Paul

- Addicted Member
- Posts: 1069
- Joined: Mon Mar 17, 2014 9:09 am
- Location: Under your bed, muwahahahaha
Re: 1:48 P-51B “Spare Parts” (Tamiya Kit)
It really doesn't matter, Kenny. Just build it for you. Mine usually wind up in the bin after a few months on the shelf because they are just an ends to a means. They are just model kits to me and I hold no value in them other than that but if you really enjoy the all out build then by all means. However they look fine to me and I would be content to display them myself.

Re: 1:48 P-51B “Spare Parts” (Tamiya Kit)
Welcome back Kenny! It's good to see your models again. There is something vicariously personal about your builds that set them apart and I really appreciate the thinking behind the model-making. I think we all grapple with similar issues but very few verbalize the struggles as clearly and as matter-of-factly as you. So thank you for that honesty.
A Mustang eh? Well another Mustang build can't hurt and at least its not a bubble top D. Subject choice aside, you are doing great work and I'm excited to see more of this build as it progresses.
A Mustang eh? Well another Mustang build can't hurt and at least its not a bubble top D. Subject choice aside, you are doing great work and I'm excited to see more of this build as it progresses.
John aka JKim
-----------<><

-----------<><
-
Medicman71

- Elite Member
- Posts: 11396
- Joined: Mon Apr 07, 2014 9:32 am
- Location: Houston, Tx
Re: 1:48 P-51B “Spare Parts” (Tamiya Kit)
Yea! Kenny is back! The cockpit looks great!! 
Mike
Sponsored by Boeing, Lockheed Martin, Northrop Grumman, Saab, BAE, and Dassault
Sponsored by Boeing, Lockheed Martin, Northrop Grumman, Saab, BAE, and Dassault

Re: 1:48 P-51B “Spare Parts” (Tamiya Kit)
Thank you very much, fellas. I appreciate it.
I think a lot of what it comes down to for me is that I need to manage my expectations better. And in order to do that, I need to have a better, more objective view of what I’m competent to do based on past experience.
A *BIG* “for instance” for me was what happened with “Der Franken Emil.” Specifically, the resin cockpit set I built and painted. I had never built a resin cockpit set before, and I had never installed one. Construction and painting was fine, but save for removing all the details molded into the sidewalls, I didn’t do any prep-work. Had I taken the time to test-fit everything before building and painting the resin set, I probably would’ve been able to use it successfully. So then I take that lesson into my Spitfire, but almost instantaneously those little parts began breaking on me while I was trying to remove them from their casting blocks, or during assembly, and so forth. Primitive tools and a heavy handed approach. It was my fault.
And to that point, I’d never even so much as installed a set of aftermarket exhausts before.
I guess in that regard I was absolutely snatching defeat out of the jaws of victory.
And actually I’m glad Carlos reminded me about guidelines- I forgot all about the exhausts and wheels I bought for this build. I do intend on using those aftermarket pieces. This’ll be a good re-introduction to working with resin.
What’s happening build-wise today with this girl? Well, I pulled the trigger on installing the cockpit and sealing up the fuselage. I took my time and made it a two hour long affair. Got the cockpit lined up and fixed to the starboard half of the fuselage, let the glue dry, then got the fuselage together, working in increments from the tail toward the nose, bottom then top. Tamiya Extra-Thins wicking abilities really comes in handy, there. Then I wrapped it all together with Tamiya tape to give it some extra support while drying, and let it rest. After that I installed the upper cowling.
Here we are:
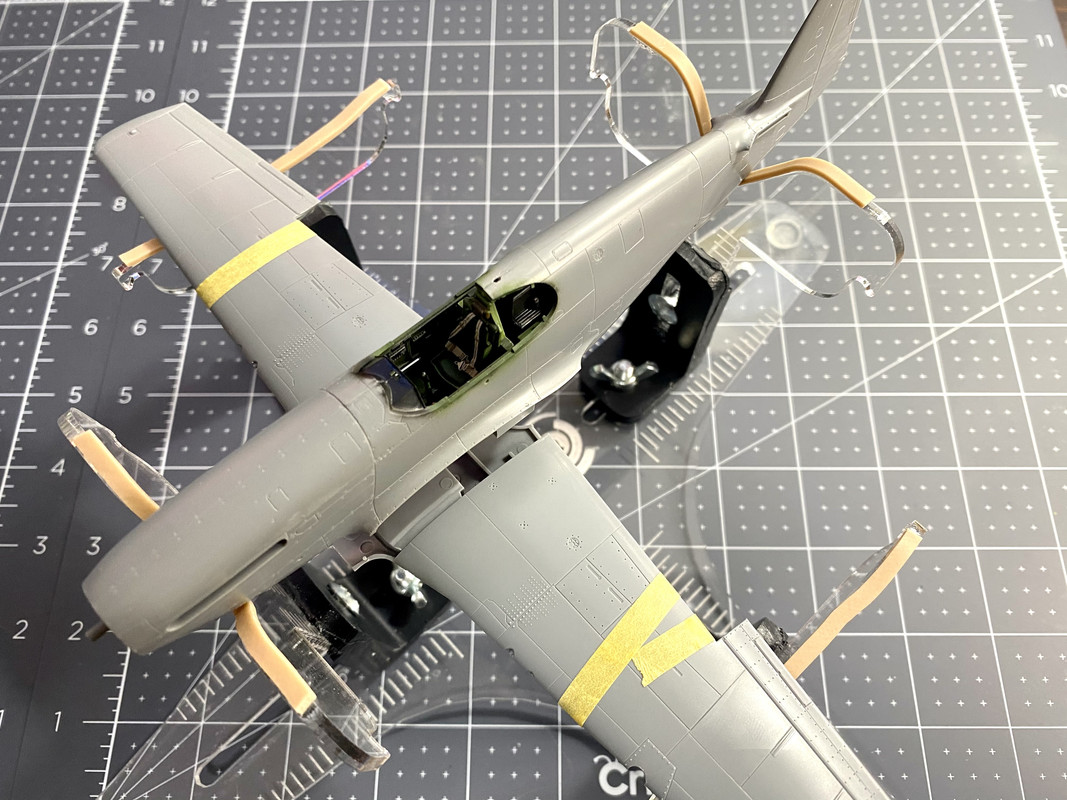
The wings are mocked-up. Just test fitting stuff. I still have painting to do in the gear bays, and panel lines to fill. I’ll be working on those tasks over the next several days, as well as filling any gaps in the seams if any. I don’t anticipate too many. The spine is looking pretty good:
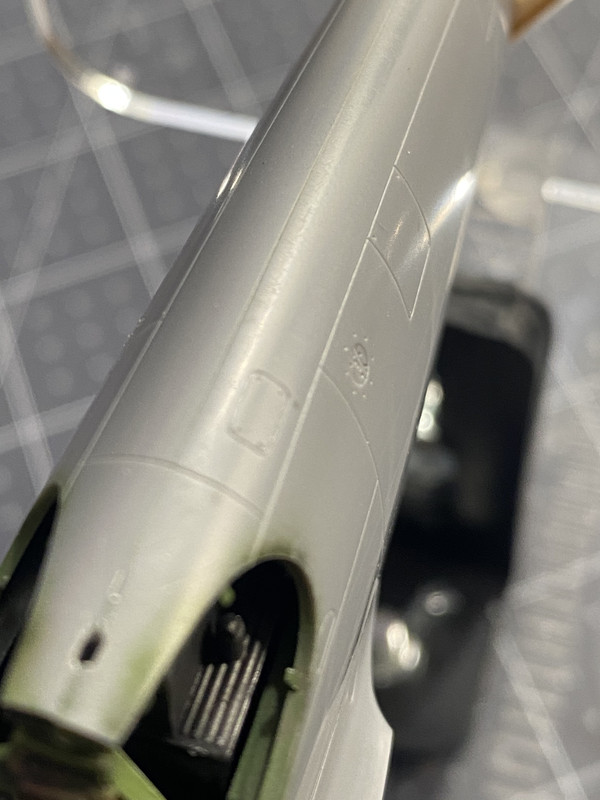
Now, down on the belly will need just a little filling:
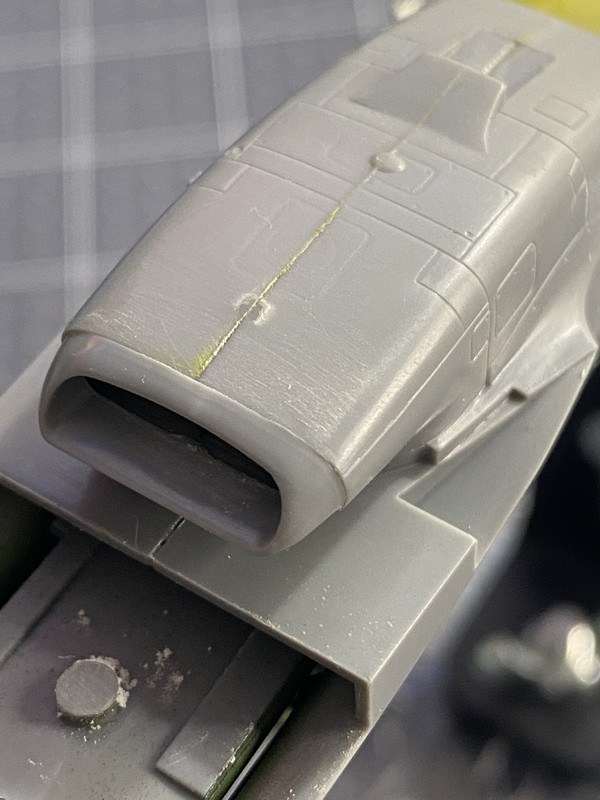
But that’s okay, I don’t mind.
That little sprue gate area looks rough, but it’s smooth to the touch. If Mr. Surfacer primer reveals a wart there I can easily take care of that.
Okay, that’s it for me and my pony! I’m gonna go check out what y’all are doing.
Thanks for looking and for your kind words.
I think a lot of what it comes down to for me is that I need to manage my expectations better. And in order to do that, I need to have a better, more objective view of what I’m competent to do based on past experience.
A *BIG* “for instance” for me was what happened with “Der Franken Emil.” Specifically, the resin cockpit set I built and painted. I had never built a resin cockpit set before, and I had never installed one. Construction and painting was fine, but save for removing all the details molded into the sidewalls, I didn’t do any prep-work. Had I taken the time to test-fit everything before building and painting the resin set, I probably would’ve been able to use it successfully. So then I take that lesson into my Spitfire, but almost instantaneously those little parts began breaking on me while I was trying to remove them from their casting blocks, or during assembly, and so forth. Primitive tools and a heavy handed approach. It was my fault.
And to that point, I’d never even so much as installed a set of aftermarket exhausts before.
I guess in that regard I was absolutely snatching defeat out of the jaws of victory.
And actually I’m glad Carlos reminded me about guidelines- I forgot all about the exhausts and wheels I bought for this build. I do intend on using those aftermarket pieces. This’ll be a good re-introduction to working with resin.
What’s happening build-wise today with this girl? Well, I pulled the trigger on installing the cockpit and sealing up the fuselage. I took my time and made it a two hour long affair. Got the cockpit lined up and fixed to the starboard half of the fuselage, let the glue dry, then got the fuselage together, working in increments from the tail toward the nose, bottom then top. Tamiya Extra-Thins wicking abilities really comes in handy, there. Then I wrapped it all together with Tamiya tape to give it some extra support while drying, and let it rest. After that I installed the upper cowling.
Here we are:
The wings are mocked-up. Just test fitting stuff. I still have painting to do in the gear bays, and panel lines to fill. I’ll be working on those tasks over the next several days, as well as filling any gaps in the seams if any. I don’t anticipate too many. The spine is looking pretty good:
Now, down on the belly will need just a little filling:
But that’s okay, I don’t mind.
That little sprue gate area looks rough, but it’s smooth to the touch. If Mr. Surfacer primer reveals a wart there I can easily take care of that.
Okay, that’s it for me and my pony! I’m gonna go check out what y’all are doing.
Thanks for looking and for your kind words.
Kenny X
Head Mother Trucker In-Charge @ Kenny X’s Reichs Winzigkleines Flugzeugewerks *and now* Airboat Records, too!
Head Mother Trucker In-Charge @ Kenny X’s Reichs Winzigkleines Flugzeugewerks *and now* Airboat Records, too!
-
BlackSheep214

- Elite Member
- Posts: 13596
- Joined: Sun Apr 06, 2014 8:47 pm
Re: 1:48 P-51B “Spare Parts” (Tamiya Kit)
Kenny...you are a machine on that P-51 Mustang. Well done getting the office buttoned up.
“Who controls the skies, controls the fate of this Earth”
Author unknown- 352nd Fighter Group, Blue-Nosed Bastards of Bodney
“Send one plane it’s a sortie; send two planes it’s a flight; send four planes it’s a test of airpower. - Richard Kohn
Author unknown- 352nd Fighter Group, Blue-Nosed Bastards of Bodney
“Send one plane it’s a sortie; send two planes it’s a flight; send four planes it’s a test of airpower. - Richard Kohn
Re: 1:48 P-51B “Spare Parts” (Tamiya Kit)
Thank you! Heh, I guess to be fair, that cockpit is pretty low on the old parts count and the module is diabolically easy to paint! Plus, I love interior green so I was kinda on fire to see what I could make happen in there.
Kenny X
Head Mother Trucker In-Charge @ Kenny X’s Reichs Winzigkleines Flugzeugewerks *and now* Airboat Records, too!
Head Mother Trucker In-Charge @ Kenny X’s Reichs Winzigkleines Flugzeugewerks *and now* Airboat Records, too!
-
speedgraflex

- Moderator
- Posts: 11534
- Joined: Fri Feb 10, 2017 11:08 pm
- Contact:
Re: 1:48 P-51B “Spare Parts” (Tamiya Kit)
Following. A lot of what you are detailing in your narrative is how closely aligned the project is with who you are at a specific time and place. I loved the earlier description given of the “best I can do with the tools at hand,” which is a fine statement which I find myself using to assess what I do as well. It’s a penetrating statement of one’s condition. I like to think of this as being one’s overall mental and physical state as well, which leads to what you are writing about on this project: sobriety and AMS. I think building a kit the way fellas of a certain age did with limited resources takes the pressure of AMS away, and lets the building process be the focus. Accuracy is only as important as we make it.
Make more models!
Re: 1:48 P-51B “Spare Parts” (Tamiya Kit)
Bruce,
You articulated that beautifully.
It made something jump out at me. For whatever reason, after I’d been off the sauce for a few weeks, 109’s, and specifically, the way in which I do 109’s, just didn’t do it for me anymore. That was.... weird. It was like, I was trying to get my mojo back doing kits I worked on before with methods and style I developed before, and all those things went right out the window once I’d sobered-up.
Or maybe I just needed to try something “new”.
It was probably a combination of both.
But at the end of the day you are absolutely correct- different circumstances, different mindset. That equates to a different vision. A radically different vision.
Shoot, It may very well be that when I got sober I said “That’s it. That part of my life is over. I’m deciding to not be that person anymore and with God’s help that’ll stick.”
And it did. And perhaps work that I did when I was drinking just didn’t seem like “me” because I became a different person...
It really makes me think.
Anyway, I know I’m happier now, and HEY— I’m more happy with my Pony than I’ve ever been with a model I was working on before, so there’s that! I’m pleased with everything about it.
Thank you for the good word, buddy!
You articulated that beautifully.
It made something jump out at me. For whatever reason, after I’d been off the sauce for a few weeks, 109’s, and specifically, the way in which I do 109’s, just didn’t do it for me anymore. That was.... weird. It was like, I was trying to get my mojo back doing kits I worked on before with methods and style I developed before, and all those things went right out the window once I’d sobered-up.
Or maybe I just needed to try something “new”.
It was probably a combination of both.
But at the end of the day you are absolutely correct- different circumstances, different mindset. That equates to a different vision. A radically different vision.
Shoot, It may very well be that when I got sober I said “That’s it. That part of my life is over. I’m deciding to not be that person anymore and with God’s help that’ll stick.”
And it did. And perhaps work that I did when I was drinking just didn’t seem like “me” because I became a different person...
It really makes me think.
Anyway, I know I’m happier now, and HEY— I’m more happy with my Pony than I’ve ever been with a model I was working on before, so there’s that! I’m pleased with everything about it.
Thank you for the good word, buddy!
Kenny X
Head Mother Trucker In-Charge @ Kenny X’s Reichs Winzigkleines Flugzeugewerks *and now* Airboat Records, too!
Head Mother Trucker In-Charge @ Kenny X’s Reichs Winzigkleines Flugzeugewerks *and now* Airboat Records, too!