Page 11 of 28
Re: 1/48 Tamiya Me-262-Gear Bay Almost Done-01/27
Posted: Wed Feb 03, 2021 4:09 pm
by BlackSheep214
LyleW wrote:Stikpusher wrote:
One bottle of paint per coupon... that’s not really worth the cost of gas of going daily for stocking up.
Take the wife with you. if you use different payment methods, you can use that coupon again. pay cash, charge one, wife pays cash and uses a diff credit card.
See.... even Lyle got it all it all figured out. Which reminds me, I’m heading to Hobby Lobby tonight while the missus is getting her hair done.

Re: 1/48 Tamiya Me-262-Gear Bay Almost Done-01/27
Posted: Wed Feb 03, 2021 5:12 pm
by Duke Maddog
LyleW wrote:Stikpusher wrote:
One bottle of paint per coupon... that’s not really worth the cost of gas of going daily for stocking up.
Take the wife with you. if you use different payment methods, you can use that coupon again. pay cash, charge one, wife pays cash and uses a diff credit card.
It's even better if you get the kids to go along.
That reminds me of something: Way back when McDonald's was having a month long sale of their basic hamburgers for .29 cent each in celebration of some anniversary; limit ten per person. So, each one of us in my family went in and bought 10 burgers each. With all nine of us buying ten each, we had a good ninety of these in the first week. We froze most of them and were eating them for months...
Now imagine doing that with Testor's paints....
Re: 1/48 Tamiya Me-262-Cockpit Time!!!
Posted: Wed Feb 03, 2021 5:14 pm
by LyleW
I don’t like the labor of Testors paint.
Re: 1/48 Tamiya Me-262-Cockpit Time!!!
Posted: Thu Feb 11, 2021 9:52 pm
by mustang1989
After a flippin' WEEK this is what I've got. Seat belts and rudder pivot and pedals installed. I've also weathered things up a bit. This whole instrument panel ordeal is gonna be a task. I'm gearing up to get that done next though. You know fellas....the one thing that I absolutely cannot stand is when I buy something and then frickin' LOOSE it. Can't find my decals that I ordered for White 3. I'm going to try to find them and work around it until I can't anymore. I already know that I'll end up buying another set only to find the set I lost the day after I apply the newly acquired decals.
 John:
John: this lighting shows the true colors with no white balance adjustments.

Re: 1/48 Tamiya Me-262-Cockpit Time!!!
Posted: Thu Feb 11, 2021 9:58 pm
by speedgraflex
Mustang that is gorgeous! Absolutely gorgeous!
Re: 1/48 Tamiya Me-262-Cockpit Time!!!
Posted: Thu Feb 11, 2021 10:25 pm
by mustang1989
Thanks Bruce! Hopefully the rest of the cockpit detail goes smoothly.
Re: 1/48 Tamiya Me-262-Cockpit Time!!!
Posted: Fri Feb 12, 2021 12:26 am
by jeaton01
Joe, the cockpit work looks great.
For future reference, it is unlikely that the harness ends were attached to the seat. It is normal practice to be attached to a major structural member. I don't really know how it was in the 262, though.
Re: 1/48 Tamiya Me-262-Cockpit Time!!!
Posted: Fri Feb 12, 2021 1:04 am
by jkim
Before jumping to any conclusions, it's best to check your references.
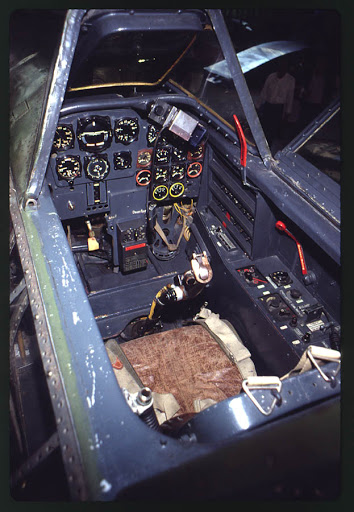

Cockpit looks very nice and the color of the cockpit seems to look more like RLM 66 in this photo. Just an FYI.... the side consoles on the Me262 were commonly made of wood so probably no metallic chipping. Minor point really but it was an interesting point that was made on my own 262 build that I thought I'd pass along.
What's up with the instrument panel? If it is the Aires standard printed acetate sandwiched between a PE face and resin panel, it should be relatively simple. At least compared to dealing with individual instrument gauges.
Hope you find the decals!
Re: 1/48 Tamiya Me-262-Cockpit Time!!!
Posted: Fri Feb 12, 2021 11:27 am
by Floki
Cockpit looks very good! I was thinking the belts where attached to the seat on the 262 and John's photos prove that.
Re: 1/48 Tamiya Me-262-Cockpit Time!!!
Posted: Fri Feb 12, 2021 12:42 pm
by Stikpusher
Isn’t the seat back actually a separate armored piece from the seat bottom? Look at the framework of the back. It’s quite substantial. So then attaching the shoulder harness to that item makes a lot more sense.