Page 20 of 38
Re: 1/32 Granville Gee Bee Model Z Super Sportster.
Posted: Sat Oct 31, 2020 9:17 am
by Floki
Yellow looks awesome Bruce! Have to say I have no idea how you are going to join both halves together without damaging that paint job. Will be very interested on how you proceed from here.
Re: 1/32 Granville Gee Bee Model Z Super Sportster.
Posted: Sat Oct 31, 2020 9:41 am
by LyleW
I was a wonderin that myself...bit if anyone can do it, Brice can..Bruce, Bruce, he's our man....well, you know. I'd run some tape down each side of the seam, start gluing at the nose and work backwards towards the tail. I think I would also sand the buik heads a bit to ease that gap.
But I glue cameras to the bench.......so that can be your guide.
Re: 1/32 Granville Gee Bee Model Z Super Sportster.
Posted: Sat Oct 31, 2020 9:50 am
by speedgraflex

Joe / Tom / Clint / Lyle
Thanks for your thoughts, fellas. Happy Halloween!
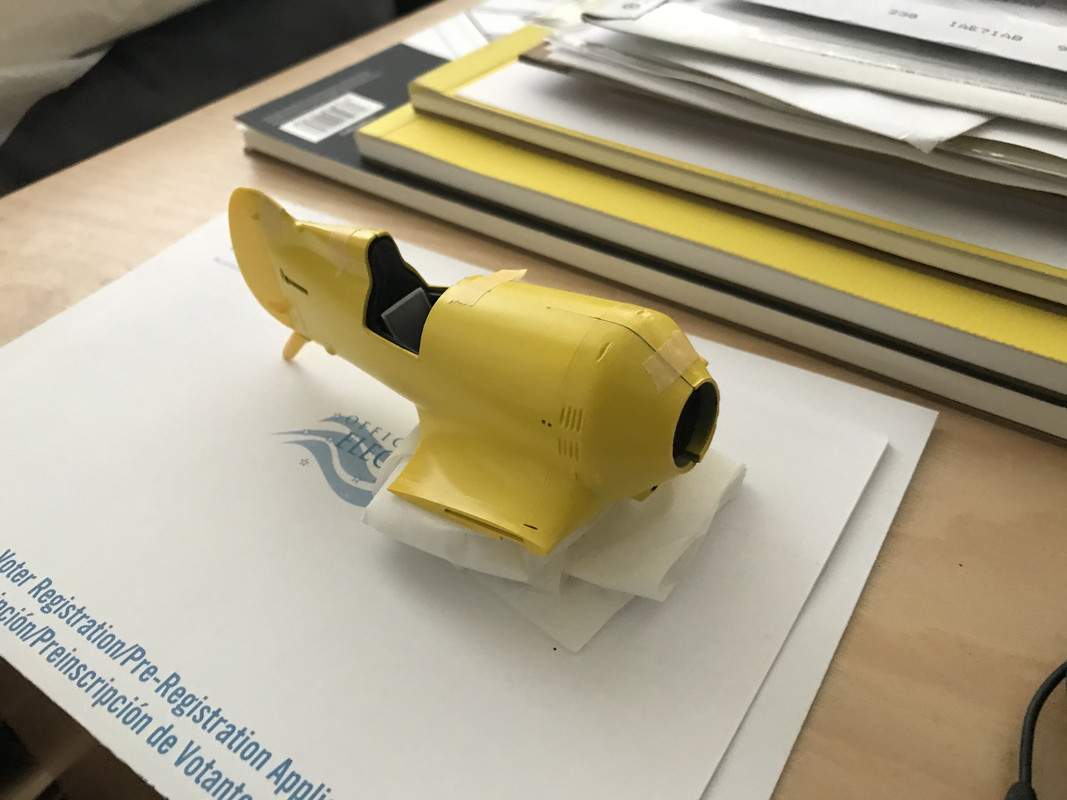
I’m not too worried because the fit is tight and there will be two more color stages on top of the yellow. The goal isn’t to build a seam, but to reduce its appearance: make the gap invisible. FYI I forgot to mention I used Mr Surfacer 1000 on the top half of the fuse already and blended that into the Tamiya primer coat.
Also, I am going to use canopy glue on the seams. I have experimented enough to know if I let that cure properly, it will hold tightly.
Re: 1/32 Granville Gee Bee Model Z Super Sportster.
Posted: Sat Oct 31, 2020 9:58 am
by KennyX
I like your plan for blending that seam in. I also am in love with the yellow you put on there. It's gorgeous. Delightfully smooth. Almost creamy-looking, like good banana pudding. I dig it, you're doing solid work here!
Re: 1/32 Granville Gee Bee Model Z Super Sportster.
Posted: Sat Oct 31, 2020 10:01 am
by speedgraflex
Thanks, Ken! Sincerely. I am going to let this cure over the weekend and build an instrument panel later tonight. Everyone here is inspiring to me and your Pips is top shelf, buddy. I doff my invisible cap.
Re: 1/32 Granville Gee Bee Model Z Super Sportster.
Posted: Sat Oct 31, 2020 12:51 pm
by jkim
Great to see the yellow color on the GB, Bruce! So used to seeing the red/white colors on this bird that the yellow is really eye-opening! And I'm sorry... trying to keep my mouth shut when it comes to critique but I can't help it... I do think you are creating more work than is necessary (and possibly sacrificing the quality of the result) by applying the paint at this stage. Sorry if you've heard this tune from me too many times!

Re: 1/32 Granville Gee Bee Model Z Super Sportster.
Posted: Sat Oct 31, 2020 1:31 pm
by mostrich
speedgraflex wrote:
That looks niiice!
Re: 1/32 Granville Gee Bee Model Z Super Sportster.
Posted: Sat Oct 31, 2020 6:37 pm
by Duke Maddog
Re: 1/32 Granville Gee Bee Model Z Super Sportster.
Posted: Sat Oct 31, 2020 6:43 pm
by speedgraflex
jkim wrote:Great to see the yellow color on the GB, Bruce! So used to seeing the red/white colors on this bird that the yellow is really eye-opening! And I'm sorry... trying to keep my mouth shut when it comes to critique but I can't help it... I do think you are creating more work than is necessary (and possibly sacrificing the quality of the result) by applying the paint at this stage. Sorry if you've heard this tune from me too many times!
John! Please always feel free to critique. I have learned so much from you, and your projects, and I am continuing to learn. I feel very confident building 2001/Star Wars/Star Trek and Space 1999 (The Eagle Transporter) subjects; O, HO, HOn3, and On3 Model Trains; and 1/24 Slot Cars, but I am still learning how to build a plastic aircraft. I’m getting better. I don’t recommend my “backwards” style of building to anyone, but I will tell all and sundry that Formula 360 is the best Photoetch glue, and also a very good plastic glue as well. Floki’s PCM 1/32 190 A cockpit has every PE piece (placards and control surfaces) secured by Formula 360, and I just tested canopy glue on the GBZ cockpit assembly as well.
- 1. The seams look worse because I need to sand off the gray interior edge where the glue goes.
2. The critical visible seams of the forward V-shaped cone will be completely hidden by the cowling.
3. The top seam is tricky but I feel no less so then if I took a conventional approach.
My Dad taught me never to use too much putty or paint, just barely enough and then stop. Right now I have one more color coat then I’ll sand with 1-2K grit before I polish the color. All I have done so far is a toothpaste polish.
In closing, your comments and thoughts are always and I do mean always appreciated. I’m sorry I did not respond sooner. I was taking photos of jewelry for a local designer.
Mostrich!!!
Thank you sir!
Duke! Duke! Duke!
You are far too kind. I learn from you! I’ve studied your paint on rockets, missiles, cars and armor!
Re: 1/32 Granville Gee Bee Model Z Super Sportster.
Posted: Sat Oct 31, 2020 8:36 pm
by mustang1989
jkim wrote:Great to see the yellow color on the GB, Bruce! So used to seeing the red/white colors on this bird that the yellow is really eye-opening! And I'm sorry... trying to keep my mouth shut when it comes to critique but I can't help it...
I do think you are creating more work than is necessary (and possibly sacrificing the quality of the result) by applying the paint at this stage. Sorry if you've heard this tune from me too many times!
I think I could take a few notes from that critique myself. It's one of the reasons that my Maverick build has taken me
ten friggin' months and I'm still not done with it. Working around paint after the fact is a
Royal PIA and really slowed my completion time down.....alot.
