Page 3 of 5

Re: Airfix 1/72 FW-190 A-8

Posted: Fri Jun 25, 2021 8:51 am
by Stuart
speedgraflex wrote:Beautiful work painting and installing so far! Is this a small gouge from cutting the ring off a sprue or is it something in the photo?
Thanks Bruce!

Spot on, it's damage from the sprue gate - If I had to give one negative on this kit, which I think is/was a common complaint on Airfix's newish toolings, is that the sprue gates are huge and very badly positioned. I've not really needed that much filler to fill gaps etc, but I have had to use a little bit here and there to repair damage from the gates. The nose cowling actually had 3 gouges like the one you picked up, because the sprues were attached to the front! :nono: What you see in the photo though is the front cowling dry fitted, I've since removed it and filled them in - I've just got to sand and polish it back to shape.

Re: Airfix 1/72 FW-190 A-8

Posted: Thu Jul 01, 2021 9:10 am
by Stuart
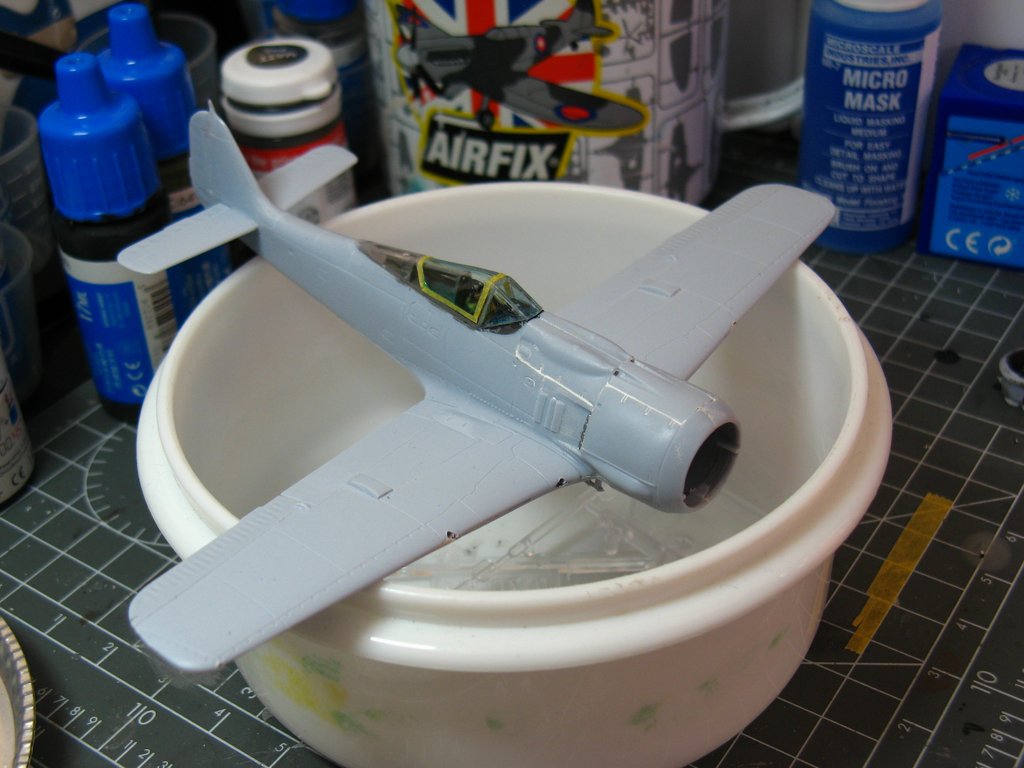
Still making progress on the FW190 - all the main parts are together and so onto primer. I'm still waiting for my new metal barrels to turn up and have drilled out the holes to take them. Annoyingly I've drilled on in slightly the wrong place, so I might have to fill and redrill it.

Image

Don't die of shock, but I've actually masked the canopy - mainly to protect it from the spray clears I intend to use. As an experiment I've just used Micormask (which is new to me) on the windscreen, just to see how well it works.

Image

Cheers!

Re: Airfix 1/72 FW-190 A-8

Posted: Thu Jul 01, 2021 10:15 am
by KSaarni
That masking (with tape) looks very very good!

- Kari

Re: Airfix 1/72 FW-190 A-8

Posted: Fri Jul 02, 2021 3:53 pm
by jkim
Looks great Stuart! I personally would not trust Micro Mask to hold a critically long straight edge such as a canopy frame. It's too inconsistent in my experience and sometimes lets paint leak under it in areas. And since it is translucent, it is difficult to ensure that you're getting 100% coverage. I use it in small spots only and find that I really have to gob it on thick to be effective.

Re: Airfix 1/72 FW-190 A-8

Posted: Wed Jul 07, 2021 8:41 am
by Stuart
Thanks for the heads-up John - I'll give it a go and see what happens, if the worst come to the worst I can always remove the paint around the frames and redo it.

So apologies for poor photo's in some places, but I've made a fair bit of progress since the last photo.

Anyway...

So things have 'progressed' a bit on the Father's day 190 over the past few weeks - it's been painted, clear coated and is now onto the decalling stage.

Painting with Humbrol and Hataka acrylics, I painted in scribbled layers, sometimes thinning with water and sometimes with glaze medium, the idea being to build up some variation in the colour - I also added a bit of white or Dark Grey to the base colours in some areas to mess it up a bit. This is the first build were I've used my Wet Palette and what a difference that made to painting with acrylics - no drying on the brush, no brush marks, no pulling in of part dried paint - great stuff, I'd heartedly recommend one to anyone that paints with Acrylics.

Image

Image

Mottling done by a q-tip. I think it might be a bit too heavy so next time I do this I'll knock it back a bit.

Image

Hopefully you can see the tonal variations - I've been trying to beat it up a bit.

Image

Image

Decals...

Image

After a few coats of Citadel Munitorum spray varnish (which was the whole point of masking the canopy), I started on the decals - which is were I am now. I have to say this is an enjoyable build thus far and it's been interesting to see how my family has been following along - it's the first kit I was given as a gift that I actually started on the day I received it - and I think that's been appreciated.

Still to add is the rest of the decals, including some spare Swastikas, the metal gun barrels (which have finally arrived!), gear, fuel tank and then onto some weathering...

Talking of weathering, I added a Flory models 'grime' wash to the F-86 I was building - not sure what to think about the effect, it's rather subtle...

Before

Image

After

Image

:hmm: I might give it another wash before I add the gear, just to see what happens.

Anyway, apologies for a lengthy post - thanks for dropping in.

Cheers!

Oh and P.S.- after three weeks of waiting my metal gun barrels have finally arrived!

Image

Re: Airfix 1/72 FW-190 A-8

Posted: Wed Jul 07, 2021 8:58 am
by KSaarni
Great to see Stuart a photo serie of the different stages!

Regarding the wash on the Sabre, indeed quite subtle. :hmm:
The Sabre itself looks really good, with or without the wash ! :-)

- Kari

Re: Airfix 1/72 FW-190 A-8

Posted: Wed Jul 07, 2021 9:05 am
by LyleW
Man, those are looking great! You is a wizard...

Re: Airfix 1/72 FW-190 A-8

Posted: Wed Jul 07, 2021 10:22 am
by Stikpusher
The 190 looks great Stuart. A nice used worn look there with the scrubbed on layers of paint. And the Flory wash on the F-86 looks just right. Especially for an ace’s mount like that one. Those tend to be a little better cared for than the unknown guys in the squadrons who haven’t made a name for themselves.

Re: Airfix 1/72 FW-190 A-8

Posted: Wed Jul 07, 2021 1:04 pm
by Stuart
Thanks Gents - much appreciated!

Carlos, that's a good point actually, I'll leave it as it is, although I'll take a better photo tomorrow.

Cheers!

Re: Airfix 1/72 FW-190 A-8

Posted: Thu Jul 08, 2021 12:38 pm
by Medicman71
Nice! They both look great!