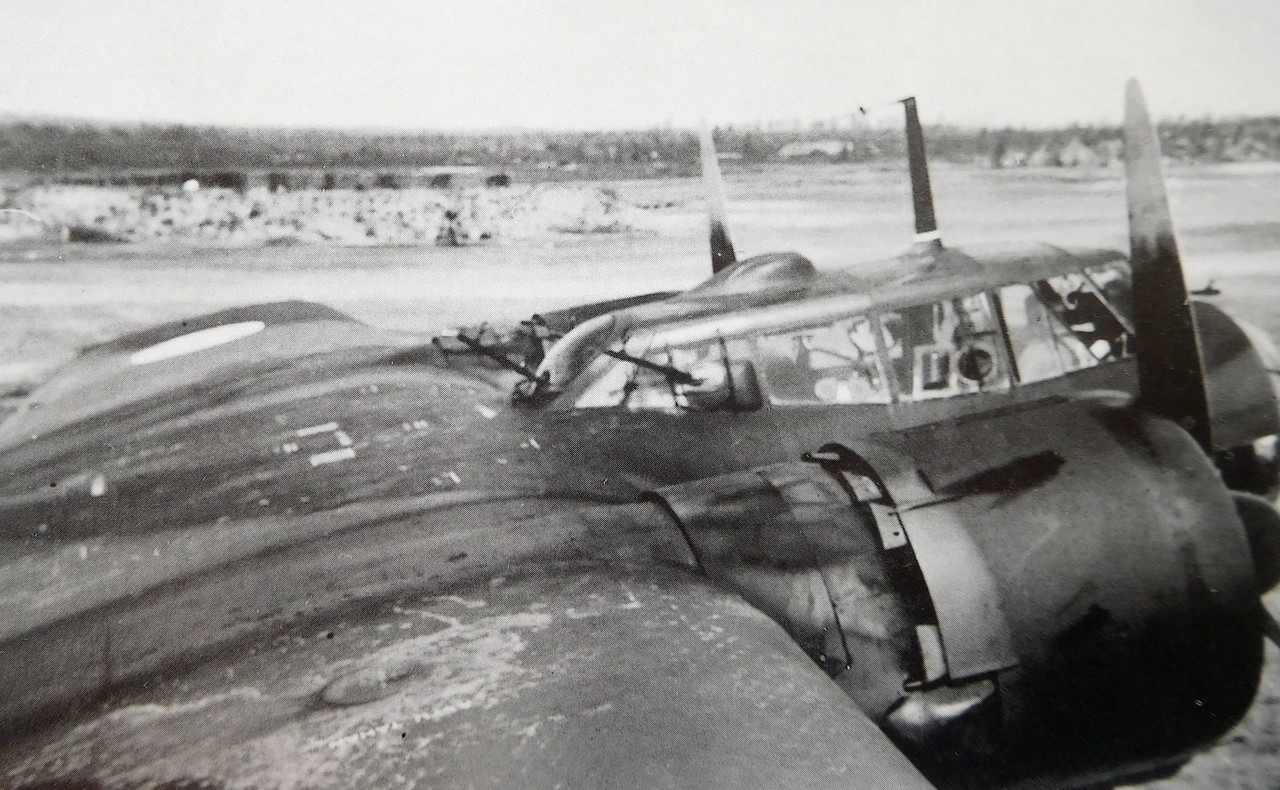
Frog 1/72 Dornier Do 17 Z, DN 51, 2/LeLv 46, Noljakka, 1942.

Post your work in progress of your aircraft builds in here.
User avatar
speedgraflex
Moderator
Posts: 11358
Joined: Fri Feb 10, 2017 11:08 pm
Contact:

Re: Frog 1/72 Dornier Do 17 Z, DN 51, 2/LeLv 46, Noljakka, 1

Post by speedgraflex »

Stikpusher wrote:Phaser lock inoperative

Best guess Mr Sulu
Image

“Fire when ready.”

Sulu studied the forward viewscreen with the intensity of a surgeon. The seconds ticked by and the apprehension grew. Movement on the viewscreen: a shadow, nothing more. It was the Reliant.
Make more models!
User avatar
Stikpusher
Moderator
Posts: 21189
Joined: Sat Apr 05, 2014 8:37 pm
Location: Ceti Alpha 5

Re: Frog 1/72 Dornier Do 17 Z, DN 51, 2/LeLv 46, Noljakka, 1

Post by Stikpusher »

Photon Torpedos ready!

Image
"Surely I have made my meaning plain? I intend to avenge myself upon you, Admiral. I have deprived your ship of power, and when I swing 'round, I intend to deprive you of your life."

FLSM
User avatar
Floki
Elite Member
Posts: 3548
Joined: Wed Dec 12, 2018 2:23 am
Location: Muncie, Indiana

Re: Frog 1/72 Dornier Do 17 Z, DN 51, 2/LeLv 46, Noljakka, 1

Post by Floki »

speedgraflex wrote:
KSaarni wrote:In my eyes, this is looking so good!

- Kari
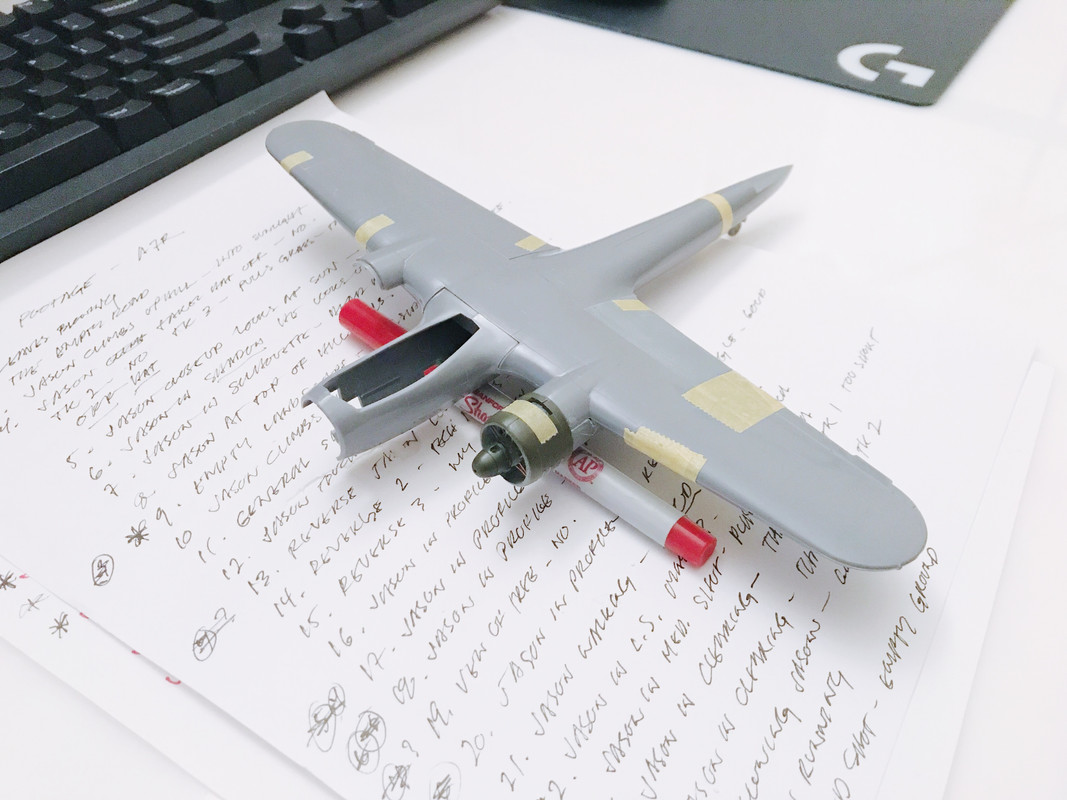
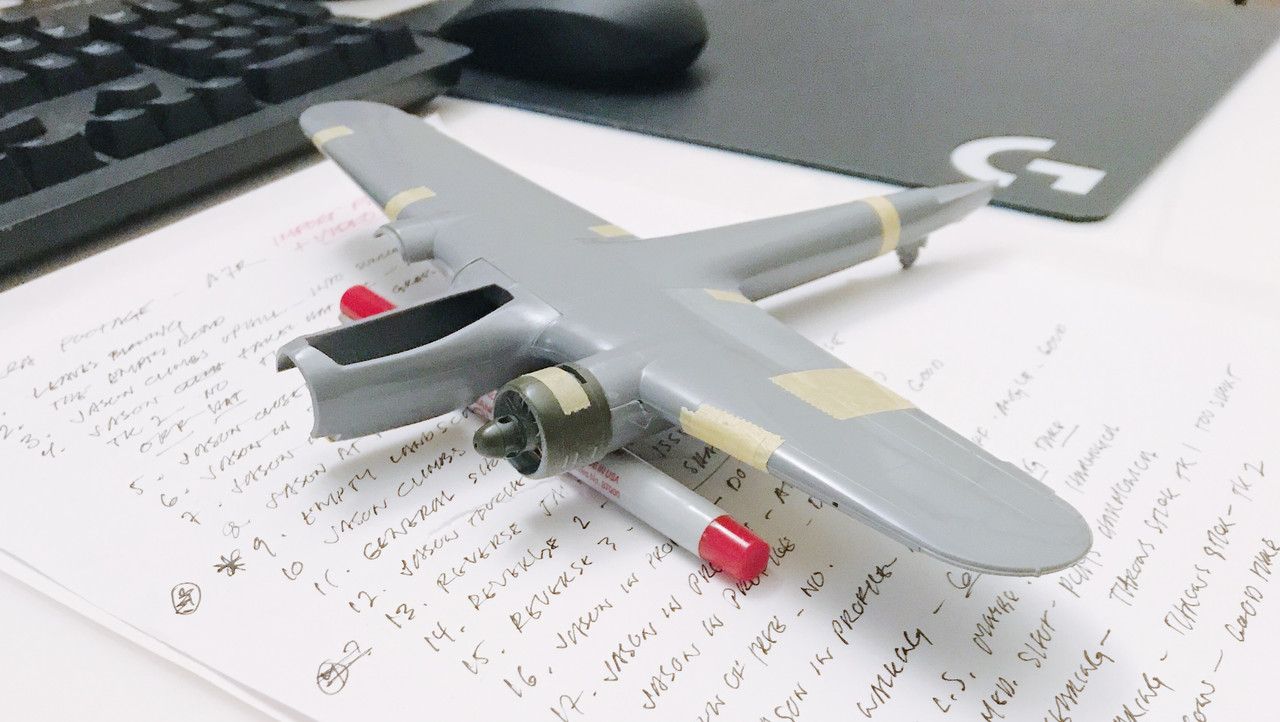
Thank you so much, Kari. I was up late—and certainly no longer objective as a result of trying so many ways to position the nacelle sections to correctly align with the engine’s circular section... huh? I was just trying to eliminate the steps! No steps = better lookin’ aircraft!

:hmm:

Image
I think you went with the better option here. Not having to correct that step in a more visible place is better than the rounded instead of pointed less visible area to the lower rear.
March as one, Don't look back
Odin's sons... Attack!
Unleash hell! Do not repent! Warfare grants us no lament
Let your weapons slash and tear This is no place for fear
Hold the lines! Move as one! In unity our victory's won
Our shields will form a mighty wall
United we shall never fall
User avatar
Stikpusher
Moderator
Posts: 21189
Joined: Sat Apr 05, 2014 8:37 pm
Location: Ceti Alpha 5

Re: Frog 1/72 Dornier Do 17 Z, DN 51, 2/LeLv 46, Noljakka, 1

Post by Stikpusher »

Fire!

Image
"Surely I have made my meaning plain? I intend to avenge myself upon you, Admiral. I have deprived your ship of power, and when I swing 'round, I intend to deprive you of your life."

FLSM
User avatar
speedgraflex
Moderator
Posts: 11358
Joined: Fri Feb 10, 2017 11:08 pm
Contact:

Re: Frog 1/72 Dornier Do 17 Z, DN 51, 2/LeLv 46, Noljakka, 1

Post by speedgraflex »

Thanks so much for your thoughts, Clint! I sincerely appreciate your experience here as well. I do think this was the right call. Maybe this is one reason why Frog kits were known to be modified by grafting the power plants from the Monogram designed kit to the wings of the Frog kit (with its correctly sized wing chord). I am also glad that I read about a week ago that there are model builders who start first with the cockpit area and modelers who start with the engines. I am definitely an "engine man" when it comes to a point of entry into building a kit. Tomorrow my plan is to build the bracing for the second engine and glue the nacelle in place with the same procedures—this is always a little risky.

Image

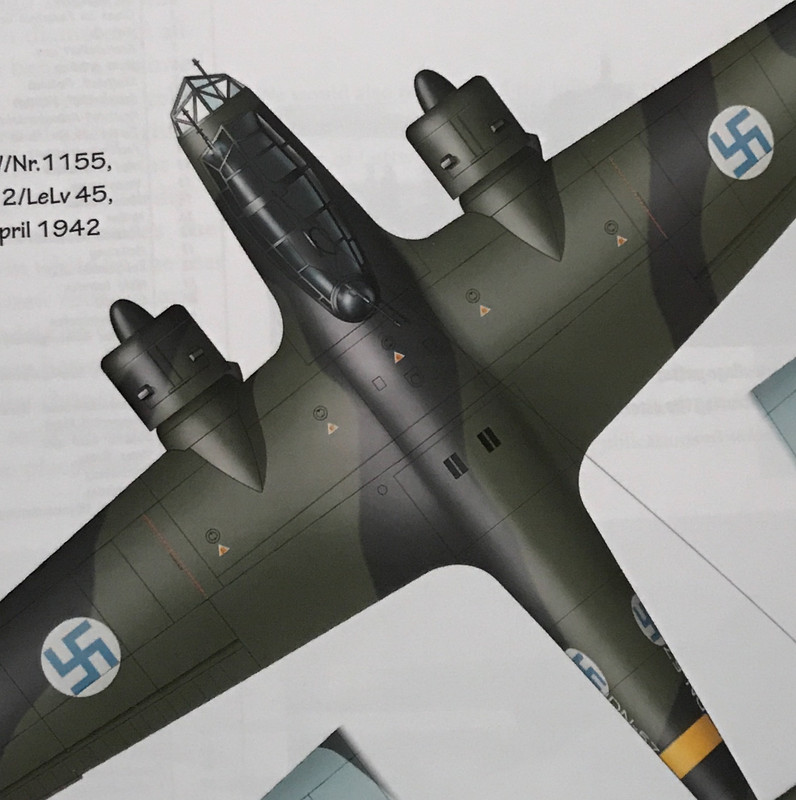
I am thinking about drilling out the five openings on top of the aircraft for the fuel fillers. My guess is that way I can create more realistic fuel covers. I don't think the FAF kept the stencils. More than likely they made their own. The fuel design for the Do 17 series has a series of 5 fill points for fluids located on top of the wing. This is just a thought. I don't know if it is worth it. This thought ties to another which would be to sand the wing surfaces smooth and incise the panel lines. I am definitely down to try this. I already smoothed the section around the engine nacelle underneath the aircraft where it will be much less stressful to try out some panel line carving using the tools I have. The upper wing is such a visible feature. I was wondering if adding these touches would be of service or not. Maybe I am just stalling from dealing with the cockpit. I also found a vac-formed canopy for this kit and am thinking about trying it out (or using it for one of the canopied sections the aircraft features). Perhaps this will improve the visibility of the cockpit itself? What do you think?

Image

Carlos, Have you watched the first season of "Star Trek Discovery" yet?
Make more models!
User avatar
KSaarni
Elite Member
Posts: 5621
Joined: Sun Apr 06, 2014 7:13 am
Location: Gent, Belgium
Contact:

Re: Frog 1/72 Dornier Do 17 Z, DN 51, 2/LeLv 46, Noljakka, 1

Post by KSaarni »

speedgraflex wrote:I am thinking about drilling out the five openings on top of the aircraft for the fuel fillers. My guess is that way I can create more realistic fuel covers. I don't think the FAF kept the stencils. More than likely they made their own.
You are right Bruce regarding those Fuel stencils. They don't exist..
I think those stencils were totally useless anyhow within the small FAF. I guess "everyone" involved with the Do-17 knew where and how to fuel.. :wink:

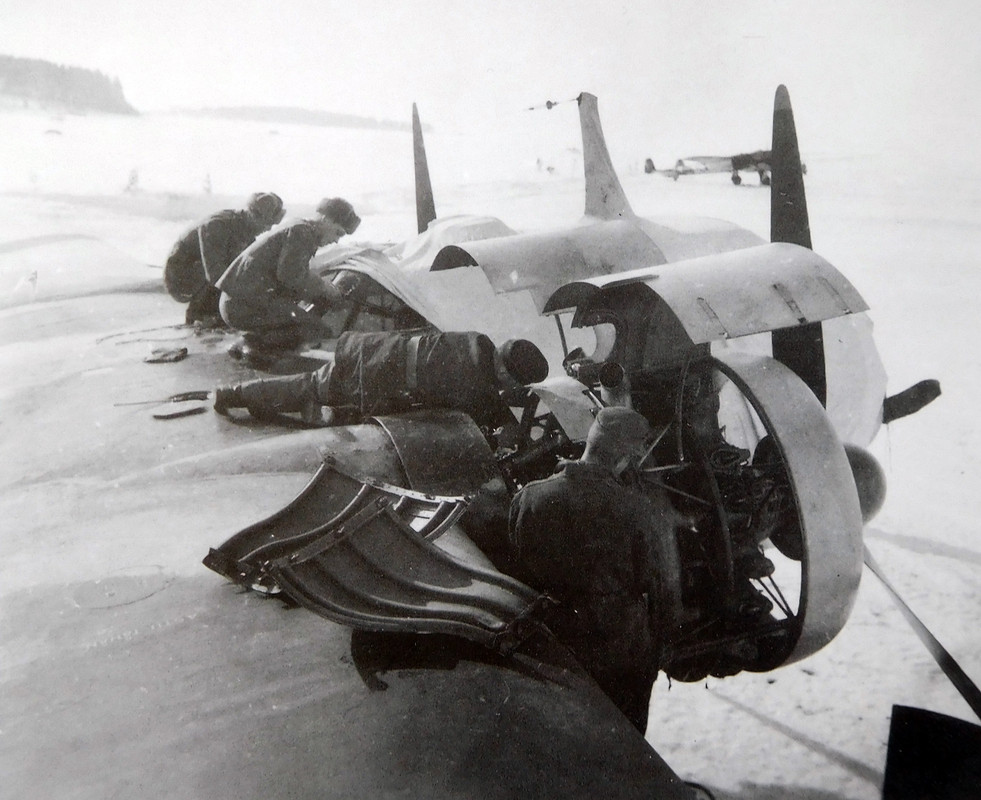
Evidence... I could find two pictures showing more clearly the upperside of the wings and cannot either see anything that would indicate any triangular fuel stencils what so ever. But instead I can see "Astu tähän" text, in other words "Step here" close to one of the fuel hatches

Interesting details in these two pictures below....

Image

Image

- Kari
---
On the bench:

MiniArt 1:48 - Junkers F13 Float Plane


https://www.facebook.com/GrundAsk-Scale ... 721218708/
User avatar
speedgraflex
Moderator
Posts: 11358
Joined: Fri Feb 10, 2017 11:08 pm
Contact:

Re: Frog 1/72 Dornier Do 17 Z, DN 51, 2/LeLv 46, Noljakka, 1

Post by speedgraflex »

Kari, Thank you so much, my friend. You found such intriguing images—many new details to consider that will raise the bar higher. The photographs and your knowledge are impeccable! The true thickness of the paint is visible at last, the abrasions from stepping into the wing areas surrounding the fluid fill covers stand out clearly as well. Your supposition that there would be no need for markings or the reason why there are none of the usual highly visible German fueling “triangles” makes sense—as well as points out that the profile I posted from Valiant Publishing’s airframe series may be incorrect. Certainly the photographic data supports that these markings were overpainted. I also wonder if the small Red Crosses on the fuselage were kept as well, or if all markings were overpainted. I am going to proceed as though all markings were removed when the factory finishes were oversprayed with FAF colors. This brings up an intriguing weathering perspective that RLM colors would “peep through” abrasions. It is possible to see this effect mainly in the second photo from the last batch you added. I know model builders have captured the effects of multiple layers showing through in weathering situations and wonder if a very thin German camo painted first will do anything for the final finish. My instinct is no, but I would like your thoughts if possible?
Make more models!
User avatar
jkim
Elite Member
Posts: 4073
Joined: Mon Apr 10, 2017 4:03 pm

Re: Frog 1/72 Dornier Do 17 Z, DN 51, 2/LeLv 46, Noljakka, 1

Post by jkim »

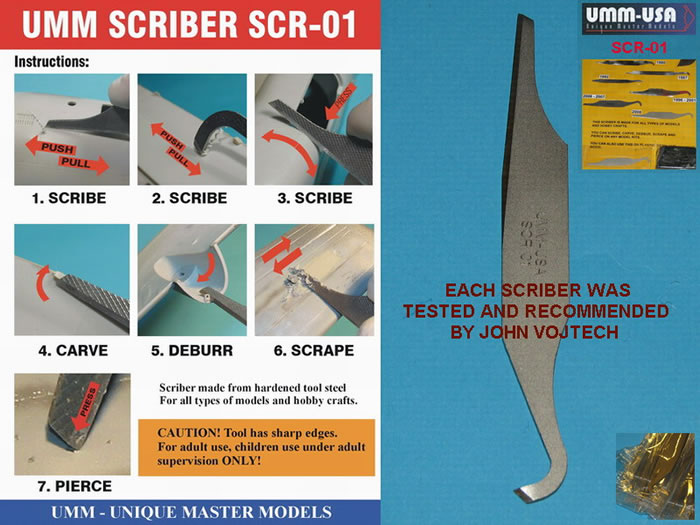
I have a love/hate relationship with scribing. I like doing it but it's hard to do without making small mistakes and the small mistakes are a pain in arse to correct. First, you will need some tools. I use a scribing tool for straight panel lines. This one is handy in that it has both a push blade and a pull blade.
Image

You'll need something to guide your panel line scribing. I use Dymo tape, which is adhesive plastic tape for label making.

You can also scribe hatches and ports such as the fuel hatch covers on your Do-17. You'll need set of metal templates to guide your scribing tool.
Image

For this type of scribing, you'll need a different tool than a panel line scriber. I use a sewing needle chucked into a pin vise. It works ok but since a needle isn't a cutting instrument, it will push plastic on either side of the groove it makes, making clean-up necessary.

I scribed the fuel ports on my 1/48 Ju88 build.
Image
John aka JKim
-----------<><
Image
User avatar
speedgraflex
Moderator
Posts: 11358
Joined: Fri Feb 10, 2017 11:08 pm
Contact:

Re: Frog 1/72 Dornier Do 17 Z, DN 51, 2/LeLv 46, Noljakka, 1

Post by speedgraflex »

John, Thank you so much for your information! I sincerely appreciate your ideas, encouragement and involvement in the techniques. Your last post was a lot to unpack at first, but I decided to email John at UMM-USA to see about a new scribing tool (I have the venerable Tamiya and a tiny Creos scriber) because the UMM Tool looks great. I also need advice on what kind of small set of circle forms to use specifically for the wings... and perhaps a small metal ruler set as well. This is far from my initial thoughts to simply drill a series of holes. Finally your Ju 88 is an incredible project and your scribing work is exquisite! Not quite finally haha the work you are doing on your 1/32 Me 262 is amazing. High altitude quality!
Make more models!
Post Reply

Return to “Aircraft Work in Progress”