Page 6 of 44
Re: 1/32 Hasegawa Fw190D-9 Red One
Posted: Wed May 02, 2018 3:35 pm
by jkim
On that Eagle Editions instrument panel, I went through the trouble of punching out dial covers out of clear acetate that I placed over the decal instruments. A punch/die set is needed to do this. The ones I have (RP Toolz Big Circle and Small Circle) are a bit pricey but they work well. UMM-USA and Sprue Brothers should have punch/die sets too.

The instrument panel was sprayed Tamiya German Grey with the black, red and yellow details picked out by brush. You know when you shake a bottle of paint and take the cap off, there is some paint on the inside of the cap? That's what I use when I brush paint. I add one or two drops of iso alcohol to Tamiya and Gunze acrylics, which gives them a better consistency for brush painting and use my cap as the paint cup.
Re: 1/32 Hasegawa Fw190D-9 Red One
Posted: Fri May 04, 2018 1:16 am
by jkim
Thinning the radiator cowling flaps is one of the many "little" things that need to be done. These kinds of tasks are usually done in-between the bigger jobs.


Time to sculpt the gun cowling! My first step is to use White Milliput to fill in the exaggerated valleys found on the kit cowling. Using a water-moistened fingertip, I can shape the valleys and blend in the putty to the approximate shape. I have both the Eagle Editions and Quickboost cowlings to use as models. All three cowlings (the kit, Eagle and QB) are different and this modified kit cowling will be different still since it is hand-shaped without any exact measurements.

After the Milliput has cured overnight, I refine the shape with sandpaper. It's difficult to gauge the work due to the contrast between the white putty and grey plastic. Mr Surfacer 1000 is used to blend any rough edges and fill small imperfections. Apply putty... sand... repeat... this process is iterated a few times to ensure a smooth surface. There were many subtle variations in the D-9 gun cowling, which Jerry Crandall's two volume reference documents thoroughly. Red 1 had a late 3-piece gun cowling with no bumps or flares. The kit cowling represents an early 5-piece gun cowling with semi-circular flares along the bottom edge of the cowling between the two fasteners. The extra panel lines are filled in with Mr Surfacer and the flares are sliced off.

When I get to the point where the cowling looks good to my eye, I have to verify the work with primer.

I spray the rear half of the cowling with Mr Surfacer 1200 thinned with Tamiya Lacquer Thinner (my preferred primer).

Comparing the modified cowling with the Eagle and Quickboost versions, I notice a few things to correct: a slight indentation along the left gun bulge and the valley between the two bulges is a little flat and needs to be hollowed out more. The hole for the starter crank will be added after the shaping is complete as will the lost panel lines.

Comparison with the un-modified kit cowling shows the reduction of the "cleavage" as well as the removed panel line and flare. I've added a bit of Mr Surfacer 1000 to the indentation and I'll do (hopefully) the final shaping of the gun cowling tomorrow.


Re: 1/32 Hasegawa Fw190D-9 Red One
Posted: Fri May 04, 2018 1:34 am
by Stuart
That's a splendid bit of modification work on that cowling John (see I remembered

) - hat's off to you on that. The thinned cowling flaps look much better as well - and nice and even.
Re: 1/32 Hasegawa Fw190D-9 Red One
Posted: Fri May 04, 2018 5:42 am
by KSaarni

- Kari
Re: 1/32 Hasegawa Fw190D-9 Red One
Posted: Fri May 04, 2018 9:51 am
by KennyX
That gun cowling work is just a pleasure to watch. Great work making the piece all the more accurate!
Re: 1/32 Hasegawa Fw190D-9 Red One
Posted: Fri May 04, 2018 1:16 pm
by Duke Maddog
Sensational work John. I commend you on your persistence in making the gun cowling.
I also use my paint lids as paint cups when I brush paint; particularly when I use fine-tipped brushes. It's so much easier to control the amount of paint on the tips of the brushes.
Re: 1/32 Hasegawa Fw190D-9 Red One
Posted: Sun May 06, 2018 8:49 pm
by jkim
Thanks for the comments! It was a busy weekend so I don't have too much to report on the D-9. Another small task is to fill the ejector pin marks in the wheel well. As you can see, it can be tricky to sand without damaging the surrounding detail.

So I made some simple sanding tools to help me. These are simply wooden toothpicks with the pointed ends blunted off. On the squared off ends, I superglued little squares of sanding paper.

Due to the small area of the sanding surface losing its sanding effectiveness relatively quickly, I made up a few of them and labelled them per the grit of the sandpaper. With these, it's much easier to sand down the putty within a confined space.

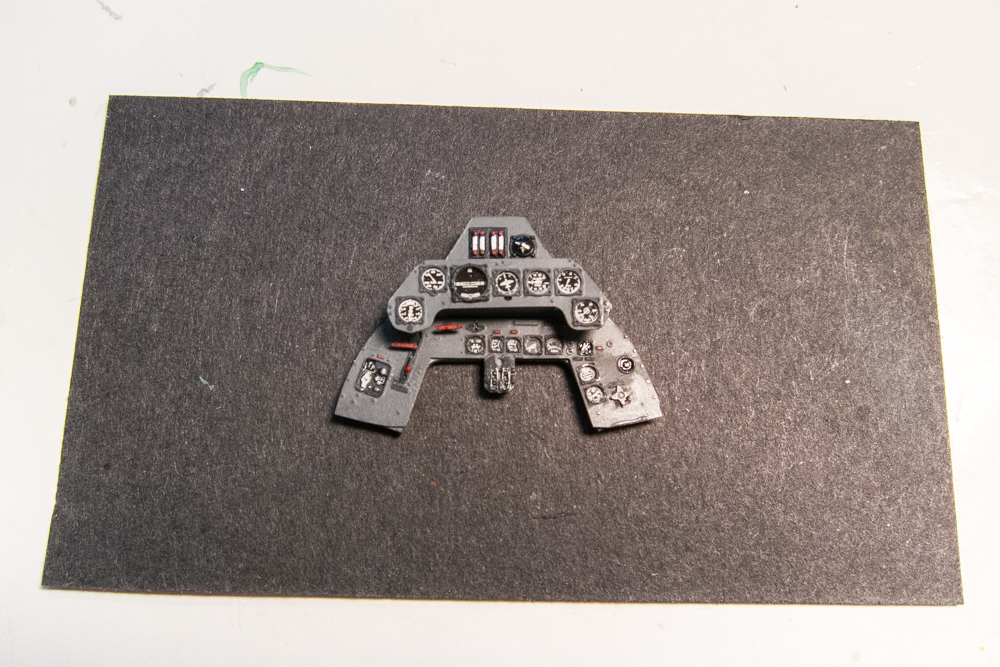
The different components of the instrument panel have been assembled. This is a mash-up of the Aires metal panel faces and the kit plastic instrument panel backing. The "discoloration" on the lower left portion of the panel is just texture: flat vs. satin... I'll fix it before the IP is secured into the fuselage.
Re: 1/32 Hasegawa Fw190D-9 Red One
Posted: Mon May 07, 2018 12:12 am
by Stuart
Brilliant idea for those sanding sticks John - It's a shame you had to use them though as that seems a bad place to put the injector pins.
That up looks really good.
Re: 1/32 Hasegawa Fw190D-9 Red One
Posted: Mon May 07, 2018 6:05 am
by KennyX
What a great idea with the sanding stick! That’s some solid problem-solving right there, nice!
Also- I’m really liking that instrument panel. What’s more, the more Insee of these FW builds, the more I appreciate that particular aircraft. It’s lovely.
Re: 1/32 Hasegawa Fw190D-9 Red One
Posted: Mon May 07, 2018 7:30 am
by mustang1989
Nifty idea on the toothpicks John. I've got a couple of areas on my current build that need to be sanded in areas like that. Thanks for the tip bud.
BTW............progress is looking GREAT!!!