1/32 Hasegawa Fw190D-9 Black One

Re: 1/32 Hasegawa Fw190D-9 Black One
I'm with Bruce. From the first to the last paragraph.

Re: 1/32 Hasegawa Fw190D-9 Black One
Thanks for support guys! A short update tonight. I mixed up another wash, this time very dark black/brown for the upper surfaces. Much less of an impact due to the darkness of the RLM82/83 scheme but there is some effect.


I finished up the exhaust stains also. It was started yesterday with the post-shading.


Using the examples found in Jerry Crandall's two Dora volumes, I outlined the two exhaust stains in different patterns. I gave the port side an arc that seemed to be present in many Doras. Due to the deflector plate and supercharger intake, the starboard side goes more straight to the back. I built up the exhaust stains using a highly thinned brown and gradually making the paint mix darker and working my way from the outside in.


I popped in the port side exhaust stubs just to see how they look... vrrrroooom!

Weathering is not done yet! The next major step will be some salt fading on the topside. Since it involves rinsing with water, I have to seal the pastel wash first with a clear coat.

I finished up the exhaust stains also. It was started yesterday with the post-shading.
Using the examples found in Jerry Crandall's two Dora volumes, I outlined the two exhaust stains in different patterns. I gave the port side an arc that seemed to be present in many Doras. Due to the deflector plate and supercharger intake, the starboard side goes more straight to the back. I built up the exhaust stains using a highly thinned brown and gradually making the paint mix darker and working my way from the outside in.
I popped in the port side exhaust stubs just to see how they look... vrrrroooom!
Weathering is not done yet! The next major step will be some salt fading on the topside. Since it involves rinsing with water, I have to seal the pastel wash first with a clear coat.
John aka JKim
-----------<><

-----------<><
-
speedgraflex

- Moderator
- Posts: 11535
- Joined: Fri Feb 10, 2017 11:08 pm
- Contact:
Re: 1/32 Hasegawa Fw190D-9 Black One
Looks great, John. I read through twice—wanted to understand the reasoning behind the exhaust sprays—fantastic approach. The exhaust buildup looks perfect!
Make more models!
Re: 1/32 Hasegawa Fw190D-9 Black One
On to the next step... salt fading. During lunch today, I thought I'd get a head start on the salt technique. I applied water on the upper surfaces and sprinkled on various grades of salt. Most of it is rock salt that I ground up myself, with a little table salt mixed in. This was done on top of a semi-gloss coat and I had a hard time keeping the water from pooling. That's all I could on my lunch break.


After work, the water had completely evaporated and the salt crystals were dry.

A thinned mix of gray is sprayed randomly over the upper surfaces. This is really hard to gauge as I cannot tell if I'm putting too much or too little gray. I err on the side of caution and decide to keep it light.
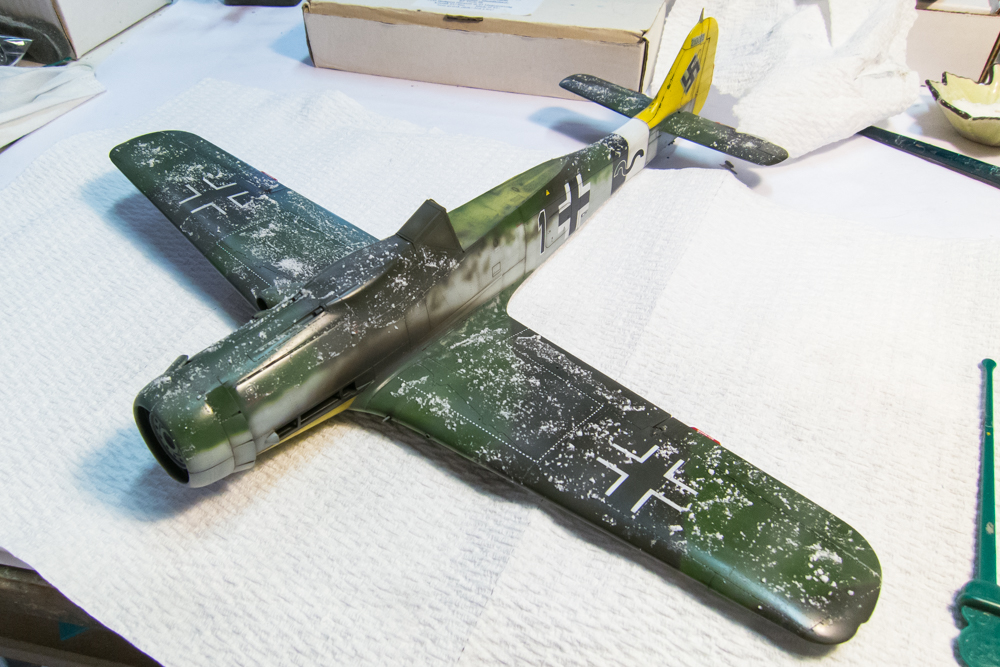
Removal of the salt is an intensive process as it has dried completely onto the model surface. I get as much of it off as I can using a stiff-bristled paint brush and then I resort to more drastic measures: I use a spray bottle of water and a clean microfiber cloth to remove the remainder. The result? Hmmm... interesting. Not quite what I expected. The pooling water must've collected the salt into clumps. Also the finer grained salt had no effect.
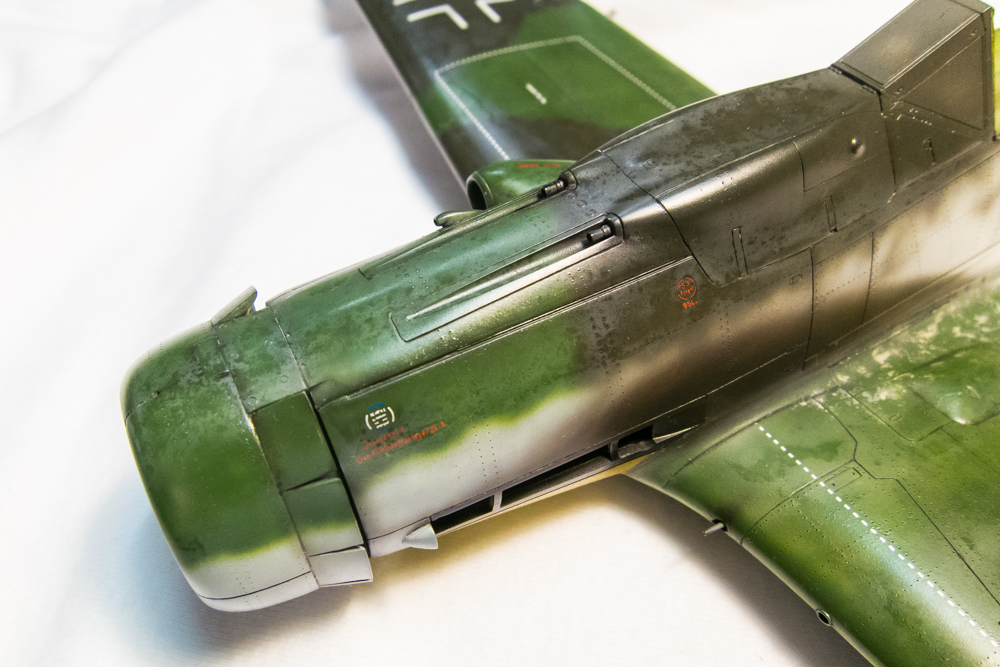
It's not bad but it's not great either. A flat coat will alter the appearance of this effect, usually by diminishing it so I'm hoping that it remains visible.

My current flat coat is Alclad Aqua Gloss plus Tamiya Flat Base. I have to be very careful with this mixture because too much Flat Base will result in a white frost effect. Also, when spraying a flat coat onto the model after the salt process, hidden salt crystals that were not removed will frost into a white stain. So I do the apply the flat coat in batches. When an area of salt frost materializes in a crevice or corner, I have to take a stiff brush or Micromesh to get rid of it and then re-coat the area with the flat.


With the flat coat, the bottom looks really good. I think this is the first time that I've liked how the bottom turned out more than the top!


So where's the salt fading effect? Oh, it's there but as feared, the flat coat really choked it out.


Other than that, the flat coat has really unified the different components of the finish: the camo paint, the masked markings and the decals.


The weathering on the top surfaces remains a question for now. Do I attempt a second salt fading layer? I know that the water will pool less on this flat coat so I may be able to get a more desirable effect. But... the disposition of the real Black 1 comes into play as well. Since the upper surfaces of this aircraft were repainted during the change from Yellow 1 to Black 1, the non-weathered look of the uppers compared to the well-weathered bottom could be argued as being appropriate.

I'll let this flat coat dry completely before I do anything else. Maybe I'll do some paint chipping next as I mull over that second salt fading pass. I'm leaning towards doing because the upper surfaces just look too clean to me.
After work, the water had completely evaporated and the salt crystals were dry.
A thinned mix of gray is sprayed randomly over the upper surfaces. This is really hard to gauge as I cannot tell if I'm putting too much or too little gray. I err on the side of caution and decide to keep it light.
Removal of the salt is an intensive process as it has dried completely onto the model surface. I get as much of it off as I can using a stiff-bristled paint brush and then I resort to more drastic measures: I use a spray bottle of water and a clean microfiber cloth to remove the remainder. The result? Hmmm... interesting. Not quite what I expected. The pooling water must've collected the salt into clumps. Also the finer grained salt had no effect.
It's not bad but it's not great either. A flat coat will alter the appearance of this effect, usually by diminishing it so I'm hoping that it remains visible.
My current flat coat is Alclad Aqua Gloss plus Tamiya Flat Base. I have to be very careful with this mixture because too much Flat Base will result in a white frost effect. Also, when spraying a flat coat onto the model after the salt process, hidden salt crystals that were not removed will frost into a white stain. So I do the apply the flat coat in batches. When an area of salt frost materializes in a crevice or corner, I have to take a stiff brush or Micromesh to get rid of it and then re-coat the area with the flat.
With the flat coat, the bottom looks really good. I think this is the first time that I've liked how the bottom turned out more than the top!
So where's the salt fading effect? Oh, it's there but as feared, the flat coat really choked it out.
Other than that, the flat coat has really unified the different components of the finish: the camo paint, the masked markings and the decals.
The weathering on the top surfaces remains a question for now. Do I attempt a second salt fading layer? I know that the water will pool less on this flat coat so I may be able to get a more desirable effect. But... the disposition of the real Black 1 comes into play as well. Since the upper surfaces of this aircraft were repainted during the change from Yellow 1 to Black 1, the non-weathered look of the uppers compared to the well-weathered bottom could be argued as being appropriate.
I'll let this flat coat dry completely before I do anything else. Maybe I'll do some paint chipping next as I mull over that second salt fading pass. I'm leaning towards doing because the upper surfaces just look too clean to me.
John aka JKim
-----------<><
-----------<><
-
speedgraflex
- Moderator
- Posts: 11535
- Joined: Fri Feb 10, 2017 11:08 pm
- Contact:
Re: 1/32 Hasegawa Fw190D-9 Black One
Good evening! It's the peanut gallery here... but I wanted to chime in that I agree with you about the lower fuselage. I actually pulled the photograph of the first wash on the lower fuselage to study it more after you published this because I felt and still feel that the way that turned out was a minor miracle. I almost could let the heaviness stand if the brushwork was less visible. The weathering centrally focuses and correctly focuses on the engine area and immediately and in a most authoritative way gets the point across that this is a working machine. Congratulations, John. Regarding the top fuselage, I wanted to call your attention to this photograph. I am sure you have seen this, but it is a wonderful reference:


Dirty. Oily. Scratched and faded paint.
Dirty. Oily. Scratched and faded paint.
Make more models!
Re: 1/32 Hasegawa Fw190D-9 Black One
Blue 12 is definitely a good reference given the amount of photos available, some of which are in color. The red primer marks on my landing gear doors were inspired the color photos of Blue 12.

John aka JKim
-----------<><
-----------<><
-
speedgraflex
- Moderator
- Posts: 11535
- Joined: Fri Feb 10, 2017 11:08 pm
- Contact:
Re: 1/32 Hasegawa Fw190D-9 Black One
Your landing gear doors are works of art, John. Wow. When I read through your thread again recently, it was the work in the engine compartment and wheel well areas that I came to appreciate even more... especially as I have an idea how making engine plugs fit within the confines of the cowling can be very tricky... but it was the tones of the engine's metal surfaces that really are beautifully represented. Back to what you are mulling over—I would lean towards more side wash of the fuselage based on the reference I am seeing, but more overall even wear. That's just a personal opinion, of course. I think regardless of fresh paint (unless you are creating the effect of seeing the fresh paint on the day of painting), once the aircraft was flown for the first time, the paint would already start to shift towards that chalk-tone that seems to be very flattened and coarse, patchy and tentative, washed with oil and grime.

I cleaned up the first image you posted, since it is the actual aircraft... immediately I noticed that the edges, and surfaces that are in contact with movement are scraped clean of the repaint... at least that’s how this now reads to me.
I cleaned up the first image you posted, since it is the actual aircraft... immediately I noticed that the edges, and surfaces that are in contact with movement are scraped clean of the repaint... at least that’s how this now reads to me.
Make more models!
Re: 1/32 Hasegawa Fw190D-9 Black One
Astute point about the side wash, Bruce. I DID want to impart that impression of wear along the fuselage sides and I think I have accomplished it, to a point, with the post-shading and pastel wash. And the chipping is yet to come. So when to close the door on one stage to move on to the next is the dilemma for me. The real art of weathering, in my opinion, is to enhance the model without calling attention to any individual effect. So I am always afraid of overdoing something. There IS another weapon in the bag of modeler trick's that has not yet been pulled out: oil filtering. 
John aka JKim
-----------<><
-----------<><
-
speedgraflex
- Moderator
- Posts: 11535
- Joined: Fri Feb 10, 2017 11:08 pm
- Contact:
Re: 1/32 Hasegawa Fw190D-9 Black One
Hmmm... do you mean using oil paint??? If so, and you like to glaze your paints—which would make sense based on your aesthetics—check out
https://www.schmincke.de/en/products/oi ... ssini.html
https://www.schmincke.de/en/products/oi ... ssini.html
Make more models!
Re: 1/32 Hasegawa Fw190D-9 Black One
Yes, oil paints. But it's not something that I am very familiar with. I've only dabbled with it and have had very mixed results. I used cheapo squeeze tubes of paints from a children't art set. Basically, you dab little blobs of different colored oil paints onto the surface of the model and then use a stiff brush to work the oils into the painted layer, creating a film or filter that alters the tone of the underlying paint in a random way.
I used oils on my P-38 build, mostly as an emergency reaction to the appearance of salt frost after I used the salt fading technique.


I wasn't totally satisfied with the imparted look on the P-38 but that is most definitely a result of my inexperience with the technique.


I used oils on my P-38 build, mostly as an emergency reaction to the appearance of salt frost after I used the salt fading technique.
I wasn't totally satisfied with the imparted look on the P-38 but that is most definitely a result of my inexperience with the technique.
John aka JKim
-----------<><
-----------<><