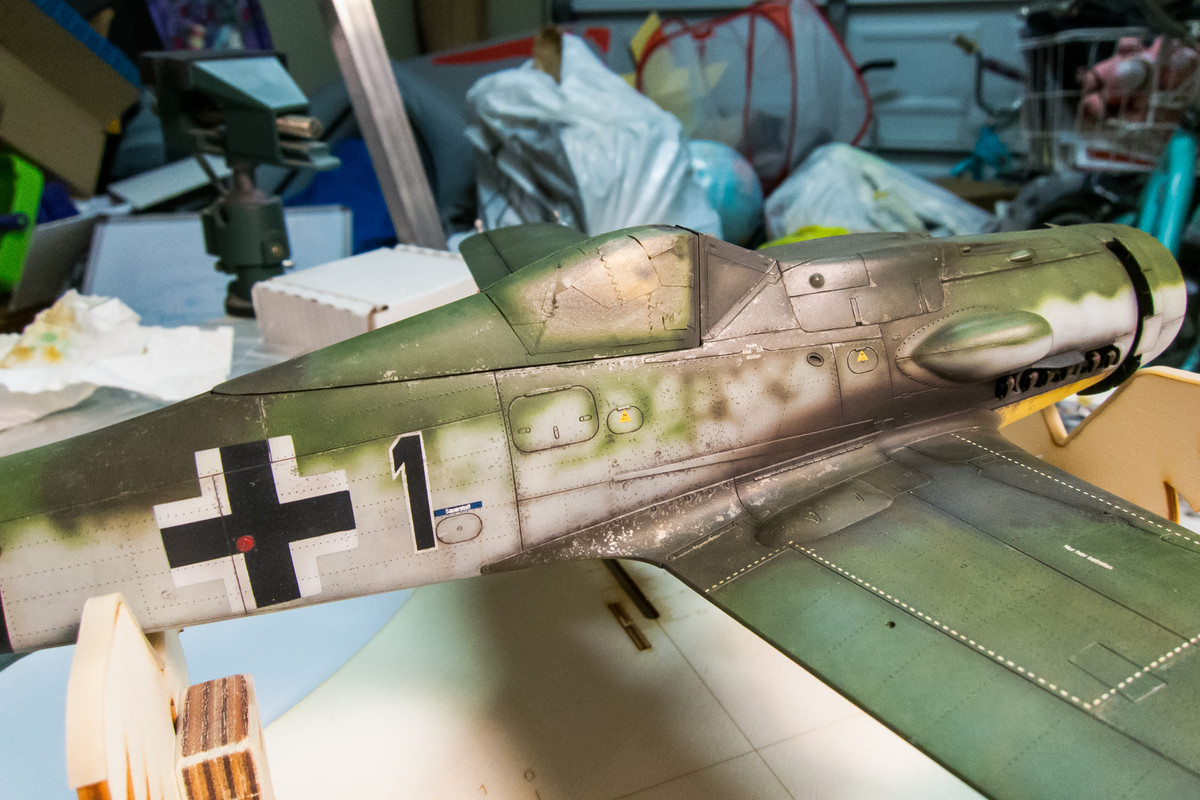
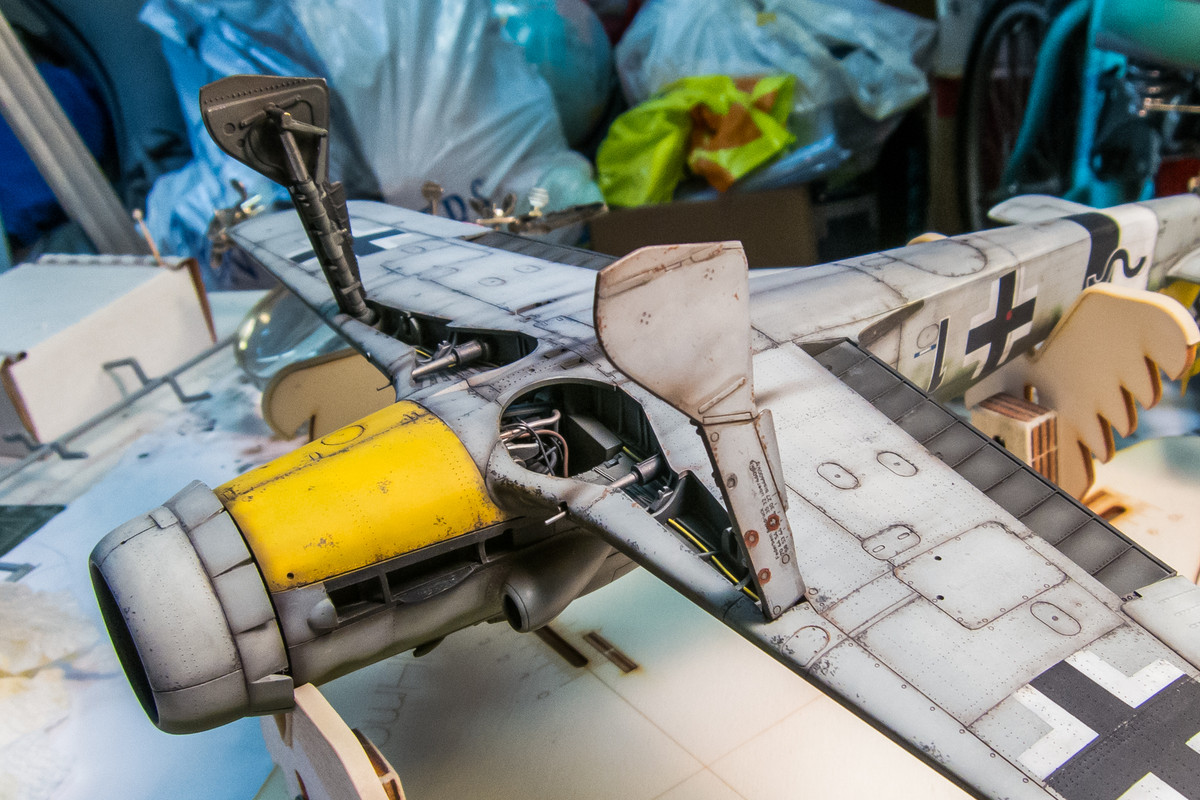
1/32 Hasegawa Fw190D-9 Black One

Post your work in progress of your aircraft builds in here.
User avatar
Fermis
Addicted Member
Posts: 1811
Joined: Sat Mar 15, 2014 10:41 pm
Location: Hamburg Michigan

Re: 1/32 Hasegawa Fw190D-9 Black One

Post by Fermis »

speedgraflex wrote:Your work is amazing, John!

:shoutout:
:that: ...flabbergasting, even!
User avatar
BlackSheep214
Elite Member
Posts: 13418
Joined: Sun Apr 06, 2014 8:47 pm

Re: 1/32 Hasegawa Fw190D-9 Black One

Post by BlackSheep214 »

In awe and speechless.... Well done!! :shoutout: :shoutout: :shoutout:
“Who controls the skies, controls the fate of this Earth”

Author unknown- 352nd Fighter Group, Blue-Nosed Bastards of Bodney

“Send one plane it’s a sortie; send two planes it’s a flight; send four planes it’s a test of airpower. - Richard Kohn
User avatar
tempestjohnny
Elite Member
Posts: 3804
Joined: Sat Oct 15, 2016 4:51 am
Location: Naples. FL

Re: 1/32 Hasegawa Fw190D-9 Black One

Post by tempestjohnny »

:bow: :bow: :bow: :bow: :bow:
User avatar
jkim
Elite Member
Posts: 4073
Joined: Mon Apr 10, 2017 4:03 pm

Re: 1/32 Hasegawa Fw190D-9 Black One

Post by jkim »

Thanks for checking fellow SPAMers! The Black 1 build is on the downhill now and I see the finish line in sight on my longest build. I hope you enjoyed the journey as much as I've had in sharing it.

When I last posted, I was waffling between doing an oil filter or not. I don't think it needed it from a tonal variation standpoint but went and did it anyway. Mostly to try and tone down some of the "white frost" appearance from my flat coat applications.
Image

It was a messy affair and I really don't have any confidence that I'm doing it correctly so I'm not going to document the process step-by-step. So let's fast forward to Black 1 after the oil filter treatment and then another flat coat to even it all out.
Image

The treatment did tone down that frost a bit and it didn't do anything crazy to the paint job. There is a little bit of color variation but it is very subtle. You'll note some after-the-fact post shading of the panel lines near the wing root that I need to tone down.
Image
Image
Image

Ok... so the paint stage on Black is essentially done. All that remains is to add all of the external bits and pieces. The exhaust stacks are the first to glued into place.
Image
Image
Image

The landing gear legs are glued onto the landing gear doors before attachment to the aircraft. The wheels will be glued on last to ensure that the flat spots in the tires are in the correct orientation.
Image

The legs are then glued into the wheel wells.
Image

There is a small wire that goes from the retracting arm towards the base of the starboard landing gear leg. Hardly noticeable but it is the tail wheel retraction wire.
Image
Image

Finally, the wheels are attached to the landing gear legs. I use a gel CA glue here to give me time to fix the flat spots on the ground. Black 1 sits on her own legs for the first time!
Image
Image
John aka JKim
-----------<><
Image
User avatar
BlackSheep214
Elite Member
Posts: 13418
Joined: Sun Apr 06, 2014 8:47 pm

Re: 1/32 Hasegawa Fw190D-9 Black One

Post by BlackSheep214 »

Awaiting for the climatic finish!
“Who controls the skies, controls the fate of this Earth”

Author unknown- 352nd Fighter Group, Blue-Nosed Bastards of Bodney

“Send one plane it’s a sortie; send two planes it’s a flight; send four planes it’s a test of airpower. - Richard Kohn
User avatar
speedgraflex
Moderator
Posts: 11358
Joined: Fri Feb 10, 2017 11:08 pm
Contact:

Re: 1/32 Hasegawa Fw190D-9 Black One

Post by speedgraflex »

Hi John,

Nice to see you back in the workshop! How are the Welch's Fruit Snacks? I am trying to find a snack food that won't leave my fingers coated during work, but no luck so far! Everything I try leaves my fingers sticky or salty! Oh, well. I looked at your first three photographs, then I enlarged the third photo! So much was going on!! It was beautiful. I was also happy to have the pixel depth, too!! Did you change your camera rig or are you uploading larger files for these beauty shots of your beautiful work. Then, then I realized that there were more photos! I started clicking through to look at these beautiful images... I think my mind is somewhere else right now... in some kind of modeling bliss. Beautiful is the right word; although at first blush this may seem the wrong word to describe this aircraft. This is just superb. Exquisite! Another word like "beautiful" that may not be quite the right word at first blush but John! WOW! I look at this aircraft—those landing gear—WOW! Superb! Exquisite! Beautiful! Clapping!


:shoutout:
Make more models!
User avatar
mostrich
Admin
Posts: 3105
Joined: Sun Apr 06, 2014 2:13 pm
Location: Hamburg, Germany
Contact:

Re: 1/32 Hasegawa Fw190D-9 Black One

Post by mostrich »

What a moment! Like Lyle I'm out of words to describe what I'm feeling while looking at the pics of this marvelous model.

Regarding the jig, I was thinking a long time about getting me one. I opted for an acrylic one from Vertigo Miniatures.

http://www.vertigo-miniatures.com/verti ... RTIGO-JIGS
User avatar
jkim
Elite Member
Posts: 4073
Joined: Mon Apr 10, 2017 4:03 pm

Re: 1/32 Hasegawa Fw190D-9 Black One

Post by jkim »

Thank you so much for the nice comments! Very much appreciated!

Bruce... the Welch's Fruit Snacks remain uneaten! I grabbed them from the Halloween leftovers, opened them on the workbench and never ate them. I think I get so "consumed" in what I am doing when I am in modeling mode that it's hard to "consume" anything else. :quotes: The photo routine is unchanged for me... Canon S100 for my in-progress shots and then a DSLR for my finished shots. (pssst... I'm getting a little b-day upgrade soon!) It's interesting how much attention and time I've spent on individual components of the model. I try to treat each piece as a separate, stand-alone model. But when I finally attach them to the model, they seem to kind of... disappear. Or maybe they are blending into the model as a whole, which is probably a good thing. I just noticed that when I added the landing gear and exhaust stubs.

Torben... the jig purchase was spur-of-the-moment. I was looking through a model supply website (UMM-USA) and saw that these wooden jigs were discounted so I bought one. I assume the acrylic ones will last longer than these light wood jigs.

Doing a few things on the Dora as this build winds down. I've removed some of the masking to check the fit and finish of the canopy. Looks a-ok open or closed.
Image
Image
Image

I'm checking the look of the underside add-ons but have not yet glued them into place.
Image

The wing lights are clear pieces supplied as part of the kit. They have been painted in clear red and clear blue and are ready to be glued into the end of the wings using Elmer's White Glue.
Image
Image

Note the rough patch on the tip of the wing just forward of the red light. That... is a fingerprint. One of the many tiny flaws that I have to catch and correct before I'm done. I think I can just buff this out with some Micromesh.
Image

Over at LSP, I was informed by someone that the ETC504 rack was usually RLM66 Dark Grey not RLM76 Light Blue. Crandall's Dora books nor the EagleCal decal instructions mention anything about this, that I recall. So I leafed through my Dora books and lo and behold, I did find a few examples where the rack is clearly a darker color than the underside color. So I'm going to make that change.
Image

I wiped off the paint using a paper towel moistened with iso alcohol. Interestingly, I was able to wash off all of the RLM76, black pres-shade, hairspray but retained the original Alclad metal color. This makes it that much easier to change. I'll spray some more hairspray on this and then put on a RLM66 coat.
Image

Some more views of the bottom with the landing gear firmly attached. A note about photography... I find it very important to take good quality photos during the build. Not only for purpose of sharing the build with others but for self-review. At first, it is pretty sobering to see high resolution photos of your work close-up. But it will definitely push you to improve. At least it does that for me. I know that if it looks good through the magnifier or through these unforgiving digital photos, it's going to look good in person.
Image
Image
Image

Time to attach the flaps. The flap attachment is via three hinges. The joint, while not the strongest, is good enough to friction hold the flaps in place without glue. I want to pose the flaps at the maximum 60 degree angle and I'm afraid that CA glue will set up too fast for me. So I used 2-part epoxy for this attachment.
Image
Image

Pull back status check # 153... getting there!
Image
John aka JKim
-----------<><
Image
User avatar
speedgraflex
Moderator
Posts: 11358
Joined: Fri Feb 10, 2017 11:08 pm
Contact:

Re: 1/32 Hasegawa Fw190D-9 Black One

Post by speedgraflex »

Nice work. I read through your build thread on Large Scale Planes to see who made the comment about the racks just to see how that was presented, but I found Martin's comments about the landing gear "undercarriage cover" to be quite interesting. I was wondering about this because my little Trimaster Dora covers were a "smidge" too long when I test fitted them and I made adjustments (I also believe someone in a build on Finescale stated, "landing covers never fit inside the openings" which may be true but I decided any landing gear I build will). Perhaps Hasegawa's 1/32 version is not the only model of the Dora with slightly over-extended covers. It's also interesting to see how modelers on a larger forum respond, and how larger photo display size on the forum makes your already impressive photography that much more formidable.
Make more models!
User avatar
BlackSheep214
Elite Member
Posts: 13418
Joined: Sun Apr 06, 2014 8:47 pm

Re: 1/32 Hasegawa Fw190D-9 Black One

Post by BlackSheep214 »

Are the ETC504 racks always designated RLM 66 regardless of Fw-190 model (A-6, A-8, etc...) ?
“Who controls the skies, controls the fate of this Earth”

Author unknown- 352nd Fighter Group, Blue-Nosed Bastards of Bodney

“Send one plane it’s a sortie; send two planes it’s a flight; send four planes it’s a test of airpower. - Richard Kohn
Post Reply

Return to “Aircraft Work in Progress”