Revell 1/72nd S-100 Schnellboot

Here is the place to show off the progress of your ship builds.
Post Reply
User avatar
Bish
Master Member
Posts: 570
Joined: Wed Apr 09, 2014 7:42 am
Location: Suffolk, England

Revell 1/72nd S-100 Schnellboot

Post by Bish »

This is my first 72nd scale ship build and the most detailed ship to date. As i am not to familiar with building ships, i am taking my time with this and i am intending follow the instruction sequence rather than jump around as i might do with armour or aircraft.

Image

I don't usually get referance boks for subjects i only have one kit of, but i have made an exception with my larger ship kits.

Image

The kit itself cost me nothing, being a gift from a good friend a few years back. But i made up for that with the AM. The Griffon premium set contains 14 PE frets, resin parts, metal barrels and torpedo's and a few other things. I got 2 Peddinghaus decal set as the boat i want to do, S-205, is not covered by one of them. Also an Artwox wood deck and some sea mines from CMK.

Image

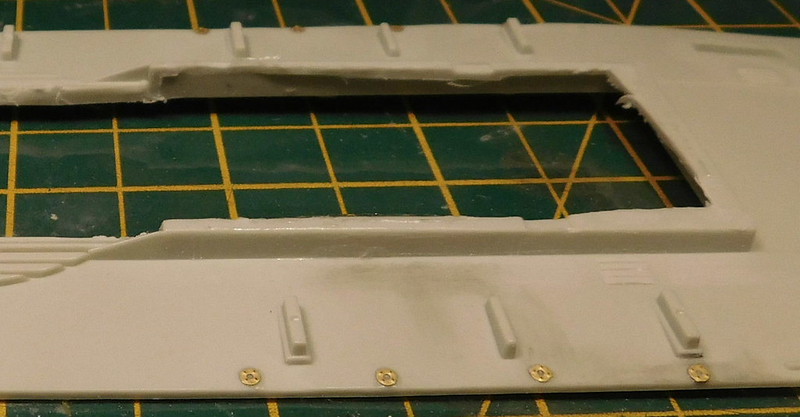
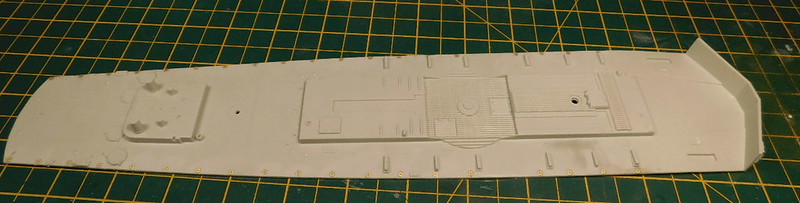
I started out with the mounts for the railings on the main deck piece. I didn't have much spare time Thurs night so didn't want to get into anything to intricate.

Image

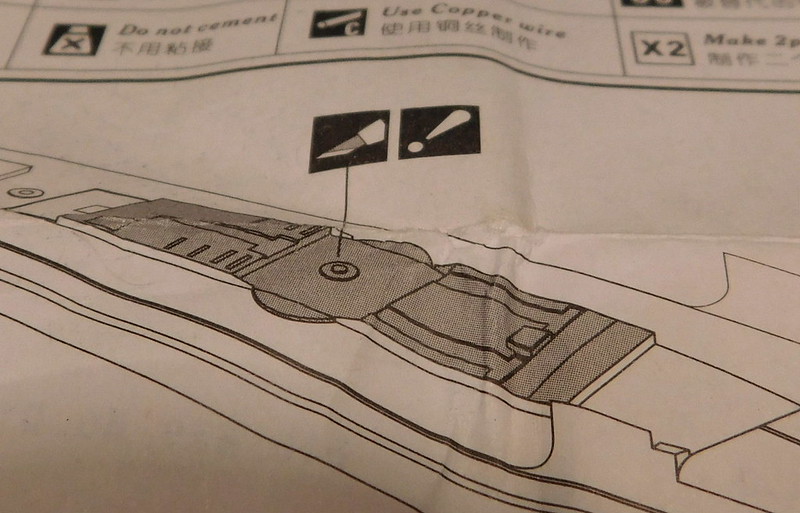
Then over the weekend i made a start on the bridge. Main piece i needed to work on was the RZA 5 torpedo sight. The kit piece lack detail and is totally wrong, and the PE only added a couple of bits. This is what it should look like, from the Squadron book.

Image

And this is the kit part, this being the upper portion. Notice how it narrows at the top.

Image

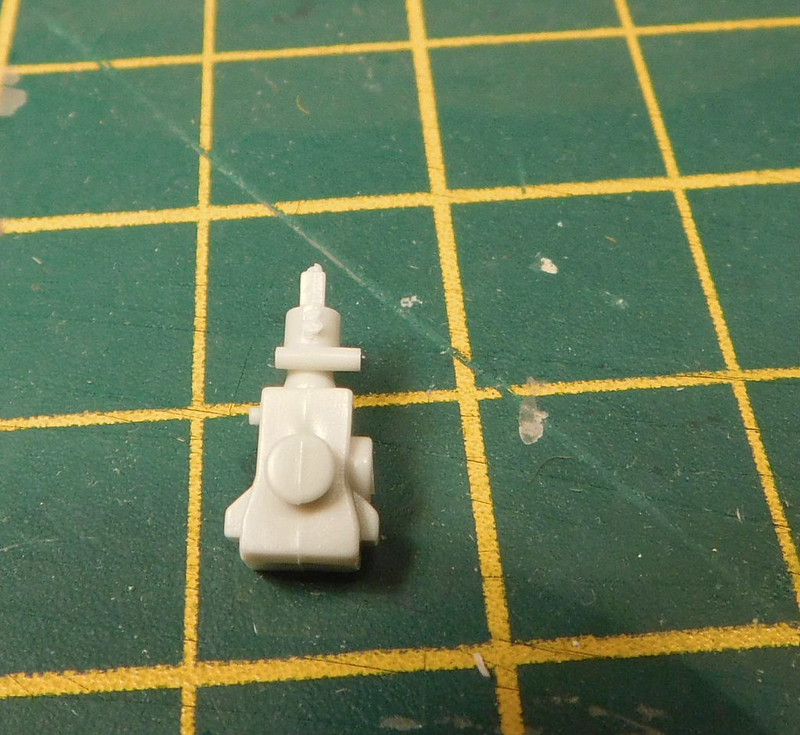
And the lower portion is part of the front of the bridge. On the real thing, it would extend lower down below the bridge floor.

Image

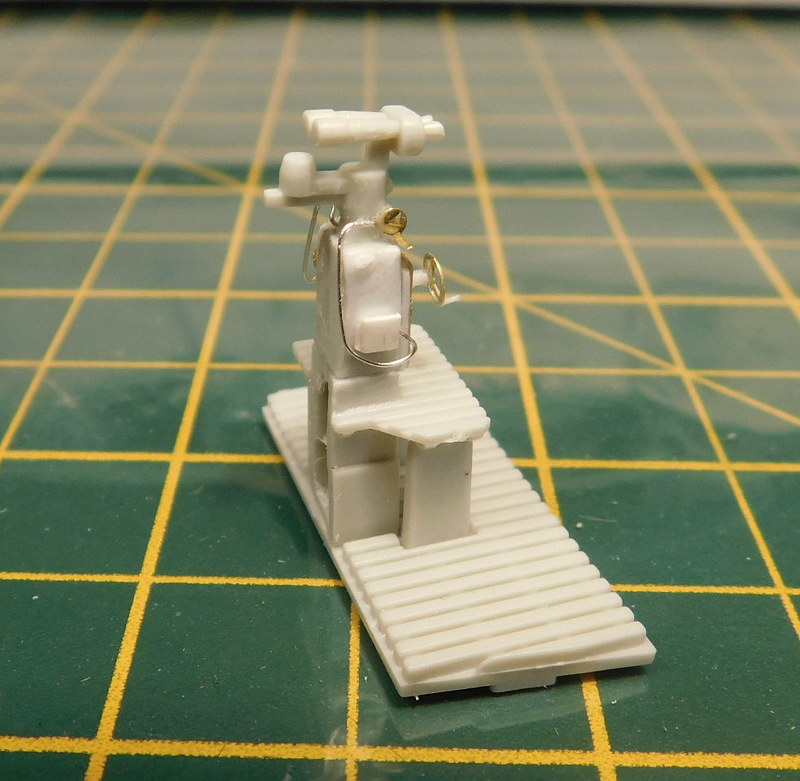
That whole piece is replaced by PE. So i cut out the bit i needed and attached it to the upper portion. I also filled out the side with some styrene sheet and added a bit of PE.

Image

I then finished it off with some PE and scratched some detail with styrene and PE scrap. The hand wheel on the rear is from the PE set, the one of the right is made from 2 spare wheels from one of my Luftwaffe ladder sets. I put 2 together to give it some thickness. I finished off with some wireing. This was one of those things when you have to know when enough is enough. I could have spent a whole day adding tiny details and it still would not have matched the real thing. I think this looks enough without going OTT. It was then fitted to the bridge floor.

Image

Image

Image

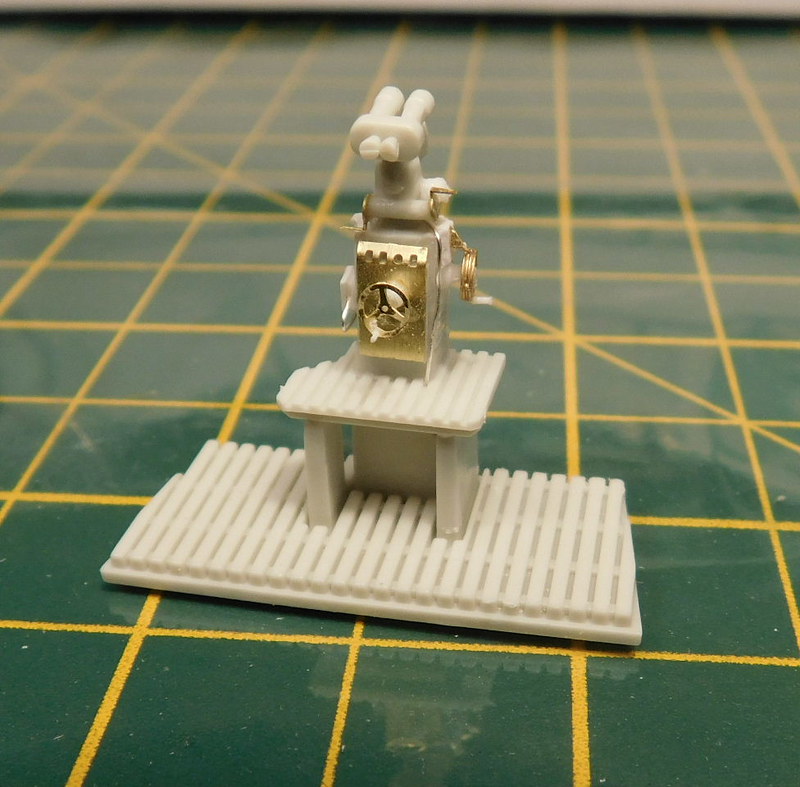
I then got the front and sides of the bridge fitted out.

Image

Image

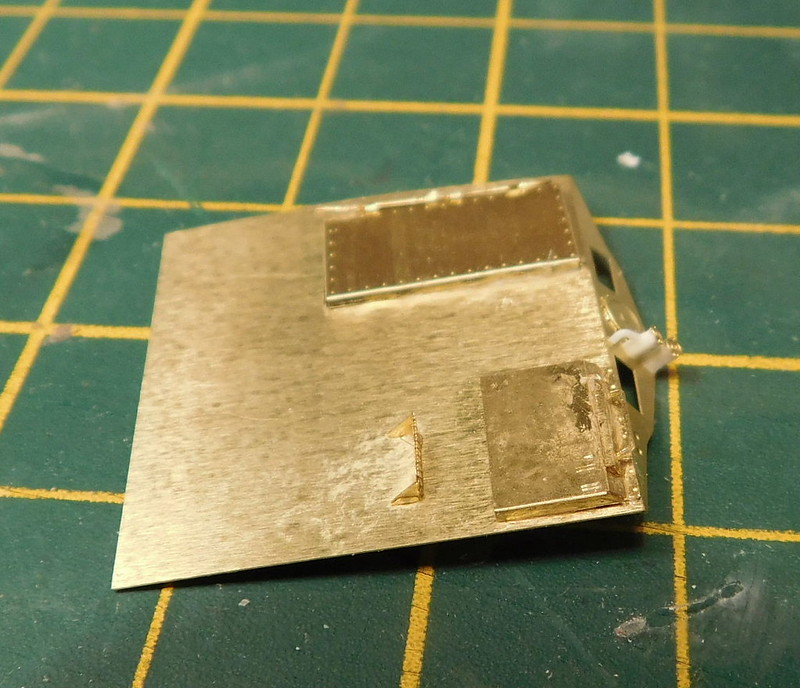
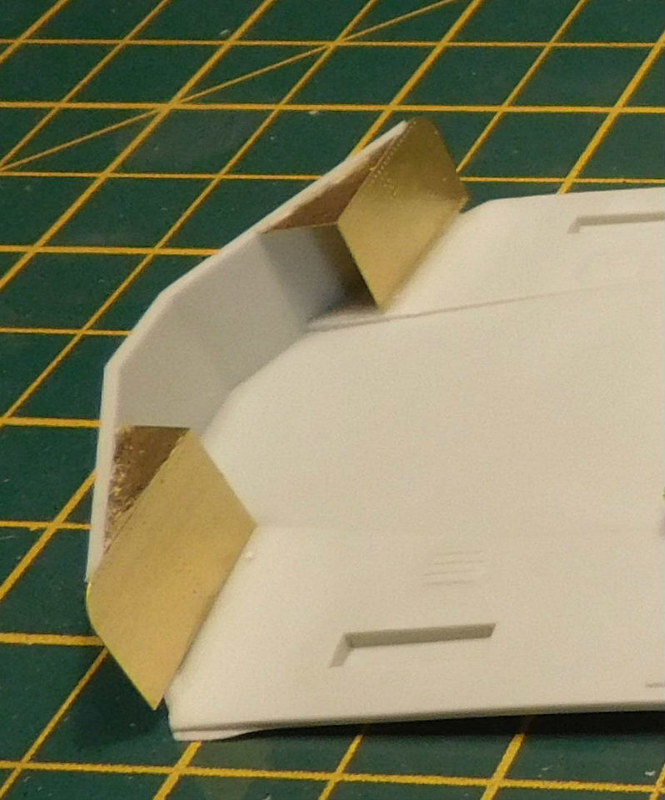
And then the armoured front to the bridge/wheel house.

Image

Image

So the bridge is now ready to be primed and painted on the inside. I'll do that and then put it all tofgether. There is some slight cleanup and a few parts to be added to the outside, but they can be done later.

Enjoying this so far, still a long way to go.
'I am a Norfolk man and i glory in being so'
On the bench: Revell 1/72nd Type VIIc U-Boat
User avatar
Floki
Elite Member
Posts: 3548
Joined: Wed Dec 12, 2018 2:23 am
Location: Muncie, Indiana

Re: Revell 1/72nd S-100 Schnellboot

Post by Floki »

I will be following along very closely! I got this kit the Griffon PE set, also two of them books. I have read that the kits armored bridge is the wrong shape but it looks like the PE takes care of that. I've had this kit and PE going on eight years and have still never compared the instructions or tried to make a plan the Griffon set looks very complex
March as one, Don't look back
Odin's sons... Attack!
Unleash hell! Do not repent! Warfare grants us no lament
Let your weapons slash and tear This is no place for fear
Hold the lines! Move as one! In unity our victory's won
Our shields will form a mighty wall
United we shall never fall
User avatar
Medicman71
Elite Member
Posts: 9698
Joined: Mon Apr 07, 2014 9:32 am
Location: Houston, Tx

Re: Revell 1/72nd S-100 Schnellboot

Post by Medicman71 »

Very nice!
Mike

Sponsored by Boeing, Lockheed Martin, Northrop Grumman, Saab, BAE, and Dassault
User avatar
Stikpusher
Moderator
Posts: 18857
Joined: Sat Apr 05, 2014 8:37 pm
Location: Ceti Alpha 5

Re: Revell 1/72nd S-100 Schnellboot

Post by Stikpusher »

I think that you will find that Ships aren’t too different than Armor Bish. Perhaps just a bit more time consuming. Have fun!
"Surely I have made my meaning plain? I intend to avenge myself upon you, Admiral. I have deprived your ship of power, and when I swing 'round, I intend to deprive you of your life."

FLSM
User avatar
LyleW
Admin
Posts: 13633
Joined: Fri Dec 13, 2013 7:25 am
Location: Mt. Washington KY

Re: Revell 1/72nd S-100 Schnellboot

Post by LyleW »

Those are good looking vessels.
To make each build less crappy than the last one. Or, put another way, "Better than the last one, not as good as the next one!"..
User avatar
Bish
Master Member
Posts: 570
Joined: Wed Apr 09, 2014 7:42 am
Location: Suffolk, England

Re: Revell 1/72nd S-100 Schnellboot

Post by Bish »

Thanks guys.

Floki, the AM set is complex, i am just following the flow of the kit instructions and fitting in the PE as needed. Despite how much there is, it seems easier to use than a Voyager PE set.
'I am a Norfolk man and i glory in being so'
On the bench: Revell 1/72nd Type VIIc U-Boat
User avatar
Stuart
Elite Member
Posts: 9572
Joined: Sun Apr 06, 2014 1:06 pm
Location: North Wales
Contact:

Re: Revell 1/72nd S-100 Schnellboot

Post by Stuart »

Great stuff Bish, the work/detail you've added with the PE is awesome!
Stuart Templeton 'I may not be good but I'm slow...'

My blog: https://stuartsscalemodels.blogspot.com/
User avatar
Bish
Master Member
Posts: 570
Joined: Wed Apr 09, 2014 7:42 am
Location: Suffolk, England

Re: Revell 1/72nd S-100 Schnellboot

Post by Bish »

Thanks Stuart. Theres a lot more PE to come.
'I am a Norfolk man and i glory in being so'
On the bench: Revell 1/72nd Type VIIc U-Boat
User avatar
Bish
Master Member
Posts: 570
Joined: Wed Apr 09, 2014 7:42 am
Location: Suffolk, England

Re: Revell 1/72nd S-100 Schnellboot

Post by Bish »

Its been a couple of weeks, so time for an update. A few people have said they have the same Griffon set, so i am going to start with a few issues i have found with it, mainly down to the instructions.

First one is on the main deck. You have to remove the raised area, greyed out in the instructions. And it clearly shows that the vertical sides are to be left.

Image

Which leaves you with this.

Image

But the 2 peices that go over the hole look like this underneath.

Image

Clearly the cross piece with not allow it to fit with the sides of the kit in place. So, the sides had to be removed, here the rear has been done but not the front.

Image

Next issue is the rear section of the torpedo tubes. Before adding AM, they should fit like this.

Image

There is a PE piece for each side which going off the instructions fit like this.

Image

Clearly thats not right, in the instructions, the top of the PE run along the plastic piece. Whjat they miss out is the the sides of the vertical plastic bulkhead have to be taken back.

Image

This also means that the torpedo tubes won't fit and have to be cut back, again this is not mentioned.

Those isues caused me some head scratching, though really it should have been clear what to do. I only realised when i look at the Griffon models website and the page on this AM set had a lot of images which included this area without the bridge fitted.

Unfortunatly, the link to different products does not seem to be working at the moment, at least on my computer. The product is a little way down on the right side, BPN 72001.

http://www.griffonmodel.com/

So once those issues where dealt with, this is how the rear deck looked.

Image

I waisted a couple of evenings trying to sort that out, but it got there. So i was able to fit the deck and put the hull together.

Image

Image

I then did some work on the raised front deck including around the forward gun mount and the hatch, this was then fitted. Towards the rear, there are 2 raised circles just behind the small raised deck section. There were 4 of these, the other 2 being on the outside edge. These are the bases for the smoke generators. The instructions tell you to remove the inner ones. But the pics of my boat clearly show the generators on these inner positions, so i removed the other ones.

Image

Image

The prop shafts were also fitted, i left out the rudders.

Image

And i got one of the rear sections of the torpedo tubes donw. Lots of tricky PE on there. You can see the front has been cut back. I did a bit to much so had to add some styrene strip.

Image

And finally, there is some question about the kit props being incorrect. In my seperate WiP thread it was mentioned that the pitch is completly wrong. Several reviews mention this as well. In the ship craft book there are a couple of pics of an S-38 prop which show them well. They also show that the centre prop attaches to the main rudder. The kit has this right, but i thought it must have been wrong when i saw the instructions, but what do i know about ships.

Image

Over on FSM one of the guys mentioned that Shapeways has 3D printed props with the correct pitch. When i checked there site, they also have the correct shield for the rear gun of the boat i am doing. I was going to have to scratch that. I was not expecting them until the end of the month but they arrived yesterday, my first 3D printed parts.


More to follow.
'I am a Norfolk man and i glory in being so'
On the bench: Revell 1/72nd Type VIIc U-Boat
User avatar
Stikpusher
Moderator
Posts: 18857
Joined: Sat Apr 05, 2014 8:37 pm
Location: Ceti Alpha 5

Re: Revell 1/72nd S-100 Schnellboot

Post by Stikpusher »

:hmm:

Man I’m loving this project! Brass, 3-D printed parts... what other goodies are you adding? Metal guns?
"Surely I have made my meaning plain? I intend to avenge myself upon you, Admiral. I have deprived your ship of power, and when I swing 'round, I intend to deprive you of your life."

FLSM
Post Reply

Return to “Work In Progress: Ships”