
Experience is good, both negative and positive. I still feel a little uncomfortable with resin to the point that I went through the trouble of sculpting the Fw 190D-13 bulges myself rather than utilize the Grey Matter resin fuselage pieces that I had bought. Like all of us, I've run into my own little disasters... snapping delicate resin parts from their casting blocks and running the razor saw into the part itself. The best was cutting off what I thought were pieces of excess resin only to find out that they were locating tabs. And the inconsistency of the medium itself makes for a potentially frustrating experience. So you are definitely not alone when it comes to bad memories of resin.
Build looks great so far! Not to put a damper on anything but NMF is another thing that gives me pause. Metal finishes have the unnerving ability to reveal the smallest flaws on the surface of the model. Depending on what you are shooting for, surface treatment of the plastic prior to painting is very important. Usually not enough to fine sand everything but a certain amount of polishing is recommended.
And what is "AMS"?
1:48 P-51B “Spare Parts” (Tamiya Kit)
Re: 1:48 P-51B “Spare Parts” (Tamiya Kit)
John aka JKim
-----------<><

-----------<><

Re: 1:48 P-51B “Spare Parts” (Tamiya Kit)
John,
Two things-
1. I remember the work you did sculpting the bulges on that build and your results were magnificent and awesome.
2. NMF scares the crap out of me, honestly. For every reason you described. That’s one reason why I’ve been so careful, and will continue to be. Needless to say, I’m going to be doing a lot -and I mean A WHOLE LOT- of preparation and testing.
One good thing I suppose- this bird is a station hack, a warbird that crashed and was cobbled back together from spare parts to be used in odd jobs. Somehow that makes me feel a bit better about attempting the finish.
Two things-
1. I remember the work you did sculpting the bulges on that build and your results were magnificent and awesome.
2. NMF scares the crap out of me, honestly. For every reason you described. That’s one reason why I’ve been so careful, and will continue to be. Needless to say, I’m going to be doing a lot -and I mean A WHOLE LOT- of preparation and testing.
One good thing I suppose- this bird is a station hack, a warbird that crashed and was cobbled back together from spare parts to be used in odd jobs. Somehow that makes me feel a bit better about attempting the finish.
Kenny X
Head Mother Trucker In-Charge @ Kenny X’s Reichs Winzigkleines Flugzeugewerks *and now* Airboat Records, too!
Head Mother Trucker In-Charge @ Kenny X’s Reichs Winzigkleines Flugzeugewerks *and now* Airboat Records, too!
Re: 1:48 P-51B “Spare Parts” (Tamiya Kit)
John,
“AMS” is Advanced Modeler Syndrome. Heh, I don’t think I’m an “Advanced Modeler” yet.
“AMS” is Advanced Modeler Syndrome. Heh, I don’t think I’m an “Advanced Modeler” yet.
Kenny X
Head Mother Trucker In-Charge @ Kenny X’s Reichs Winzigkleines Flugzeugewerks *and now* Airboat Records, too!
Head Mother Trucker In-Charge @ Kenny X’s Reichs Winzigkleines Flugzeugewerks *and now* Airboat Records, too!
Re: 1:48 P-51B “Spare Parts” (Tamiya Kit)
Speaking of natural metal finish, I figure now is as good a time as any to lay out what I’ll be doing.
Or at least what I’m planning to do.
So, being that this aircraft is an airworthy re-built wreck turned station hack, I figure “Airframe Aluminum” from Alclad’s high shine range goes right out the window for the fuselage. Which, that’s fine with me because I’ve heard it’s delicate. I’m going with plain old Alclad Aluminum on the fuselage, with some panels darkened with Alclad Dark Aluminum, I’ll use Alclad’s Stainless Steel on the panels where the exhausts are, and some Alclad Duraluminum here and there for darker panels.
What do y’all think?
Or at least what I’m planning to do.
So, being that this aircraft is an airworthy re-built wreck turned station hack, I figure “Airframe Aluminum” from Alclad’s high shine range goes right out the window for the fuselage. Which, that’s fine with me because I’ve heard it’s delicate. I’m going with plain old Alclad Aluminum on the fuselage, with some panels darkened with Alclad Dark Aluminum, I’ll use Alclad’s Stainless Steel on the panels where the exhausts are, and some Alclad Duraluminum here and there for darker panels.
What do y’all think?
Kenny X
Head Mother Trucker In-Charge @ Kenny X’s Reichs Winzigkleines Flugzeugewerks *and now* Airboat Records, too!
Head Mother Trucker In-Charge @ Kenny X’s Reichs Winzigkleines Flugzeugewerks *and now* Airboat Records, too!
Re: 1:48 P-51B “Spare Parts” (Tamiya Kit)
I’m thinking about the gear bays too.
I was just gonna spray them interior green, but I started looking at colorized photos of old P-51B’s and I found these:
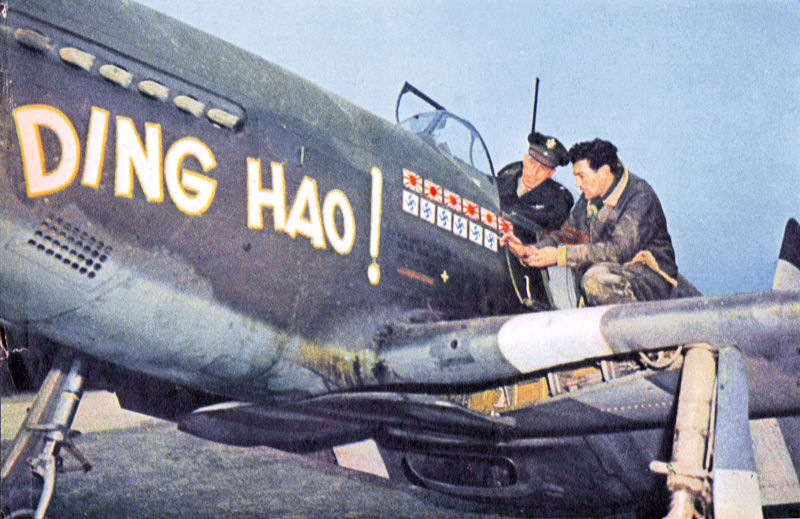
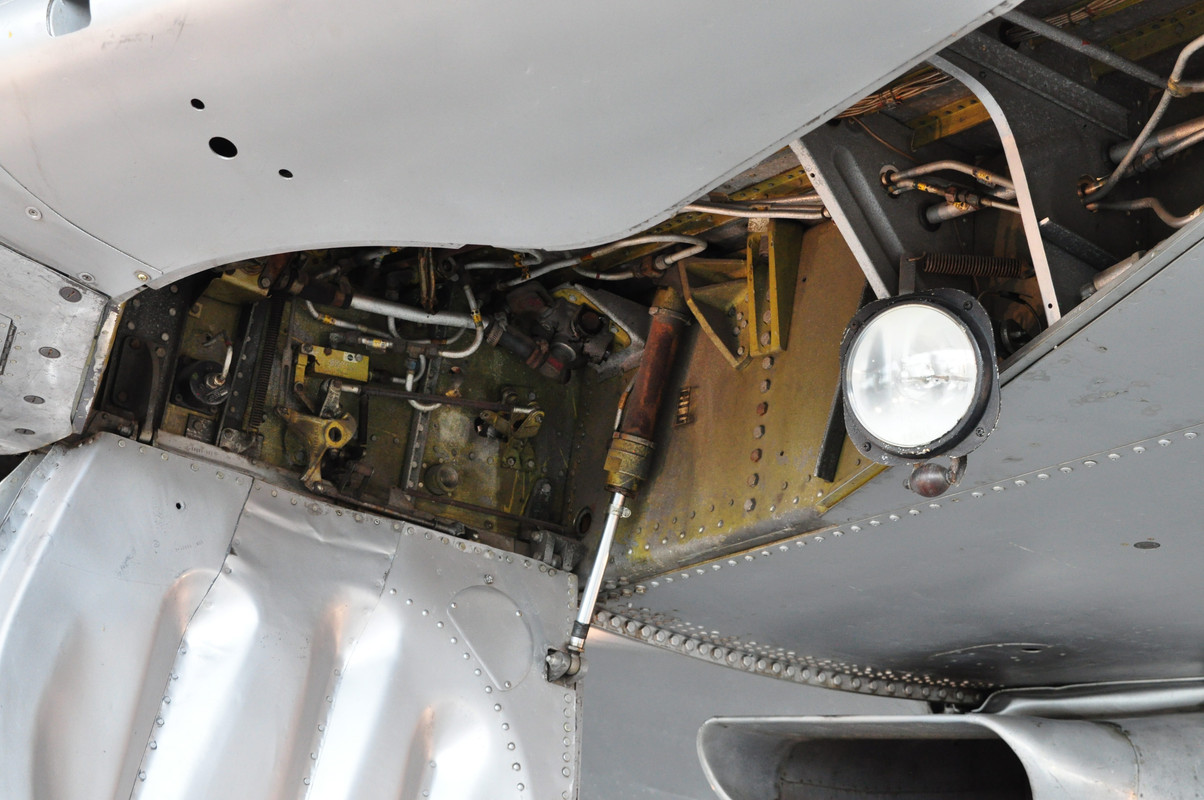
That’s kinda cool looking. Chromate on some surfaces and bare metal on other surfaces in there. I think that would look really nice in my model’s gear bays. And I figure if I can mask and airbrush paint on a 1:72 ejector seat, I can mask in there pretty good. And hey- if I screw it up there’s always Windex. So I’m feeling pretty good about that.
Back to the NMF, I’m going to do some tests starting in the next couple few days with some mule plastic. I’ll report the results.
I was just gonna spray them interior green, but I started looking at colorized photos of old P-51B’s and I found these:
That’s kinda cool looking. Chromate on some surfaces and bare metal on other surfaces in there. I think that would look really nice in my model’s gear bays. And I figure if I can mask and airbrush paint on a 1:72 ejector seat, I can mask in there pretty good. And hey- if I screw it up there’s always Windex. So I’m feeling pretty good about that.
Back to the NMF, I’m going to do some tests starting in the next couple few days with some mule plastic. I’ll report the results.
Kenny X
Head Mother Trucker In-Charge @ Kenny X’s Reichs Winzigkleines Flugzeugewerks *and now* Airboat Records, too!
Head Mother Trucker In-Charge @ Kenny X’s Reichs Winzigkleines Flugzeugewerks *and now* Airboat Records, too!
Re: 1:48 P-51B “Spare Parts” (Tamiya Kit)
I think that's a good plan in terms of Alclad shades. I can't seem to find it now but I saw an interesting "test" of Alclad sprayed onto a sanded surface that had not been polished and it gave an effect that could be interpreted as wear. The key is WHATEVER finish you have (lightly sanded or highly polished), it should be consistent along the entire surface to be sprayed.
John aka JKim
-----------<><
-----------<><
-
tempestjohnny

- Elite Member
- Posts: 3825
- Joined: Sat Oct 15, 2016 4:51 am
- Location: Naples. FL
Re: 1:48 P-51B “Spare Parts” (Tamiya Kit)
Kenny the back wall of the gear bay is the main wing spar. That is zinc chromate. After that some bays were painted some left nmf.
-
tempestjohnny
- Elite Member
- Posts: 3825
- Joined: Sat Oct 15, 2016 4:51 am
- Location: Naples. FL
Re: 1:48 P-51B “Spare Parts” (Tamiya Kit)
Oh one more thing. If a hack builder like me can do NMF you can

Re: 1:48 P-51B “Spare Parts” (Tamiya Kit)
You've made a great start on this one Kenny - looking forward to seeing how you progress it!
Stuart Templeton 'I may not be good but I'm slow...'
Re: 1:48 P-51B “Spare Parts” (Tamiya Kit)
John,
THANK YOU for weighing in with the good word on that. Me personally, lately I’ve been buffing my airframes out with microfiber pads, going in steps from 3,200 up to 12,000. I came around to doing that because I found myself having to sand ugly fills so much it was a necessity. I also polish the primer the same way after I lay that down. Just makes more sense to me to keep things smooth and consistent. Or maybe I ought to say it’s easier for me to focus on a consistency in surface when I take care to polish that way. Plus, I anticipate a lot of sanding and polishing on the wings here soon after filling up those panel lines. I think for my first NMF, better to go with a consistent, smooth surface as opposed to abrasions on the skin for to create wear. NOW I WILL SAY- that does give me ideas, John, so double thank you’s for mentioning that. It’ll give me something to experiment with on the mules. I can see how that would be a very useful tool to keep in their toolbox.
Tempest,
Thanks buddy! I appreciate it. And you know, that’s really cool just from the perspective of being an artist looking at something a fella engineered. I don’t know why but the idea of using the wing spar as the rear “wall” of a gear bay is just hella cool and sexy. Personally, I love it. It affords cool opportunities for artistic license when modeling them.
Stuart,
Thank you my man and cheers!!
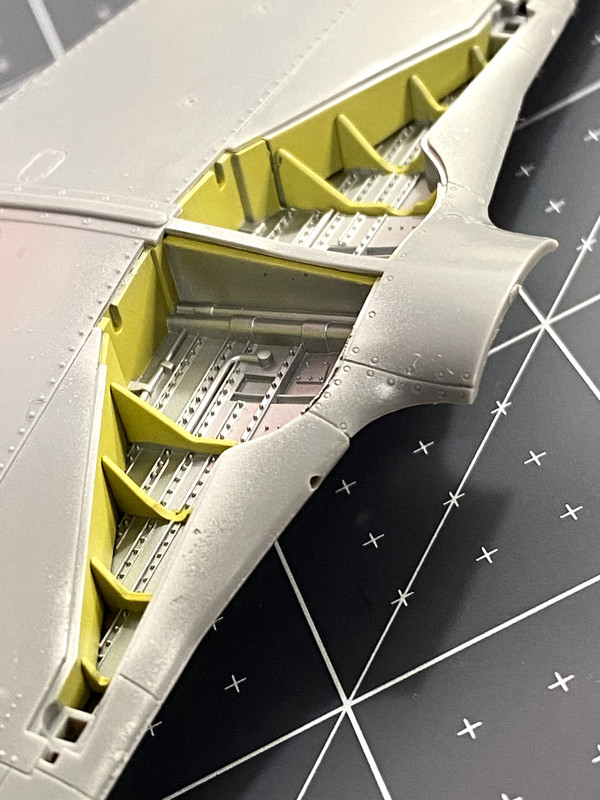
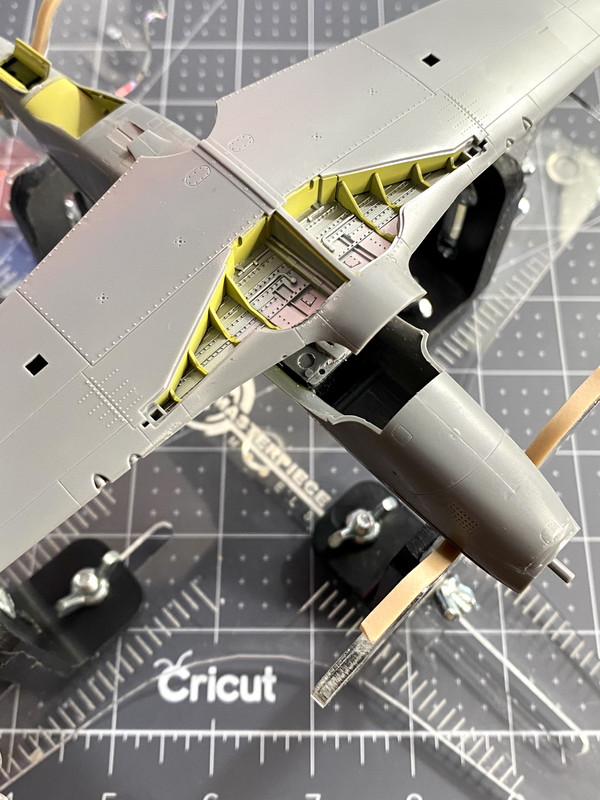
I got the main paint on the gear bays first thing this morning, and fused the top half of the wings down. I really like how this looks. I’d laid down the metal in there days ago. Held up to masking just fine. In the end this will be weathered, and I may end up dry brushing a bit of zinc chromate on the small, thin strips that run horizontally in there. Or I may not. I’ll noodle that.
And like I said about artistic license, it’s a great stock gear bay. Beats the Hell out of the barren corrugated squares in Tamiya’s Corsair kit. For an older kit, it’s detailed pretty good.
That said, the Vector resin set I have for this kit beats the kit bay hands-down in the detail department.
BUT- one modeler’s issue I have is looking at kit parts with a snobbish bent, buying resin replacement parts, aaaaand then totally screwing the proverbial “pooch” when it’s GO!-time. So my goal here with this build is to try and make as much of the kit it’s self look as nice as I can with good painting and detailing. See if I can make a *mostly* stock model look really good with competent painting and other things that proper time and attention can afford.
And on that note, if your Stang happens to have an interior green gear bay, you can totally go nuts in there with different shades. I’d prime the “floor” area with High Speed Silver, and the back spar and ribs in black, and then use a darker, dark-gray leaning interior green for the ribs, a light-gray leaning interior green for the floor over the metallic, and then maybe a slightly brownish shade for the spar, or Hell, do the spar Chromate. All kinds of fun is possible in there.
Here’s some pics:
THANK YOU for weighing in with the good word on that. Me personally, lately I’ve been buffing my airframes out with microfiber pads, going in steps from 3,200 up to 12,000. I came around to doing that because I found myself having to sand ugly fills so much it was a necessity. I also polish the primer the same way after I lay that down. Just makes more sense to me to keep things smooth and consistent. Or maybe I ought to say it’s easier for me to focus on a consistency in surface when I take care to polish that way. Plus, I anticipate a lot of sanding and polishing on the wings here soon after filling up those panel lines. I think for my first NMF, better to go with a consistent, smooth surface as opposed to abrasions on the skin for to create wear. NOW I WILL SAY- that does give me ideas, John, so double thank you’s for mentioning that. It’ll give me something to experiment with on the mules. I can see how that would be a very useful tool to keep in their toolbox.
Tempest,
Thanks buddy! I appreciate it. And you know, that’s really cool just from the perspective of being an artist looking at something a fella engineered. I don’t know why but the idea of using the wing spar as the rear “wall” of a gear bay is just hella cool and sexy. Personally, I love it. It affords cool opportunities for artistic license when modeling them.
Stuart,
Thank you my man and cheers!!
I got the main paint on the gear bays first thing this morning, and fused the top half of the wings down. I really like how this looks. I’d laid down the metal in there days ago. Held up to masking just fine. In the end this will be weathered, and I may end up dry brushing a bit of zinc chromate on the small, thin strips that run horizontally in there. Or I may not. I’ll noodle that.
And like I said about artistic license, it’s a great stock gear bay. Beats the Hell out of the barren corrugated squares in Tamiya’s Corsair kit. For an older kit, it’s detailed pretty good.
That said, the Vector resin set I have for this kit beats the kit bay hands-down in the detail department.
BUT- one modeler’s issue I have is looking at kit parts with a snobbish bent, buying resin replacement parts, aaaaand then totally screwing the proverbial “pooch” when it’s GO!-time. So my goal here with this build is to try and make as much of the kit it’s self look as nice as I can with good painting and detailing. See if I can make a *mostly* stock model look really good with competent painting and other things that proper time and attention can afford.
And on that note, if your Stang happens to have an interior green gear bay, you can totally go nuts in there with different shades. I’d prime the “floor” area with High Speed Silver, and the back spar and ribs in black, and then use a darker, dark-gray leaning interior green for the ribs, a light-gray leaning interior green for the floor over the metallic, and then maybe a slightly brownish shade for the spar, or Hell, do the spar Chromate. All kinds of fun is possible in there.
Here’s some pics:
Kenny X
Head Mother Trucker In-Charge @ Kenny X’s Reichs Winzigkleines Flugzeugewerks *and now* Airboat Records, too!
Head Mother Trucker In-Charge @ Kenny X’s Reichs Winzigkleines Flugzeugewerks *and now* Airboat Records, too!