Revell Fw-190 A8 1/32

Re: Revell Fw-190 A8 1/32
Nice work on the engine Kari! I know what you mean about the fabric seatbelts... lots of patience required to thread the harnesses through the buckles. Not a big deal but the metal part that attaches the lap belt to the top of the seat should be triangular, like the reference photo you've posted. The square metal part with the tab and hole are meant for the seat sides. I'm at a similar stage on a Me 262 build using HGW belts.
John aka JKim
-----------<><

-----------<><

Re: Revell Fw-190 A8 1/32
Many thanks Stik & John
That is true, the PE parts flatness, in particular this piece, look indeed too flat...
And furthermore, I agree fully that the top part is not the same as in reality but not either in the instructions. The problem is... that I cannot find any PE piece that would the right one...
Here is the instructions, upperpiece "nr 4"

But when we look at the PE sheet, we can see "nr 4" is something totally different.. As a matter of fact, when you start to look at other pieces, you notice that there is a mismatch for other parts also.

As most PE parts, except this upperpart, was found on the PE sheet, I did not reflect this too much. Not first time instructions numberings do not match the reality. It was only when I found that reference picture alarmbell started to ring...
Actually, scratchbuilding this part with round thin string could solve the two "issues"

- Kari
That is true, the PE parts flatness, in particular this piece, look indeed too flat...
And furthermore, I agree fully that the top part is not the same as in reality but not either in the instructions. The problem is... that I cannot find any PE piece that would the right one...
Here is the instructions, upperpiece "nr 4"
But when we look at the PE sheet, we can see "nr 4" is something totally different.. As a matter of fact, when you start to look at other pieces, you notice that there is a mismatch for other parts also.
As most PE parts, except this upperpart, was found on the PE sheet, I did not reflect this too much. Not first time instructions numberings do not match the reality. It was only when I found that reference picture alarmbell started to ring...
Actually, scratchbuilding this part with round thin string could solve the two "issues"
- Kari
Last edited by KSaarni on Fri Apr 13, 2018 4:49 am, edited 1 time in total.
---
On the bench:
Eduard 1:48 - Fokker D.VII OAW
https://www.facebook.com/GrundAsk-Scale ... 721218708/
On the bench:
Eduard 1:48 - Fokker D.VII OAW
https://www.facebook.com/GrundAsk-Scale ... 721218708/
-
speedgraflex

- Moderator
- Posts: 11535
- Joined: Fri Feb 10, 2017 11:08 pm
- Contact:
Re: Revell Fw-190 A8 1/32

Is PE 3 actually PE 4 in this case? I am excited to see these seatbelt fasteners, Kari and your scratchbuild solution as well as the actual a/c design. First, I have no idea why the PE does not match the instructions... is that common with Eduard? I have several kits and AM pieces (including the one I plan to use on the Thunderbolt, actually) but (and this is a problem I am trying to overcome) I never really read instructions as closely as I should.

I think in a large part due to John's influence I have HGW seatbelts on standby for Luftwaffe projects. Have you compared these belts to Eduard's at some point?
Last edited by speedgraflex on Fri Apr 13, 2018 11:19 am, edited 1 time in total.
Make more models!
Re: Revell Fw-190 A8 1/32
Aah, many thanks Bruce!speedgraflex wrote:
Is PE 3 actually PE 4 in this case? I am excited to see these seatbelt fasteners, Kari and your scratchbuild solution as well as the actual a/c design. First, I have no idea why the PE does not match the instructions... is that common with Eduard? I have several kits and AM pieces (including the one I plan to use on the Thunderbolt, actually) but (and this is a problem I am trying to overcome) I never really read instructions as closely as I should.
I think in a large part due to John's influence I have HGW seatbelts on standby for Luftwaffe projects. Have you compared these belts to Eduard's at some point?
I think you are very much right!
Part 3 could be the right piece and the same time more or a less the only piece in the PE set that looks 95% as the correct one. That missing 5% (of full 100%) is due to the "flat-headed" bucket triangle in the PE part compared with the "sharp-headed" bucket triangle in the reference pic ...
What has confused me, is the "stick" coming out of the bucket. I have thought, that it would be some sort of support structure that would be "inside" the belt itself.
But now when looking at the cut-off pic you show then things look clearer! Those "sticks" (cannot find a better description) could then be those mounting irons (in the ref pic)
Therefore I cut one bucket off, bended the the "stick" a little bit and voilá:

Interesting to hear what Johns final verdict will be.
- Kari
Last edited by KSaarni on Fri Apr 13, 2018 4:50 am, edited 2 times in total.
---
On the bench:
Eduard 1:48 - Fokker D.VII OAW
https://www.facebook.com/GrundAsk-Scale ... 721218708/
On the bench:
Eduard 1:48 - Fokker D.VII OAW
https://www.facebook.com/GrundAsk-Scale ... 721218708/
-
speedgraflex
- Moderator
- Posts: 11535
- Joined: Fri Feb 10, 2017 11:08 pm
- Contact:
Re: Revell Fw-190 A8 1/32
That looks great, Kari! I won't speak for John, but that looks just right to me, recreating the look of the source image you posted. The image you posted of the restoration is really amazing. Do you happen to know if the white paint is a metal primer used inside cockpits? I always assumed the Luftwaffe basically used a primer-paint inside the cockpit itself to eliminate a second stage in the painting process. I am SO excited for your work on the cockpit! I will have to break out my 1/48 Trimaster A-8 to use as a study aid from now on... your work is just so beautiful and your photography, too, is as well. I am enjoying all of these moments very much. Cheers.
Last edited by speedgraflex on Fri Apr 13, 2018 9:35 am, edited 1 time in total.
Make more models!
Re: Revell Fw-190 A8 1/32
I'm not sure why the instructions do not match the parts either but you guys have figured it out. On your fret, parts 3 and 4 are the buckles that attach to the top of the seat (two different styles). The long tab on part 3 is meant to be bent into an attachment ring, just as you've done. I've used these on previous builds and they came with the older HGW belts that you had to cut out your self.
On my 262 build, I have a newer set of laser-cut HGW belts (designed for the Revell 262B so there are two sets of harnesses included for about the same price as the 262A set).

They treat the seat attachment buckle a little bit differently. The top buckle (Part 5) doesn't have the long tab. The attachment ring is a separate and tiny part 6.
Here's what mine look like prior to weathering...

On my 262 build, I have a newer set of laser-cut HGW belts (designed for the Revell 262B so there are two sets of harnesses included for about the same price as the 262A set).
They treat the seat attachment buckle a little bit differently. The top buckle (Part 5) doesn't have the long tab. The attachment ring is a separate and tiny part 6.
Here's what mine look like prior to weathering...
John aka JKim
-----------<><
-----------<><
-
speedgraflex
- Moderator
- Posts: 11535
- Joined: Fri Feb 10, 2017 11:08 pm
- Contact:
Re: Revell Fw-190 A8 1/32
Amazing work!jkim wrote:Here's what mine look like prior to weathering...
Last edited by speedgraflex on Fri Apr 13, 2018 9:35 am, edited 2 times in total.
Make more models!
-
dmminiatures

- Master Member
- Posts: 534
- Joined: Mon Apr 07, 2014 10:16 am
Re: Revell Fw-190 A8 1/32
I love it. enjoying the whole WIP experience. Great work so far Kari. 1/32 is so nice making all the modification.
Monty / dmminiatures
Re: Revell Fw-190 A8 1/32
Thank you guys !
And John, the cockpit of the 262 is just absolutely stunning! Not to mention the seatbelts, they look very natural.
Have you, and if, added some weathering on the seatbelts (paint, wash anything)? They have such a nice shade of color
- - -
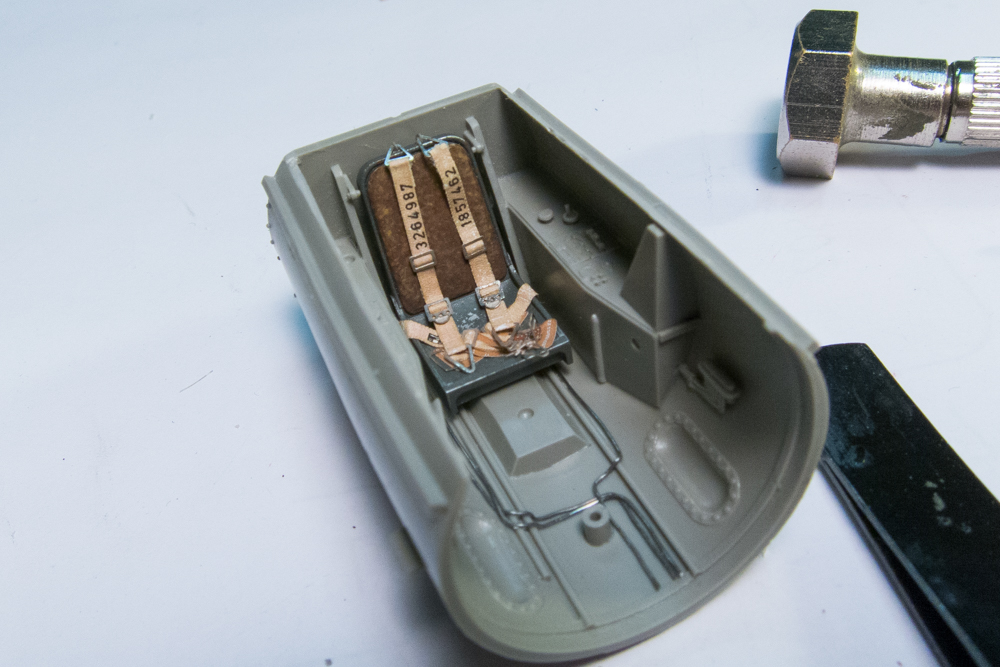
Planning how to change the wrong bucket with the right one, without destroying too much of the work done so far with the seat...
- Kari
And John, the cockpit of the 262 is just absolutely stunning! Not to mention the seatbelts, they look very natural.
Have you, and if, added some weathering on the seatbelts (paint, wash anything)? They have such a nice shade of color
- - -
Planning how to change the wrong bucket with the right one, without destroying too much of the work done so far with the seat...
- Kari
---
On the bench:
Eduard 1:48 - Fokker D.VII OAW
https://www.facebook.com/GrundAsk-Scale ... 721218708/
On the bench:
Eduard 1:48 - Fokker D.VII OAW
https://www.facebook.com/GrundAsk-Scale ... 721218708/
Re: Revell Fw-190 A8 1/32
What did you glue your belts with? I use White Glue so it's fairly easy to separate pieces that have been glued together.
Thank you for the comment about the Me 262 cockpit. The tub has not been painted. Only the seat and the instrument panel have been completed. That build is on hold while I prepare for a two-week trip coming up. I shot my seat with a gloss coat and applied a dark wash to the belts. They are weathered now but a little too heavy as the wash stained the belt material.
Thank you for the comment about the Me 262 cockpit. The tub has not been painted. Only the seat and the instrument panel have been completed. That build is on hold while I prepare for a two-week trip coming up. I shot my seat with a gloss coat and applied a dark wash to the belts. They are weathered now but a little too heavy as the wash stained the belt material.
John aka JKim
-----------<><
-----------<><