
I copy you on Aires. It can be heaven and hell at once. I've heard so many horrible things about their cockpit and wheel bay set for Hasegawa's A-7 Corsair, that I've stared a hundred times on the box in my stash without touching it.
While reading your lines and looking at your pics I can fully sympathize with your joys of dryfitting and playing around with the parts, while imagining how it all will look when done. Even this early stage can be so enjoyable.
1/32 Hasegawa Fw190D-9 Red One

Re: 1/32 Hasegawa Fw190D-9 Red One
Yeah, don't believe everything you hear. I think the bad instructions lead modelers to make bad choices on their Aires set, which makes for bad results. I've been lucky to have stumbled onto some things that made assembly of certain Aires sets much easier.
For example, the Aires resin cockpit for the 1/48 Academy P-38 kit works MUCH better if you fit the cockpit into the UPPER fuselage, instead of the LOWER half as shown on the instructions.


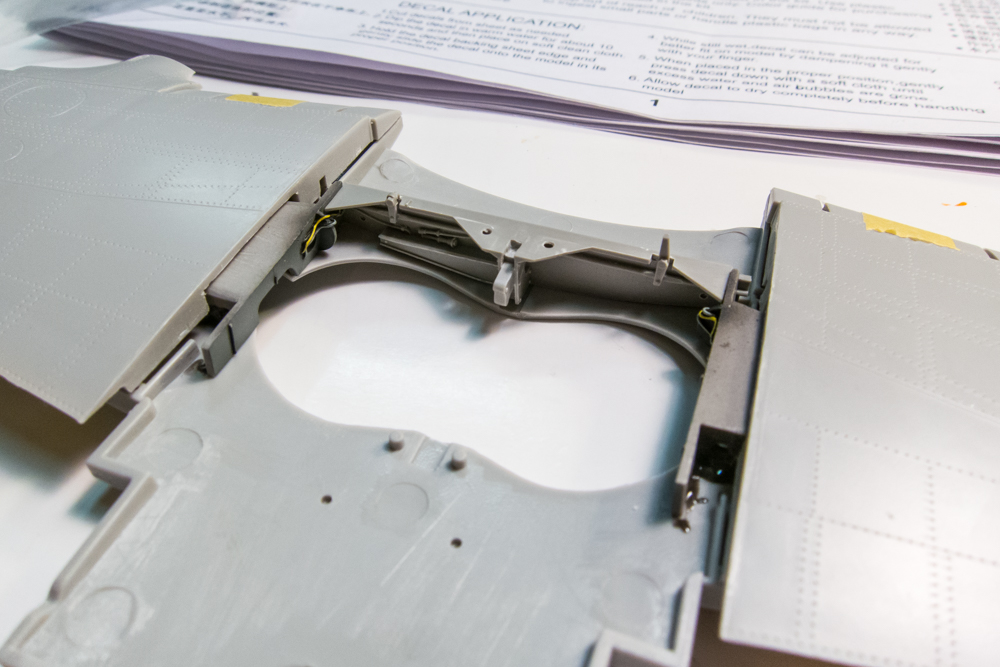
On the 1/32 Trumpeter Me262 kit, Aires tells you to mount the forward wheel spar (RP12) on a little tab on the ceiling of the wheel well bay.
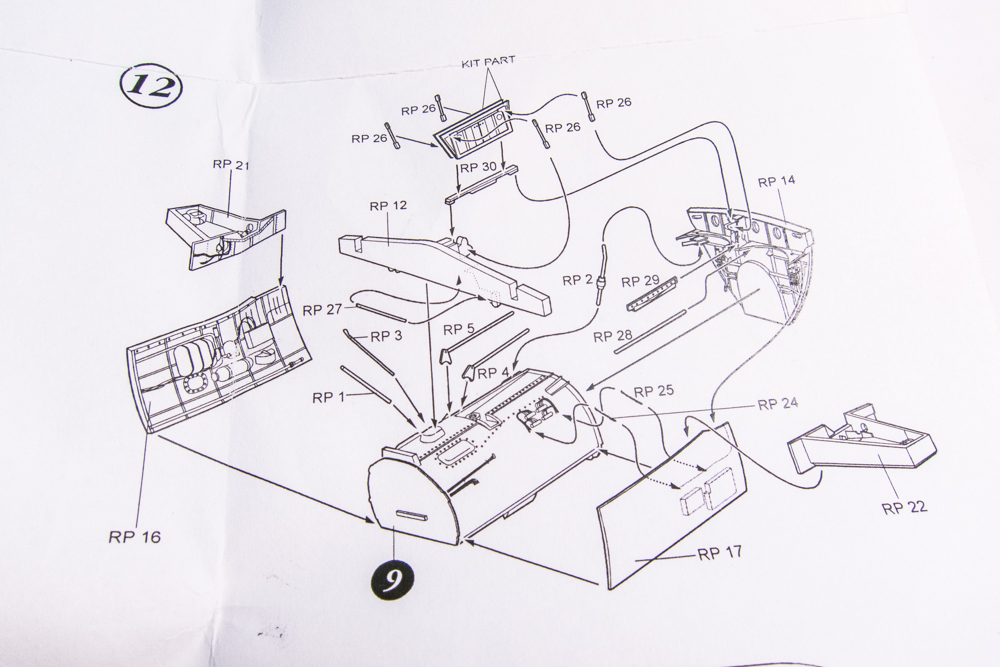
You'll get a much more positive fit, if you mount that spar inside wing bottom piece.
For example, the Aires resin cockpit for the 1/48 Academy P-38 kit works MUCH better if you fit the cockpit into the UPPER fuselage, instead of the LOWER half as shown on the instructions.
On the 1/32 Trumpeter Me262 kit, Aires tells you to mount the forward wheel spar (RP12) on a little tab on the ceiling of the wheel well bay.
You'll get a much more positive fit, if you mount that spar inside wing bottom piece.
John aka JKim
-----------<><

-----------<><
-
speedgraflex

- Moderator
- Posts: 11534
- Joined: Fri Feb 10, 2017 11:08 pm
- Contact:
Re: 1/32 Hasegawa Fw190D-9 Red One
Your response above is beautifully documented, John. Thank you and thank y’all for such an illuminating discussion. Of course I am following the Me262, so yes... but it is interesting to see the Lightning... or see the “light,” I suppose!
A case in point would be a 1/48 P-51D Tamiya Build I follow on another site. The modeler ordered both Aires and Vector wheel well correction sets in order to compare both. Now I have the Vector so I know what it looks like... and the Aires looks really good, I almost want to write that it looks better.
A case in point would be a 1/48 P-51D Tamiya Build I follow on another site. The modeler ordered both Aires and Vector wheel well correction sets in order to compare both. Now I have the Vector so I know what it looks like... and the Aires looks really good, I almost want to write that it looks better.
Make more models!
Re: 1/32 Hasegawa Fw190D-9 Red One
Like the OP on that P-51D thread, I didn't realize that Aires made a 1/48 wheel well for the P-51. And yes, I agree... I think it looks a tad better than the Vector in terms of detail.
I shouldn't have started singing Aires praises until I checked the instrument panel fit. Something weird is going on there. Lots of discrepancy in the fore-aft position of the instrument panel comparing between the resin and kit parts. The initial dry-fit of the Aires tub+IP put the IP panel at the front edge of the coaming/shroud. It should be nested UNDER it. I'll report more later.
I shouldn't have started singing Aires praises until I checked the instrument panel fit. Something weird is going on there. Lots of discrepancy in the fore-aft position of the instrument panel comparing between the resin and kit parts. The initial dry-fit of the Aires tub+IP put the IP panel at the front edge of the coaming/shroud. It should be nested UNDER it. I'll report more later.
John aka JKim
-----------<><
-----------<><
-
Medicman71

- Elite Member
- Posts: 11396
- Joined: Mon Apr 07, 2014 9:32 am
- Location: Houston, Tx
Re: 1/32 Hasegawa Fw190D-9 Red One
 Your builds are always worth watching. But I disagree with the Aires thing. Try fitting their wheel bays and cockpit into the 1/48 Tamiya F-16.
Mike
Sponsored by Boeing, Lockheed Martin, Northrop Grumman, Saab, BAE, and Dassault
Sponsored by Boeing, Lockheed Martin, Northrop Grumman, Saab, BAE, and Dassault
Re: 1/32 Hasegawa Fw190D-9 Red One
Hey, I believe you, Doc! I'm just passing along some of my experiences, which happen to have worked out in favor of a few Aires products. I have not had the pleasure of fitting the Aires wheel wells into an F-16 kit.
And as I mentioned, not all is well with the Aires cockpit set on this particular build. I can get the cockpit tub to fit decently enough into the fuselage sides, but once I introduce the instrument panel into the mix, things start to get a little murky.
There are a couple of problems here. First of all, the length of the side consoles are different. The resin side consoles are noticeably shorter. Since the instrument panel butts up against the forward edges of the side consoles, the position of the instrument panel is tied into the position of the cockpit tub.

When I put the kit cockpit into one of the fuselage sides, you can see how far back the instrument panel is nestled into the coaming.

Compare the instrument panel position when I put the resin cockpit tub into place. Much further forward, which then causes an unsightly gap between the top of the instrument panel and the bottom of the coaming. You can see the other issue... the offset that puts the upper instrument panel closer to the pilot than the lower panel is much more pronounced on the Aires instrument panel AND it has some funky angles to it. Why not slide the resin cockpit forward? Well, that causes a gap between the rear decking and the rear cockpit wall.
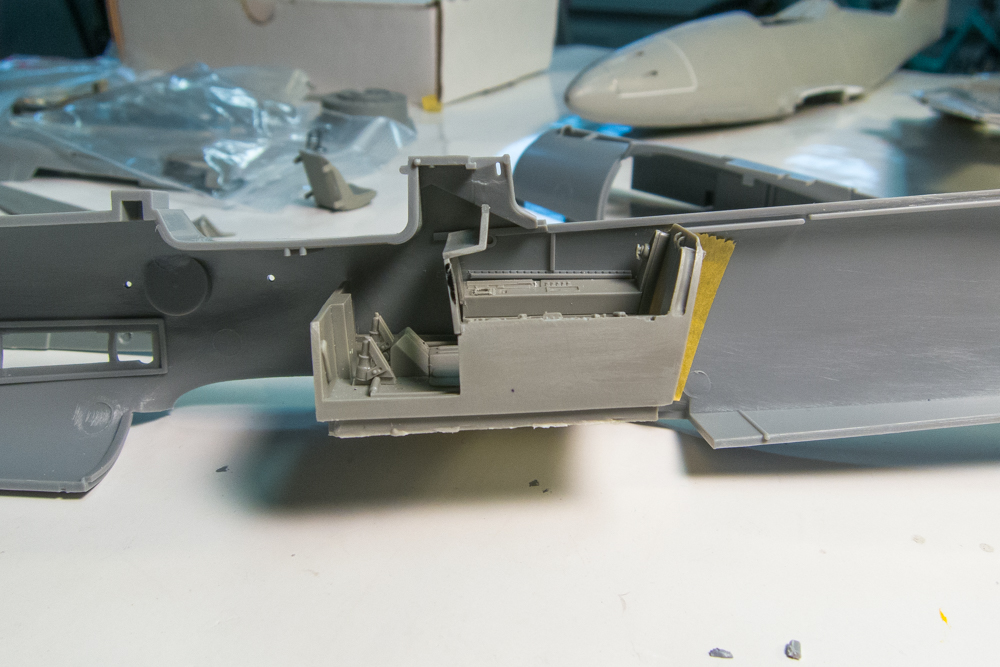
One possible solution is breaking the connection between the instrument panel and the cockpit tub and installing them separately. Since the big offset between the upper and lower instrument panels is complicating matters, I'm contemplating using the kit IP. Just to test my idea, I used Blu-Tack to locate the instrument panel in a suitable position under the coaming. Not all the way back like the kit IP but not too far forward... a happy medium between the two.
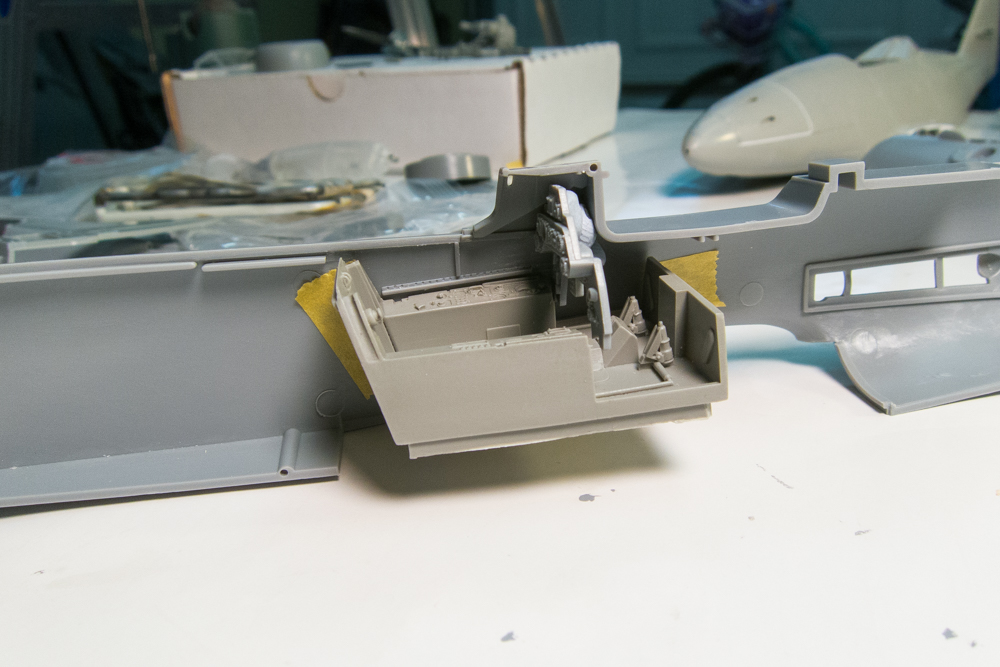
Buttoning up the fuselage sides and taking a peek inside yields some promising results. It actually looks ok. There is a gap between the instrument panel and side consoles but I'm not sure how much you'd notice looking in from a closed canopy. And perhaps I can reduce/eliminate that gap by moving the instrument panel a bit.


More later...
And as I mentioned, not all is well with the Aires cockpit set on this particular build. I can get the cockpit tub to fit decently enough into the fuselage sides, but once I introduce the instrument panel into the mix, things start to get a little murky.
There are a couple of problems here. First of all, the length of the side consoles are different. The resin side consoles are noticeably shorter. Since the instrument panel butts up against the forward edges of the side consoles, the position of the instrument panel is tied into the position of the cockpit tub.
When I put the kit cockpit into one of the fuselage sides, you can see how far back the instrument panel is nestled into the coaming.
Compare the instrument panel position when I put the resin cockpit tub into place. Much further forward, which then causes an unsightly gap between the top of the instrument panel and the bottom of the coaming. You can see the other issue... the offset that puts the upper instrument panel closer to the pilot than the lower panel is much more pronounced on the Aires instrument panel AND it has some funky angles to it. Why not slide the resin cockpit forward? Well, that causes a gap between the rear decking and the rear cockpit wall.
One possible solution is breaking the connection between the instrument panel and the cockpit tub and installing them separately. Since the big offset between the upper and lower instrument panels is complicating matters, I'm contemplating using the kit IP. Just to test my idea, I used Blu-Tack to locate the instrument panel in a suitable position under the coaming. Not all the way back like the kit IP but not too far forward... a happy medium between the two.
Buttoning up the fuselage sides and taking a peek inside yields some promising results. It actually looks ok. There is a gap between the instrument panel and side consoles but I'm not sure how much you'd notice looking in from a closed canopy. And perhaps I can reduce/eliminate that gap by moving the instrument panel a bit.
More later...
John aka JKim
-----------<><
-----------<><
-
speedgraflex
- Moderator
- Posts: 11534
- Joined: Fri Feb 10, 2017 11:08 pm
- Contact:
Re: 1/32 Hasegawa Fw190D-9 Red One
Watching with great interest! I would be tempted to resurrect the MDC and use the faux Dremel to make it fit. Also check the coaming position against the blueprints; has the kit located this further from its proper place? And wow, that cockpit design is fitted around the pilot like a second skin... I am getting used to the roomier cockpits found in American fighter planes, John.
I really admire your integrity—you’re coming at this with fresh ideas, John. Does the Revi sight tuck up under the coaming as well?
I really admire your integrity—you’re coming at this with fresh ideas, John. Does the Revi sight tuck up under the coaming as well?
Make more models!
Re: 1/32 Hasegawa Fw190D-9 Red One
Thanks Bruce! The MDC cockpit tub was hacked up when I did Yellow 11. To be honest, there wasn't that much of a detail advantage to the MDC cockpit tub anyway.

Assuming that I will be using the kit instrument panel, I want to see if I can graft the photoetch instrument faces onto the kit part. The kit part has some nice detail but I don't like the raised molding for the instrument gauges. I prefer raised dials but blank instrument faces where I can punch and install individual gauge decals.

First I shave the raised details from the top panel...

The photoetch part is a good fit, shape-wise, for the top panel.

Shaving the bottom panel was a bit trickier and required removal of the portion of the top panel that extended onto the bottom. So far, so good.
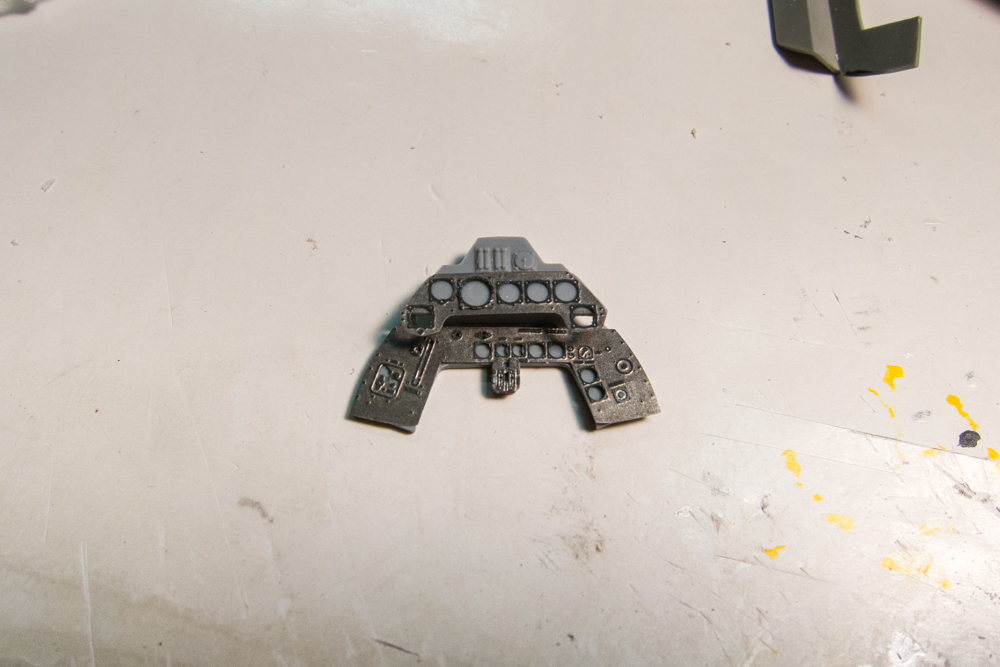
Again, using Blu Tack to temporarily place the instrument panel under the coaming, I think I can place it so that the instrument panel will butt up against the side consoles.

I think this is a GO. I'm not going to agonize too much over exact positioning as long as it looks the part. The Revi gun sight goes into that rectangular opening in the coaming. The gap in the padding along the edges of the coaming will be filled in with a piece of stretched sprue when the time comes.


A view towards the rear to check the position of the cockpit tub against the rear deck... looks good. There is a small gap between the back end of the rear deck and the fuselage but that will be covered by the canopy.

Still lots of prelim work on this build including riveting the entire airframe. A tedious and time consuming affair but it will pay dividends in the end. I just need to get into the riveting mood first.
Assuming that I will be using the kit instrument panel, I want to see if I can graft the photoetch instrument faces onto the kit part. The kit part has some nice detail but I don't like the raised molding for the instrument gauges. I prefer raised dials but blank instrument faces where I can punch and install individual gauge decals.
First I shave the raised details from the top panel...
The photoetch part is a good fit, shape-wise, for the top panel.
Shaving the bottom panel was a bit trickier and required removal of the portion of the top panel that extended onto the bottom. So far, so good.
Again, using Blu Tack to temporarily place the instrument panel under the coaming, I think I can place it so that the instrument panel will butt up against the side consoles.
I think this is a GO. I'm not going to agonize too much over exact positioning as long as it looks the part. The Revi gun sight goes into that rectangular opening in the coaming. The gap in the padding along the edges of the coaming will be filled in with a piece of stretched sprue when the time comes.
A view towards the rear to check the position of the cockpit tub against the rear deck... looks good. There is a small gap between the back end of the rear deck and the fuselage but that will be covered by the canopy.
Still lots of prelim work on this build including riveting the entire airframe. A tedious and time consuming affair but it will pay dividends in the end. I just need to get into the riveting mood first.
John aka JKim
-----------<><
-----------<><
-
speedgraflex
- Moderator
- Posts: 11534
- Joined: Fri Feb 10, 2017 11:08 pm
- Contact:
Re: 1/32 Hasegawa Fw190D-9 Red One
Wow! Read this series documenting the IP three times so far. Great job, John. Of course you should go for it. That looks fantastic. And I was wondering about the PE on the IP after studying some of the PE frets made by MDC (the glow will fade but I would still suggest that hacked up cockpit by MDC looks proper to my eyes even if the fit is not there) and I wondered how you would make that work.
Your solution is fantastic, John! Flossing the kit's IP and using the Aires PE (It is Aires PE, correct? The coloration is a bit bronze which I associate with them), you completely transform the drab and featureless kit IP into a basis for your incredible punch and set beauties! Congratulations.
As far as riveting solace/solitude, I learned quite a bit from this:
http://www.ipmsstockholm.org/magazine/1 ... ribing.htm
Tech tips type of articles are usually not front and center for me unless the author commands the datum of his trade/knows whereof he/she speaks, etc. I found this article to be extremely well done... and comforting. I am at the beginning, you are experienced at this. You may have read this article when you first began riveting. I just wanted you to see it, in case you have not.
All the best.
Your solution is fantastic, John! Flossing the kit's IP and using the Aires PE (It is Aires PE, correct? The coloration is a bit bronze which I associate with them), you completely transform the drab and featureless kit IP into a basis for your incredible punch and set beauties! Congratulations.
As far as riveting solace/solitude, I learned quite a bit from this:
http://www.ipmsstockholm.org/magazine/1 ... ribing.htm
Tech tips type of articles are usually not front and center for me unless the author commands the datum of his trade/knows whereof he/she speaks, etc. I found this article to be extremely well done... and comforting. I am at the beginning, you are experienced at this. You may have read this article when you first began riveting. I just wanted you to see it, in case you have not.
All the best.
Make more models!

Re: 1/32 Hasegawa Fw190D-9 Red One
So interesting John,
This is a very enjoyable build to follow !
"Delicious" describes it perhaps best...
- Kari
This is a very enjoyable build to follow !
"Delicious" describes it perhaps best...
- Kari
---
On the bench:
Eduard 1:48 - Fokker D.VII OAW
https://www.facebook.com/GrundAsk-Scale ... 721218708/
On the bench:
Eduard 1:48 - Fokker D.VII OAW
https://www.facebook.com/GrundAsk-Scale ... 721218708/