Adding highlights to a model is the basis for an interesting discussion, and when you mentioned adding lights to the cockpit, I considered adding working cockpit interior lamps on the P-51D in 1/32–work lamps for night missions.
John’s conceptual note about theater versus film makeup is interesting, too. I appreciate that concept; it is definitely worth thinking about. I aporeciate this concept on stage or set because reduction of elements to pure forms interests me personally. Maybe I appreciate this in life; in all things seen or unseen. Perhaps we all appreciate the concept—or at least some of us do, otherwise my row to hoe is going to be a rocky one.
Final point, I feel we build to suit our intentions for display. If the work is going into a cabinet or on a shelf, as is fairly customary, the environments create their own requirements, with lighting placement being primary.
1:48 Tamiya Corsair
-
speedgraflex

- Moderator
- Posts: 11534
- Joined: Fri Feb 10, 2017 11:08 pm
- Contact:
Re: 1:48 Tamiya Corsair
Make more models!

Re: 1:48 Tamiya Corsair
you know, Bruce, that’s something I haven’t thought of enough and probably should- intentions for display. I put my stuff on a shelf in a build-in. It’s a nice built-in, but it isn’t lit very well. And I keep my pipe tobacco there and books. The lighting sucks there, too. I just kind of accepted it. I need to figure out a way to light those shelves up.
Kenny X
Head Mother Trucker In-Charge @ Kenny X’s Reichs Winzigkleines Flugzeugewerks *and now* Airboat Records, too!
Head Mother Trucker In-Charge @ Kenny X’s Reichs Winzigkleines Flugzeugewerks *and now* Airboat Records, too!
-
speedgraflex
- Moderator
- Posts: 11534
- Joined: Fri Feb 10, 2017 11:08 pm
- Contact:
Re: 1:48 Tamiya Corsair
What you have sounds good, bud. I wonder about what the end game is when we build; these models go beyond in terms of scope of accuracy and individual artistry so they ought to receive their due.
Make more models!
Re: 1:48 Tamiya Corsair
I am much happier with this. This is much better:


They say that Tamiya paints are difficult to brush with. There’s a fair amount of truth in that. They can be, but it’s doable. They reduce, mix, and spray so nicely though. It’s why I’m glad I got an airbrush. They also say that Tamiya paints are suboptimal or next to impossible to dry-brush with. I have found them to be more unwieldy. That said, you can still pick small details out with Tamiya paints. You just have to change your delivery mechanism. Today I used the sharp Tamiya cotton buds:


This made it a whole lot easier to pick out those buttons with accuracy, and without making a mess of things. Way better than a brush.
Also...

...”swingin’ to the drum, swingin’ to guitar, swingin’ to the bass IN THE BACK OF MY CAR!”
They say that Tamiya paints are difficult to brush with. There’s a fair amount of truth in that. They can be, but it’s doable. They reduce, mix, and spray so nicely though. It’s why I’m glad I got an airbrush. They also say that Tamiya paints are suboptimal or next to impossible to dry-brush with. I have found them to be more unwieldy. That said, you can still pick small details out with Tamiya paints. You just have to change your delivery mechanism. Today I used the sharp Tamiya cotton buds:
This made it a whole lot easier to pick out those buttons with accuracy, and without making a mess of things. Way better than a brush.
Also...
...”swingin’ to the drum, swingin’ to guitar, swingin’ to the bass IN THE BACK OF MY CAR!”
Kenny X
Head Mother Trucker In-Charge @ Kenny X’s Reichs Winzigkleines Flugzeugewerks *and now* Airboat Records, too!
Head Mother Trucker In-Charge @ Kenny X’s Reichs Winzigkleines Flugzeugewerks *and now* Airboat Records, too!

Re: 1:48 Tamiya Corsair
Excellent, Kenny! I can see the improvements to the cockpit painting this time around so the extra effort was well worth it. I agree about Tamiya paints. I love the fact that they dry so fast coming out of the airbrush but that quality also makes the paint difficult to brush with. I usually use the cap as a color cup and add a drop or two of iso alcohol before brush painting.
Here's an example of using highlights and washes to create some artificial contrast and definition. It's from a 1/48 Spitfire Mk 24 build that I did a few years back. The wash is a bit sloppy (I think I've refined my touch since then ) but it illustrates the visual trickery that I was talking about. The raised ribs and spars have been painted in a slightly lighter shade of cockpit green. And the dark wash creates a dark outline around every raised feature. I am essentially drawing rings around every feature in the cockpit with the idea that the more separation I create between each part, the more the eyes see them as separate items and not a monolithic piece of resin.

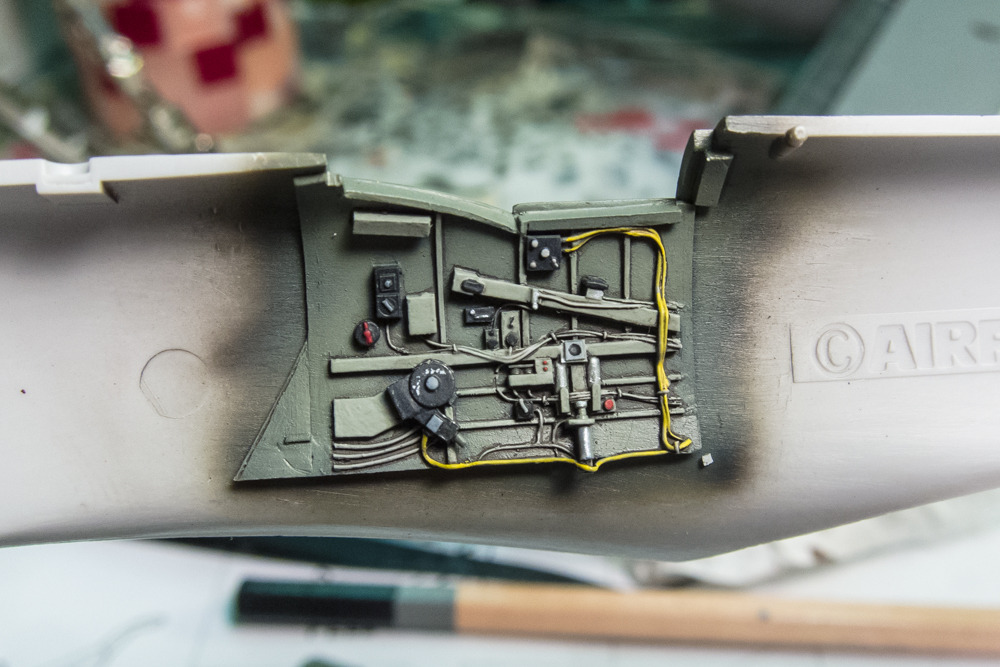

I'm not saying "this is how cockpit painting should be done". It's a subjective thing and everyone has their own individual approach but I wanted to illustrate that my approach to producing realistic looking models often involves exaggeration. I've included a photo of the unpainted cockpit sidewall. You'll note that it produces its own shadows and highlights in the given lighting and that you could argue that it was not necessary to do what I did.
Here's an example of using highlights and washes to create some artificial contrast and definition. It's from a 1/48 Spitfire Mk 24 build that I did a few years back. The wash is a bit sloppy (I think I've refined my touch since then
) but it illustrates the visual trickery that I was talking about. The raised ribs and spars have been painted in a slightly lighter shade of cockpit green. And the dark wash creates a dark outline around every raised feature. I am essentially drawing rings around every feature in the cockpit with the idea that the more separation I create between each part, the more the eyes see them as separate items and not a monolithic piece of resin.I'm not saying "this is how cockpit painting should be done". It's a subjective thing and everyone has their own individual approach but I wanted to illustrate that my approach to producing realistic looking models often involves exaggeration. I've included a photo of the unpainted cockpit sidewall. You'll note that it produces its own shadows and highlights in the given lighting and that you could argue that it was not necessary to do what I did.
Last edited by jkim on Thu May 17, 2018 11:44 am, edited 1 time in total.
John aka JKim
-----------<><

-----------<><

Re: 1:48 Tamiya Corsair
That is a really interesting description John and pretty much what I aspire too (but don't reach). I would normally dry-brush the raised areas a lighter colour and then add a wash to add shadow like you do - although again not as well. I like the idea of actually painting the raised etail a lighter shade.
I often wonder about just buying some resin cockpits to just practice cockpit painting on - and them maybe mounting them as a display.
I often wonder about just buying some resin cockpits to just practice cockpit painting on - and them maybe mounting them as a display.
Stuart Templeton 'I may not be good but I'm slow...'
Re: 1:48 Tamiya Corsair
Sorry Kenny - and I think your latest effort is cracking - nice work!
Stuart Templeton 'I may not be good but I'm slow...'
Re: 1:48 Tamiya Corsair
John,
Firstly, that cockpit is very nice. Beautiful, actually. What interests me most, here, is how well you nailed accentuating the natural shadows. To me, the work you did on it is a god example of the “More-Realism” (I just made that up to describe what I’m shooting for) that I’m trying to get. It’s like I said- there’s no much light coming into an area that small, so accentuating the highlights helps. And you nailed it. A natural effect created with paints and washes. And I bet it looked lovey in the completed piece, too!
Firstly, that cockpit is very nice. Beautiful, actually. What interests me most, here, is how well you nailed accentuating the natural shadows. To me, the work you did on it is a god example of the “More-Realism” (I just made that up to describe what I’m shooting for) that I’m trying to get. It’s like I said- there’s no much light coming into an area that small, so accentuating the highlights helps. And you nailed it. A natural effect created with paints and washes. And I bet it looked lovey in the completed piece, too!
Kenny X
Head Mother Trucker In-Charge @ Kenny X’s Reichs Winzigkleines Flugzeugewerks *and now* Airboat Records, too!
Head Mother Trucker In-Charge @ Kenny X’s Reichs Winzigkleines Flugzeugewerks *and now* Airboat Records, too!
Re: 1:48 Tamiya Corsair
LOL Thanks, Stuart! I’m just over here racking my brain trying to figure out how you brush so damn good!
Kenny X
Head Mother Trucker In-Charge @ Kenny X’s Reichs Winzigkleines Flugzeugewerks *and now* Airboat Records, too!
Head Mother Trucker In-Charge @ Kenny X’s Reichs Winzigkleines Flugzeugewerks *and now* Airboat Records, too!
Re: 1:48 Tamiya Corsair
lol - thanks Kenny! (I personally don't think I'm that good but hey - thanks dude!)
One thing I do know though - I ran a few experiments with brush painted Tamiya paints and concluded that - you CAN brush paint with Tamiya paints, but why would you want to. If you mix in some thinner and some retarder they work really well on larger areas, but I don't find them enjoyable to work with.
For interiors I really wouldn't bother - they're a pain in the arse.
I mainly paint with Humbrol, Hataka, Citadel and Revell acrylics, and they're all good for brushing (when thinned). I still think the best paint to brush with is enamel, which is why I'm slowly going back to it.
One thing I do know though - I ran a few experiments with brush painted Tamiya paints and concluded that - you CAN brush paint with Tamiya paints, but why would you want to. If you mix in some thinner and some retarder they work really well on larger areas, but I don't find them enjoyable to work with.
For interiors I really wouldn't bother - they're a pain in the arse.
I mainly paint with Humbrol, Hataka, Citadel and Revell acrylics, and they're all good for brushing (when thinned). I still think the best paint to brush with is enamel, which is why I'm slowly going back to it.
Stuart Templeton 'I may not be good but I'm slow...'