1/48 Tamiya Tiger I (late)
-
speedgraflex

- Moderator
- Posts: 11533
- Joined: Fri Feb 10, 2017 11:08 pm
- Contact:
Re: 1/48 Tamiya Tiger I (late)
This is an incredibly enjoyable build to watch, and learn from your process, Kent! Very cool; and thank you so much for the explanation of CA applicator-tools! Sincerely.
Make more models!
-
kahunaminor
- Advanced Member
- Posts: 375
- Joined: Thu Jul 07, 2016 4:53 am
Re: 1/48 Tamiya Tiger I (late)
It was time to consider installing the lovely RB 48B02 barrel into the turret. The kit comes with an undercut in the barrel mount which the OOB plastic barrel slips into. The problem was that this would need to be removed to fit the turned barrel:
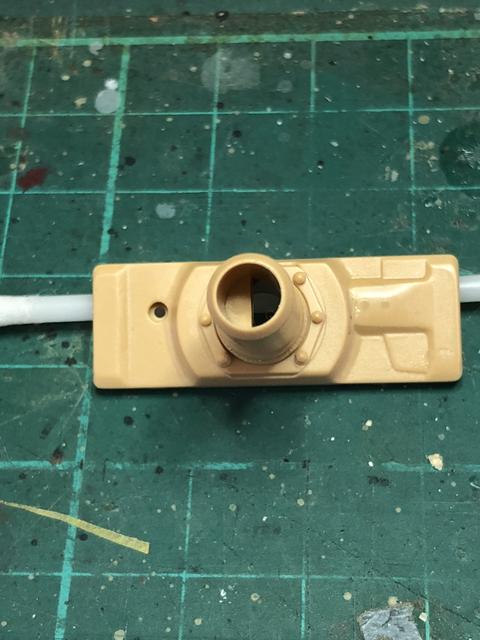
Out with a trusty grinding bit on my faux Dremel and the offending part was soon removed from the rear, preserving the detail on the front. Some fine tuning with a round file to tidy up the moulding and the barrel was then also slid into place from the rear and once positioned, secured with CA. All the lovely brass detail bits were then just slid into position and secured with thin CA:


Then it was time to add the Aber grilles to the rear deck:


A little housekeeping on the Zimmerit. A check of the decals showed the unit cutouts at front and rear I had previously made at the time of initial application would be too small for the decals. So out with a micro chisel and just carefully enlarged the cutouts to suit:


Finally the first paint of the build. Sovereign Colours Track colour on all the tracks (naturally):


A final look at where we are for the day. From recollection I probably should have painted and attached the wheels and tracks before I got to this point as the upper hull and track skirts will likely get in the way. Oh well, the journey continues.
Regards,
Out with a trusty grinding bit on my faux Dremel and the offending part was soon removed from the rear, preserving the detail on the front. Some fine tuning with a round file to tidy up the moulding and the barrel was then also slid into place from the rear and once positioned, secured with CA. All the lovely brass detail bits were then just slid into position and secured with thin CA:
Then it was time to add the Aber grilles to the rear deck:
A little housekeeping on the Zimmerit. A check of the decals showed the unit cutouts at front and rear I had previously made at the time of initial application would be too small for the decals. So out with a micro chisel and just carefully enlarged the cutouts to suit:
Finally the first paint of the build. Sovereign Colours Track colour on all the tracks (naturally):
A final look at where we are for the day. From recollection I probably should have painted and attached the wheels and tracks before I got to this point as the upper hull and track skirts will likely get in the way. Oh well, the journey continues.
Regards,
Last edited by kahunaminor on Thu Jul 26, 2018 12:13 am, edited 2 times in total.
Kent in Oz
-
Stikpusher

- Moderator
- Posts: 21379
- Joined: Sat Apr 05, 2014 8:37 pm
- Location: Ceti Alpha 5
Re: 1/48 Tamiya Tiger I (late)
Very nice progress Kent! All that metal is really enhancing this great base kit!
"Surely I have made my meaning plain? I intend to avenge myself upon you, Admiral. I have deprived your ship of power, and when I swing 'round, I intend to deprive you of your life."
FLSM
FLSM
-
kahunaminor
- Advanced Member
- Posts: 375
- Joined: Thu Jul 07, 2016 4:53 am
Re: 1/48 Tamiya Tiger I (late)
Thanks Stick,
It was your metal comment that jogged my memory, out came the can of Tamiya Metal Primer for a quick coat on all the metal including the barrel and grills:

Then it was on to some more mundane work, wheel building, Zimmerit touch ups on some errant edges with CA, starting the exhausts and installing the front headlight. I also drilled out the monocular sight in the gun mantlet:


I then started thinking about my commander figure and what uniform to paint him. I decided on the M44 camouflage issued to SS units. I then took another look at the two figures, the OOB yellow and the other in grey from the Tamiya set. The moulding looks a bit soft on the grey as compared to the OOB figure. I think I shall revisit my decision and go back to the OOB 3/4 figure. The headphones will need some flash removed from between the head proper and the headset but manageable I think:


I will use these acrylic sets from the AKI figures range for the purpose of painting:

Regards,
It was your metal comment that jogged my memory, out came the can of Tamiya Metal Primer for a quick coat on all the metal including the barrel and grills:
Then it was on to some more mundane work, wheel building, Zimmerit touch ups on some errant edges with CA, starting the exhausts and installing the front headlight. I also drilled out the monocular sight in the gun mantlet:
I then started thinking about my commander figure and what uniform to paint him. I decided on the M44 camouflage issued to SS units. I then took another look at the two figures, the OOB yellow and the other in grey from the Tamiya set. The moulding looks a bit soft on the grey as compared to the OOB figure. I think I shall revisit my decision and go back to the OOB 3/4 figure. The headphones will need some flash removed from between the head proper and the headset but manageable I think:
I will use these acrylic sets from the AKI figures range for the purpose of painting:
Regards,
Kent in Oz
-
mustang1989

- Moderator
- Posts: 5044
- Joined: Tue Mar 18, 2014 8:35 pm
Re: 1/48 Tamiya Tiger I (late)
Man you're really giving this one the works Kent. I can't tell you how many times I've gotten caught up in the assembly process only to forget that I had something ELSE that should've been done BEFORE I completed a given section of a build. It can and will be worked through though. Man …….the un-necessary hell we put ourselves through some times. 
-
Stikpusher
- Moderator
- Posts: 21379
- Joined: Sat Apr 05, 2014 8:37 pm
- Location: Ceti Alpha 5
Re: 1/48 Tamiya Tiger I (late)
Your mention of priming the metal now has me wondering about the zimmerit.... how well will the paint adhere to the sticker stuff? I had never even thought of that angle regarding the Tamiya zimmerit stickers before.....
Anyways, this project is coming along beautifully! Agreed that the kit TC figure is better than the one from the figure set. Of course you could tone that guy up a bit with a new xacto blade tip and other tools..
Anyways, this project is coming along beautifully! Agreed that the kit TC figure is better than the one from the figure set. Of course you could tone that guy up a bit with a new xacto blade tip and other tools..
"Surely I have made my meaning plain? I intend to avenge myself upon you, Admiral. I have deprived your ship of power, and when I swing 'round, I intend to deprive you of your life."
FLSM
FLSM
-
kahunaminor
- Advanced Member
- Posts: 375
- Joined: Thu Jul 07, 2016 4:53 am
Re: 1/48 Tamiya Tiger I (late)
It appears to be a sort of thin resin sheet with ridges backed by an adhesive. I have some spare I was going to attach to a mule and hit it with Tamiya fine Grey primer. We shall see directly.Stikpusher wrote:Your mention of priming the metal now has me wondering about the zimmerit.... how well will the paint adhere to the sticker stuff? I had never even thought of that angle regarding the Tamiya zimmerit stickers before.....
Anyways, this project is coming along beautifully! Agreed that the kit TC figure is better than the one from the figure set. Of course you could tone that guy up a bit with a new xacto blade tip and other tools..
I went back to the kit crewman.
Regards,
Kent in Oz
-
kahunaminor
- Advanced Member
- Posts: 375
- Joined: Thu Jul 07, 2016 4:53 am
Re: 1/48 Tamiya Tiger I (late)
Some minor work on the road wheels. All assembled and the running edges worn down to remove a small mold line and give that “lived in look”. These will get a rub with Tamiya Extra thin cement to smooth them a little:


Looking a bit like the headless horseman of sleepy hollow at the moment, the commander is dry fit to get his arm positions set....almost!:


That’s all for now, regards,
Looking a bit like the headless horseman of sleepy hollow at the moment, the commander is dry fit to get his arm positions set....almost!:
That’s all for now, regards,
Kent in Oz
-
kahunaminor
- Advanced Member
- Posts: 375
- Joined: Thu Jul 07, 2016 4:53 am
Re: 1/48 Tamiya Tiger I (late)
Well time to base coat this beastie.
Testors Panzer Dunkelgelb 1943 thinned about 70/30 with Mr Color Levelling Thinner and shot at 20psi or 1.5 bar. The interior of the commander’s cupola was painted Tamiya XF 1 flat black and the hatch put in place to mask the interior:


I will do the wheels in a seperate session and touch up a couple of spots.
Regards,
Testors Panzer Dunkelgelb 1943 thinned about 70/30 with Mr Color Levelling Thinner and shot at 20psi or 1.5 bar. The interior of the commander’s cupola was painted Tamiya XF 1 flat black and the hatch put in place to mask the interior:
I will do the wheels in a seperate session and touch up a couple of spots.
Regards,
Kent in Oz
-
Stikpusher
- Moderator
- Posts: 21379
- Joined: Sat Apr 05, 2014 8:37 pm
- Location: Ceti Alpha 5
Re: 1/48 Tamiya Tiger I (late)
Looks good! Testors enamel and Gunze thinner is not a combination that I have heard of before. But if it worked, I shall note accordingly... 
"Surely I have made my meaning plain? I intend to avenge myself upon you, Admiral. I have deprived your ship of power, and when I swing 'round, I intend to deprive you of your life."
FLSM
FLSM