
I have never used Gunze so I can't help you on the psi (I spray my acrylics at between 15-20psi if that helps)
That is some very nice photos of the instrument panels too. and the last panel does appear to be attached to the cockpit floor.
For primer I only use Tamiya superfine I don't think I could continue building if they got rid of that stuff.
Pacific Coast Models 1/32 Fw 190A-1. Black 13. Belgium, 1941
Re: Pacific Coast Models 1/32 Fw 190A-0. Black 13. Belgium,
March as one, Don't look back
Odin's sons... Attack!
Unleash hell! Do not repent! Warfare grants us no lament
Let your weapons slash and tear This is no place for fear
Hold the lines! Move as one! In unity our victory's won
Our shields will form a mighty wall
United we shall never fall
Odin's sons... Attack!
Unleash hell! Do not repent! Warfare grants us no lament
Let your weapons slash and tear This is no place for fear
Hold the lines! Move as one! In unity our victory's won
Our shields will form a mighty wall
United we shall never fall
-
speedgraflex

- Moderator
- Posts: 11535
- Joined: Fri Feb 10, 2017 11:08 pm
- Contact:
Re: Pacific Coast Models 1/32 Fw 190A-0. Black 13. Belgium,
Thanks, Clint. I am still getting used to using the air brush. I started with acrylics then migrated to lacquers. I think it’s equally important how much we thin out the paint. I know I am still off with the mix.
Make more models!

Re: Pacific Coast Models 1/32 Fw 190A-0. Black 13. Belgium,
When spraying Gunze colors (Aqueous or lacquers) I work in thin layers with a 20-40% paint ratio, depending how opaque the tone is. Pressure mostly around 0.8 bar for detail work, 1-1.2 bar for base layers with a bit more distance to the surface.
Cheers,
Torben
Torben

Re: Pacific Coast Models 1/32 Fw 190A-0. Black 13. Belgium,
No primer necessary on clean plastic or resin, IMO. Just spray it straight on there... it'll be alright. I don't really pay much attention to the number on my regulator but I think it normally resides between 5-15 psi. Gunze RLM66 is what I've been using on my Luftwaffe pits. I usually spray it using a 2:1 or 3:1 thinner/paint mix over a black base. Drugstore 91% iso alcohol is my workhouse thinner for Tamiya and Gunze acrylics.
To make life easier, I recommend picking up an assortment 1oz and 2oz medicine dropper bottles. I use these to house my oft-used liquids including my many thinners and clear coats. Label them clearly (I used a Label Maker that I found here in the office) cuz you don't want to mistakenly thin your acrylic paint with acetone! It makes paint mixing that much more convenient.

I drop my paint and thinner directly into the cup and mix with those green plastic coffee stirrers from Starbucks.
Not sure about the F-8 instrument panel but I wanna say that the center panel is for the bomb release controls.
To make life easier, I recommend picking up an assortment 1oz and 2oz medicine dropper bottles. I use these to house my oft-used liquids including my many thinners and clear coats. Label them clearly (I used a Label Maker that I found here in the office) cuz you don't want to mistakenly thin your acrylic paint with acetone! It makes paint mixing that much more convenient.
I drop my paint and thinner directly into the cup and mix with those green plastic coffee stirrers from Starbucks.
Not sure about the F-8 instrument panel but I wanna say that the center panel is for the bomb release controls.
John aka JKim
-----------<><

-----------<><
-
speedgraflex
- Moderator
- Posts: 11535
- Joined: Fri Feb 10, 2017 11:08 pm
- Contact:
Re: Pacific Coast Models 1/32 Fw 190A-0. Black 13. Belgium,
Thank you so much, Torben! I will try out the ratios and the pressures you use. I need to create a baseline for the Gunze lacquer. I just need to paint.
Thank you so much, John! I will go pick up bottles from Rite Aid. I do have ideas about your photo booth project but I mainly think you should do what feels right to you and not lose your approach because it really works, and frankly it’s one of your many strengths.
Thank you so much, John! I will go pick up bottles from Rite Aid. I do have ideas about your photo booth project but I mainly think you should do what feels right to you and not lose your approach because it really works, and frankly it’s one of your many strengths.
Make more models!

Re: Pacific Coast Models 1/32 Fw 190A-0. Black 13. Belgium,
I "just" say Bruce, retroactively,  - rules with this build !
- Kari
- rules with this build !- Kari
---
On the bench:
Eduard 1:48 - Fokker D.VII OAW
https://www.facebook.com/GrundAsk-Scale ... 721218708/
On the bench:
Eduard 1:48 - Fokker D.VII OAW
https://www.facebook.com/GrundAsk-Scale ... 721218708/
-
speedgraflex
- Moderator
- Posts: 11535
- Joined: Fri Feb 10, 2017 11:08 pm
- Contact:
Re: Pacific Coast Models 1/32 Fw 190A-0. Black 13. Belgium,
Dear Kari, Thank you so much for bringing popcorn! I am following your great progress as well—especially now since the upper areas of camouflage feature RLM71/02, and you are using RLM02 so brilliantly inside your Dornier Do 17.
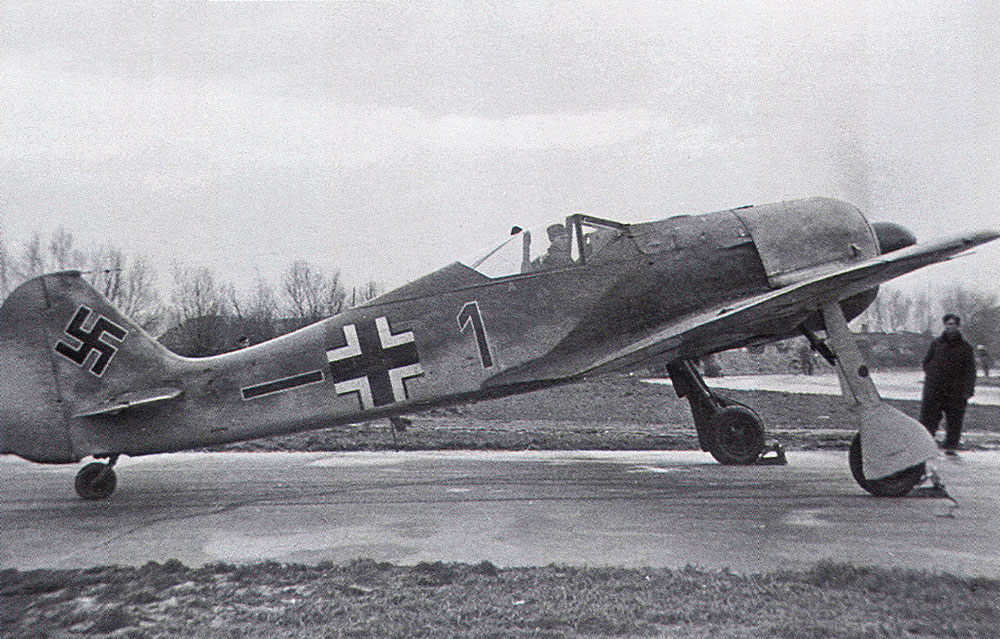
From the b/w series of photos taken of Black 13 there is an extraordinary amount of usage as well as repair effects to capture as faithfully as possible. It looks as though the engine exhausts burned the sides of the fuselage in a distinct pattern with a hard edge to it. I have seen some weird exhaust issues before but the way the tips are pointed here clearly created a distinct pattern. Here is Black 1, an A-1 version, with the same effect. The exhaust is burned into a hard line through the layers of paint.
This is an RC model by Tom Pierce with spot on exhaust effect for a later series:
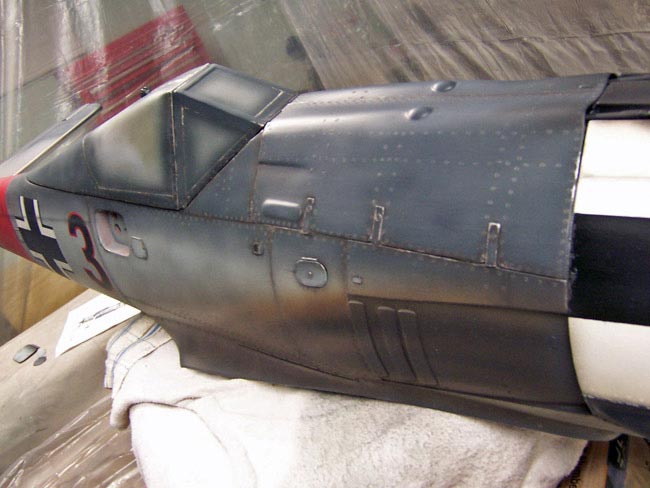
I am going to need advice on how to not make this look painted at the same time as look present. Does that make any sense?
From the b/w series of photos taken of Black 13 there is an extraordinary amount of usage as well as repair effects to capture as faithfully as possible. It looks as though the engine exhausts burned the sides of the fuselage in a distinct pattern with a hard edge to it. I have seen some weird exhaust issues before but the way the tips are pointed here clearly created a distinct pattern. Here is Black 1, an A-1 version, with the same effect. The exhaust is burned into a hard line through the layers of paint.
This is an RC model by Tom Pierce with spot on exhaust effect for a later series:
I am going to need advice on how to not make this look painted at the same time as look present. Does that make any sense?
Make more models!
-
Stikpusher

- Moderator
- Posts: 21386
- Joined: Sat Apr 05, 2014 8:37 pm
- Location: Ceti Alpha 5
Re: Pacific Coast Models 1/32 Fw 190A-0. Black 13. Belgium,
I am betting that area is actually painted on. Later FW-190s often sported a stylized bird of prey motif in that area to hide exhaust stains. Other later 190s had this area simply in Black for the same reason. This may have been a forerunner of that, before the artistic types who came up with the bird idea came along.
"Surely I have made my meaning plain? I intend to avenge myself upon you, Admiral. I have deprived your ship of power, and when I swing 'round, I intend to deprive you of your life."
FLSM
FLSM
-
speedgraflex
- Moderator
- Posts: 11535
- Joined: Fri Feb 10, 2017 11:08 pm
- Contact:
Re: Pacific Coast Models 1/32 Fw 190A-0. Black 13. Belgium,
Great points made here. I still go back and forth, Carlos. Today at 9:15 am I think the effect is the result of the engine overheating being directed out a series of exhaust pipes similar to the nozzles of an airbrush! The exhaust smoke is “painted” on the fuselage over the paint. I could be absolutely head up my arse wrong about this though and by 9:30 am think something else. Thanks again for your thoughts.Stikpusher wrote:I am betting that area is actually painted on. Later FW-190s often sported a stylized bird of prey motif in that area to hide exhaust stains. Other later 190s had this area simply in Black for the same reason. This may have been a forerunner of that, before the artistic types who came up with the bird idea came along.
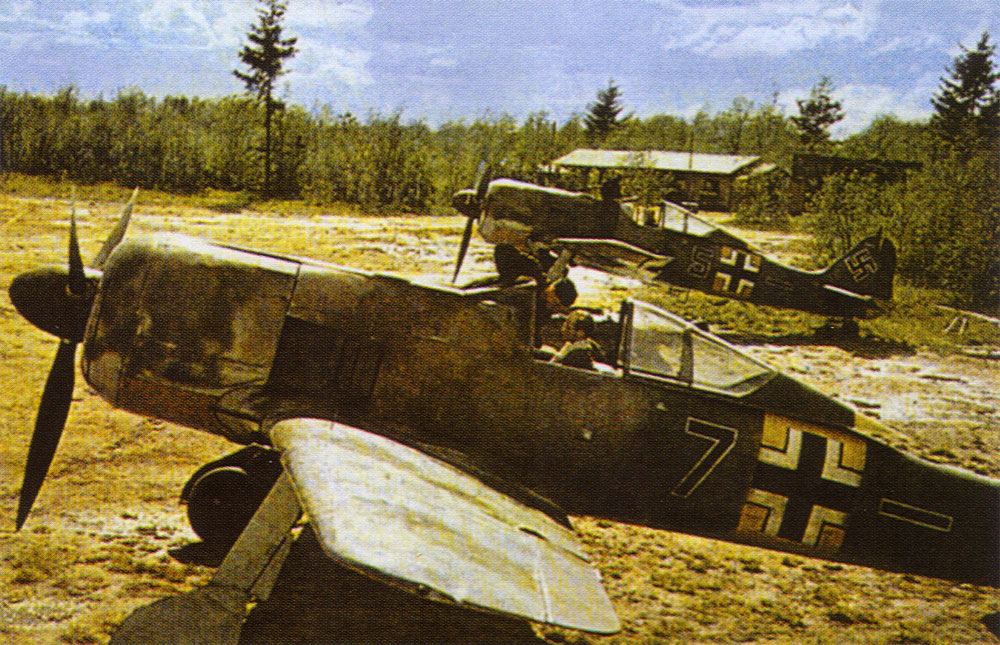
Color shot of A-5:

Make more models!
Re: Pacific Coast Models 1/32 Fw 190A-0. Black 13. Belgium,
I agree with Carlos... my guess is that the exhaust area may have been painted a dark color.

From the photo above, it looks like the exhaust stains are diffuse and overlapping with the painted dark area just aft of the exhausts. The exhaust stains seem to start dying off in the area below the windscreen, at which point the painted area is no longer affected by the exhaust staining.
From the photo above, it looks like the exhaust stains are diffuse and overlapping with the painted dark area just aft of the exhausts. The exhaust stains seem to start dying off in the area below the windscreen, at which point the painted area is no longer affected by the exhaust staining.
John aka JKim
-----------<><
-----------<><