1:48 Tamiya Corsair

Re: 1:48 Tamiya Corsair
I really like what you are doing here Kenny! I'm always trying to think outside of the box when it comes to techniques so I share your interest in exploring new paths based on the little ideas we hatch in our brains. Your work inspires me to think a little bit deeper about my own work and I'm grateful for the kick in the pants that your build logs give me.
John aka JKim
-----------<><

-----------<><

Re: 1:48 Tamiya Corsair
John I have been wanting to do this since I saw that gorgeous ME262 of yours all shiny and silver. Oh man that was awesome.
I am still trying to work out how I will do the chipped zinc Chromate primer bit without sealing this layer and using hairspray. I’m considering:
1. Applying the Zinc Chromate with a sponge to get me the chipped to bare metal look I’m after
2. Fill-in some areas in the chipping zones with Zinc Chromate so that I can chip and scour down to primer only AND chip all the way down to bare metal
3. Smooth that all out with the microfiber pads going from 3,200 to 12,000
4. Then seal with Mr. Hobby Super Clear
5. Then apply hairspray
7. Apply shading and basecoats
8. Chip and scuff down to primer in selected areas and chip and scour down to bare metal and chipped primer in other areas.
Doing it this way eliminates the need for Mr. Surfacer -the AS-12 is my “primer”-, it eliminates the need to seal the bare metal, it eliminates the need for hairspray under the Zinc Chromate, and will theoretically get the job done in fewer layers. I paint in layers but layered multilevel chipping to primer and bare metal needs an unwieldy amount of layers, seems to me. I dislike that.. Combining the model’s primer X bare metal X chipped Zinc Chromate into one layer of AS-12 with the Zinc Chromate applied with a sponge on top eliminates a lot of layers. We’ll see. I’m still testing this out on Reggie and Doug. In the meantime, I like looking at my Corsair in this state because as of now BIG HOG is sure looking pretty. Thanks again for that recommendation of AS-12!
I am still trying to work out how I will do the chipped zinc Chromate primer bit without sealing this layer and using hairspray. I’m considering:
1. Applying the Zinc Chromate with a sponge to get me the chipped to bare metal look I’m after
2. Fill-in some areas in the chipping zones with Zinc Chromate so that I can chip and scour down to primer only AND chip all the way down to bare metal
3. Smooth that all out with the microfiber pads going from 3,200 to 12,000
4. Then seal with Mr. Hobby Super Clear
5. Then apply hairspray
7. Apply shading and basecoats
8. Chip and scuff down to primer in selected areas and chip and scour down to bare metal and chipped primer in other areas.
Doing it this way eliminates the need for Mr. Surfacer -the AS-12 is my “primer”-, it eliminates the need to seal the bare metal, it eliminates the need for hairspray under the Zinc Chromate, and will theoretically get the job done in fewer layers. I paint in layers but layered multilevel chipping to primer and bare metal needs an unwieldy amount of layers, seems to me. I dislike that.. Combining the model’s primer X bare metal X chipped Zinc Chromate into one layer of AS-12 with the Zinc Chromate applied with a sponge on top eliminates a lot of layers. We’ll see. I’m still testing this out on Reggie and Doug. In the meantime, I like looking at my Corsair in this state because as of now BIG HOG is sure looking pretty. Thanks again for that recommendation of AS-12!
Kenny X
Head Mother Trucker In-Charge @ Kenny X’s Reichs Winzigkleines Flugzeugewerks *and now* Airboat Records, too!
Head Mother Trucker In-Charge @ Kenny X’s Reichs Winzigkleines Flugzeugewerks *and now* Airboat Records, too!
Re: 1:48 Tamiya Corsair
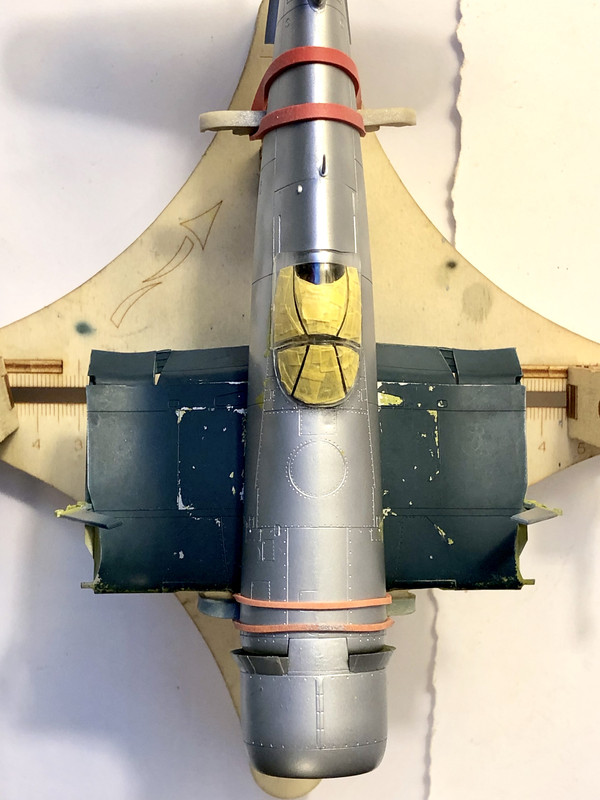

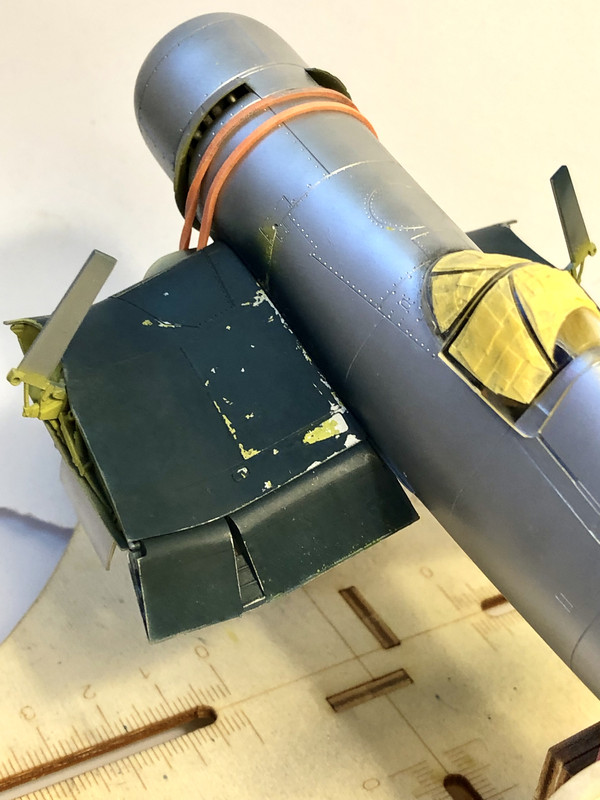
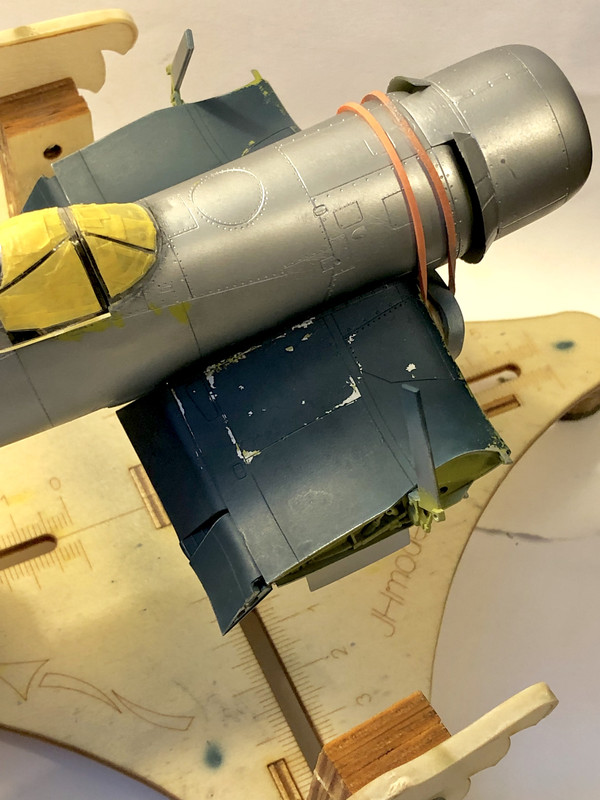

Kenny X
Head Mother Trucker In-Charge @ Kenny X’s Reichs Winzigkleines Flugzeugewerks *and now* Airboat Records, too!
Head Mother Trucker In-Charge @ Kenny X’s Reichs Winzigkleines Flugzeugewerks *and now* Airboat Records, too!

Re: 1:48 Tamiya Corsair
That's bloody awesome Kenny! 
Stuart Templeton 'I may not be good but I'm slow...'
Re: 1:48 Tamiya Corsair
Thank you, Stewart. And I take back every mean thing I ever said about NAVY Blue/Gloss Sea Blue. That NAVY Blue looks lovey all chipped up and scuffed. I just had to adjust how I painted it.
I’m happier with that weathering than I was with my previous attempt at a Corsair. For one thing, his was a much more organized, disciplined approach and it paid off. For another thing, that AS-12 is a magnificent chipping base. It shows so well but it doesn’t try to take center stage and steal the show. I’m oping it’ll look nice with the wings folded. Just a little visual interest in there among the shadows. I think it will.
I’m happier with that weathering than I was with my previous attempt at a Corsair. For one thing, his was a much more organized, disciplined approach and it paid off. For another thing, that AS-12 is a magnificent chipping base. It shows so well but it doesn’t try to take center stage and steal the show. I’m oping it’ll look nice with the wings folded. Just a little visual interest in there among the shadows. I think it will.
Kenny X
Head Mother Trucker In-Charge @ Kenny X’s Reichs Winzigkleines Flugzeugewerks *and now* Airboat Records, too!
Head Mother Trucker In-Charge @ Kenny X’s Reichs Winzigkleines Flugzeugewerks *and now* Airboat Records, too!
Re: 1:48 Tamiya Corsair
I totally understand your thought process, Kenny. The reduction of layers is something that I'm always thinking about too. Trying to accomplish the project objectives with as few weathering layers as possible. I've even gone to the extent of re-scribing all of my panel lines in the beginning to account for these layers. I've not run into having so much paint on the model so that the surface details start to disappear but it is always on my mind.
John aka JKim
-----------<><
-----------<><
Re: 1:48 Tamiya Corsair
You hit the nail on the head, my man, and thank you for that comment. Seriously. It feels really good to hear a modeler I admire and respect echo a sentiment I’ve been holding tightly on to.
And I’m not going to lie- it wasn’t easy. It got sketchy and scary for a moment. Applying unthinned Tamiya paint with a sponge leaves a noticeable texture in the paint being applied. Thank goodness I was in Wall-to-wall conference calls this afternoon and had time to gently smooth and polish all of that with my microfiber pads. And I’m pleased with how the AS-12 held up under that without benefit of primer. I’m calling this experiment a success- the bare metal and “chipped” zinc Chromate encompass one layer themselves instead of a layer of Mr. Surfacer, Bare Metal, Clear, Zinc Chromate, and then more clear. It was worth the effort, 110%. And it wouldn’t have happened had it not been for your recommendation of AS-12 and you saying to me “Your work deserves better.” Thank you my friend. Thank you so much. I owe you a lot. A whole lot.
And I’m not going to lie- it wasn’t easy. It got sketchy and scary for a moment. Applying unthinned Tamiya paint with a sponge leaves a noticeable texture in the paint being applied. Thank goodness I was in Wall-to-wall conference calls this afternoon and had time to gently smooth and polish all of that with my microfiber pads. And I’m pleased with how the AS-12 held up under that without benefit of primer. I’m calling this experiment a success- the bare metal and “chipped” zinc Chromate encompass one layer themselves instead of a layer of Mr. Surfacer, Bare Metal, Clear, Zinc Chromate, and then more clear. It was worth the effort, 110%. And it wouldn’t have happened had it not been for your recommendation of AS-12 and you saying to me “Your work deserves better.” Thank you my friend. Thank you so much. I owe you a lot. A whole lot.
Kenny X
Head Mother Trucker In-Charge @ Kenny X’s Reichs Winzigkleines Flugzeugewerks *and now* Airboat Records, too!
Head Mother Trucker In-Charge @ Kenny X’s Reichs Winzigkleines Flugzeugewerks *and now* Airboat Records, too!

Re: 1:48 Tamiya Corsair
That is looking very good. I have read about the hairspray method but I am still not sure how it works on a conceptual level.





Re: 1:48 Tamiya Corsair
It took me a little while to get my head around it, myself.
The theory behind it is that hairspray is water soluble, Tamiya acrylic paint is “relatively water soluble” in the sense that it’ll absorb water really well when tacky or dry. So what happens is, when you gently wet the surface of the paint the water gets absorbed and subsequently dissolves the hairspray beneath it. When that happens, the paint has nothing to stick to, and it’ll flake off when poked with a toothpick, brushed with a toothbrush, and so forth.
It should be noted that commercially-available chipping medium like AK Interactive’s “Heavy Chipping Fluid” are out there, and they work in the same manner and that many modelers are of the opinion that they work more consistantly and reliably than hairspray. I’ve used AK’s product but was unhappy with the results. However, this is not an indictment against AK’s product. I probably just got a dud bottle, or more likely I accidentally contaminated it the first time I used it. I could see that happening- I tend to save a pipette or two for dispensing thinners and so forth- one for Mr. Leveling Thinner, one for Mona Lisa, and so forth. It could’ve been a mixup with the pipette, perhaps some white spirit or other thinner got in there, who knows.
Anyhow, I like Aqua Net hairspray for this job. It’s cheap, un-scented, and I’ve got a method for reliably airbrushing with it and getting good results pretty-well dialed-in. Here’s some tips:
1. I get the best results when I give the surface three or four light, misting coats with the stuff
2. I turn-up the PSI on my airbrush to around 15 when I spray it, and I don’t so much “bomb it on”, rather, I hold the airbrush to where I get a medium-sized spray pattern, and mist it onto the area. I have a feeling that the humidity and so forth of the place a modeler lives with factor into this. It’s very humid here and even when I spray indoors, it can cause me problems. So take that into account when I speak about this kind of stuff.
3. This works well with Tamiya paints. I have not tried it with other acrylics. Enamel? Forget about it. Lacquer? No way.
4. I’ve let the paint dry for up to 24 hours and still successfully chipped it, but it was more difficult to do. I prefer to chip within about a half hour of laying-down the paint. That means I break it down into sections.
5. When I do my chipping, I first gently wet the surface to be chipped with a small-diameter brush charged with water, and next I very, VERY GENTLY nick the wet surface with the tip of a toothspick which I have whittled-down to have an even finer point. It doesn’t take much pressure to get this done. I go as small as I can, with the chips, and slowly enlarge/shape them to suit me.
6. If the layer below is Acrylic, seal it with gloss clear and let that dry first before you attempt this method.
The theory behind it is that hairspray is water soluble, Tamiya acrylic paint is “relatively water soluble” in the sense that it’ll absorb water really well when tacky or dry. So what happens is, when you gently wet the surface of the paint the water gets absorbed and subsequently dissolves the hairspray beneath it. When that happens, the paint has nothing to stick to, and it’ll flake off when poked with a toothpick, brushed with a toothbrush, and so forth.
It should be noted that commercially-available chipping medium like AK Interactive’s “Heavy Chipping Fluid” are out there, and they work in the same manner and that many modelers are of the opinion that they work more consistantly and reliably than hairspray. I’ve used AK’s product but was unhappy with the results. However, this is not an indictment against AK’s product. I probably just got a dud bottle, or more likely I accidentally contaminated it the first time I used it. I could see that happening- I tend to save a pipette or two for dispensing thinners and so forth- one for Mr. Leveling Thinner, one for Mona Lisa, and so forth. It could’ve been a mixup with the pipette, perhaps some white spirit or other thinner got in there, who knows.
Anyhow, I like Aqua Net hairspray for this job. It’s cheap, un-scented, and I’ve got a method for reliably airbrushing with it and getting good results pretty-well dialed-in. Here’s some tips:
1. I get the best results when I give the surface three or four light, misting coats with the stuff
2. I turn-up the PSI on my airbrush to around 15 when I spray it, and I don’t so much “bomb it on”, rather, I hold the airbrush to where I get a medium-sized spray pattern, and mist it onto the area. I have a feeling that the humidity and so forth of the place a modeler lives with factor into this. It’s very humid here and even when I spray indoors, it can cause me problems. So take that into account when I speak about this kind of stuff.
3. This works well with Tamiya paints. I have not tried it with other acrylics. Enamel? Forget about it. Lacquer? No way.
4. I’ve let the paint dry for up to 24 hours and still successfully chipped it, but it was more difficult to do. I prefer to chip within about a half hour of laying-down the paint. That means I break it down into sections.
5. When I do my chipping, I first gently wet the surface to be chipped with a small-diameter brush charged with water, and next I very, VERY GENTLY nick the wet surface with the tip of a toothspick which I have whittled-down to have an even finer point. It doesn’t take much pressure to get this done. I go as small as I can, with the chips, and slowly enlarge/shape them to suit me.
6. If the layer below is Acrylic, seal it with gloss clear and let that dry first before you attempt this method.
Kenny X
Head Mother Trucker In-Charge @ Kenny X’s Reichs Winzigkleines Flugzeugewerks *and now* Airboat Records, too!
Head Mother Trucker In-Charge @ Kenny X’s Reichs Winzigkleines Flugzeugewerks *and now* Airboat Records, too!
-
Medicman71

- Elite Member
- Posts: 11396
- Joined: Mon Apr 07, 2014 9:32 am
- Location: Houston, Tx
Re: 1:48 Tamiya Corsair
The hairspray method works well with Model Master Acrylic as well. I used it on this one (Be kind, it was one of my first kits I did after getting back into the hobby).


Mike
Sponsored by Boeing, Lockheed Martin, Northrop Grumman, Saab, BAE, and Dassault
Sponsored by Boeing, Lockheed Martin, Northrop Grumman, Saab, BAE, and Dassault