Yeah baw 1:32 Saburo Shindo Zeke!
-
tempestjohnny

- Elite Member
- Posts: 3826
- Joined: Sat Oct 15, 2016 4:51 am
- Location: Naples. FL
Re: Yeah baw 1:32 Saburo Shindo Zeke!
Wow this looks real. Awesome work Kenny

Re: Yeah baw 1:32 Saburo Shindo Zeke!
Thank you fellas so much. I appreciate it very much.
I apologize that it’s been quiet here for the past few days. I have been knee-deep in construction of the Zero’s movable control surfaces and retractable landing gear, and I’ve been wanting to do a writeup about it because John expresses some interest in seeing how this all works.
This proved difficult to write about (and even more challenging to execute) than I thought it would be.
Let me state at the outset that when envisioning how this would turn out, I decided that I wanted all the control surfaces, save for the flaps on the innermost areas of the wings set to neutral, and this aircraft would not be displayed in-flight. Also, the movable control surfaces and retractable great weren’t really a big selling point for me when I bought this kit. You know me, I like interesting cockpits and cool, well-detailed engines, and of course- nice looking airframes.
Still though, these features made me curious. And I ended up attempting to build the control surfaces movable as per the instructions just because I was curious if I could do it or not.
Firstly, the vertical stab and rudder: 50% FAIL, it’ll only go one way BUT- it sits neutral so it doesn’t ruin the project.
Secondly, the flaps on the horizontal stab: 100% FAIL as much as I tried to be careful with the glue when assembling that all together, I screwed the pooch somewhere along the line because they ain’t moving! The bright side: they sit at perfect neutral as-is so again, the project isn’t ruined.
I’m really glad I took mishaps into account when assembling the thing, and did it in such a way where if glue got where it didn’t belong, it’d dry with the control surfaces neutral. *WHEW*
Okay, next up, the gear bay doors and the retractable landing gear mechanism!
Here’s the gear bay doors open and closed:
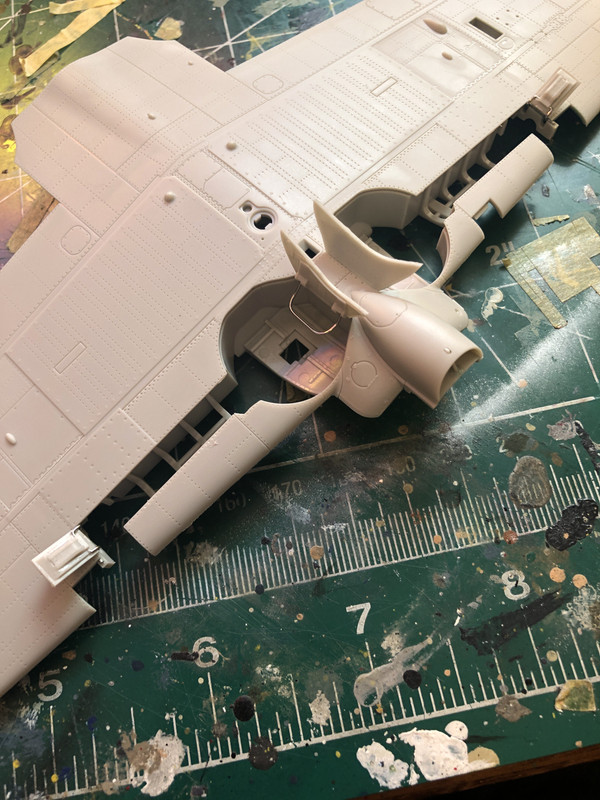
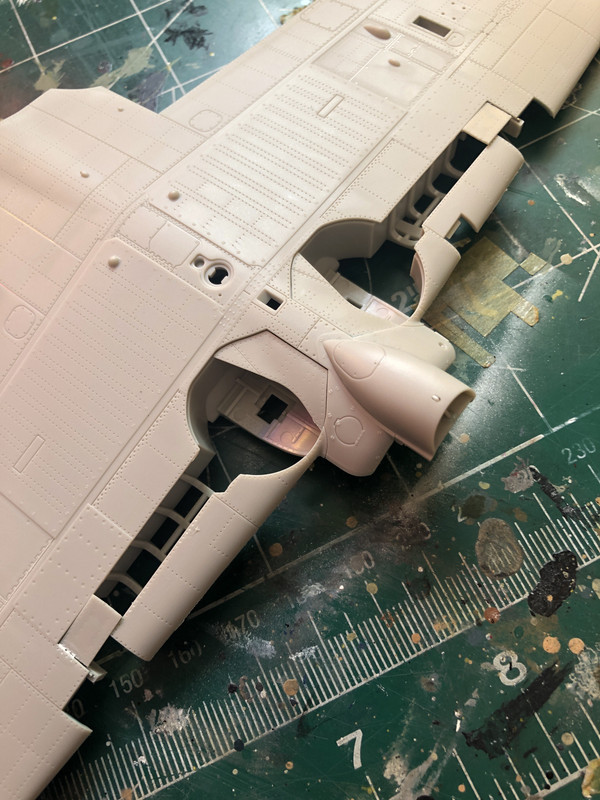
These little guys are held in place by fiddly little metal hinges. Installing them is not easy.
Next comes the little thingunmabobbers inside the gear bays that hold the innermost hinges:
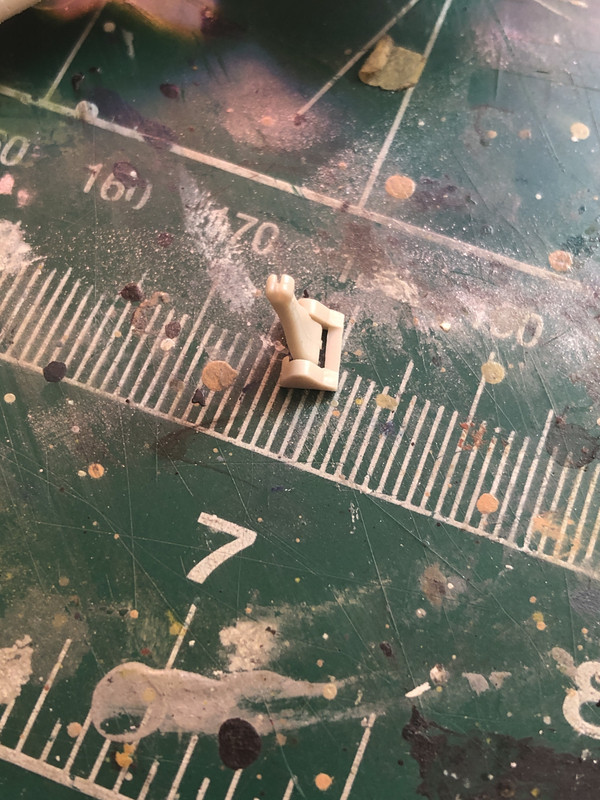
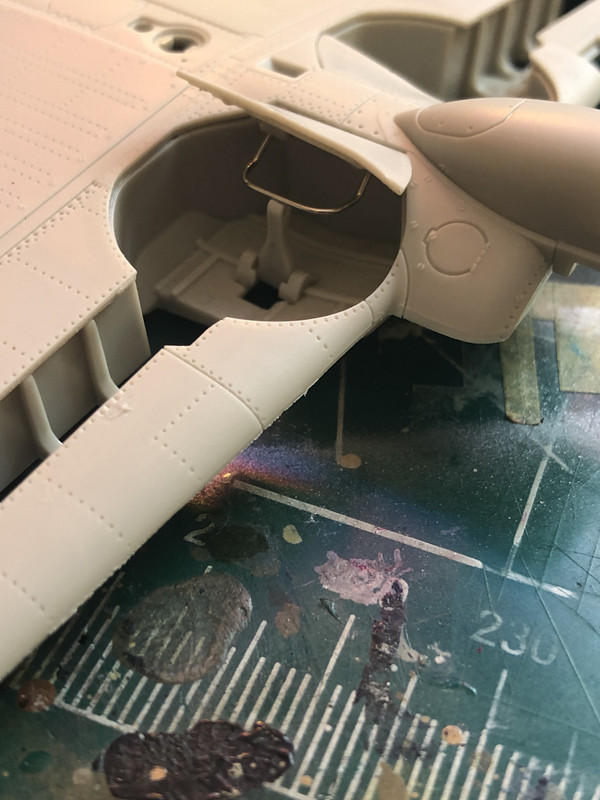
Great care must be taken when installing these as that piece needs to be able to move freely so you can close those covers up. Very fiddly.
And again, I screwed up someplace because post installation, they doors will not close all the way:
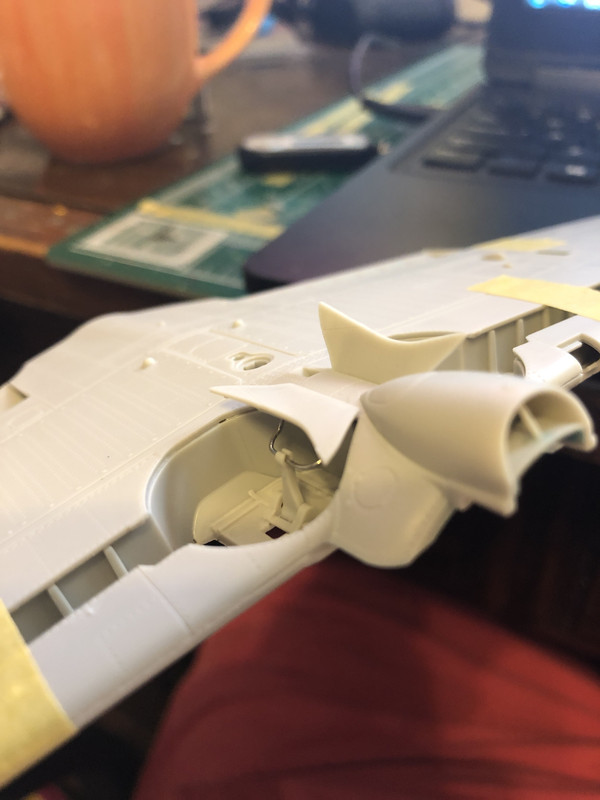
Fellas that’s three strikes and I’m out, looks like! Interestingly enough, they still do move! So the good news is, I can leave them open, as was the plan all along. So there’s a bright-side here too! Looks like I’m still in the game!
Next, here’s the mechanism that makes the gear retract:
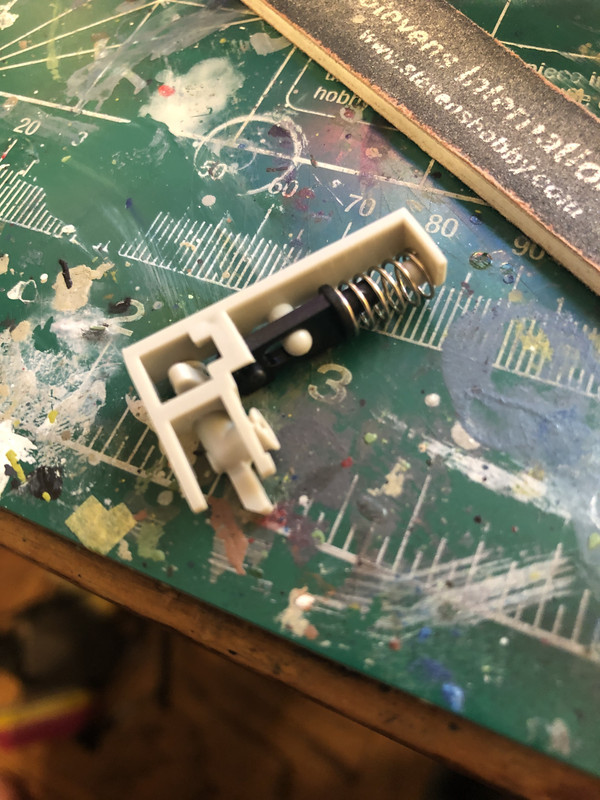
The cylindrical piece on the left there holds the strut. Inserting a special tool over it and turning it allows a nub on the rear of it to push against the black piece and it slides back against the spring, giving a nice smooth action. Here it is, installed and doing its thing:
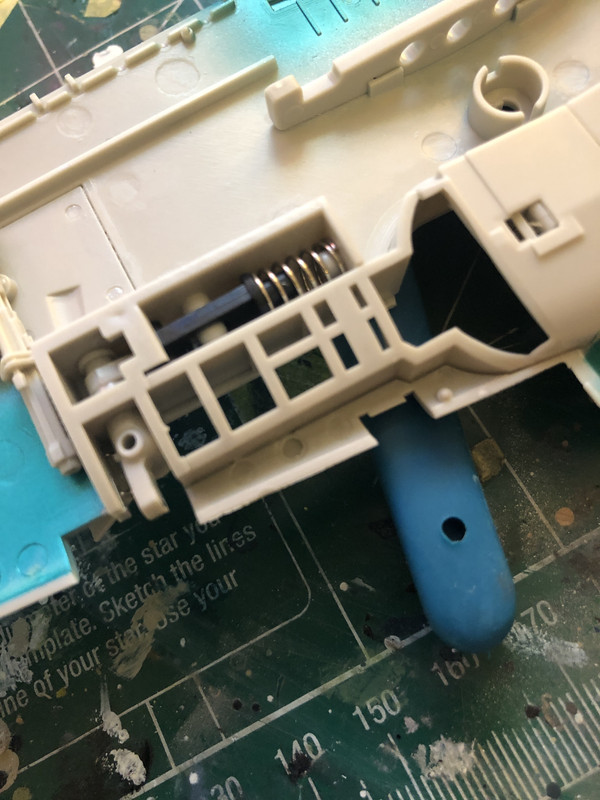
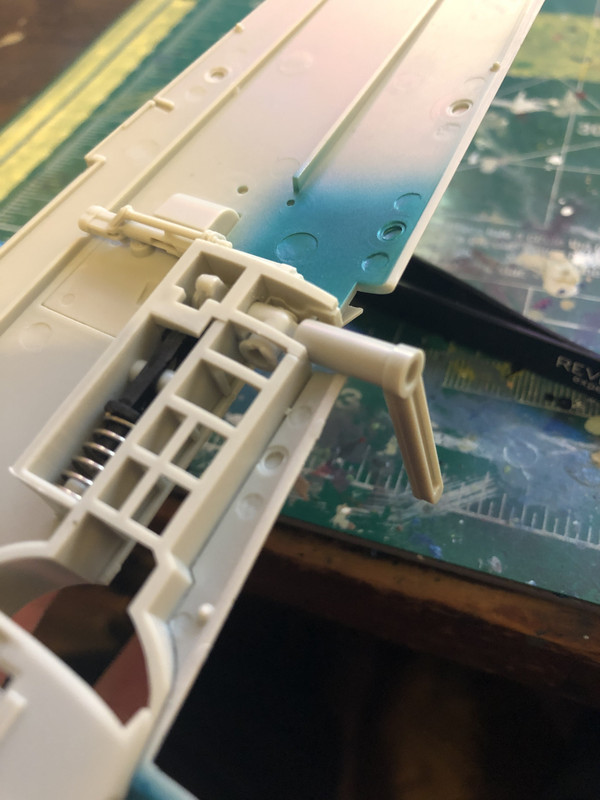
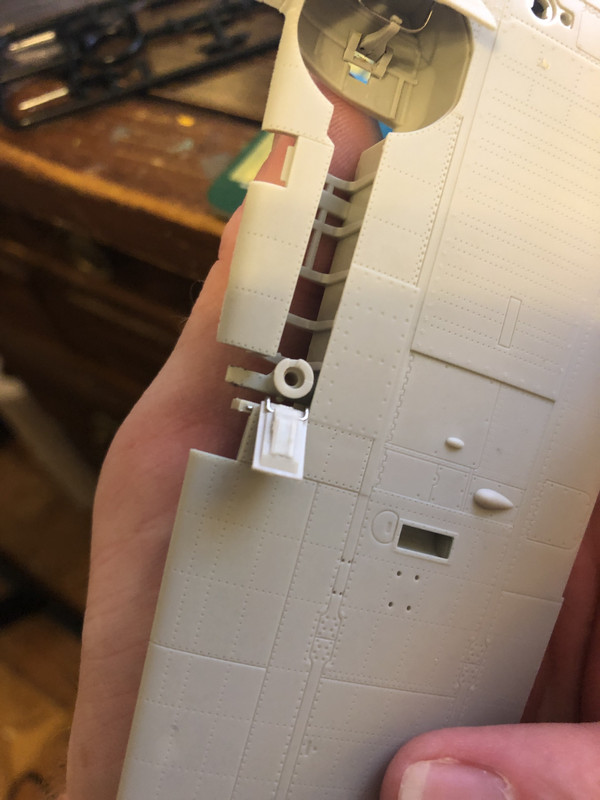
These WORK! Or at least they did during assembly. I left them in the gear-down position and haven’t checked them again. But I’m happy at least that I was able to assemble those correctly.
As to the bay doors, I’m disinclined to fix them as I never intended to display this bird in-flight anyway. So yesterday morning I pulled the trigger on gluing them in place in the open position because I didn’t want them wiggling around.
After that, I spent the rest of my time filling in and sanding down these ejector pin marks on the flaps:
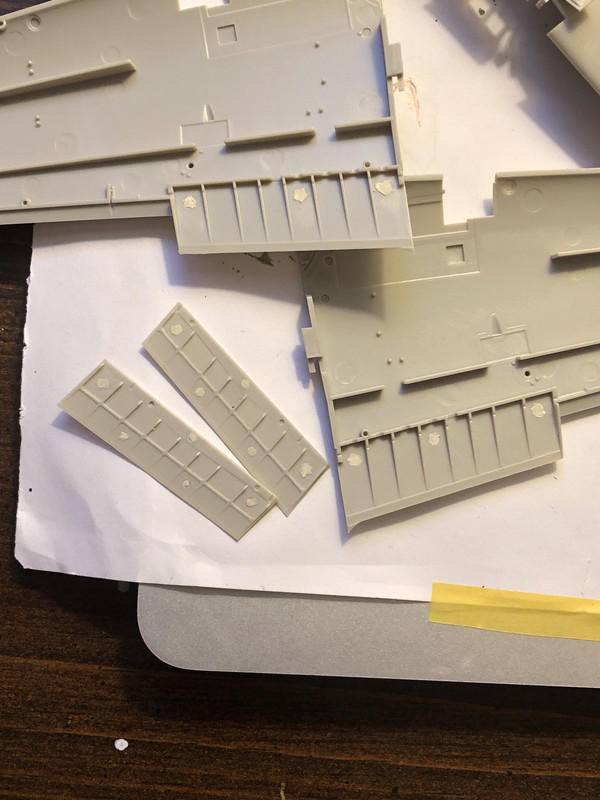
I used Mr. White Putty for that job. I spackled a little at a time into each one with a toothpick, let it dry, and I’ve been sanding each one, one by one, ever since
Okay! So, the verdict on this is- I still think it’s a great kit because it has all the features I like in a model airplane -only LARGER, BOOYAH BABY!- and somehow with all that mechanical crap packed into those wings the pieces fit together beautifully and trouble-free and the wing roots are lovely:
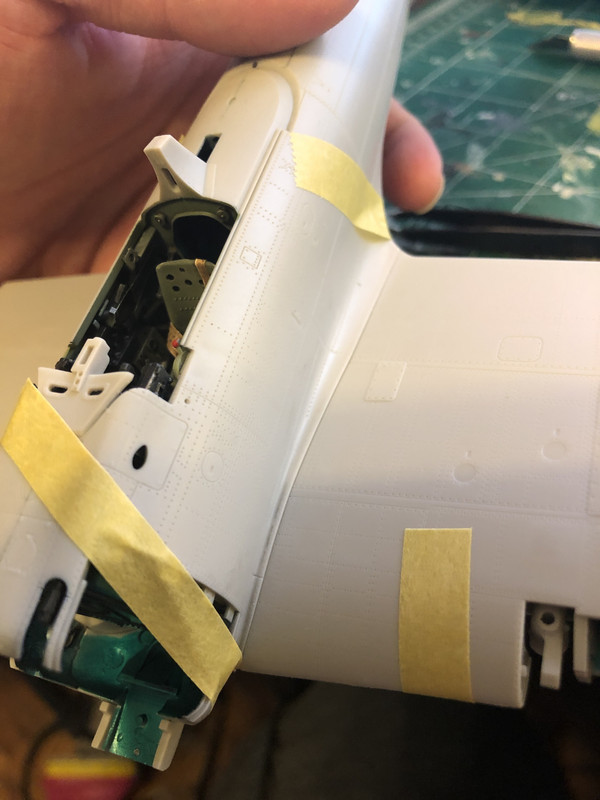
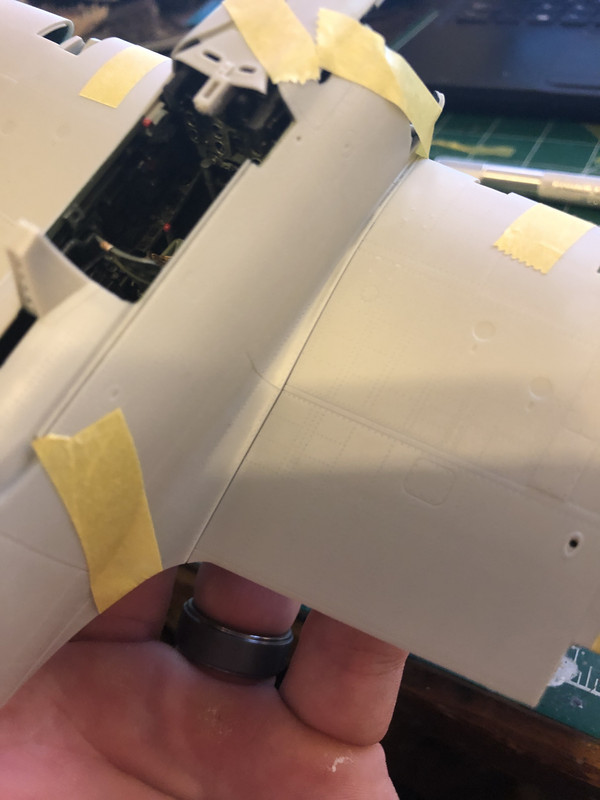
...and the fit everyplace else so far has been lovely, too.
So all that said, for me, personally, all those other little features are just gravy. And I’m glad I got to try building them and making them work, even though most of them were fails, I bet better modelers than me could build this kit and make all those extras work no problem.
Anyhow, that’s where we’re at! And thank you guys as always for looking and for your kind words. I appreciate it!
I apologize that it’s been quiet here for the past few days. I have been knee-deep in construction of the Zero’s movable control surfaces and retractable landing gear, and I’ve been wanting to do a writeup about it because John expresses some interest in seeing how this all works.
This proved difficult to write about (and even more challenging to execute) than I thought it would be.
Let me state at the outset that when envisioning how this would turn out, I decided that I wanted all the control surfaces, save for the flaps on the innermost areas of the wings set to neutral, and this aircraft would not be displayed in-flight. Also, the movable control surfaces and retractable great weren’t really a big selling point for me when I bought this kit. You know me, I like interesting cockpits and cool, well-detailed engines, and of course- nice looking airframes.
Still though, these features made me curious. And I ended up attempting to build the control surfaces movable as per the instructions just because I was curious if I could do it or not.
Firstly, the vertical stab and rudder: 50% FAIL, it’ll only go one way
BUT- it sits neutral so it doesn’t ruin the project.Secondly, the flaps on the horizontal stab: 100% FAIL
as much as I tried to be careful with the glue when assembling that all together, I screwed the pooch somewhere along the line because they ain’t moving! The bright side: they sit at perfect neutral as-is so again, the project isn’t ruined.I’m really glad I took mishaps into account when assembling the thing, and did it in such a way where if glue got where it didn’t belong, it’d dry with the control surfaces neutral. *WHEW*
Okay, next up, the gear bay doors and the retractable landing gear mechanism!
Here’s the gear bay doors open and closed:
These little guys are held in place by fiddly little metal hinges. Installing them is not easy.
Next comes the little thingunmabobbers inside the gear bays that hold the innermost hinges:
Great care must be taken when installing these as that piece needs to be able to move freely so you can close those covers up. Very fiddly.
And again, I screwed up someplace because post installation, they doors will not close all the way:
Fellas that’s three strikes and I’m out, looks like! Interestingly enough, they still do move! So the good news is, I can leave them open, as was the plan all along. So there’s a bright-side here too! Looks like I’m still in the game!
Next, here’s the mechanism that makes the gear retract:
The cylindrical piece on the left there holds the strut. Inserting a special tool over it and turning it allows a nub on the rear of it to push against the black piece and it slides back against the spring, giving a nice smooth action. Here it is, installed and doing its thing:
These WORK! Or at least they did during assembly. I left them in the gear-down position and haven’t checked them again. But I’m happy at least that I was able to assemble those correctly.
As to the bay doors, I’m disinclined to fix them as I never intended to display this bird in-flight anyway. So yesterday morning I pulled the trigger on gluing them in place in the open position because I didn’t want them wiggling around.
After that, I spent the rest of my time filling in and sanding down these ejector pin marks on the flaps:
I used Mr. White Putty for that job. I spackled a little at a time into each one with a toothpick, let it dry, and I’ve been sanding each one, one by one, ever since
Okay! So, the verdict on this is- I still think it’s a great kit because it has all the features I like in a model airplane -only LARGER, BOOYAH BABY!- and somehow with all that mechanical crap packed into those wings the pieces fit together beautifully and trouble-free and the wing roots are lovely:
...and the fit everyplace else so far has been lovely, too.
So all that said, for me, personally, all those other little features are just gravy. And I’m glad I got to try building them and making them work, even though most of them were fails, I bet better modelers than me could build this kit and make all those extras work no problem.
Anyhow, that’s where we’re at! And thank you guys as always for looking and for your kind words. I appreciate it!
Kenny X
Head Mother Trucker In-Charge @ Kenny X’s Reichs Winzigkleines Flugzeugewerks *and now* Airboat Records, too!
Head Mother Trucker In-Charge @ Kenny X’s Reichs Winzigkleines Flugzeugewerks *and now* Airboat Records, too!


Re: Yeah baw 1:32 Saburo Shindo Zeke!
Looking for Kenny, I'm with you on the moving parts, as long as I could get them all in the gear down position i would be happy.
March as one, Don't look back
Odin's sons... Attack!
Unleash hell! Do not repent! Warfare grants us no lament
Let your weapons slash and tear This is no place for fear
Hold the lines! Move as one! In unity our victory's won
Our shields will form a mighty wall
United we shall never fall
Odin's sons... Attack!
Unleash hell! Do not repent! Warfare grants us no lament
Let your weapons slash and tear This is no place for fear
Hold the lines! Move as one! In unity our victory's won
Our shields will form a mighty wall
United we shall never fall

Re: Yeah baw 1:32 Saburo Shindo Zeke!
Superb work Kenny, It's looking awesome dude!
I have to say I don't get the whole working parts thing - especially in something that size. I know plastic models are technically toys but they never struck me as robust, certainly when I was young my creations didn't last many battles before they were destroyed.
I have to say I don't get the whole working parts thing - especially in something that size. I know plastic models are technically
toys but they never struck me as robust, certainly when I was young my creations didn't last many battles before they were destroyed.Stuart Templeton 'I may not be good but I'm slow...'
-
Medicman71

- Elite Member
- Posts: 11398
- Joined: Mon Apr 07, 2014 9:32 am
- Location: Houston, Tx
Re: Yeah baw 1:32 Saburo Shindo Zeke!
Very nice!
Mike
Sponsored by Boeing, Lockheed Martin, Northrop Grumman, Saab, BAE, and Dassault
Sponsored by Boeing, Lockheed Martin, Northrop Grumman, Saab, BAE, and Dassault
Re: Yeah baw 1:32 Saburo Shindo Zeke!
PZ,
Thank you!!
Clint,
Yeah, man, at this stage in the game I really can’t be trusted to do them any other way if there’s options
Stewart,
I’m with you on that, looking back. Was it innovative? Sure! But is it necessary? I don’t know about that... but hey- the fit is great and the level of detail is fantastic. So I got no complaints.
Mr Medic Man,
Thank you sir!!
Getting closer and closer to paint time. And let me tell you, I’m really looking forward to that.
Thank you!!
Clint,
Yeah, man, at this stage in the game I really can’t be trusted to do them any other way if there’s options
Stewart,
I’m with you on that, looking back. Was it innovative? Sure! But is it necessary? I don’t know about that... but hey- the fit is great and the level of detail is fantastic. So I got no complaints.
Mr Medic Man,
Thank you sir!!
Getting closer and closer to paint time. And let me tell you, I’m really looking forward to that.
Kenny X
Head Mother Trucker In-Charge @ Kenny X’s Reichs Winzigkleines Flugzeugewerks *and now* Airboat Records, too!
Head Mother Trucker In-Charge @ Kenny X’s Reichs Winzigkleines Flugzeugewerks *and now* Airboat Records, too!
-
Handiabled

- Master Member
- Posts: 591
- Joined: Sat Mar 15, 2014 7:13 am
Re: Yeah baw 1:32 Saburo Shindo Zeke!
You are crafting an outstanding build here! Everything looks fantastic!
Re: Yeah baw 1:32 Saburo Shindo Zeke!
Thank you so much.
I was telling Bruce earlier that I’m resisting the maddening urge to rush this bad boy into the painting stage. I’ve been thinking about it a whole lot at night, and it has been waking me up...
...but I’ve got miles to go yet before that happens and I don’t want to rush and screw this thing up.
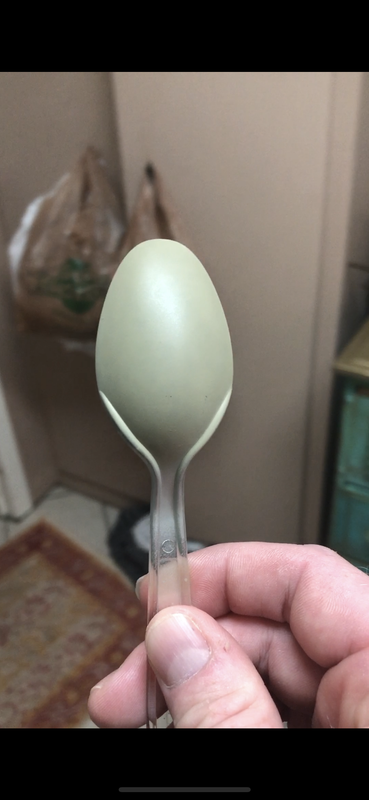
Speaking of painting, I’ve found a mix I like very much, which I’ll be using for this one. I got the formula from Straggler over at AviationOfJapan.com. Have a look here at this sample, which I laid-down yesterday. Check it out—
1. When illuminated at this angle, we get the nice olive green gray that folks are so fond of:
2. And when illuminated at this angle, the color turns to a lovely golden khaki/caramel brown gray:
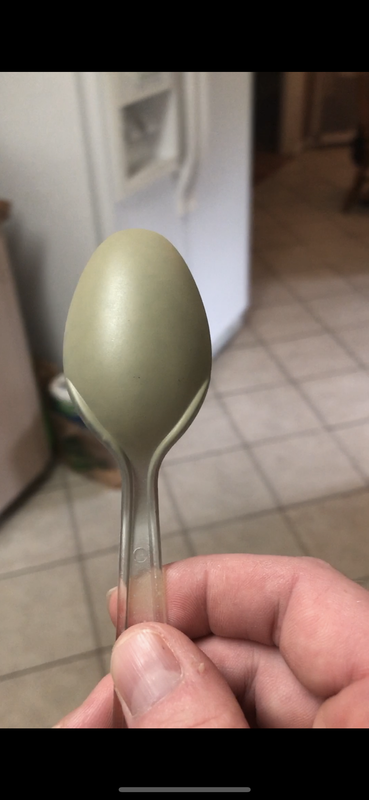
Same paint, different light angles, two distinct, lovely colors. I cannot wait to see what this does on the airframe. I like this mix because it jibes with what I read an early US pilot said about the Zero: “...it looked like it was painted gold when I first saw it.” (Paraphrasing)
I had been having trouble with my initial tests because this color/hue shifting property wasn’t as evident in my initial tests as I would’ve liked, and that was a head-scratcher. My first mix, which I formulated myself from scratch was nice-enough looking and even Nick Millman (Straggler) said it was a “close enough match” didn’t shift color/hue the way it should. The second round of tests used the formula he gave me, but it looked too, uh- “dull” if that makes sense. It’d shift color/hue, but looked flat. I didn’t like that. Fast forward to yesterday. I tested the formula Nick gave me again, only this time instead of black basing it, I shot it over AS-12. BINGO. The black base must’ve been muting it, because when I sprayed it over shiny metal, POW! It behaved exactly as I wanted it to after a nice *gloss coat.
*Apparently these aircraft were glossy and polished-up real well when not badly weathered. Instead of using my normal go-to Mr. Hobby Super Clear (which I surmised would make my airplane look like either a bowling lane or a dance floor at Studio 54), I used Tamiya Clear for the rest, and that worked for my eye just fine.
So here we are, and on we plow.
I was telling Bruce earlier that I’m resisting the maddening urge to rush this bad boy into the painting stage. I’ve been thinking about it a whole lot at night, and it has been waking me up...
...but I’ve got miles to go yet before that happens and I don’t want to rush and screw this thing up.
Speaking of painting, I’ve found a mix I like very much, which I’ll be using for this one. I got the formula from Straggler over at AviationOfJapan.com. Have a look here at this sample, which I laid-down yesterday. Check it out—
1. When illuminated at this angle, we get the nice olive green gray that folks are so fond of:
2. And when illuminated at this angle, the color turns to a lovely golden khaki/caramel brown gray:
Same paint, different light angles, two distinct, lovely colors. I cannot wait to see what this does on the airframe. I like this mix because it jibes with what I read an early US pilot said about the Zero: “...it looked like it was painted gold when I first saw it.” (Paraphrasing)
I had been having trouble with my initial tests because this color/hue shifting property wasn’t as evident in my initial tests as I would’ve liked, and that was a head-scratcher. My first mix, which I formulated myself from scratch was nice-enough looking and even Nick Millman (Straggler) said it was a “close enough match” didn’t shift color/hue the way it should. The second round of tests used the formula he gave me, but it looked too, uh- “dull” if that makes sense. It’d shift color/hue, but looked flat. I didn’t like that. Fast forward to yesterday. I tested the formula Nick gave me again, only this time instead of black basing it, I shot it over AS-12. BINGO. The black base must’ve been muting it, because when I sprayed it over shiny metal, POW! It behaved exactly as I wanted it to after a nice *gloss coat.
*Apparently these aircraft were glossy and polished-up real well when not badly weathered. Instead of using my normal go-to Mr. Hobby Super Clear (which I surmised would make my airplane look like either a bowling lane or a dance floor at Studio 54), I used Tamiya Clear for the rest, and that worked for my eye just fine.
So here we are, and on we plow.
Kenny X
Head Mother Trucker In-Charge @ Kenny X’s Reichs Winzigkleines Flugzeugewerks *and now* Airboat Records, too!
Head Mother Trucker In-Charge @ Kenny X’s Reichs Winzigkleines Flugzeugewerks *and now* Airboat Records, too!
Re: Yeah baw 1:32 Saburo Shindo Zeke!
That's a great looking mix Kenny - I love how the hue changes!
Stuart Templeton 'I may not be good but I'm slow...'