Yeah baw 1:32 Saburo Shindo Zeke!
-
Medicman71

- Elite Member
- Posts: 11398
- Joined: Mon Apr 07, 2014 9:32 am
- Location: Houston, Tx
Re: Yeah baw 1:32 Saburo Shindo Zeke!
Glad to hear everything went well with the wife! Take good care of her.
Mike
Sponsored by Boeing, Lockheed Martin, Northrop Grumman, Saab, BAE, and Dassault
Sponsored by Boeing, Lockheed Martin, Northrop Grumman, Saab, BAE, and Dassault

Re: Yeah baw 1:32 Saburo Shindo Zeke!
We’ve got a slight hiccup.
Have a look at the cowling:
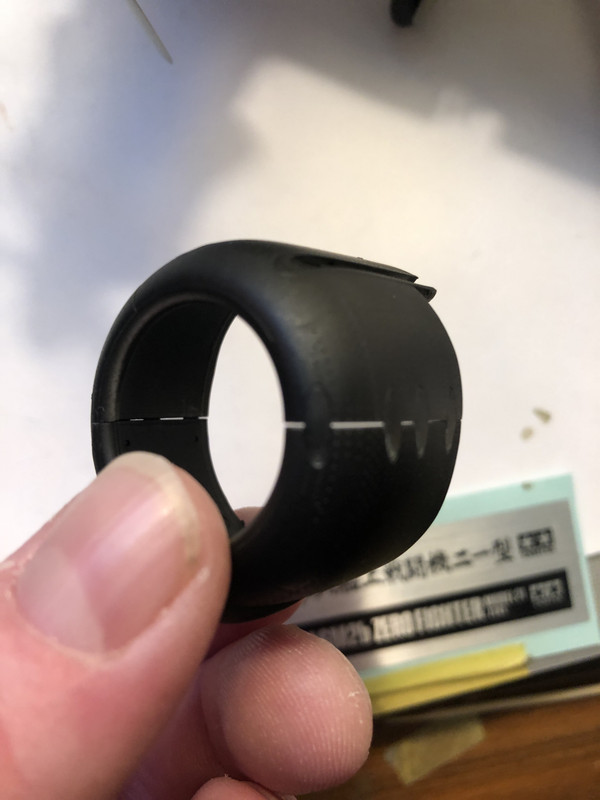
It doesn’t fit flush. I wouldn’t normally sweat this because with some Tamiya Extra Thin I could have that squared-away no problem. But I wanted to have the cowling removable, and when I fit it over the frames, those minuscule gaps grow by about half a millimeter.
Furthermore, the cowling doesn’t fit 100% without some gentle coaxing, and it seems to me that it’s sitting about a half millimeter too far forward:
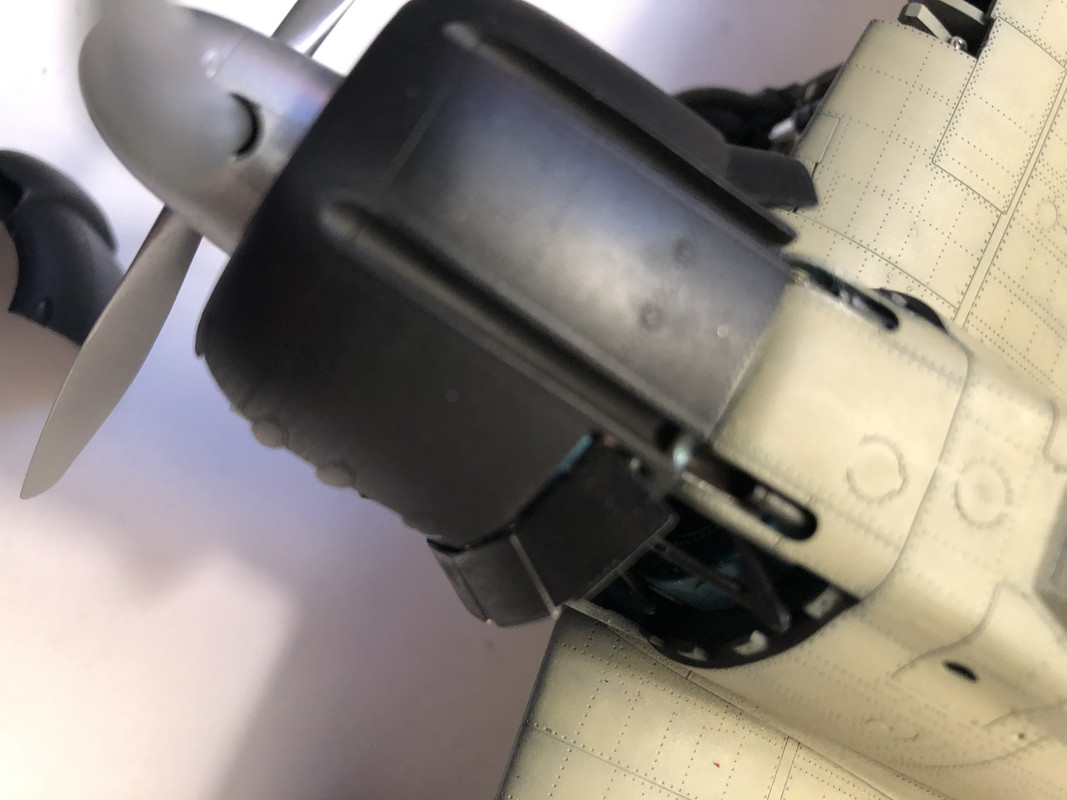
That’s easily corrected by gently nudging it back and talking sweet to it, but it exacerbated the gap problem even worse when the bottom of the cowling is added.
Now, I’m pretty sure I could jam that SOB together around the engine, and glue it up with no gaps or crookedness, but I didn’t put all that work in to super-detailing that engine to entomb it under a cowling.
I’m pretty sure this is my fault, although I’ll be damned if I can figure out how. For one thing, the arms that mount the engine and firewall to the airframe are indeed installed correctly, they mated-up beautifully aside from a small issue with the join from the firewall to the airframe (which I was actually able to correct fairly well), and from what I can tell, none of that brass I put in there is interfering.
Oh well, I’m disinclined to worry about because frankly, this photo here, which was a one-off which I ended up really liking:
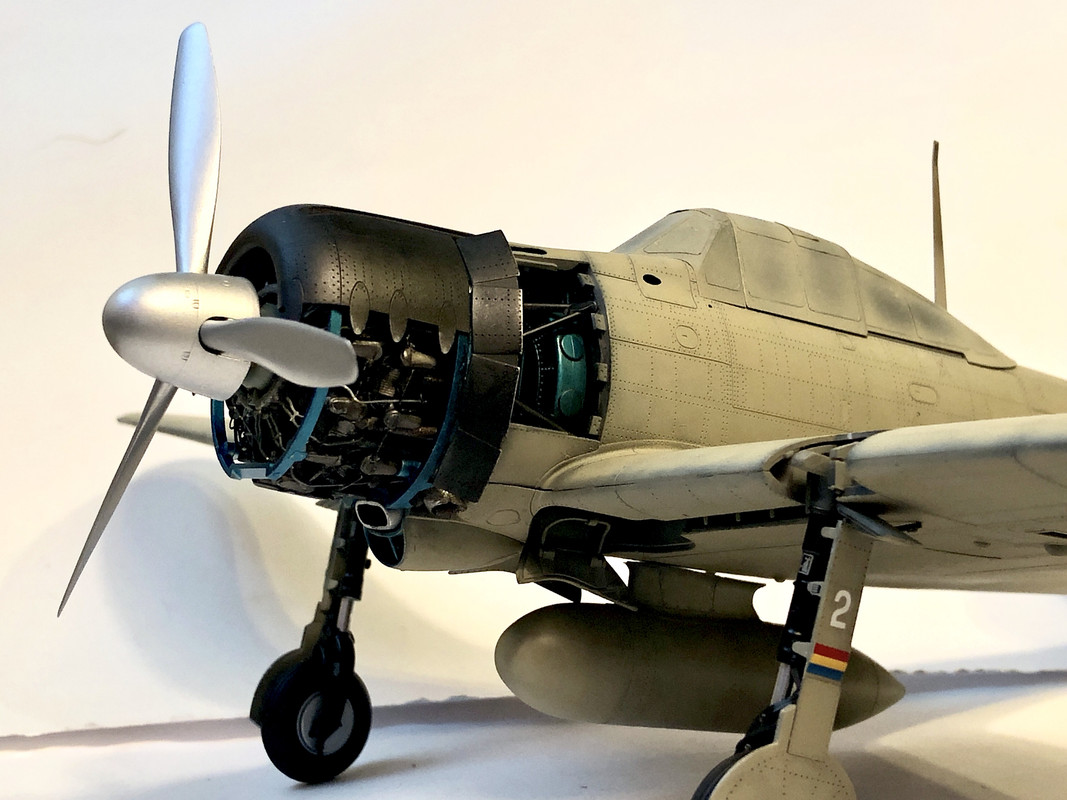
made my vision come to life in physical form. Seeing this photo after I took it sealed it for me- “This is rad! This is what I wanted to accomplish. I feel good about this work.” I sad to myself.
So I’m disinclined to worry about the cowling problem, and I’m leaning toward displaying the model this way once she’s all finished because it’s quite compelling to me.
Of course, my vision also included the means of showing this model cowling intact, so that the lines of the aircraft could be fully appreciated, but I resolve to not be disappointed about that, after all- I can always build an A6M2 with the cowling intact later on.
Looking at it objectively, I picked a challenging kit for my first real Go! at a 1:32 aircraft. All the fiddly bits for the movable control surfaces (some of which were a success and others of which were not -but hey at least they ended up neutral which was the plan) and the retractable gear and the brass engine details... if this was the only problem that arose, and if it still looks really cool after all is said and done being displayed this way, then I am 100% pleased with the outcome of this project and I will absolutely consider it a tremendous personal achievement.
So all that said- BANZAI you boys, I’m moving ahead with my next steps toward completing this project. I’ll be painting stripes and insignias on her this week, along with painting the rest of the wing and airframe parts (two gun covers and two panels, only one of which will be glued on), and then on from there. Looking at probably having her completed in the next four weeks or so, give or take.
Have a look at the cowling:
It doesn’t fit flush. I wouldn’t normally sweat this because with some Tamiya Extra Thin I could have that squared-away no problem. But I wanted to have the cowling removable, and when I fit it over the frames, those minuscule gaps grow by about half a millimeter.
Furthermore, the cowling doesn’t fit 100% without some gentle coaxing, and it seems to me that it’s sitting about a half millimeter too far forward:
That’s easily corrected by gently nudging it back and talking sweet to it, but it exacerbated the gap problem even worse when the bottom of the cowling is added.
Now, I’m pretty sure I could jam that SOB together around the engine, and glue it up with no gaps or crookedness, but I didn’t put all that work in to super-detailing that engine to entomb it under a cowling.
I’m pretty sure this is my fault, although I’ll be damned if I can figure out how. For one thing, the arms that mount the engine and firewall to the airframe are indeed installed correctly, they mated-up beautifully aside from a small issue with the join from the firewall to the airframe (which I was actually able to correct fairly well), and from what I can tell, none of that brass I put in there is interfering.
Oh well, I’m disinclined to worry about because frankly, this photo here, which was a one-off which I ended up really liking:
made my vision come to life in physical form. Seeing this photo after I took it sealed it for me- “This is rad! This is what I wanted to accomplish. I feel good about this work.” I sad to myself.
So I’m disinclined to worry about the cowling problem, and I’m leaning toward displaying the model this way once she’s all finished because it’s quite compelling to me.
Of course, my vision also included the means of showing this model cowling intact, so that the lines of the aircraft could be fully appreciated, but I resolve to not be disappointed about that, after all- I can always build an A6M2 with the cowling intact later on.
Looking at it objectively, I picked a challenging kit for my first real Go! at a 1:32 aircraft. All the fiddly bits for the movable control surfaces (some of which were a success and others of which were not -but hey at least they ended up neutral which was the plan) and the retractable gear and the brass engine details... if this was the only problem that arose, and if it still looks really cool after all is said and done being displayed this way, then I am 100% pleased with the outcome of this project and I will absolutely consider it a tremendous personal achievement.
So all that said- BANZAI you boys, I’m moving ahead with my next steps toward completing this project. I’ll be painting stripes and insignias on her this week, along with painting the rest of the wing and airframe parts (two gun covers and two panels, only one of which will be glued on), and then on from there. Looking at probably having her completed in the next four weeks or so, give or take.
Kenny X
Head Mother Trucker In-Charge @ Kenny X’s Reichs Winzigkleines Flugzeugewerks *and now* Airboat Records, too!
Head Mother Trucker In-Charge @ Kenny X’s Reichs Winzigkleines Flugzeugewerks *and now* Airboat Records, too!
-
Stikpusher

- Moderator
- Posts: 21388
- Joined: Sat Apr 05, 2014 8:37 pm
- Location: Ceti Alpha 5
Re: Yeah baw 1:32 Saburo Shindo Zeke!
Just a thought, but a little fine tuning work with some needle files on the contact points would probably clean up the fit issues.
"Surely I have made my meaning plain? I intend to avenge myself upon you, Admiral. I have deprived your ship of power, and when I swing 'round, I intend to deprive you of your life."
FLSM
FLSM
Re: Yeah baw 1:32 Saburo Shindo Zeke!
While I did address the inside of the cowling parts, I did not address the actual contact points themselves where the cowling goes together. And Carlos, check this out— the brass details set comes with fiddly bits which represent those so really, I’ve got nothing to lose by getting in there and fine ruining them like you say because if I screw up, I can replace them with brass. I’ll give it a shot on your recommendation. I’m in no hurry to get this bird to the finish line. I’ve been having so much fun just working on it doing my best one subassembly or one painting job at a time. Why not.
Kenny X
Head Mother Trucker In-Charge @ Kenny X’s Reichs Winzigkleines Flugzeugewerks *and now* Airboat Records, too!
Head Mother Trucker In-Charge @ Kenny X’s Reichs Winzigkleines Flugzeugewerks *and now* Airboat Records, too!

Re: Yeah baw 1:32 Saburo Shindo Zeke!
I would display it like that too the bottom of that radial engine sticking out gives it a lot of viewing interest.
March as one, Don't look back
Odin's sons... Attack!
Unleash hell! Do not repent! Warfare grants us no lament
Let your weapons slash and tear This is no place for fear
Hold the lines! Move as one! In unity our victory's won
Our shields will form a mighty wall
United we shall never fall
Odin's sons... Attack!
Unleash hell! Do not repent! Warfare grants us no lament
Let your weapons slash and tear This is no place for fear
Hold the lines! Move as one! In unity our victory's won
Our shields will form a mighty wall
United we shall never fall
Re: Yeah baw 1:32 Saburo Shindo Zeke!
Right!? I mean come on! Why keep the engine detail a surprise? Let it all hang out! I’m still doing gentle sanding and filing here and there as I have time, to help straighten the cowling out, and to get a better fit for like a bonus, but as to the final display- It’ll be bottom-off. I love the way it looks this way.
Kenny X
Head Mother Trucker In-Charge @ Kenny X’s Reichs Winzigkleines Flugzeugewerks *and now* Airboat Records, too!
Head Mother Trucker In-Charge @ Kenny X’s Reichs Winzigkleines Flugzeugewerks *and now* Airboat Records, too!

Re: Yeah baw 1:32 Saburo Shindo Zeke!
Don't forget to put a drip tray under it! 
Stuart Templeton 'I may not be good but I'm slow...'
Re: Yeah baw 1:32 Saburo Shindo Zeke!
 THANK YOU for reminding me!!!
Kenny X
Head Mother Trucker In-Charge @ Kenny X’s Reichs Winzigkleines Flugzeugewerks *and now* Airboat Records, too!
Head Mother Trucker In-Charge @ Kenny X’s Reichs Winzigkleines Flugzeugewerks *and now* Airboat Records, too!
-
BlackSheep214

- Elite Member
- Posts: 13600
- Joined: Sun Apr 06, 2014 8:47 pm
Re: Yeah baw 1:32 Saburo Shindo Zeke!
ZEKE porn!!!! 
“Who controls the skies, controls the fate of this Earth”
Author unknown- 352nd Fighter Group, Blue-Nosed Bastards of Bodney
“Send one plane it’s a sortie; send two planes it’s a flight; send four planes it’s a test of airpower. - Richard Kohn
Author unknown- 352nd Fighter Group, Blue-Nosed Bastards of Bodney
“Send one plane it’s a sortie; send two planes it’s a flight; send four planes it’s a test of airpower. - Richard Kohn
-
speedgraflex

- Moderator
- Posts: 11538
- Joined: Fri Feb 10, 2017 11:08 pm
- Contact:
Re: Yeah baw 1:32 Saburo Shindo Zeke!
Also depending on the size of your cojones I would be tempted to heat some water up not boiling but hot water and heat one half slightly to correct the mismatch. By fitting the one to the other you correct the problem without removing plastic. It takes several tries to do this... in order to heat the plastic all the way through so that it reforms. I have a feeling that’s possibly a part that was pulled a little too fast from the mold. I would try to get the pieces in alignment before proceeding.
But damn that photo with the cowl off makes my day! Bravo, Banzai Ken!
But damn that photo with the cowl off makes my day! Bravo, Banzai Ken!
Make more models!