Tamiya 1/32 Spitfire XIVe Conversion
-
Stikpusher

- Moderator
- Posts: 21180
- Joined: Sat Apr 05, 2014 8:37 pm
- Location: Ceti Alpha 5
Re: Tamiya 1/32 Spitfire XIVe Conversion
Nice of Tamiya to include that part. No such part on my Academy kit, although there is an oval shaped panel line on the fuselage underside where that item would likely go. I wonder how commonly that device was fitted to Spitfires?
"Surely I have made my meaning plain? I intend to avenge myself upon you, Admiral. I have deprived your ship of power, and when I swing 'round, I intend to deprive you of your life."
FLSM
FLSM
-
jeaton01
- Elite Member
- Posts: 2374
- Joined: Thu Apr 23, 2020 9:20 am
- Location: Northern California
- Contact:
Re: Tamiya 1/32 Spitfire XIVe Conversion
This will be fun to watch. On the Tamiya 1/32 Spitfire I had a hand in building there were two sets of gear struts, one for up and the other for down. They can be interchanged for display, but on the XIV the tailwheel will be an issue since it would have to have an alternate.

Re: Tamiya 1/32 Spitfire XIVe Conversion
Check your references. Almost every wartime photo of the XIVe that I've seen, either fighter or fighter recon, had the beam approach aerial on it.Stikpusher wrote: ↑Fri Sep 15, 2023 10:59 pm Nice of Tamiya to include that part. No such part on my Academy kit, although there is an oval shaped panel line on the fuselage underside where that item would likely go. I wonder how commonly that device was fitted to Spitfires?
Interesting! Won't be an issue with this build since I don't need the option of a wheels up display and LFD supplies the retractable tailwheel assembly.jeaton01 wrote: ↑Sat Sep 16, 2023 12:10 am This will be fun to watch. On the Tamiya 1/32 Spitfire I had a hand in building there were two sets of gear struts, one for up and the other for down. They can be interchanged for display, but on the XIV the tailwheel will be an issue since it would have to have an alternate.
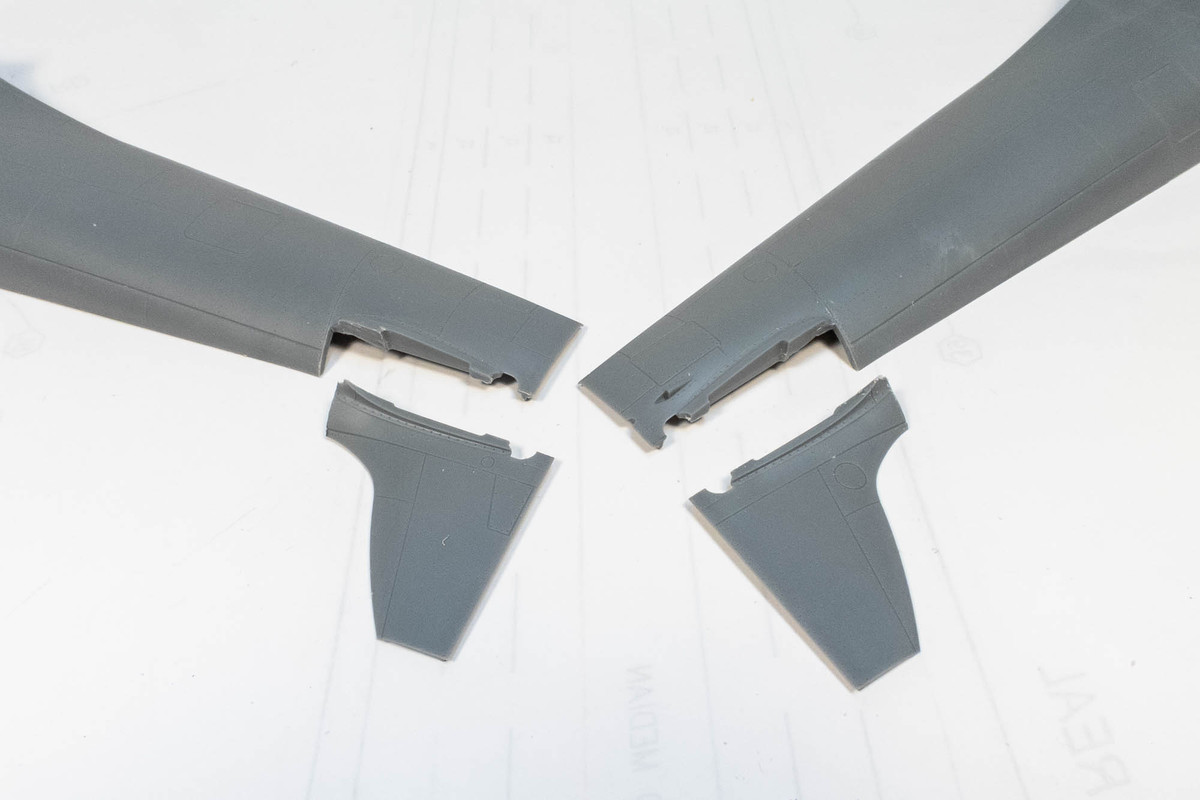
I decided to forge ahead and start the surgery on the kit fuselage. Here are the fuselage halves unaltered.
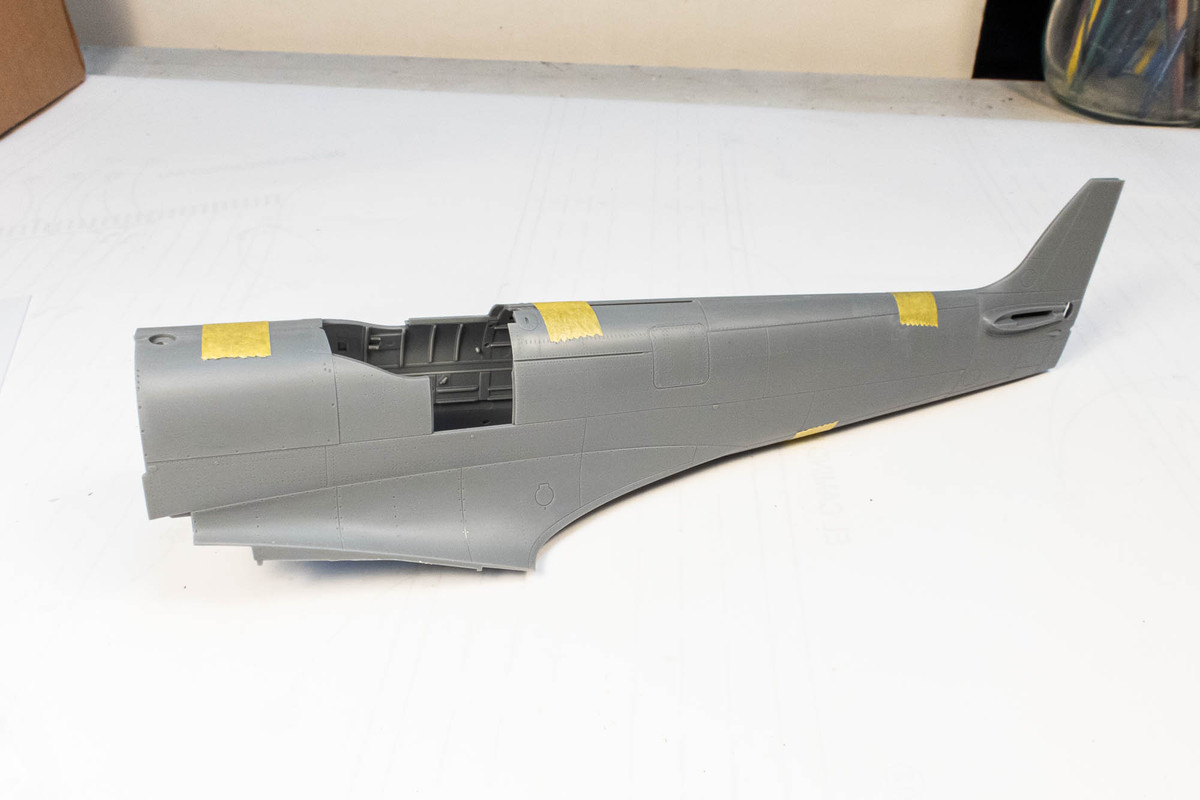
The forward cut seems pretty straightforward but I'm nervous about the tail cut.
I started with the forward removal. I like to make my cut just outside of the actual joint just to give me some wiggle room in case of a mistake. I've drawn guide lines in pencil.
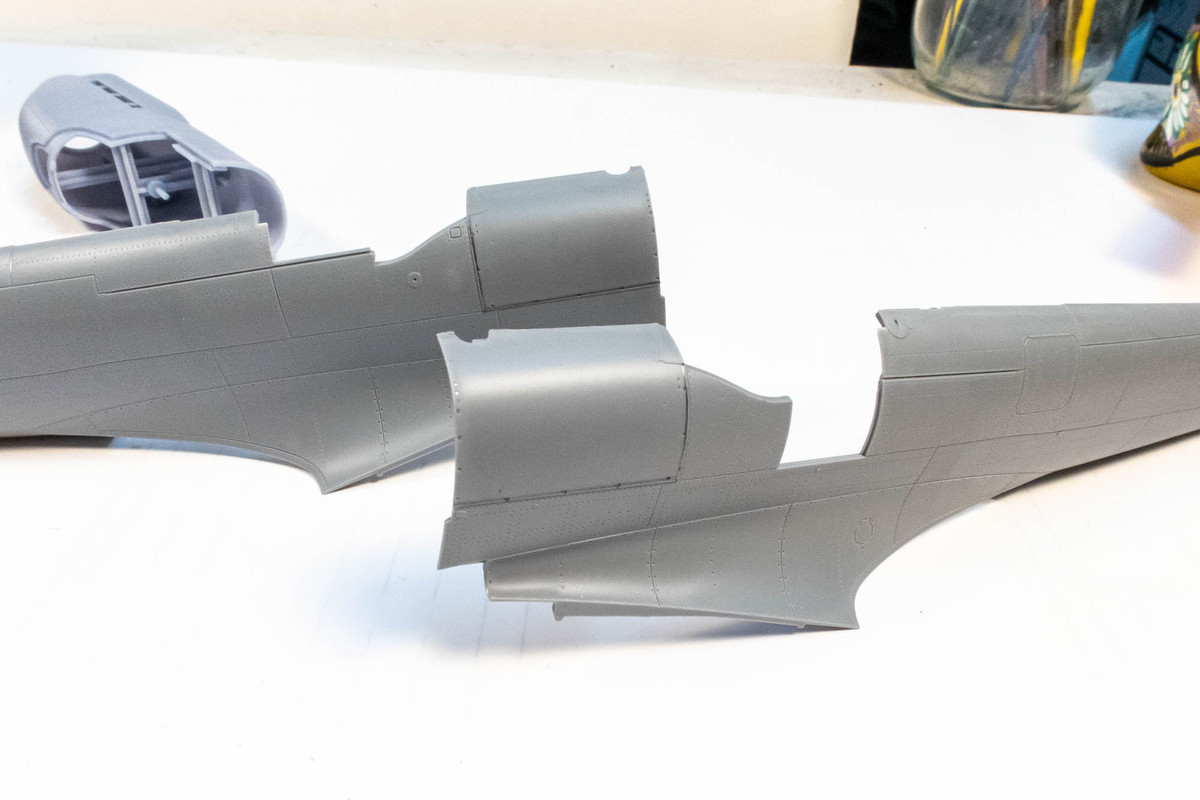
The fuselage halves after the cuts and some clean-up. I had to use some black CA to fill in a couple of notches from errant cuts.
A preliminary dry-fit of the Griffon nose looks good.
John aka JKim
-----------<><

-----------<><
-
BlackSheep214

- Elite Member
- Posts: 13409
- Joined: Sun Apr 06, 2014 8:47 pm
Re: Tamiya 1/32 Spitfire XIVe Conversion
Nice work! 
“Who controls the skies, controls the fate of this Earth”
Author unknown- 352nd Fighter Group, Blue-Nosed Bastards of Bodney
“Send one plane it’s a sortie; send two planes it’s a flight; send four planes it’s a test of airpower. - Richard Kohn
Author unknown- 352nd Fighter Group, Blue-Nosed Bastards of Bodney
“Send one plane it’s a sortie; send two planes it’s a flight; send four planes it’s a test of airpower. - Richard Kohn
Re: Tamiya 1/32 Spitfire XIVe Conversion
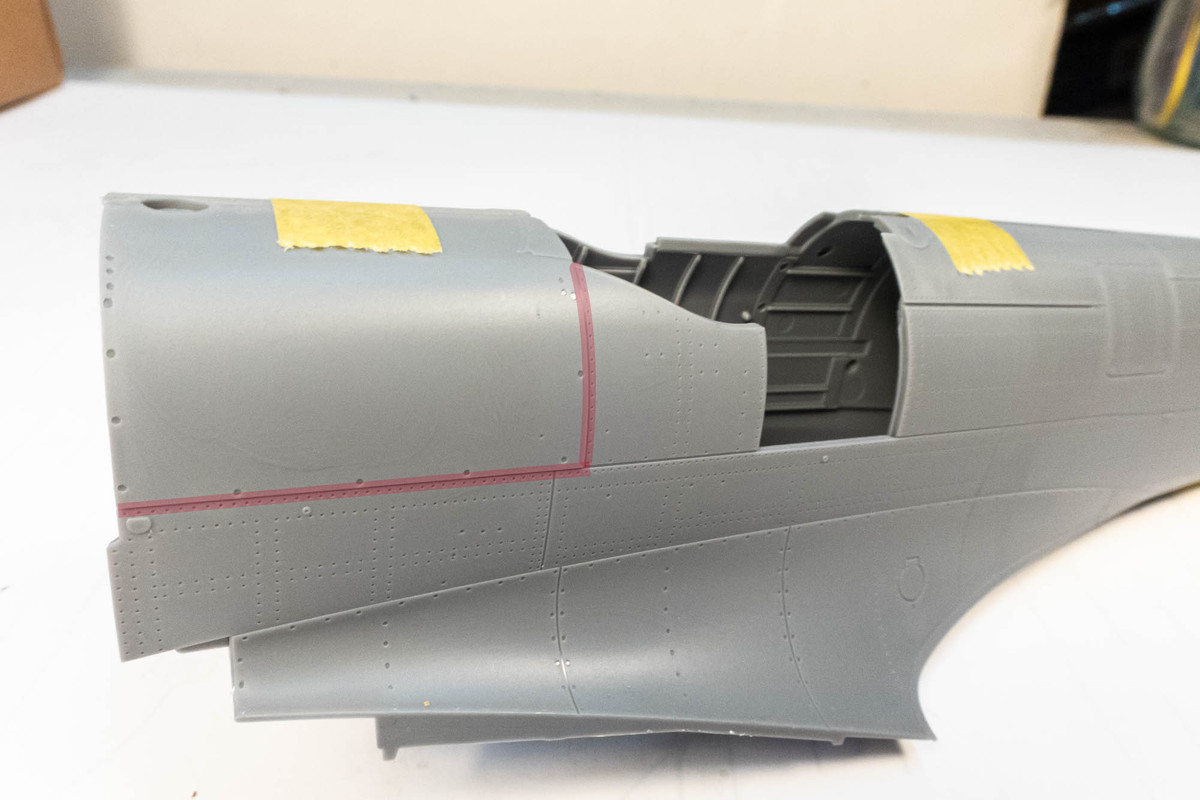
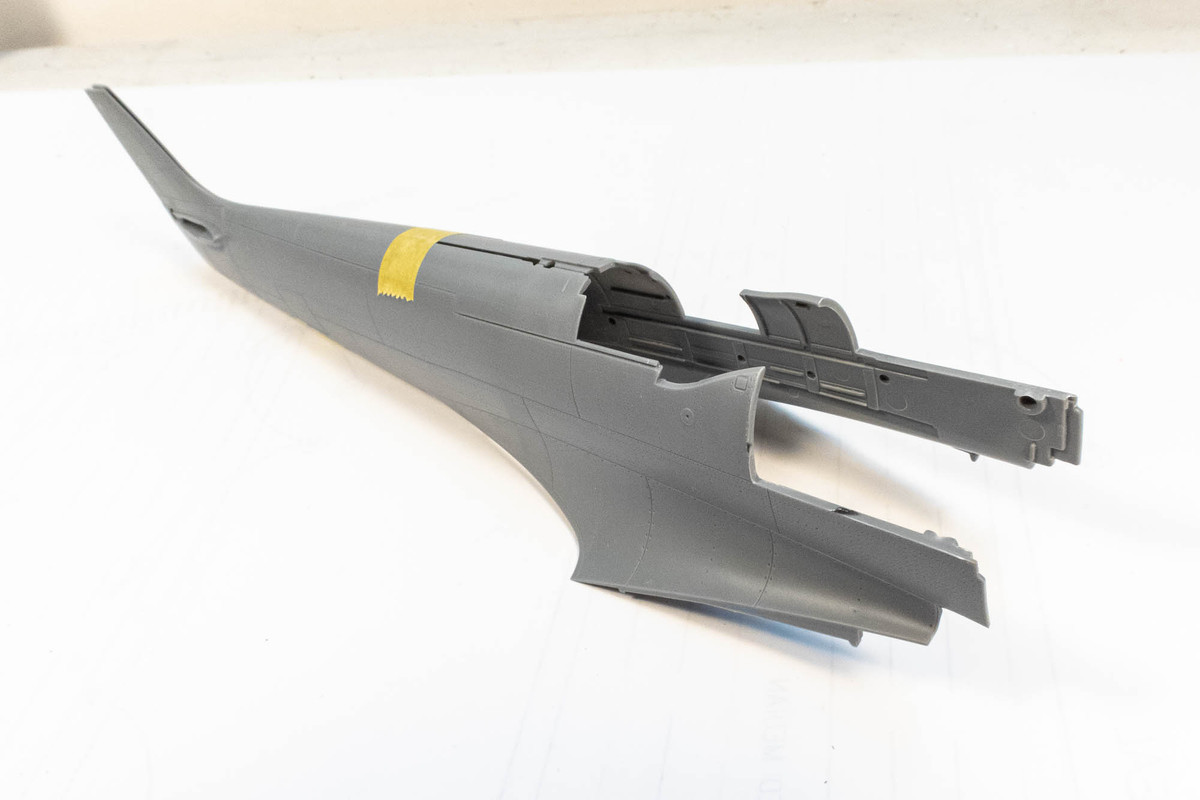
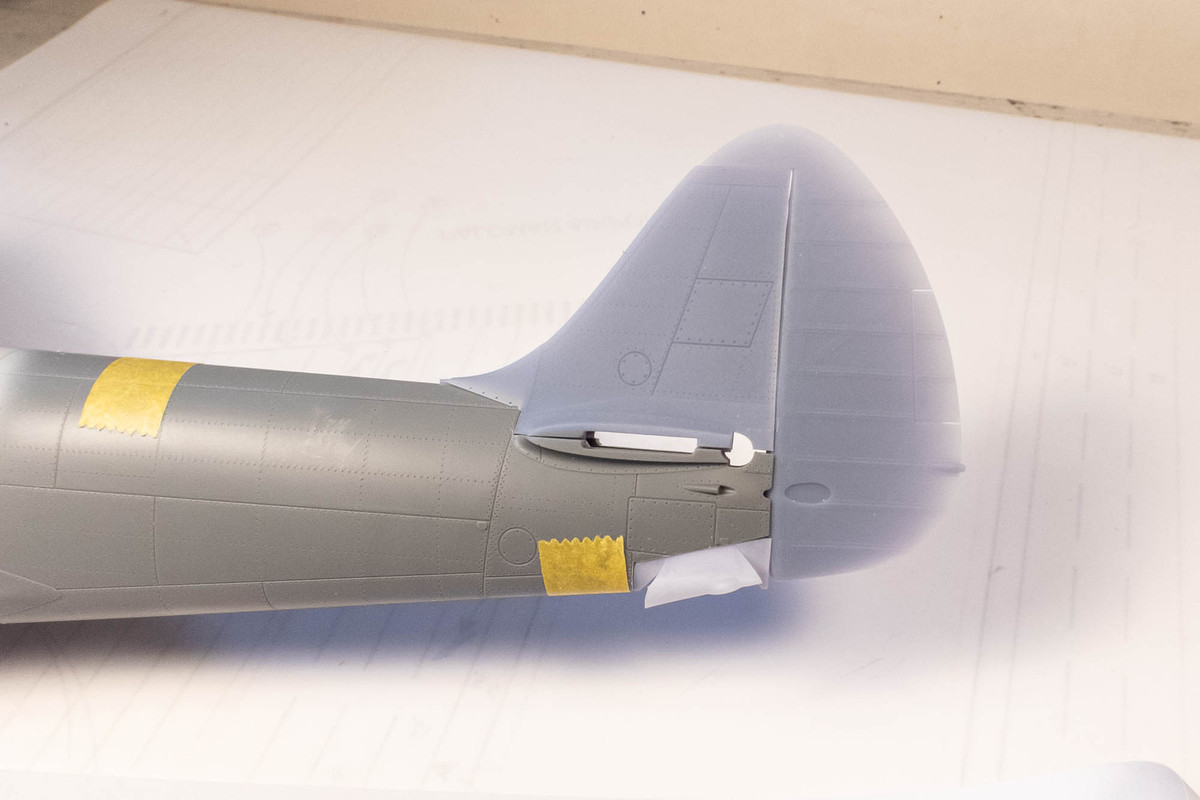
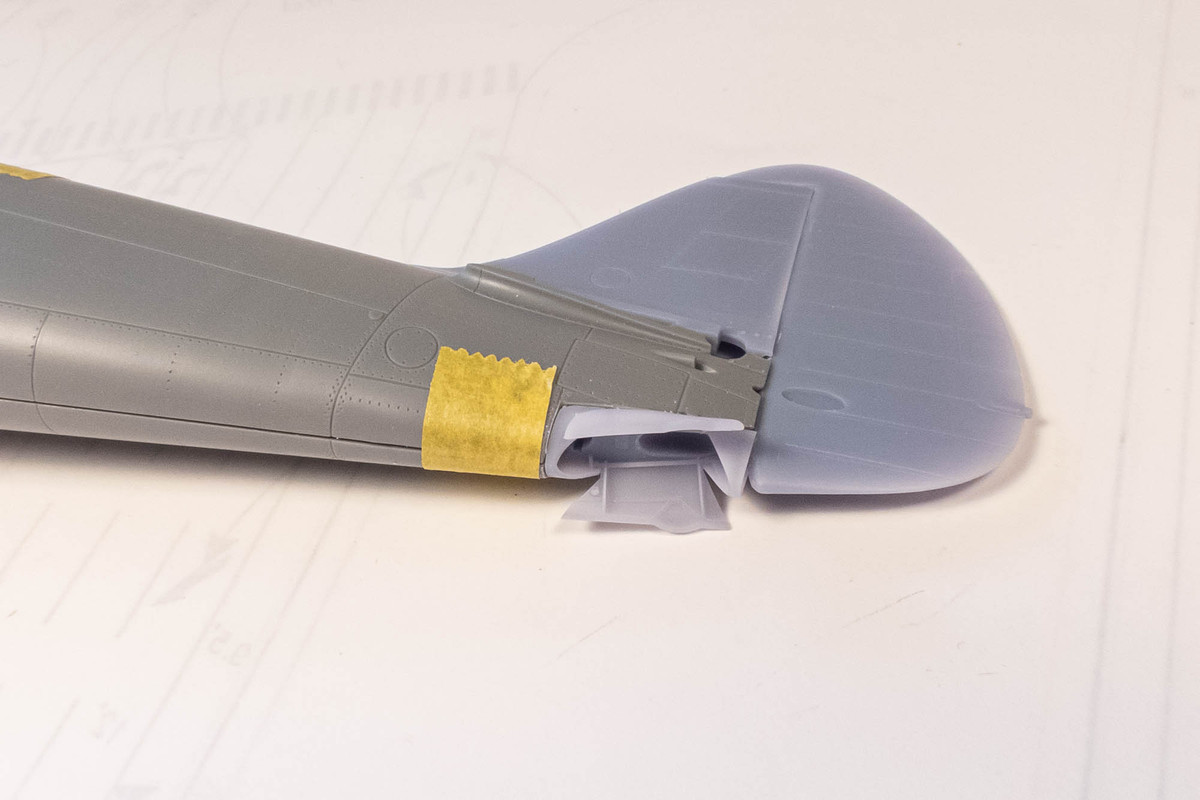
In between painting steps on the Fw190A build, I've gone ahead and sawed off the Tamiya tail to accommodate the resin tail fin. Although I was nervous about it, it turned to be a much simpler cut than the nose.
Since I'm not in a rush to jump in fully on this build, here's a look at the resin nose and tail mounted temporarily on the kit fuselage. There is a bit of issue at the forward joint where the tail fin spine meets the fuselage. It's covered by a piece of tape in these photos but I'll have to take a closer look there.
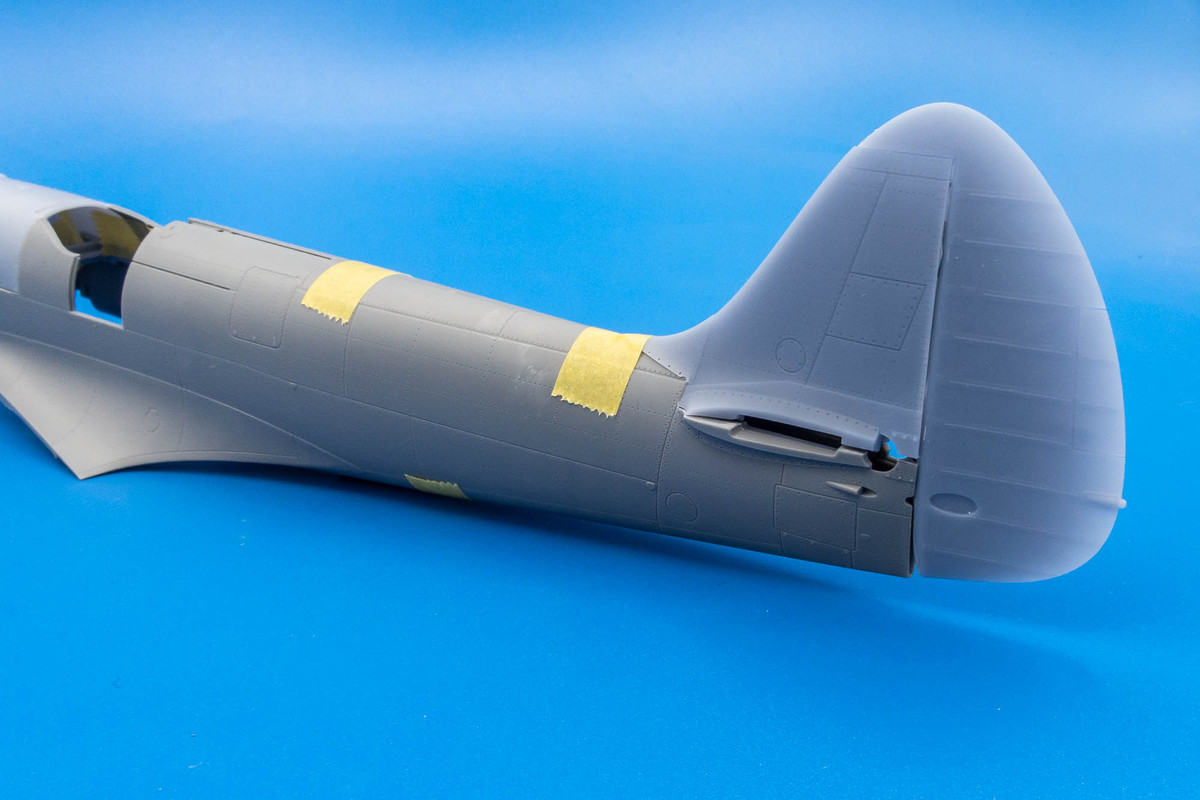
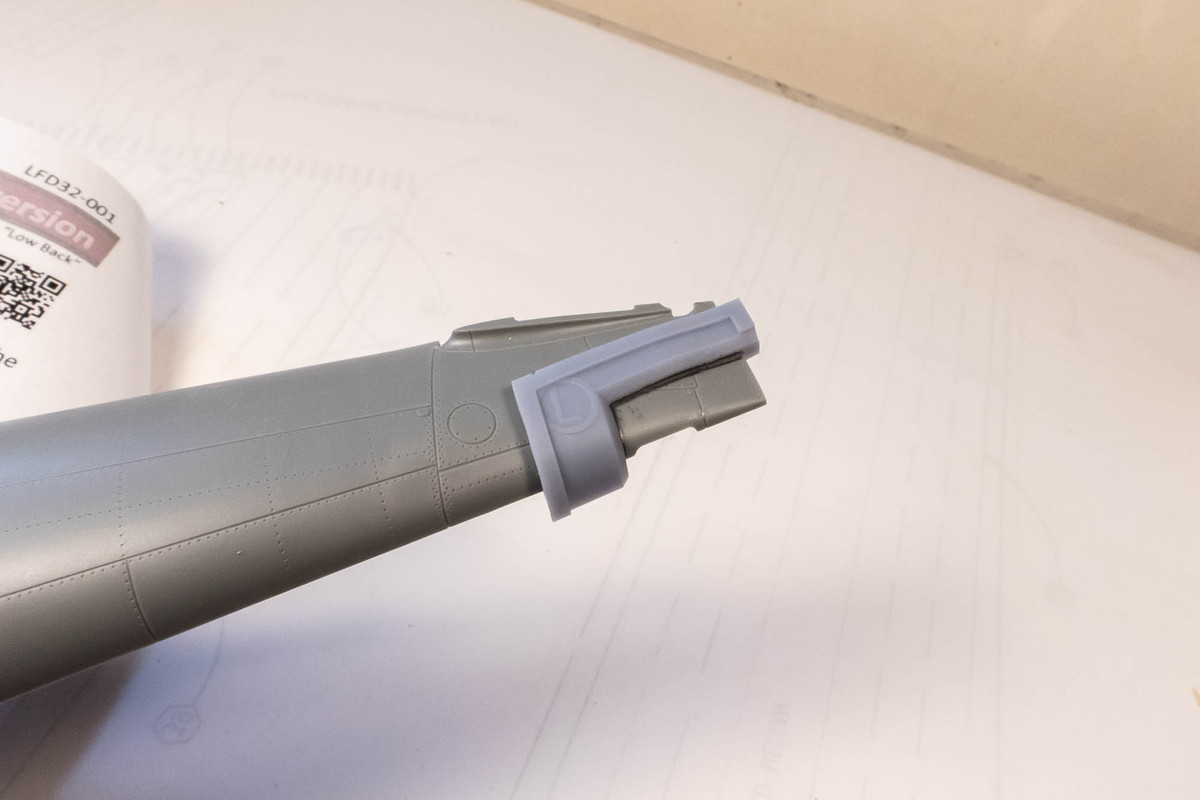
The cuts are still rough but preliminary fit looks nice. I'm hoping it all works out nice and neat! The LFD set comes with two tail fins... one standard and one with a wider chord.
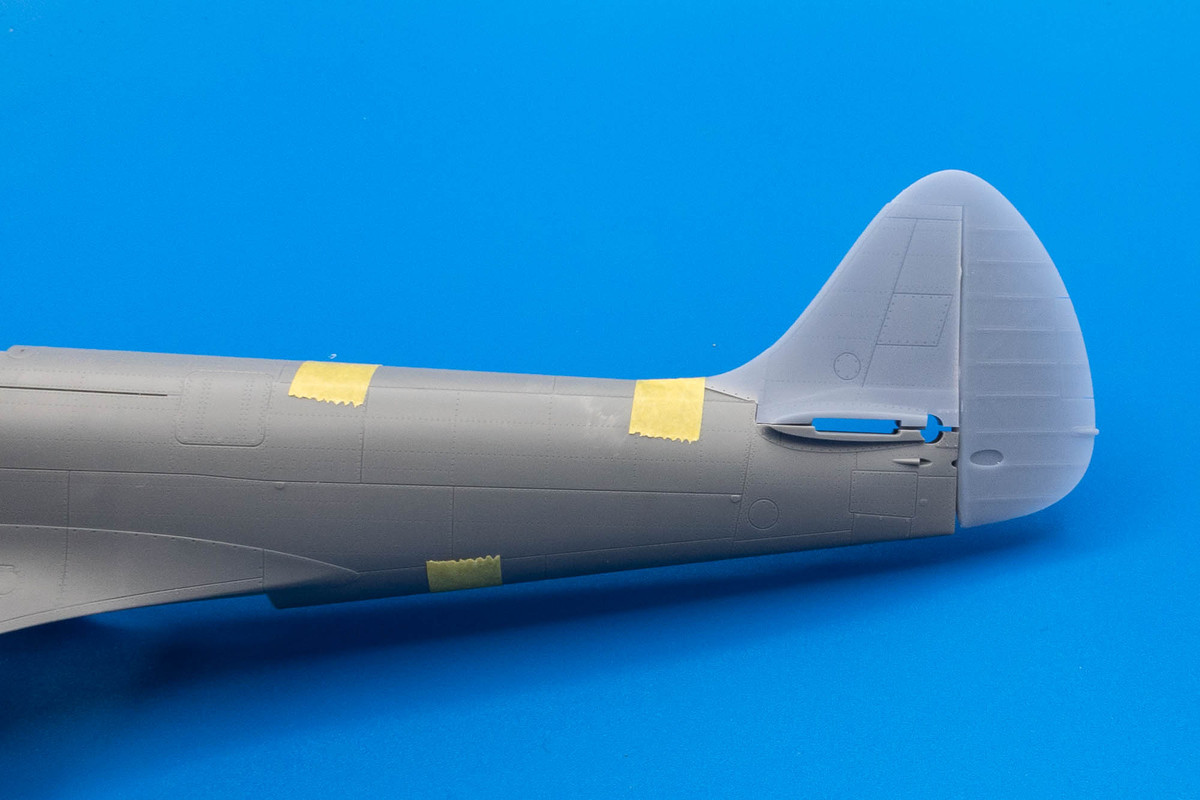
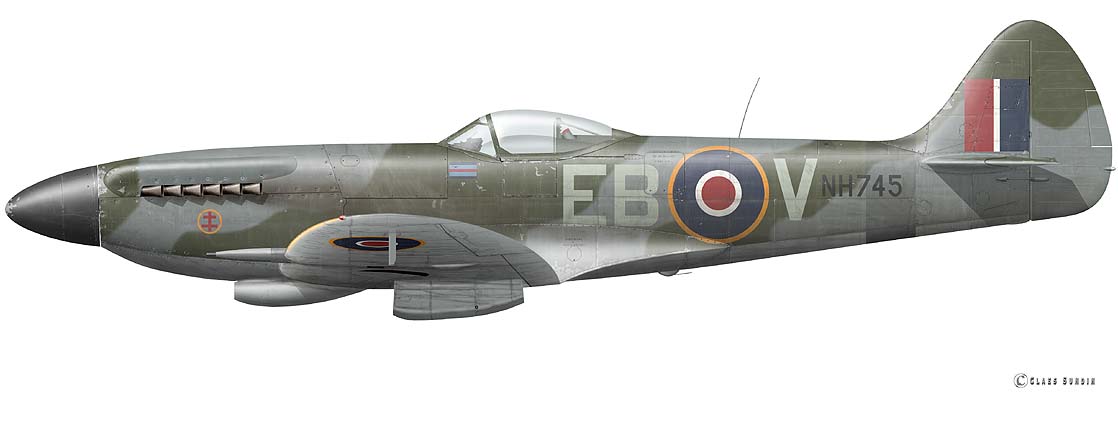
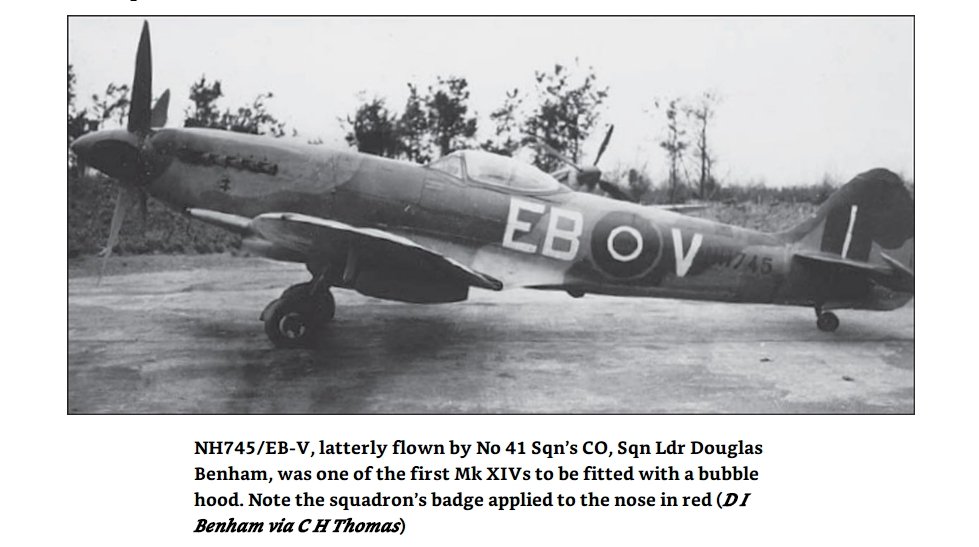
Since EB-V was an early XIVe, I am assuming the standard tail and this seems to be verified by a quick superimposition of the standard tail and photo of EB-V.

Since I'm not in a rush to jump in fully on this build, here's a look at the resin nose and tail mounted temporarily on the kit fuselage. There is a bit of issue at the forward joint where the tail fin spine meets the fuselage. It's covered by a piece of tape in these photos but I'll have to take a closer look there.
The cuts are still rough but preliminary fit looks nice. I'm hoping it all works out nice and neat! The LFD set comes with two tail fins... one standard and one with a wider chord.
Since EB-V was an early XIVe, I am assuming the standard tail and this seems to be verified by a quick superimposition of the standard tail and photo of EB-V.
John aka JKim
-----------<><
-----------<><
-
BlackSheep214
- Elite Member
- Posts: 13409
- Joined: Sun Apr 06, 2014 8:47 pm
Re: Tamiya 1/32 Spitfire XIVe Conversion
Nice surgery work!
“Who controls the skies, controls the fate of this Earth”
Author unknown- 352nd Fighter Group, Blue-Nosed Bastards of Bodney
“Send one plane it’s a sortie; send two planes it’s a flight; send four planes it’s a test of airpower. - Richard Kohn
Author unknown- 352nd Fighter Group, Blue-Nosed Bastards of Bodney
“Send one plane it’s a sortie; send two planes it’s a flight; send four planes it’s a test of airpower. - Richard Kohn
Re: Tamiya 1/32 Spitfire XIVe Conversion
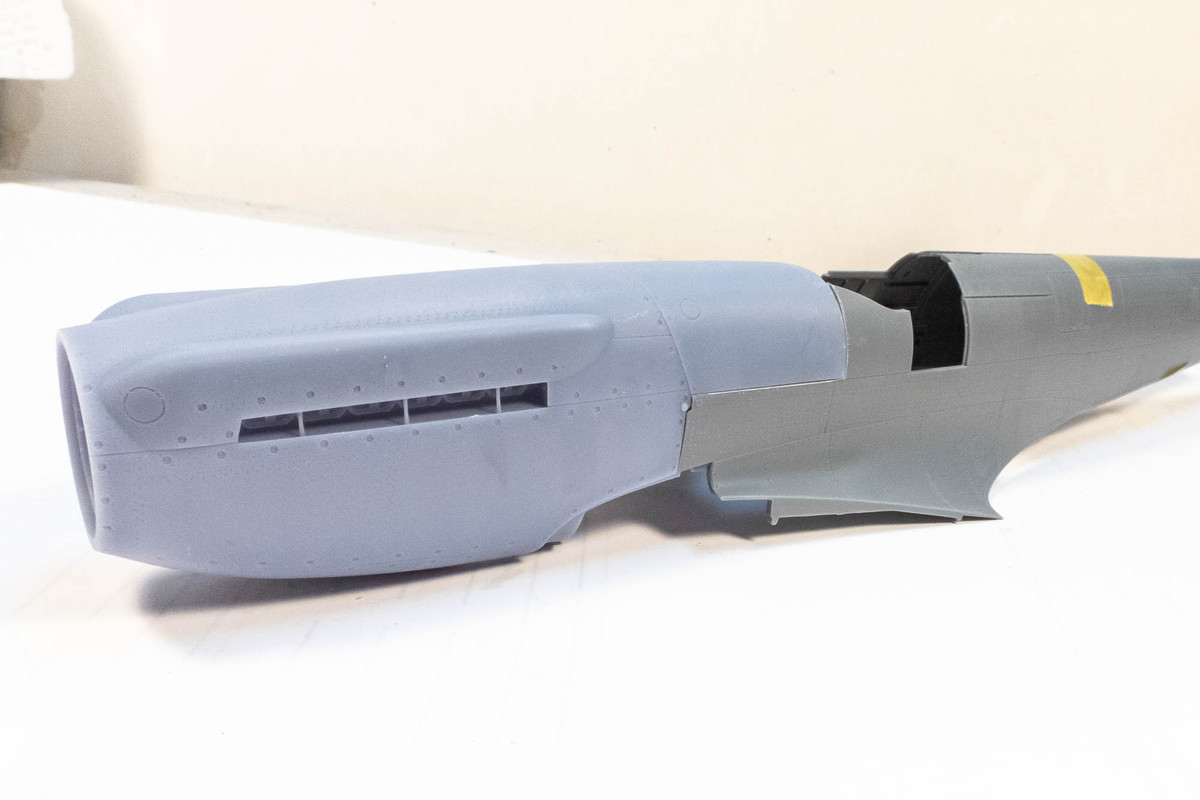
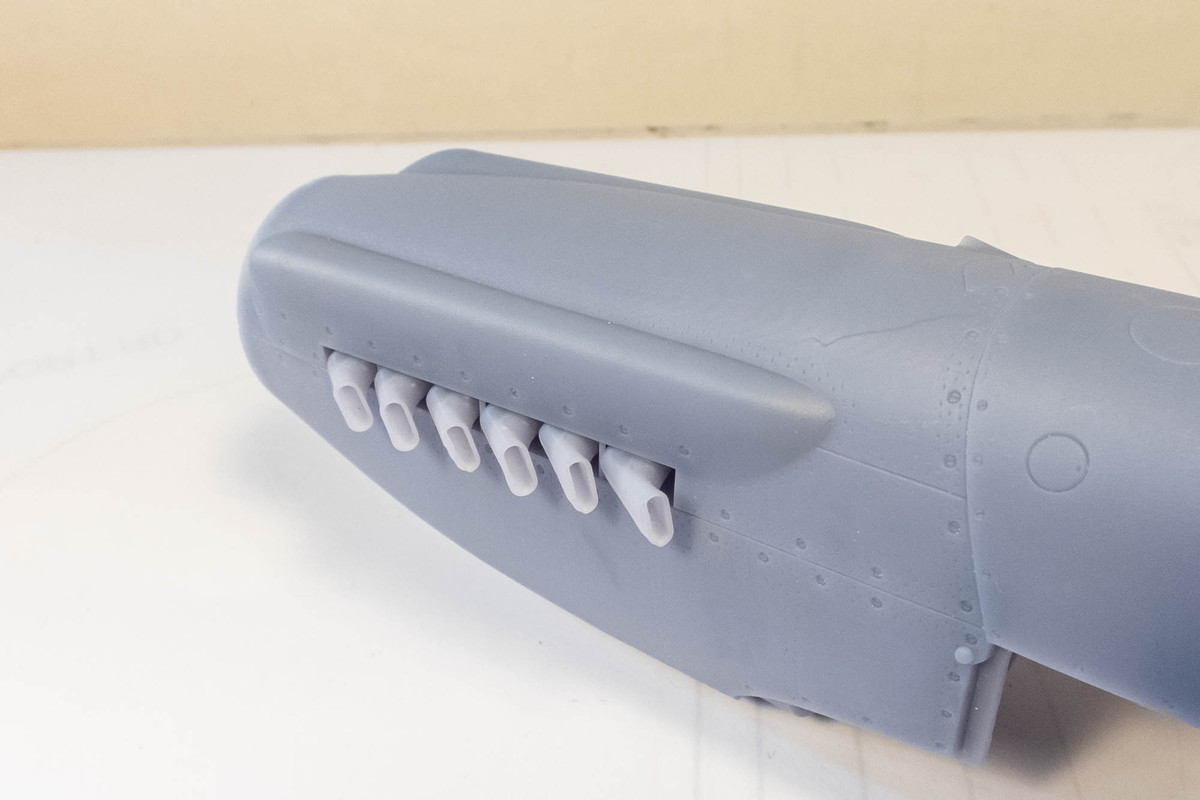
Mathieu at Laminar Flow Design graciously sent me a set of fishtail exhausts based on my subject aircraft. His XIVe low-back conversion set includes only the round exhausts and was surprised to see the photo of EB-V with the fishtails clearly visible.

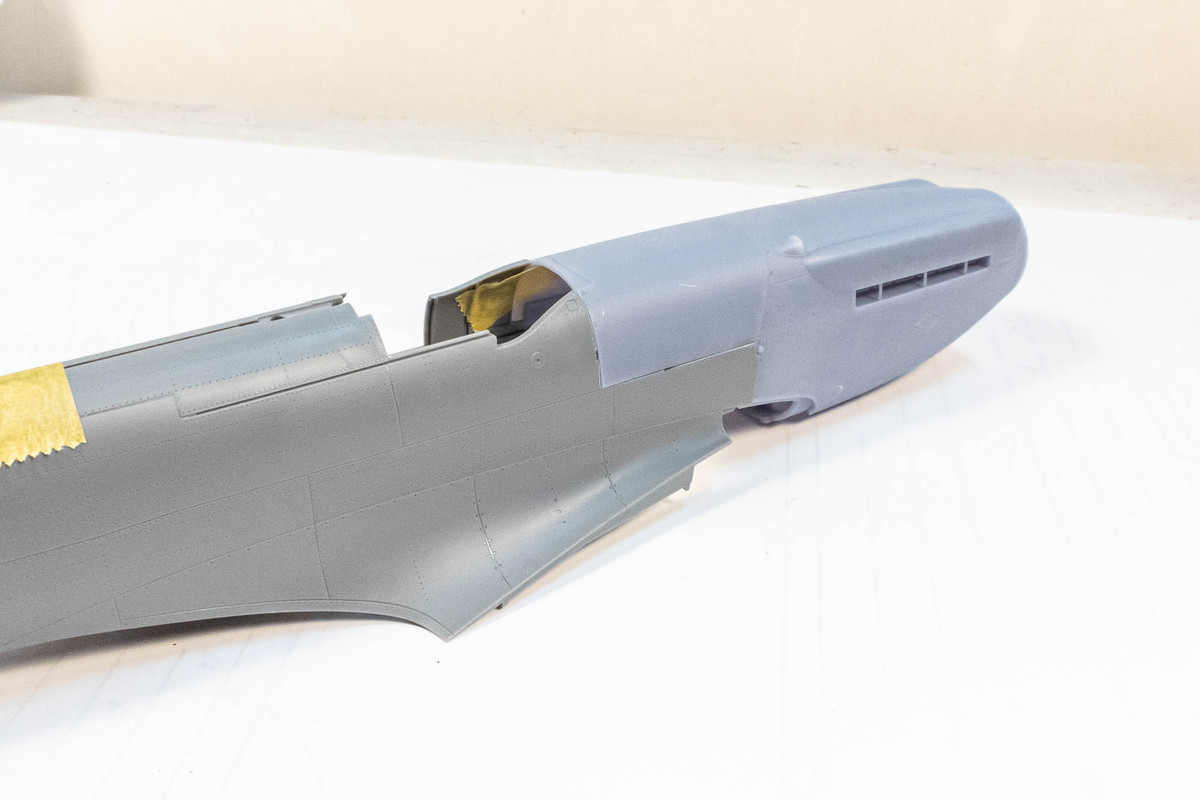
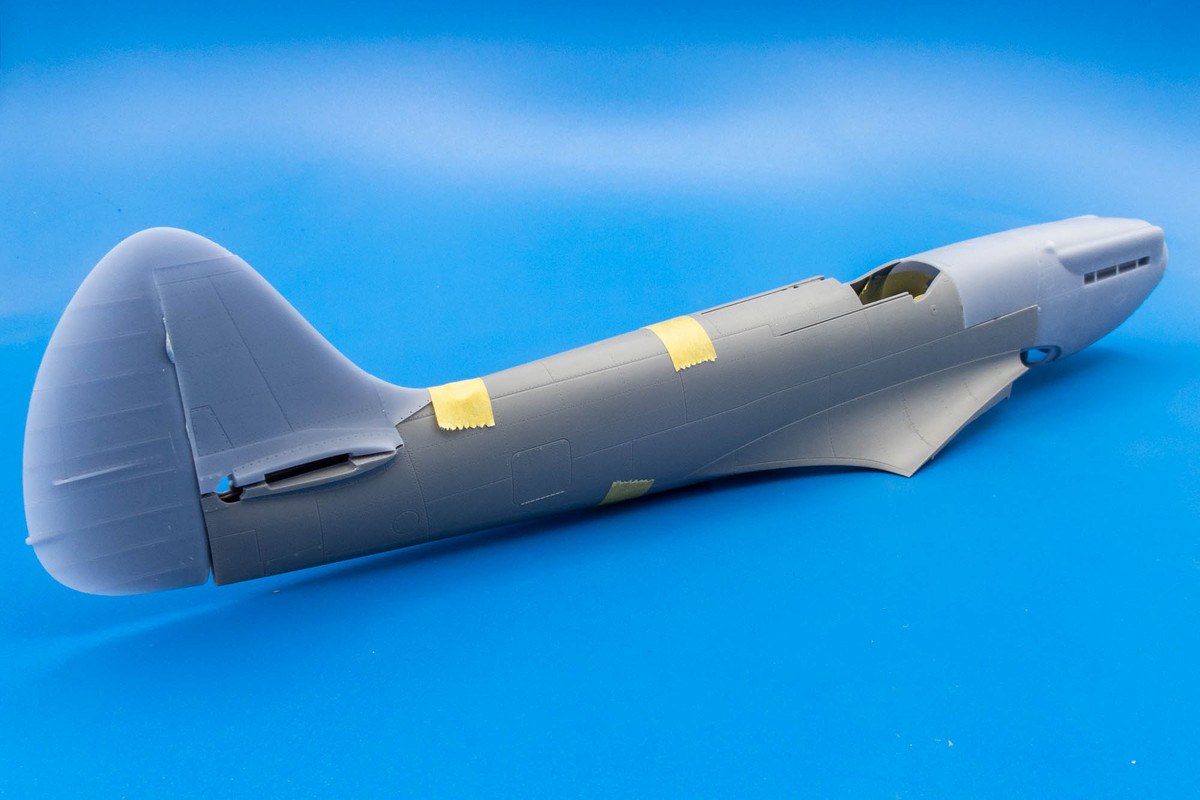
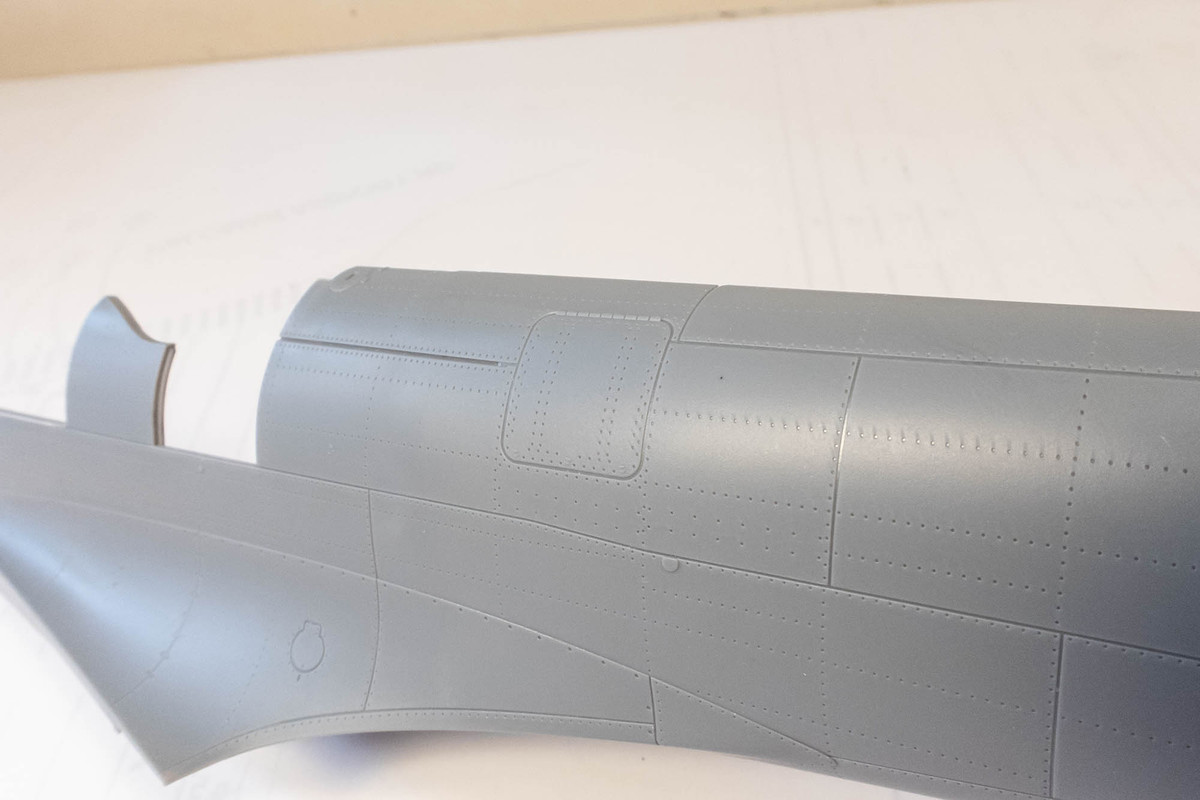
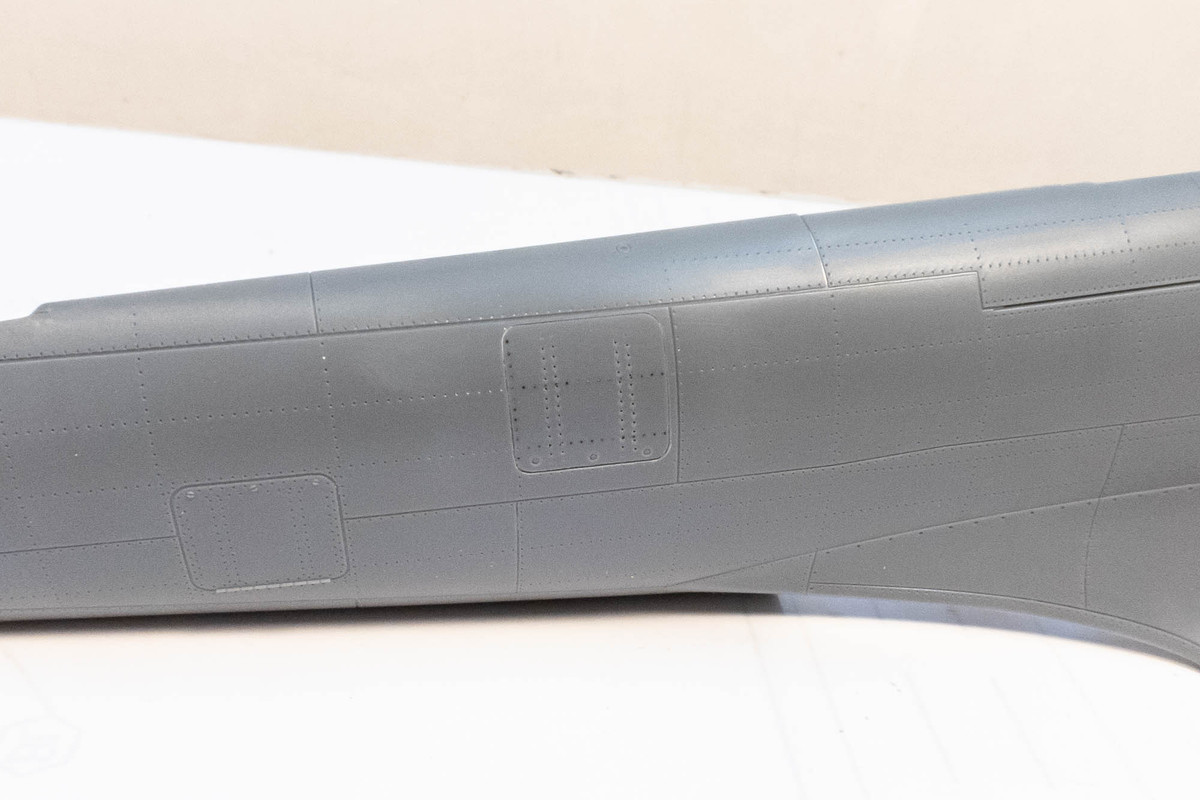
More modifications to the XVIe fuselage... the port hatch behind behind the cockpit needs to be removed. Interestingly, Claes Sundin's profile of EB-V shows this hatch in place but I think it is in error.
No hatch in the the photo.
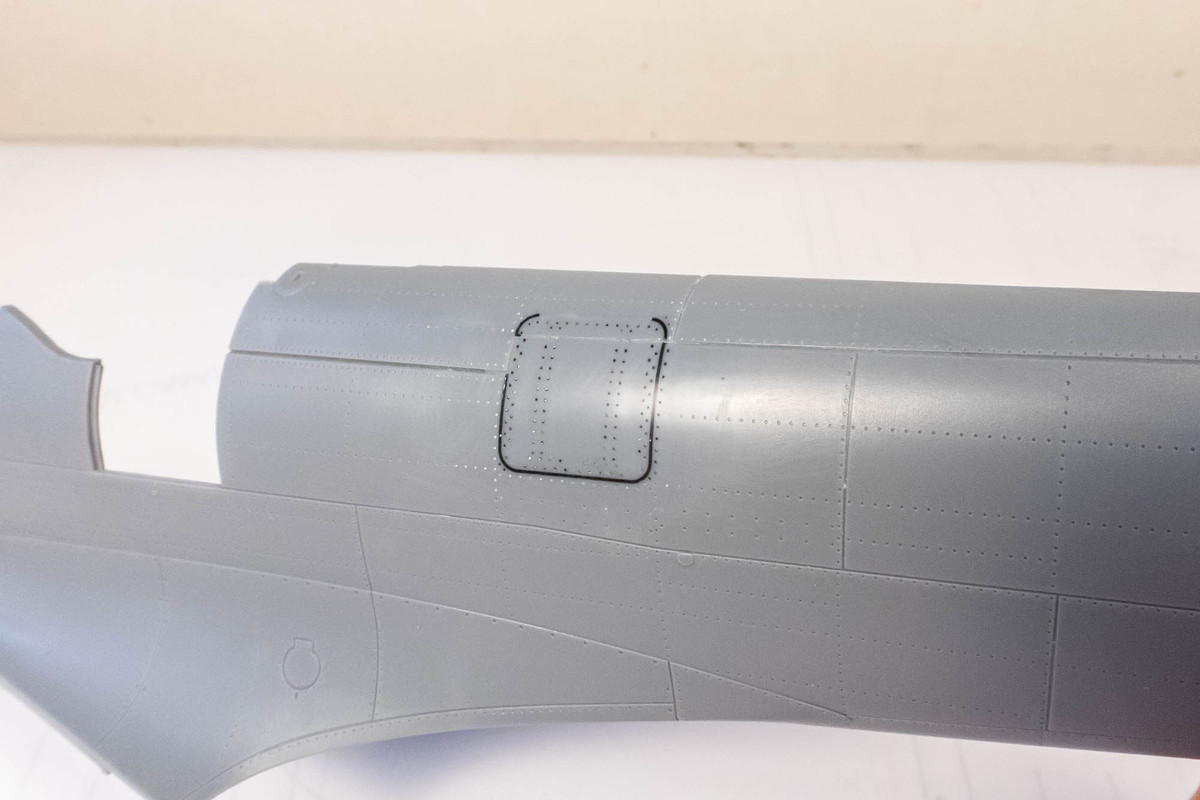
There is a bit of raised detail around the hatch that needs to be removed before filling including the hinge on the top and fasteners on the bottom.
The hatch and rivets are filled in with black CA glue. I'll clean this up and shoot with a coat of primer when it is finished.

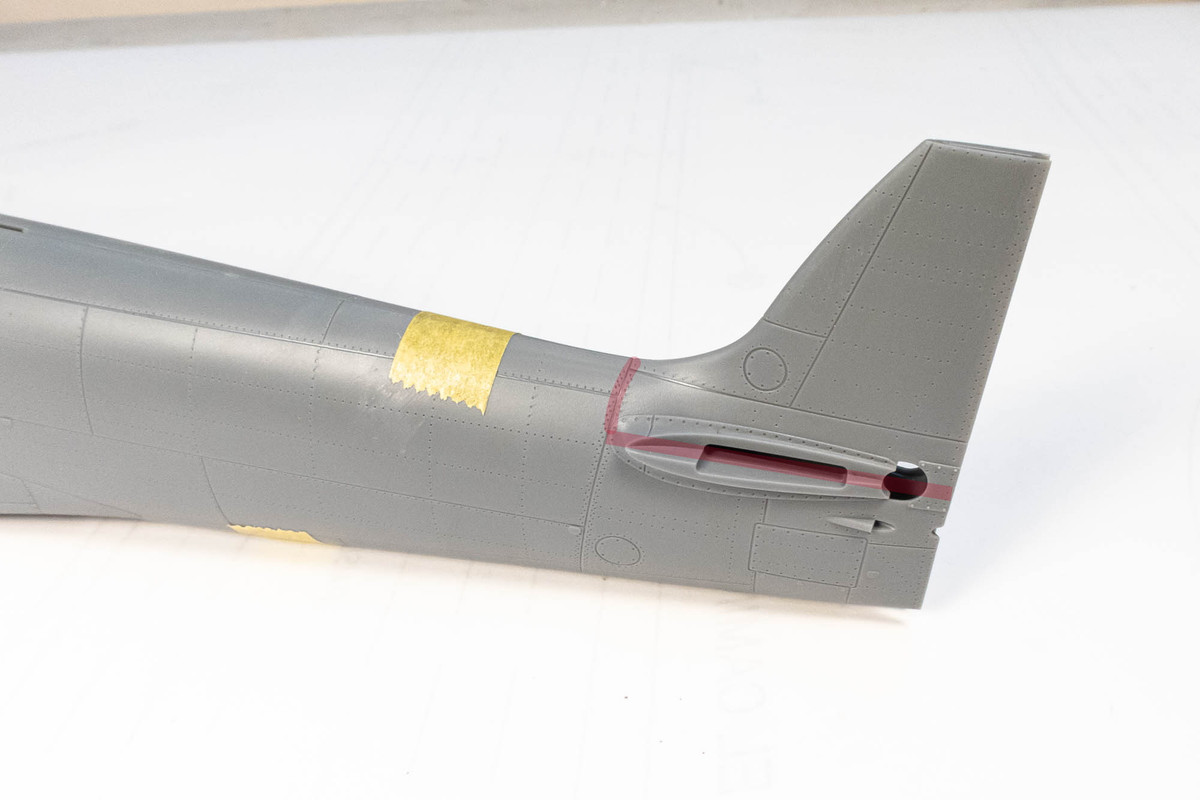
Next, I'm going to open the retractable tail wheel bay. LFD conveniently provides scribing/cutting templates. I am choosing to trace the cut lines in pencil and remove the template prior to cutting.

Dry-fitting the tail components. The horizontal stabilizers need to be adjusted for the extra width of the XIVe tail so surgery here is not quite finished.
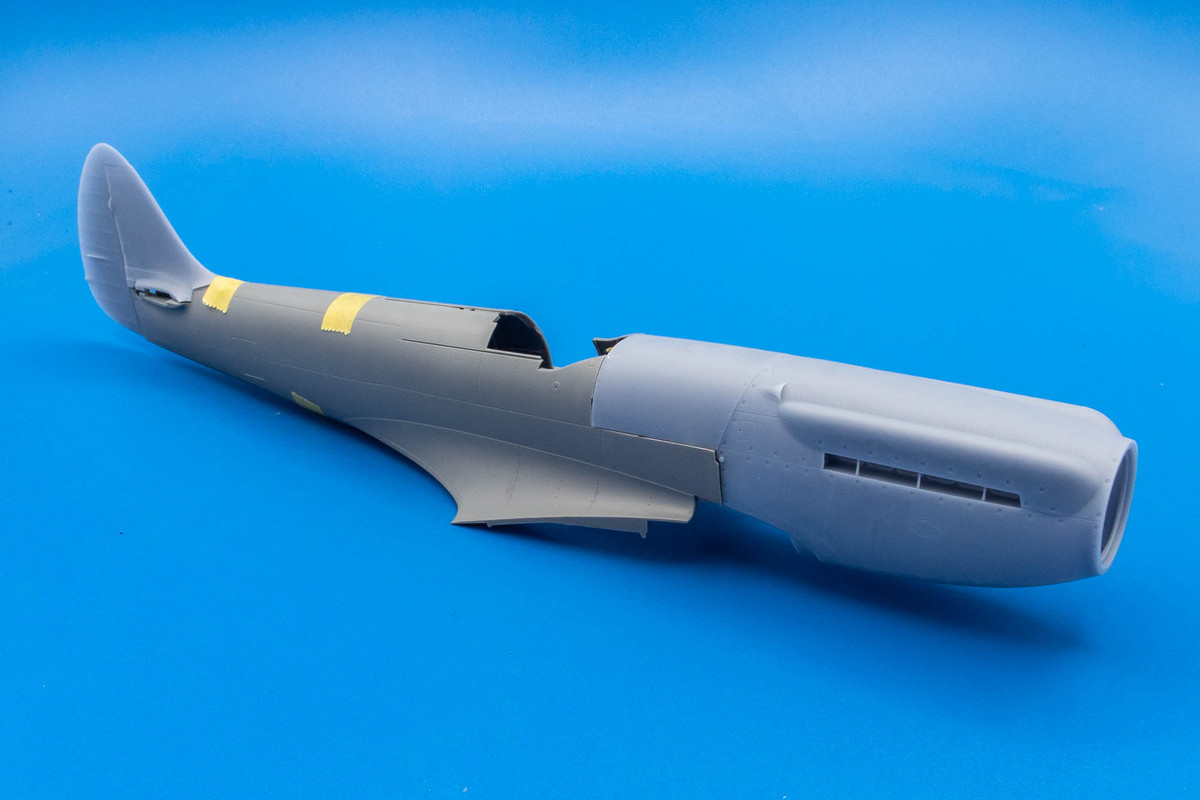
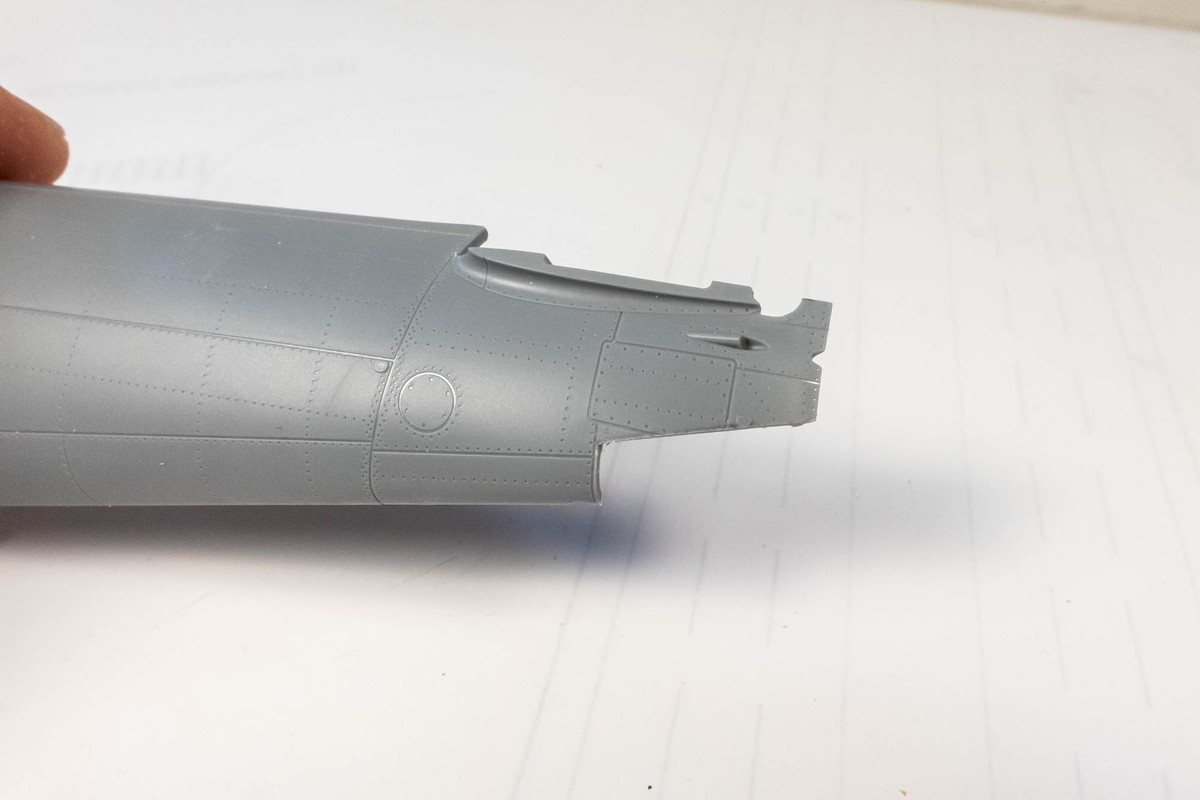
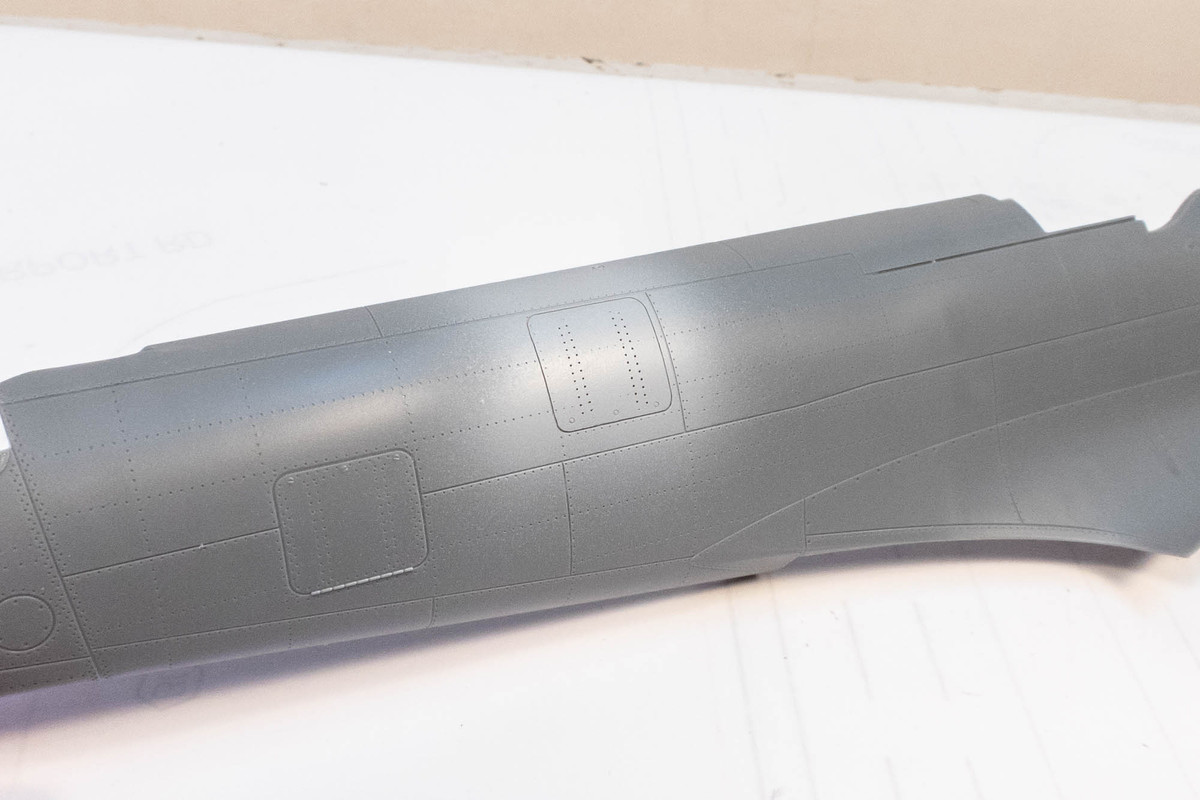
EB-V was fighter version so the camera ports will not be used in this build. But I need to add a hatch on the starboard side. LFD provides the hatch as a separate part but I thought it'd be neater/easier to just scribe the hatch instead of cutting an opening and gluing the resin hatch into place. Again, LFD provides the hatch template, which is positively located using the interior fuselage ribs... no guessing. The template is secured into place with tape.
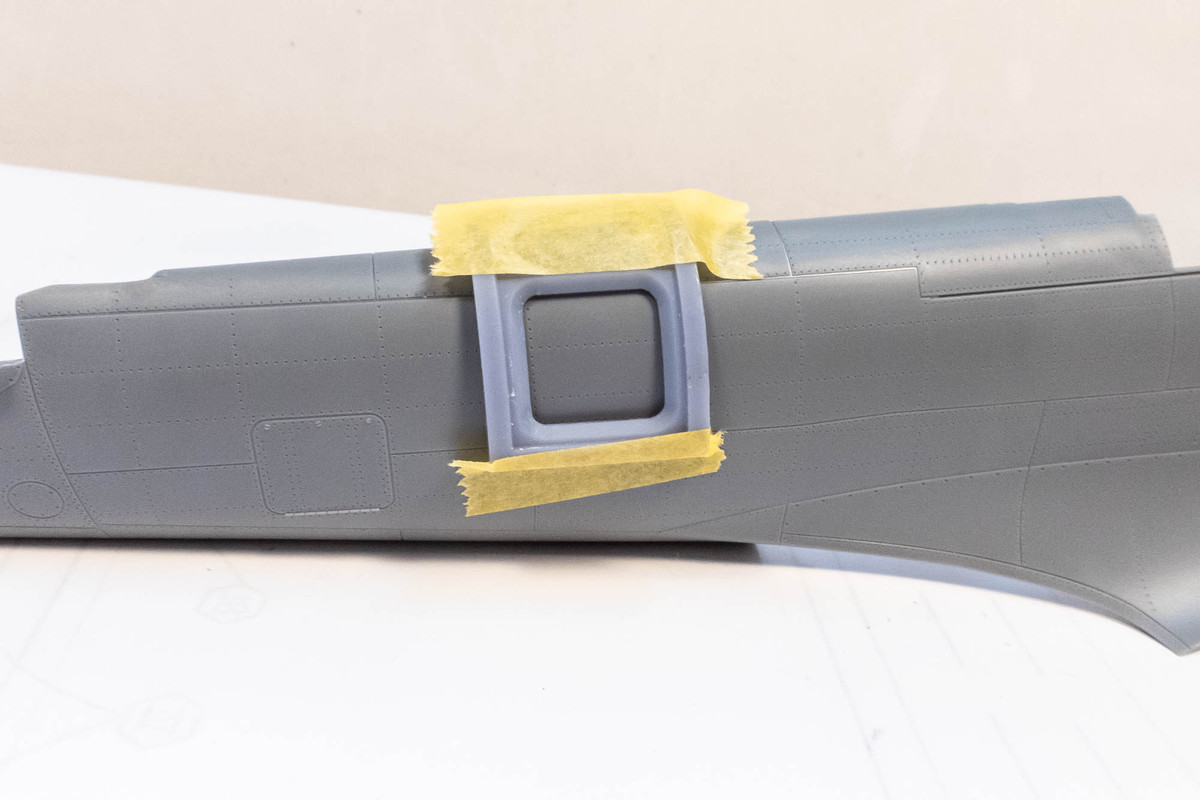
Using a sewing needle chucked into a pin vise, the hatch is scribed.
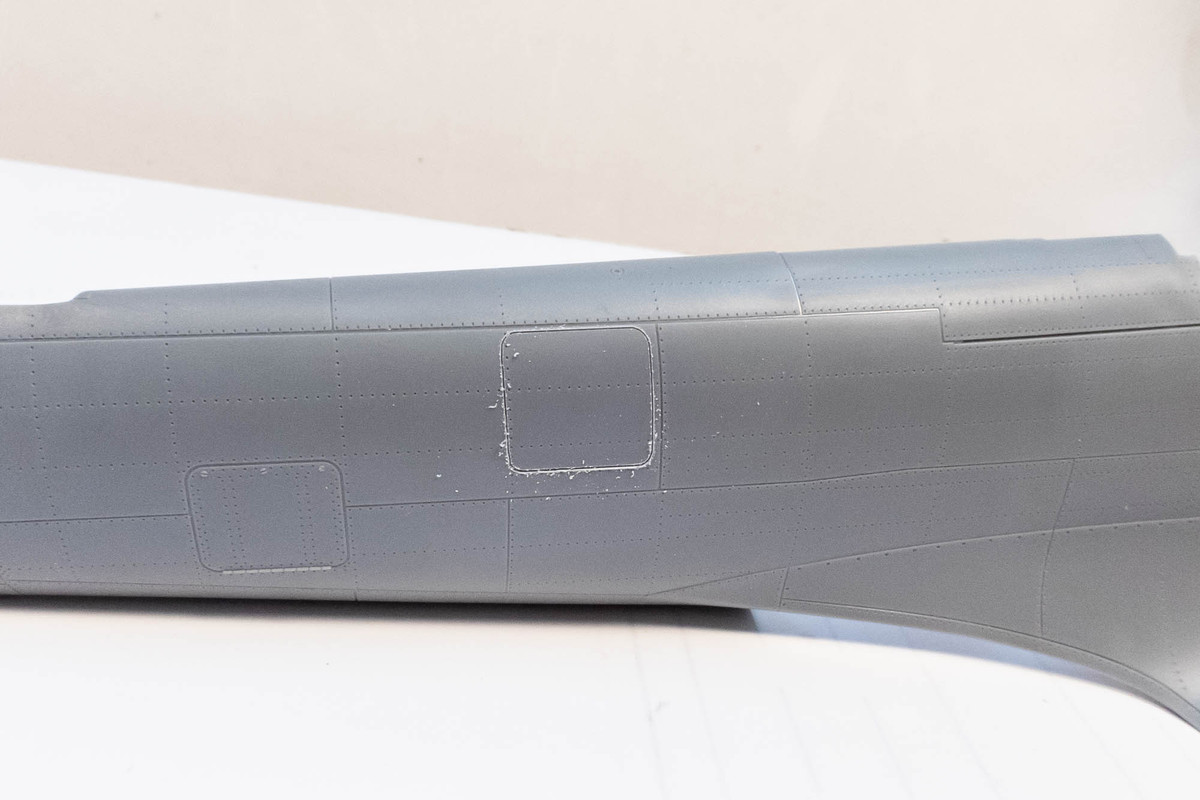
The rivets are filled in with black CA glue and new rivets and fasteners are applied.
A shot of primer to check our work.
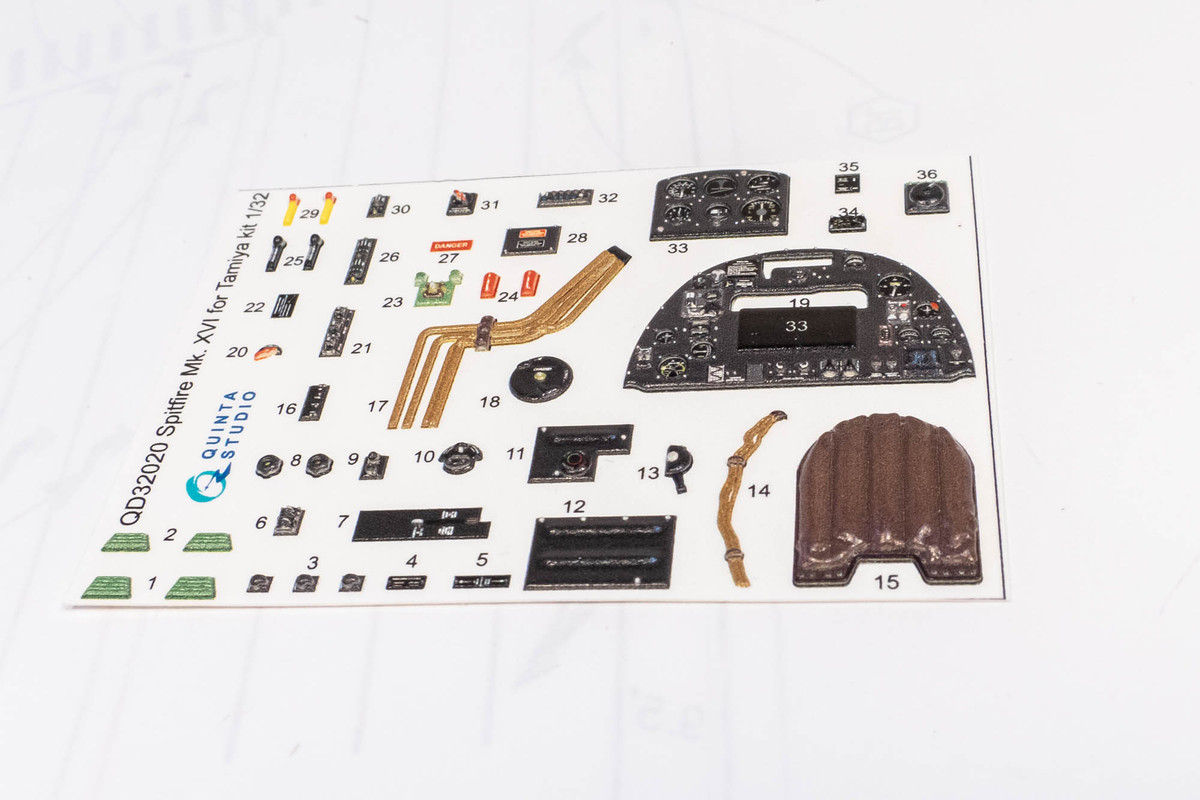
I think most of the fuselage modifications are done so I can start looking at the cockpit next. I've picked up the Quinta 3D decal set for this build.
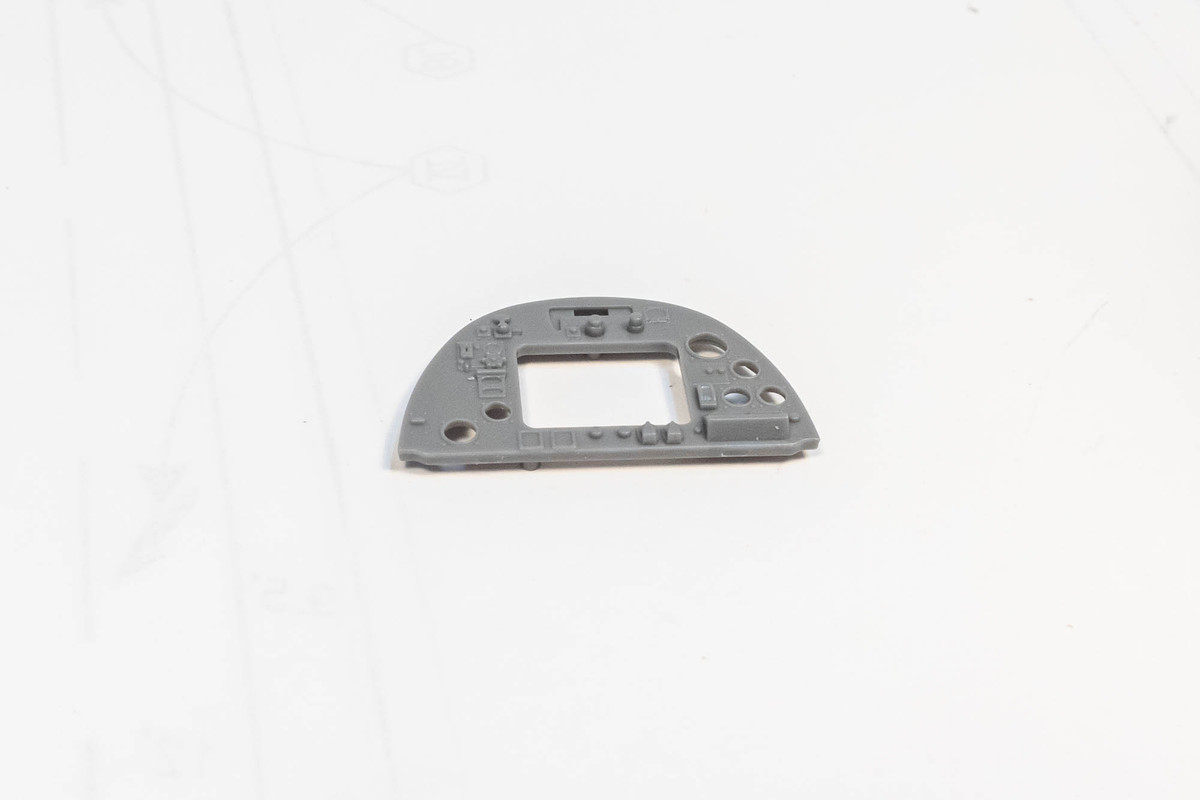
But the kit instrument panel has some nice 3D relief, which gives me a moment of pause. Although the 3D decals have some raised details, the molded details here are better. I'm going to look at the kit IP a little more closely before committing to the Quinta set.
More modifications to the XVIe fuselage... the port hatch behind behind the cockpit needs to be removed. Interestingly, Claes Sundin's profile of EB-V shows this hatch in place but I think it is in error.
No hatch in the the photo.
There is a bit of raised detail around the hatch that needs to be removed before filling including the hinge on the top and fasteners on the bottom.
The hatch and rivets are filled in with black CA glue. I'll clean this up and shoot with a coat of primer when it is finished.
Next, I'm going to open the retractable tail wheel bay. LFD conveniently provides scribing/cutting templates. I am choosing to trace the cut lines in pencil and remove the template prior to cutting.
Dry-fitting the tail components. The horizontal stabilizers need to be adjusted for the extra width of the XIVe tail so surgery here is not quite finished.
EB-V was fighter version so the camera ports will not be used in this build. But I need to add a hatch on the starboard side. LFD provides the hatch as a separate part but I thought it'd be neater/easier to just scribe the hatch instead of cutting an opening and gluing the resin hatch into place. Again, LFD provides the hatch template, which is positively located using the interior fuselage ribs... no guessing. The template is secured into place with tape.
Using a sewing needle chucked into a pin vise, the hatch is scribed.
The rivets are filled in with black CA glue and new rivets and fasteners are applied.
A shot of primer to check our work.
I think most of the fuselage modifications are done so I can start looking at the cockpit next. I've picked up the Quinta 3D decal set for this build.
But the kit instrument panel has some nice 3D relief, which gives me a moment of pause. Although the 3D decals have some raised details, the molded details here are better. I'm going to look at the kit IP a little more closely before committing to the Quinta set.
John aka JKim
-----------<><
-----------<><
Re: Tamiya 1/32 Spitfire XIVe Conversion
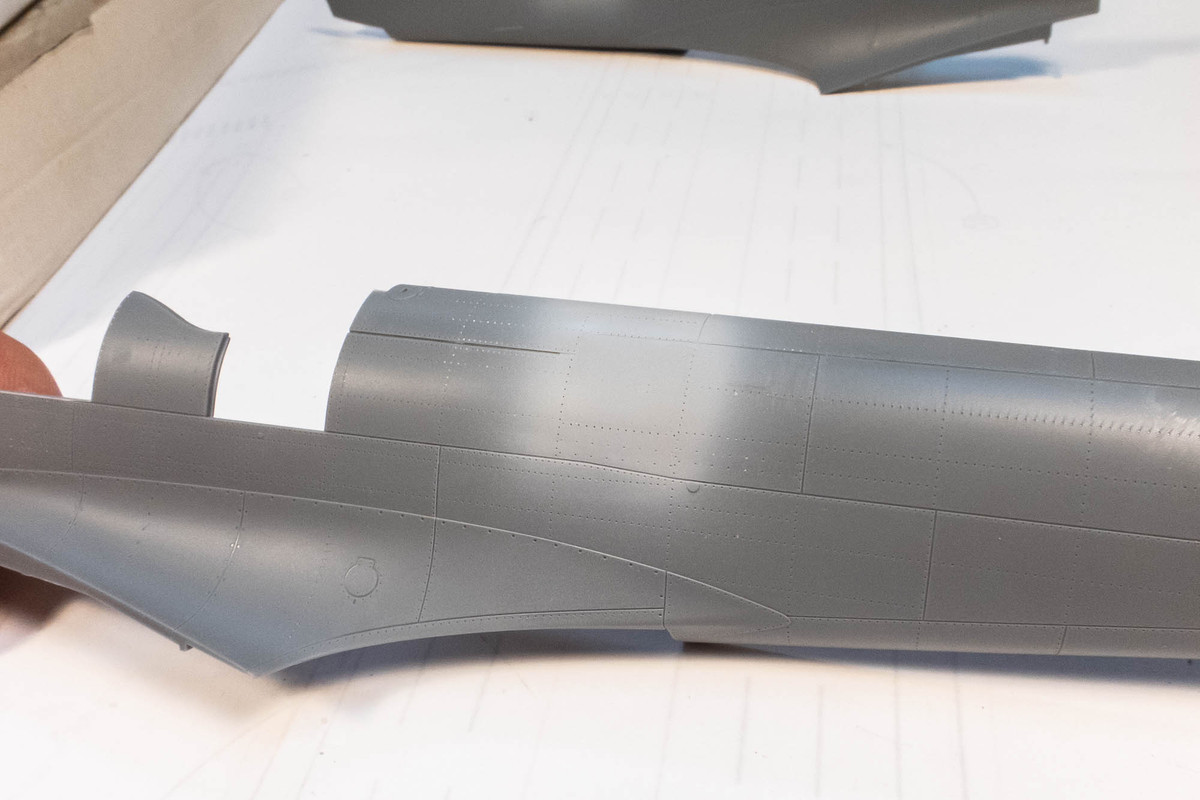
The port side hatch removal is complete after a primer coat.
Here is a look at the Quinta instrument panel. I masked each dial with tape and shot the panel with some clear flat. All of the pre-painted stuff, whether it is Eduard photoetch or 3D decals, looks better with a flat coat.
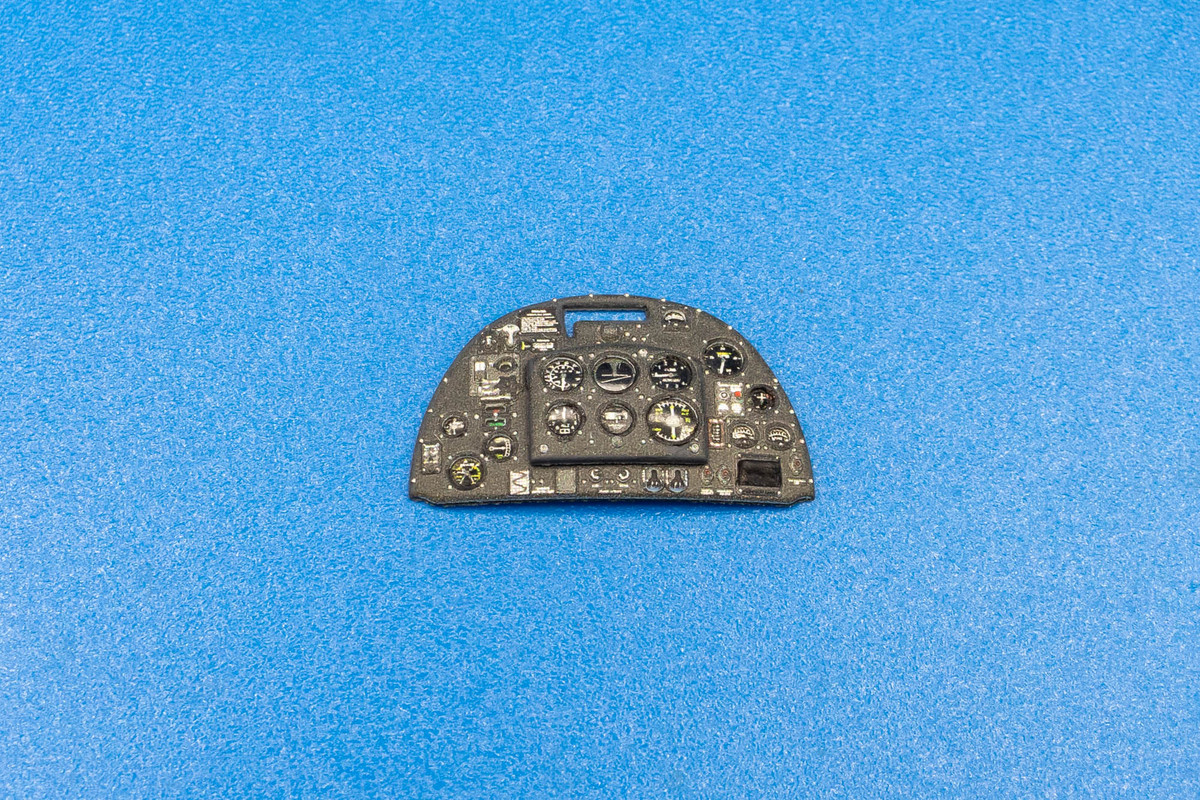
Here is a look at the Quinta instrument panel. I masked each dial with tape and shot the panel with some clear flat. All of the pre-painted stuff, whether it is Eduard photoetch or 3D decals, looks better with a flat coat.
John aka JKim
-----------<><
-----------<><
-
jeaton01
- Elite Member
- Posts: 2374
- Joined: Thu Apr 23, 2020 9:20 am
- Location: Northern California
- Contact:
Re: Tamiya 1/32 Spitfire XIVe Conversion
The Quinta panel looks pretty nice.
-
Stikpusher
- Moderator
- Posts: 21180
- Joined: Sat Apr 05, 2014 8:37 pm
- Location: Ceti Alpha 5
Re: Tamiya 1/32 Spitfire XIVe Conversion
Interesting that the radio access hatch was moved. Perhaps that is due to the cutdown fuselage altering the center of gravity for the design. The radio weight was roughly that of a man, and not like today’s much lighter micro electronics or even the 70’s solid state designs.
"Surely I have made my meaning plain? I intend to avenge myself upon you, Admiral. I have deprived your ship of power, and when I swing 'round, I intend to deprive you of your life."
FLSM
FLSM