Panzerkampfwagen V Panther Ausf. A

Here is the place to show off the progress of your armor builds
User avatar
BlackSheep214
Elite Member
Posts: 13593
Joined: Sun Apr 06, 2014 8:47 pm

Re: Panzerkampfwagen V Panther Ausf. A

Post by BlackSheep214 »

Just watched a YouTube video on how to do camo scheme. One user used a sponge dabbed in green and does the same with red brown. He also used something like a paneliner to tone down the newness of the armor especially with highlighting the ridges of Zimmert. I do have brown paneliner that would do the trick. A little goes a long way I suppose. Only one way to find out is by doing it.

Using a sponge might be something that would be less stressful than freehand airbrushing where I know I’ll *blankity blank* up.

In the beginning he mentioned bringing out shadow highlights using army color skeleton bone by dry brushing in certain areas. That’s something I’m skeptical in attempting it.

Then a final step would be a pin wash (Tamiya black paneliner?) in crevices and whatnot. Not sure if the decals should be one first or last. Of course some chipping by dry brushing silver. Just have no idea where would they be on the tank hull or turrent itself. :bag:

I will utilize Dust Effects as well - especially on the tracks and lower hull areas.

Any other ideas or tips I may not have thought of would be appreciated.

“Who controls the skies, controls the fate of this Earth”

Author unknown- 352nd Fighter Group, Blue-Nosed Bastards of Bodney

“Send one plane it’s a sortie; send two planes it’s a flight; send four planes it’s a test of airpower. - Richard Kohn
User avatar
Stikpusher
Moderator
Posts: 21374
Joined: Sat Apr 05, 2014 8:37 pm
Location: Ceti Alpha 5

Re: Panzerkampfwagen V Panther Ausf. A

Post by Stikpusher »

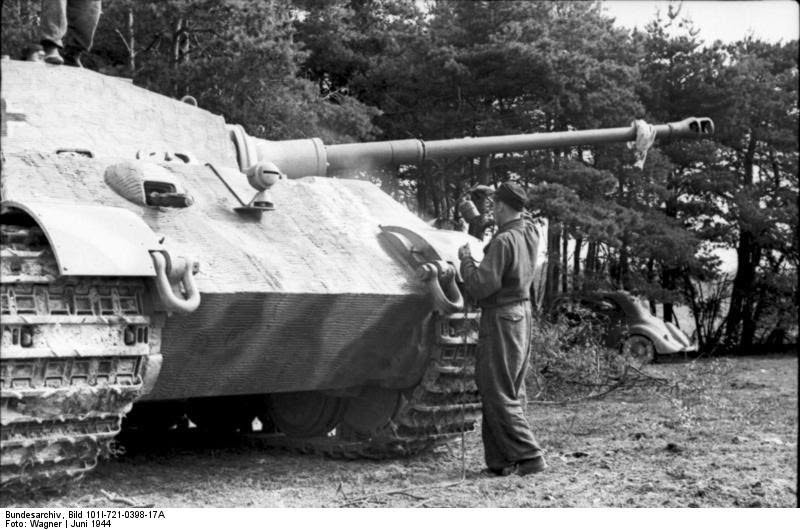
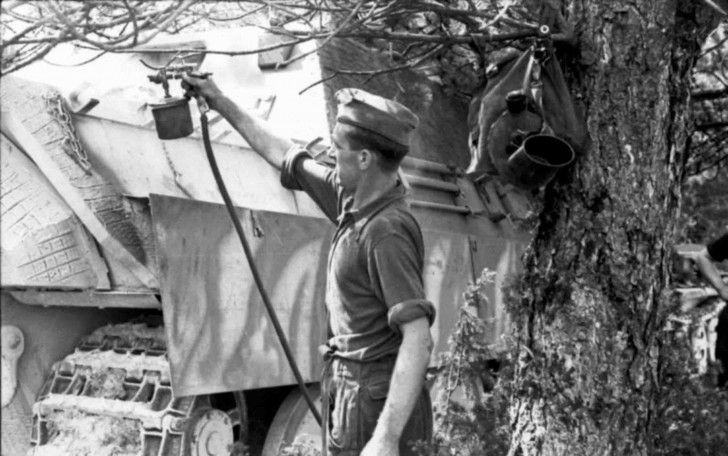
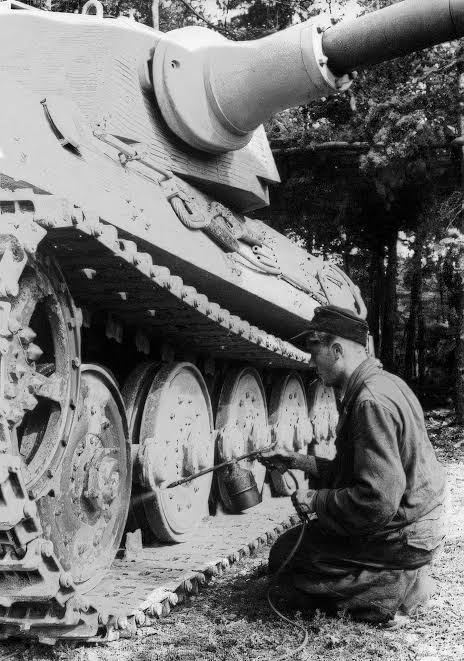
Panther D’s & A’s were painted by the crews in field conditions. The camo was usually sprayed on using compressors and in whatever manner that worked for the situation. Unless you’re doing a field applied brushed on scheme, there is no need for a hard edge or masking. It wasn’t until later when the Panther G variant was in production that hard edge factory applied patterns began to be applied in Autumn of ‘44

Image

Image

Image
"Surely I have made my meaning plain? I intend to avenge myself upon you, Admiral. I have deprived your ship of power, and when I swing 'round, I intend to deprive you of your life."

FLSM
User avatar
Stikpusher
Moderator
Posts: 21374
Joined: Sat Apr 05, 2014 8:37 pm
Location: Ceti Alpha 5

Re: Panzerkampfwagen V Panther Ausf. A

Post by Stikpusher »

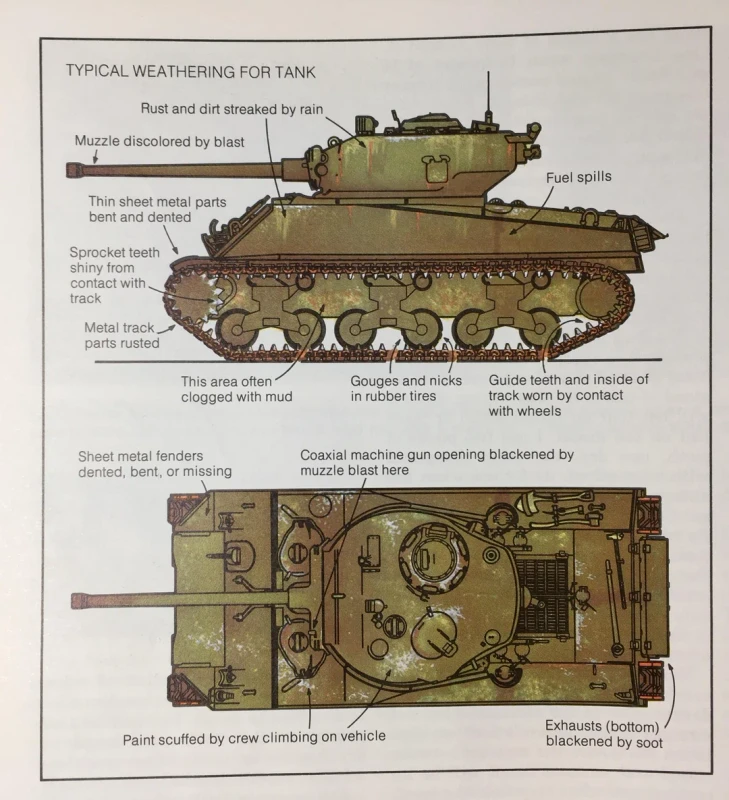
Here is a guide for basic armor weathering

Image
"Surely I have made my meaning plain? I intend to avenge myself upon you, Admiral. I have deprived your ship of power, and when I swing 'round, I intend to deprive you of your life."

FLSM
User avatar
BlackSheep214
Elite Member
Posts: 13593
Joined: Sun Apr 06, 2014 8:47 pm

Re: Panzerkampfwagen V Panther Ausf. A

Post by BlackSheep214 »

Great reference pics on scuff marks.

Not going with hard edges but I will experiment with a sponge on spare turrent. Don’t have special weather stuff for oil/fuel spills.Then again, there are Zimmerits on hull sides. I imagine one can concoct something using paint thinned down to water. Don’t have anything to stimulate mud on lower hull behind road wheels, so I’m not going to worry about that too much. Shiny spots on sprockets and teeth I can do.

I’ll see what I can do and skip on. Not going to go crazy being anal about weathering to extremes. I’ll keep it simple to my liking.
“Who controls the skies, controls the fate of this Earth”

Author unknown- 352nd Fighter Group, Blue-Nosed Bastards of Bodney

“Send one plane it’s a sortie; send two planes it’s a flight; send four planes it’s a test of airpower. - Richard Kohn
User avatar
Gary Brantley
Elite Member
Posts: 2770
Joined: Tue Apr 08, 2014 9:40 pm
Location: Cameron, Texas

Re: Panzerkampfwagen V Panther Ausf. A

Post by Gary Brantley »

Tom, I'm not very experienced with armor builds, having only done three thus far. But here's my last one and it has more weathering applied than my first ones did. Compared to many, it's not too heavily done and might give you some more ideas for your tank:

https://www.spamodeler.com/forum/viewto ... 41+Bulldog
User avatar
Stikpusher
Moderator
Posts: 21374
Joined: Sat Apr 05, 2014 8:37 pm
Location: Ceti Alpha 5

Re: Panzerkampfwagen V Panther Ausf. A

Post by Stikpusher »

BlackSheep214 wrote: Sat Sep 12, 2026 8:11 am Great reference pics on scuff marks.

Not going with hard edges but I will experiment with a sponge on spare turrent. Don’t have special weather stuff for oil/fuel spills.Then again, there are Zimmerits on hull sides. I imagine one can concoct something using paint thinned down to water. Don’t have anything to stimulate mud on lower hull behind road wheels, so I’m not going to worry about that too much. Shiny spots on sprockets and teeth I can do.

I’ll see what I can do and skip on. Not going to go crazy being anal about weathering to extremes. I’ll keep it simple to my liking.
You do not need pre made weathering stuff. It’s very easily done with old school techniques. For washes, thinned oils work better than thinned enamels, which work better than thinned acrylics. Mud is easily made by mixing talcum powder, foot powder, or even sifted sand/dirt with paints of the appropriate color. You can even add in things like ground seasoning spices or finely cut up unraveled twine to represent vegetation mixed into the mud. Think outside the pre packaged box :wink:

Image

Sifted dirt and cut up twine mixed into mud colored paint.
"Surely I have made my meaning plain? I intend to avenge myself upon you, Admiral. I have deprived your ship of power, and when I swing 'round, I intend to deprive you of your life."

FLSM
User avatar
Gary Brantley
Elite Member
Posts: 2770
Joined: Tue Apr 08, 2014 9:40 pm
Location: Cameron, Texas

Re: Panzerkampfwagen V Panther Ausf. A

Post by Gary Brantley »

Stikpusher wrote: Sat Sep 12, 2026 10:03 am

You do not need pre made weathering stuff. It’s very easily done with old school techniques. For washes, thinned oils work better than thinned enamels, which work better than thinned acrylics. Mud is easily made by mixing talcum powder, foot powder, or even sifted sand/dirt with paints of the appropriate color. You can even add in things like ground seasoning spices or finely cut up unraveled twine to represent vegetation mixed into the mud. Think outside the pre packaged box :wink:

Image

Sifted dirt and cut up twine mixed into mud colored paint.
:P1: :shoutout:
Post Reply

Return to “Work In Progress: Armor”